Table of Contents
Advertisement
Quick Links
_____________________________________________________________________________________
OPERATING INSTRUCTIONS
WITH SPARE PARTS CATALOG
INDUSTRIAL SEWING MACHINE
SADE
JUKI CENTRAL EUROPE Sp. z o.o.
Platan Park C ul. Poleczki 21, 02-822 Warszawa, POLAND
Year of manufacture............
Serial number ......................
Edition I / 2015
EN, Original instructions
All rights to reprint or copy are reserved - only allowed with the permission of the manufacturer.
Advertisement
Table of Contents

Subscribe to Our Youtube Channel
Related Manuals for JUKI SADE


Summary of Contents for JUKI SADE
- Page 1 _____________________________________________________________________________________ OPERATING INSTRUCTIONS WITH SPARE PARTS CATALOG INDUSTRIAL SEWING MACHINE SADE JUKI CENTRAL EUROPE Sp. z o.o. Platan Park C ul. Poleczki 21, 02-822 Warszawa, POLAND Year of manufacture………… Serial number ….……………… Edition I / 2015 EN, Original instructions All rights to reprint or copy are reserved - only allowed with the permission of the manufacturer.
- Page 2 Industrial Sewing Machine SADE...
- Page 3 Industrial Sewing Machine SADE...
- Page 4 Industrial Sewing Machine SADE...
-
Page 5: Table Of Contents
IRE PREVENTION REGULATIONS 2.10 S AFETY SIGNS 2.11 R ESIDUAL RISK DESCRIPTION AND ASSESSMENT 3 ..INDUSTRIAL SEWING MACHINE LU-2810-7 SADE DESCRIPTION ......27 NTENDED USE ECHNICAL CHARACTERISTICS ONSTRUCTION AND OPERATIONS PTIONAL EQUIPMENT 4 ..PRELIMINARY OPERATIONS AND PUTTING INTO SERVICE ........41... - Page 6 OW TO SET THE MODEL OF THE MACHINE HEAD 6.11 A DJUSTING THE MACHINE HEAD 6.12 B ACKSTACK SETTING 6.13 B OBBIN THREAD MONITOR ADJUSTMENT 7 ..OPERATION OF INDUSTRIAL SEWING MACHINE SADE ..........70 ONTROL DEVICE 7.1.1 SADE ) ....................71 TRANSLATION IN SETTINGS 7.1.2...
- Page 7 Industrial Sewing Machine SADE 7.1.11 E SADE ....................102 XITING THE SOFTWARE 7.1.12 T ....................102 RANSLATING ADE MODULES PERATING INITIALISATION 7.2.1 ......................103 PERATOR IDENTIFICATION 7.2.2 ..........................104 EWING TEST RODUCT CYCLE OPERATING 7.3.1 ......................104 PERATOR IDENTIFICATION 7.3.2 ......................
- Page 8 Industrial Sewing Machine SADE...
-
Page 9: General
1.1 Introduction IMPORTANT! This operating instructions should be attached to Industrial Sewing Machine SADE. We recommend that the supplier of new or of used machine should keep an acknowledgment of receipt this instructions together with a machine signed by the purchaser. - Page 10 Strictly follow the recommendations speci- fied by these signs. IMPORTANT! The Company JUKI CENTRAL EUROPE reserves the right to make design changes to improve the product and improve safety. These changes will also be introduced on an ongoing basis to the instruc- tions.
-
Page 11: The Machine Identification
Year of manufacture: ……………… Manufacturer: JUKI CENTRAL EUROPE Delivery and commissioning date: ……………………………………….. The owner of the machine SADE: ….…………………………………. 2 SAFETY OF USE AND WARNINGS 2.1 General safety rules IMPORTANT! These instructions do not limit the general health and safety instruc- tions - are merely a supplement. - Page 12 JUKI assumes no responsibility for damages or personal injury or death resulting from the use of the machine for any application other than the intended one.
-
Page 13: Safety Rules Of The First Assembly
12. Never modify and alter the machine in order to prevent accident that can result in personal injury or death. JUKI assumes no responsibility for damages or personal injury or death resulting from the machine which has been modified or altered. -
Page 14: Safe Working Practices For Connecting To Line Power
Industrial Sewing Machine SADE Two persons should perform the work associated with the first installation, at the destination. For loading and unloading use forklift or other devices for carrying loads with suffi- cient capacity. The forks must be inserted under the palette that includes wooden box with machine, and during assembly legs under working table. - Page 15 Industrial Sewing Machine SADE IMPORTANT! Keep a log with notes on any problems encountered, failures, acci- dents or maintenance carried out on your own responsibility. Before operation Be sure to use the casters with a locking mechanism and lock them to secure the machine during the operation, maintenance, inspection and repair in order to pre- vent accident that can result in personal injury or death.
- Page 16 Industrial Sewing Machine SADE The direction of normal rotation of the machine is counterclockwise as observed from the pulley side. Take care not to allow the machine to rotate in the reverse di- rection. Never operate the machine unless the machine head and the oil tank have been filled with oil.
-
Page 17: Operating Environment
Industrial Sewing Machine SADE To ensure safety, never operate the machine with the ground wire for the power supply removed. When inserting/removing the power plug, the power switch has to be turned OFF in advance. In time of thunder and lightening, stop your work and disconnect the power plug from the receptacle so as to ensure safety. -
Page 18: Items For Which The Power To The Machine Has To Be Turned Off
Switch off the sewing control motor before threading up, cleaning and first line maintenance. Wear eye protection during the sewing. Switch off the sewing control motor and log-off from Sade before you leave the machine. This will prevent unauthorized production and accidents. -
Page 19: Rules For Safe Cleaning, Maintenance And Repair
JUKI genuine one. In prevention of accident caused by unfamiliarity with the machine or electrical- shock accident, be sure to ask an electrical technician of your company or JUKI or distributor in your area for repair and maintenance (including wiring) of electrical components. -
Page 20: Principles For Safe Handling, Transportation And Unpacking
Lubrication Be sure to use JUKI genuine oil and JUKI genuine grease to the parts to be lubri- cated. If the oil adheres on your eye or body, be sure to immediately wash it off in order to prevent inflammation or irritation. -
Page 21: Fire Prevention Regulations
Industrial Sewing Machine SADE For loading and unloading, use a forklift or other device intended to carry a load with sufficient capacity. The forks should be inserted underneath a pallet with the box. Persons operating these devices should have a valid permission to operate them. -
Page 22: Safety Signs
2.10 Safety signs Pictograms (safety signs) on the machine warn against hazards which might arise while operating the industrial sewing machine SADE and give tips on proper use. Signs should always be clear and clean, unobstructed and visible to the operator and other persons who may find themselves in the vicinity of the working machine. - Page 23 Industrial Sewing Machine SADE Explanation of pictorial warning indications and warning labels Be aware that holding the There is a risk of injury if con- sewing machine during op- tacting a moving section. eration can hurt your hands. There is a risk of electrical shock if contacting a high- voltage section.
- Page 24 Industrial Sewing Machine SADE Fig 1. Industrial sewing machine head LU-2810-7 SADE – pictograms placement Signs announcing the need to read Read the instruction the instructions. manual. Placed on control box.
- Page 25 Industrial Sewing Machine SADE Signs announcing the risk of elec- tric shock and how to avoid danger by keeping a safe distance from of Risk of electric shock. parts under voltage. Placed on control box. Signs announcing the need to turn...
-
Page 26: Residual Risk Description And Assessment
Industrial Sewing Machine SADE 2.11 Residual risk description and assessment Industrial sewing machine SADE is designed and constructed in accordance with the current state of the art and the applicable standards. Despite the efforts of the manufac- turer to ensure the safety and elimination of hazards when using the machine, some el- ements of risk during operation cannot be avoided. -
Page 27: Industrial Sewing Machine Lu-2810-7 Sade Description
3 INDUSTRIAL SEWING MACHINE LU-2810-7 SADE DESCRIPTION 3.1 Intended use Industrial sewing machine SADE is intended to airbags for cars sewing. It is designed to work in a standing position. The work table height adjustment allows you to adjust the machine to the operator's height. -
Page 28: Technical Characteristics
Industrial Sewing Machine SADE Fig. 2. The industrial sewing machine SADE – machine sides 3.2 Technical characteristics Table 1. Parameter Unit Industrial Sewing Machine SADE 1-needle, unison-feed, lockstitch Model name machine with automatic thread trimmer stationary, with the possibility of moving to... - Page 29 Thread trimming method Cam-driven scissors type Automatic lubrication by oil tank (with oil Lubrication gauge) JUKI New Defrix Oil No. 1 (equivalent to Lubricating oil ISO standard VG7) or JUKI MACHINE OIL No. 7 Bed size 643 x 178...
-
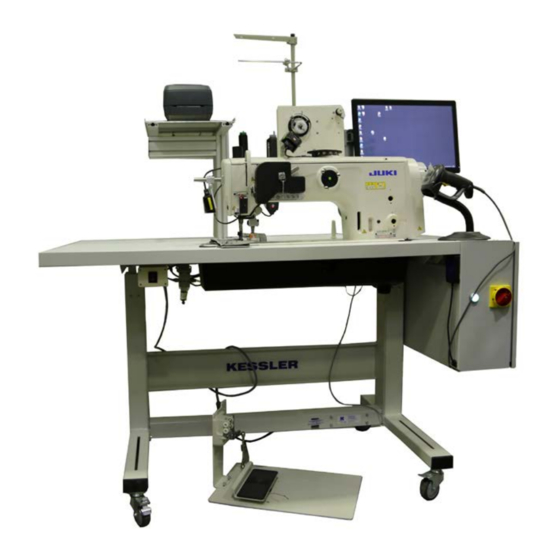
Page 30: Construction And Operations
88.5 dB; (includes K 3.3 Construction and operations The industrial sewing machine SADE consists of (see fig. 3): − sewing machine head (1), − sewing machine stand (2) designed as a table with adjustable work table height, −... - Page 31 5 – control touch panel 11 – pneumatic regulator 6 – stand for thread spools Fig. 3. The industrial sewing machine LU-2810-7 SADE - construction Fig. 4. CP-18 driver Each operator receives his own identification card. He logs on to a computer program installed on a machine by a card reader (fig.
- Page 32 The signal of this unit is processed by the JUKI SADE to prevent the oper- ator from starting a product cycle with a bobbin running on spare thread.
- Page 33 The bobbins of normal LU2810 sewing machines are incompatible with the bobbins used on the JUKI SADE. This is done to avoid the accidental use of standard bobbins with undetermined threads.
- Page 34 The control unit cabinet placed at the left side of the machine is like the heart of the JUKI SADE machine. It connects all components. It will monitor and control all in- and output by programmable logic controller (PLC) with dedicated software. Figure 9 shows the location of various components in the control unit cabinet.
- Page 35 Fig. 10. Control panel CP-18 Pedal connection Like on normal sewing machines, a pedal is used for speed regulation. On the JUKI SADE the signal of the pedal is directly connected with the Juki control drive. The PLC can block the signal so that the machine won’t run if the pedal is pressed. Also...
- Page 36 Software protection key Sade is the dedicated software for the JUKI SADE workstation. The software is copy- protected and will not run without a corresponding software protection key reading the hard drive serial number and creating a special access code. During installation time 3 different codes used and an *.ini file is created.
- Page 37 Industrial Sewing Machine SADE Monitor The JUKI SADE has touch screen LCD monitor that simplifies operation. You should mount it to the special stand at the rear part of work station. Fig. 12. Monitor LCD with touch screen Numeric keypad (Optional) Instead of a normal keyboard, a numeric keypad is used.
- Page 38 Fig. 15. Barcode printer Network adapter Using Microsoft Windows as operating system for the JUKI SADE makes it easy to im- plement JUKI SADE production data into a corporate network environment. By default the JUKI SADE computer is equipped with a standard networking and wireless adapter.
- Page 39 Industrial Sewing Machine SADE Static barcode scanners Static barcode scanners provide a way to monitor data prior of, and during the production cycle. Figure 17 shows the scanners mounted under the thread cone stand to check data found on the inside of the top thread cone. It scans both, the top and bottom thread.
-
Page 40: Optional Equipment
The chip card reader offers a secure alternative to the numeric code used to identify us- ers to the JUKI SADE. Simply hold the RFID card to the reader and the user is automat- ically logged in if his RFID card has been registered in the SADE software under user management. -
Page 41: Preliminary Operations And Putting Into Service
The sewing machine can be ordered with additional equipment - see section 3.4. Machine SADE is sent in the form of a partially disassembled – in a wooden box set on a pallet. Only a monitor and stand for thread spools are not fastened. -
Page 42: Installing The Sewing Machine Components
Industrial Sewing Machine SADE Take particular care when loading and unloading in the presence of bystanders who should not be in the danger zone (maneuvering the load). For loading and unloading activities there are needed two persons. Be careful when unpacking the machine out of the wooden box. Unscrew metal band and screws fixing the machine to the palled. - Page 43 Industrial Sewing Machine SADE (2) Adjusting the air pressure 1) The operating air pressure is 0.5 to 0.55 MPa. sure regulating knob ❶ of the filter Adjust the air pressure using air pres- regulator. Check whether ø 8 exhaust tube ❶ coming (3) Exhaust tube hole ❷...
-
Page 44: Electrical Connections
Industrial Sewing Machine SADE Mounting the LCD monitor Tighten the LCD monitor by 4 screws to the stand. Thanks to swivel points You can set monitor in most comfortable position. Fig. 22. Mounting the LCD monitor Connecting components Before You connect machine to the electrical power source: −... - Page 45 Industrial Sewing Machine SADE NOTE! The company JUKI CENTRAL EUROPE Sp. z o.o. assumes no responsibility for damage caused during the execution electrical connection improper with the applicable regulations and subse- quent operation of the machine. The machine must be connected to the mains current single phase 1 x 230 V, a set of plug / socket, by cable which is standard machine equipment.
- Page 46 Industrial Sewing Machine SADE Fig. 23. Electrical circuit diagram...
- Page 47 Industrial Sewing Machine SADE Fig. 24. Control block diagram...
-
Page 48: Preparation Of Industrial Sewing Machine Sade
Industrial Sewing Machine SADE 5 PREPARATION OF INDUSTRIAL SEWING MACHINE SADE 5.1 Preliminary operations - general principles NOTE! Never use a machine with a disassembled or damaged guards or scanners. IMPORTANT! For working, use protective clothing and safety shoes. Do not use clothing with loosely hanging straps, tie strings, etc. -
Page 49: First Lubrication
Lubrication procedure Fill the oil tank with oil before operating the sewing machine. 1) Fill the oil tank with JUKI NEW DEFRIX OIL No.1 (Part No.: MDFRX1600C0) or JUKI MACHINE OIL #7 (Part No.: MML007600CA) using the oiler supplied with the machine from section end of oil amount indicating rod ❷... -
Page 50: Attaching The Needle
Industrial Sewing Machine SADE For the oil for hook lubrication, purchase JUKI NEW DEFRIX OIL No. 1 (Part No.: MDFRX1600C0) or JUKI MACHINE OIL #7 (Part No.: MML007600CA). Be sure to lubricate clean oil. 1) Remove rubber cap ❶. Adjusting the oil quantity in the hook 2) Loosen nut ❷... -
Page 51: Placing Thread Cones
Industrial Sewing Machine SADE Fig. 25. Statement on touch screen about needle changing The dialog will close automatically. 1) Turn the handwheel to bring the needle bar to the highest 2) Loosen needle clamp screw ❷. Hold the needle so that the position of its stroke. -
Page 52: Attaching And Removing The Bobbin
Like on all sewing machines the thread guide should be straight above the cone allow- ing the thread to come off vertically. SADE uses sensors to sense the thread cone being present at the cone stand and not only scanning the bar code. -
Page 53: Threading The Hook
Industrial Sewing Machine SADE Lift latch ❶ of hook, and take out the bobbin. Put the bobbin into the shaft in the hook correctly and release the latch. Do not make the machine run idle with the bobbin (bobbin thread). The bobbin thread is caught in the hook. -
Page 54: Winding A Bobbin
Industrial Sewing Machine SADE 5.7 Winding a bobbin The bobbin will snap on the winder shaft if placed correctly. If you look at the bobbin, you’ll notice a larger and deeper flange on the bobbin. This side has to be put face to- wards the bobbin winder when winding the bobbin. -
Page 55: Threading The Machine Head
Industrial Sewing Machine SADE ❶ to ❹ in the numerical order. 1) Pass the thread through sections ❺ 2) Put the thread until the root of bobbin thread clamp reached. Then, trim the thread. (The thread end is retained under the looper thread clamp.) - Page 56 Industrial Sewing Machine SADE Fig. 29. Threading the machine head ⓫ Thread the machine head following the order as illustrated in the figure. Thread tension monitor ⓫ is necessary to monitor tension of top thread * Pass thread through the right side of thread tension monitor and to prevent the thread from slipping off the needle eyelet when per- forming thread trimming at a position which is outside the material.
-
Page 57: Adjusting The Sewing Machine
Industrial Sewing Machine SADE with the spring of thread tension monitor ⓫, or thread tension monitor ⓫ If thread tangling failure occurs when starting sewing from the material edge, the thread should be removed from the location where it is clamped should be changed with another one. -
Page 58: Thread Tension
C to increase the needle thread ten- sion, or counter-clockwise D to decrease This procedure deals with setting of the BTSR. A special application is available for the BTSR thread tension sensor for re calibration. Contact your Juki service distributor for details. Fig. 30. Thread tension Apply the same tension to both of the thread tension nut No. -
Page 59: Thread Take-Up Spring
Industrial Sewing Machine SADE WARNING! To protect against possible personal injury due to abrupt start of the machine, be sure to start the following work after turning the power off and ascertaining that the motor is at rest. Turn tension adjustment screw ❸ clock-... -
Page 60: Adjusting The Pressure Of The Presser Foot
Industrial Sewing Machine SADE (2) When you want to change the ten- sion of the thread take-up spring spring ❶, loosen nut ❼ first. Turn To adjust the tension of thread take-up spring shaft ❽ counterclockwise to in- crease the tension or clockwise to de- crease it. - Page 61 Industrial Sewing Machine SADE WARNING! To protect against possible personal injury due to abrupt start of the machine, be sure to start the following work after turning the power off and ascertaining that the motor is at rest. 2) Loosen hook driving shaft set collar clamping screw ❸, and turn the handwheel 1) Adjust the standard feed adjusting dial to "0".
- Page 62 Industrial Sewing Machine SADE tilting the machine head. To protect the relevant parts from contact, shift the thread stand to a position at which the thread stand does not interfere with the control panel. To check the needle bar position as described in the aforementioned 2) [i.e., "...the needle bar ascend by 2.3 mm from the lowest position of its...
-
Page 63: Adjusting The Hook Needle Guard
Industrial Sewing Machine SADE 6.6 Adjusting the hook needle guard WARNING! To protect against possible personal injury due to abrupt start of the machine, be sure to start the following work after turning the power off and ascertaining that the motor is at rest. -
Page 64: Adjusting The Position Of Counter Knife, Knife Pressure And Clamp Pressure
Industrial Sewing Machine SADE 1) Turn the handwheel in the normal direc- opening lever ❶ to the closest position tion of rotation to bring bobbin case to inner hook ❷. 2) Turn inner hook ❷ in the direction of the arrow until stopper ❸ is pressed against the slits in throat plate ❹. - Page 65 Industrial Sewing Machine SADE 1) Move the moving knife ❺ by hand to its forward travel end. • Adjusting the counter knife ❶. Adjust the position of the counter 2) Loosen counter knife base setscrews ❸ so that it is spaced 1.2 to 1.5 mm...
-
Page 66: Adjusting The Amount Of The Alternating Vertical Movement Of The Walking Foot And The Presser Foot
Industrial Sewing Machine SADE 6.9 Adjusting the amount of the alternating vertical movement of the walking foot and the presser foot This regulating unit is mechanically locked against unauthorized setting change. To make regulation remove lock at first. Adjust the amount of the alternating vertical presser foot using dial ❶. -
Page 67: How To Set The Model Of The Machine Head
Industrial Sewing Machine SADE 6.10 How to set the model of the machine head This controller must be operated only by authorized and qualified person. Call Function Setting No. 95 in reference to "III-6. Function Setting of SC-922" in the In- struction Manual for the SC- 922. -
Page 68: Adjusting The Machine Head
Industrial Sewing Machine SADE 6.11 Adjusting the machine head switch ❹ and switch ❺, turn 1) Simultaneously pressing ON the power switch. is displayed in the indicator and the mode is changed over to the adjust- ment mode. 3) Turn the pulley of the machine... -
Page 69: Backstack Setting
Industrial Sewing Machine SADE When checking the adjustment result, set "Function setting No. 90; Initial chine stops with its needle up". Then, check whether or not marker dot ❼ is sewing machine movement function" at "1: Initial operation - Sewing ma- aligned with marker line ❽. -
Page 70: Operation Of Industrial Sewing Machine Sade
Control device is computer program SADE operated from touch screen. There is an option to translate (or rename) all text of the modules in Sade. In this manu- al we’ll assume the text to be default (English). Read section 7.1.1 to find details on translations. -
Page 71: Sade Translation (In Settings)
Industrial Sewing Machine SADE 7.1.1 SADE translation (in settings) Select on the top menu the new language you want to translate SADE to. After the con- firmation of the language the list of text appears. You can translate the text directly in SADE by typing the translation on the right side. -
Page 72: Configuration
Any number of configurations can be saved independently. A saved configuration can be loaded and transferred to other machines. Once Sade is started a log file is generat- ed. The actual configuration file is listed in this log file (section 7.1.9). To ensure proper logging, the name of a modified configuration file is pre-determined. -
Page 73: Machine Identification (In Settings)
Industrial Sewing Machine SADE Fig. 35. The configuration screen 7.1.2.1 Machine identification (in settings) Machine identification is probably the most important code for the product traceability system. The code is alpha-numeric and 60 positions in length. WARNING! Always make sure the correct machine code is set. - Page 74 Industrial Sewing Machine SADE Fig. 37. Material identification a pre-set message will appear directly before or after completion of a production cycle. Fig. 38. The “Needle change” comunicate Typical use of this counter is to control needle change actions. The counter is interrupt- ed if the machine is stopped and will only count during actual running of the machine.
-
Page 75: Login And Exit Program, Changing User, Manual Operation
[Shut down] button. Exiting the program can be done by clicking on the upper left corner Juki SADE logo. The manual sewing mode can be accessed by clicking on the hand pictogram and the logged in user can be changed by clicking on the double arrow pictogram. -
Page 76: Data Source And Target Configuration
The Path Locations Tab On the [Path Locations] tab, source and target of data can be set. Even when used as a stand-alone machine, the JUKI SADE will check for input and write output to two locations. To set a desired path, click on the folder pictogram at the right side of the path line. -
Page 77: Product Selection Menu
If the operator tries to enter a product i.d. code that does not exist the SADE it will re- fuse this code and the operator won’t be able to start a product cycle. -
Page 78: Product Options
Industrial Sewing Machine SADE Enable declare ok, after the checking of the tear seam sewing and some tension values being outside the limits normally the parts would be rejected and automatically declared as fault part. The Enable declare OK function allows a super user / administrator to de- clare the part as OK. -
Page 79: Product Definition Options
Industrial Sewing Machine SADE 7.1.2.9 Product definition options Fig. 44. Product definition options Under [product] tab options a product definition can be made. The product definition contains all relevant data to perform the sewing of a product. It has to contain the sewing job which defines the seam length´s and the thread tension limits and the stitch length setting, and the materials which should be used. - Page 80 Industrial Sewing Machine SADE For an easy selection you can select or deselect the display of material groups. Simply click on the tab on top, selected material group is highlighted in grey colour. Fig. 45. Selected parameter group You can define up to five different sub materials to be used and checked for presence upon starting the sewing process.
- Page 81 Industrial Sewing Machine SADE Fig. 47. Sewing job profile editor After selecting either an existing sewing job or creating a new one the following screen appears. Fig. 48. Screen sewing job profile The product profile describes the features of a specific side air bag cover seam.
-
Page 82: Explanation Of The Product Profile Parameters
Industrial Sewing Machine SADE 7.1.2.11 Explanation of the product profile parameters Seam length Defines the seam lengths of pre seam, safety seam and post seam. You can type the length into the boxes, use the scroll buttons or simply move the stitch graph by hand. - Page 83 Industrial Sewing Machine SADE Fig. 50. Setting notch 1...
- Page 84 Industrial Sewing Machine SADE Blind area and edge offset (safety seam) During the number of stitches entered here, the positive notch recognition of the guide will be ignored. This feature is useful to suppress threads and materials that might be falsely seen as the first positive notch;...
-
Page 85: Thread Tension Settings And Tolerances
Industrial Sewing Machine SADE Fig. 52. Setting blind area and edge offset (post seam) 7.1.2.12 Thread tension settings and tolerances Defines the limit of the thread tension which is measured by the thread tension sensor. In this section there are optional settings for an additional tolerance of the thread ten- sion. -
Page 86: Machine Parameters - Stitch Length Setting
7.1.2.13 Machine parameters – stitch length setting Seam monitoring by the JUKI SADE is fully based on stitch counting. However a stitch length value has to be entered for reference. Unless the stitch length setting is automat- ed, this value will have to be set manually for production or data in any way. Once the set-point has been reached, there is no alternative but to heal back and end the seam;... - Page 87 Industrial Sewing Machine SADE The stitch length is set automatically to the value entered in the sewing job. In order to keep the stitch length always accurate it is set EVERY time you start a sewing proce- dure. After log in to program You should click on icon Settings placed in upper right corner.
-
Page 88: Label Pre Seam And Machine Stop Point
Industrial Sewing Machine SADE Choose Sewing jobs: Fig. 57. Sewing jobs Tab Click on pencil icon placed at the left side of sewing program name, that you want to change the stitching length. Fig. 58. Changing the stitching length Tab Select the tab Machine parameters and set stich length in mm. -
Page 89: Label Post Seam And Setting Stop Point Of The Machine
This is actually the most important setting of the system. The end label or traceability label is essential part of the documentation of the SADE system. It is unique label that you can define under section label in the settings section. However you can select the stop point of the machine meaning when it should receive the command to interrupt the sewing process, print the label and ask for scanning the label. -
Page 90: Message - Post Check
Industrial Sewing Machine SADE Label post seam settings: You select the label, then you select the scanning operation, you select the sewing if it should be done within the post seam or maybe at a different position. Message. Fig. 61. -
Page 91: Tension Monitor
7.1.2.18 Tension monitor Before start of the production cycle, these settings will be transmitted to the Juki PLC control, and evaluated accordingly. Max NOKs or Max NOKs in a row filter can be used to allow a certain number of successive stitches to be outside tolerance settings. The BTSR thread tension monitor can be calibrated by the optional software license and a set of weights and special stand. -
Page 92: Cone Upper Thread
Industrial Sewing Machine SADE Fig. 64. Product definition editor The product definition editor is used to link product profile and materials to a product identification code. Explanation of the product definition parameters: 7.1.3.1 Cone upper thread From this field a upper thread for the sewing can be selected (reference to the material database). -
Page 93: Others
Industrial Sewing Machine SADE 7.1.3.5 Others From this field an additional material such as a plastic retainer etc. for the sewing can be selected (reference to the material database). 7.1.3.6 Needle wear By checking the stitch counter active box in the product configuration the needle change interval time can be set. -
Page 94: Material Editor
Industrial Sewing Machine SADE 7.1.4 Material editor Click on [Materials] to access the editor. The following screen will appear: Fig. 65. Material editor Use the material editor to store material identification codes. Each material can be ac- cessed by pressing the corresponding tab on the top. -
Page 95: User Management Editor
Industrial Sewing Machine SADE Fig. 67. Material name field 7.1.5 User Management editor Click on “Users management” (fig. 40, section 7.1.2.5) to access the editor. The follow- ing screen will appear: Fig. 68. User Management editor The editor has two tabs, the first lists the names of the users and, the second tab de- fines the profiles. - Page 96 Industrial Sewing Machine SADE Fig. 69. User profile defining Tab To define a profile click on [+] to add a record. The first field of the record is the (unique) name of the profile. This name is used to link a user to a profile.
-
Page 97: User Identification
Industrial Sewing Machine SADE Edit Material Allows the user to edit the material database, Material profile editor; allows the user to start the Material profile editor Edit Labels Allows the user to edit the labels (if option label generator has been... - Page 98 Industrial Sewing Machine SADE Fig. 70. Label lay-out editor Sade offers the possibility to create a different traceability label for each product profile. With the editor lay-outs can be made and maintained. A label can contain any number of elements. There are 5 types of elements available: 1) Barcode;...
- Page 99 Industrial Sewing Machine SADE NOTE! For label printers the size of the label has to be set in the Windows printer settings as well. To place an element on the label lay-out first select the type of element, for example text.
-
Page 100: Search Archive
The following screen will appear: Fig. 72. Search Archive Sade has an onboard routine for product traceability queries. First select a search index and enter the search data or simply scan the bar code of the finished product. -
Page 101: Traceability Files
Sade’s Find routine. 7.1.9 Log files Sade keeps a log file of all events it can monitor. This will start as soon as Sade is started. First action Sade will take is to see if the previous log was closed properly. If Sade crashed for whatever reason, it won’t be able to write a line in the log to say that it... -
Page 102: Free Sew Function
7.1.12 Translating Sade modules Almost all text elements of the Sade user interface and editors can be translated or re- named. All modules have their own English original wording. These files can be found in the user documents SADE folder and are called (lan- guage).lng. -
Page 103: Operator Identification
Scan your operator ID barcode with the hand held scanner; o Scan RFID chip card at the scanner. If the code is correct, Sade will advance into the product identification screen (fig. 74). Fig. 74. Operator identification Place thread cones – details see clause 5.4. -
Page 104: Sewing Test
RFID card (if you have this option) or type in your ID. The JUKI SADE is now ready for production. 7.3 Product cycle - operating In this section you’ll find a step by step walkthrough of a production cycle. -
Page 105: Product Selection Screen
Enter the product identification code(s). Normally the hand held barcode scanner is used to enter the code. After scanning a valid barcode, Sade will advance to the next field. -
Page 106: Material Identification
Sade for the specific product defini- tion. Then Sade will prompt you for a correct material to be placed on in the positions. o If all input is accepted, the [OK] button becomes active and once pressed, you’ll advance into the main production screen, unless a needle change is required. -
Page 107: Sewing
Industrial Sewing Machine SADE 7.3.6 Sewing Fig. 77. Main production screen The main production screen shows relevant product and material data on the right side and the graph of the thread tension, the sewing position in the seam and the Sewing speed. -
Page 108: Controls
During sewing the seam is evaluated on upper thread tension. If tension is outside pre- set tolerance, the machine will also stop. Read section 10 for more info on faults. Once the second notch has passed the guide, Sade will evaluate the passed seam and print a “Product traceability label”. -
Page 109: Sewing Speed Table
Industrial Sewing Machine SADE 7.4 Sewing speed table Operate the sewing machine at a speed equal to or lower than maximum sewing speed selected from those shown in the table below according to the sewing conditions. The sewing speed is automatically set according to the amount of the alternating verti- cal movement of the walking foot and the pressure foot. -
Page 110: Adjusting The Automatic Presser Foot Lifter
Industrial Sewing Machine SADE The safety clutch functions when an exces- sive load is applied to the hook or the other components during sewing. At this time, the hook will never rotate even if turning the handwheel. When the safety clutch has... -
Page 111: Normal-/Reverse-Feed Stitch Needle Entry Points Alignment At The Time Of Automatic Reverse Feed Stitching
Industrial Sewing Machine SADE 4) Remove rubber cap ❷ from the rear screw ❸. face of the machine arm. Loosen set- 5) Turn presser bar lifting arm ❹ in the di- ther. Then, tighten setscrew ❸. rection of the arrow until it will go no fur-... - Page 112 Industrial Sewing Machine SADE In the case the stitch pitch is large and correction of the timing is difficult, it is recom- mended to decrease the reverse feed sewing speed or use the temporary stop function Refer to "III-8. Detailed explanation of selection of functions ⑯ Compensation of at each corner section of the sewing pattern.
-
Page 113: Operation Switches
Industrial Sewing Machine SADE Stitch-by-stitch reverse feed stitching speed (Function setting No. 8) and the temporary stop function at each corner section of the sewing pattern (Function No. 151). This speed can be changed using Function setting No. 8. Default value... -
Page 114: Machine Protection When Is Not In Use
This is not used in SADE for stitch length changing. ❺ Needle thread tension changeover switch In machine SADE stitch length is changed in program – see clause 7.1.2.13. When the switch is pressed, the double tension function is selected to increase the ❻... -
Page 115: Cleaning The Machine During Work
Industrial Sewing Machine SADE 7.11 Cleaning the machine during work NOTE! It is unacceptable to wash electrical and electronical equipment with water spray. NOTE! Before cleaning, absolutely turn off the power and remove the plug from the socket – you will avoid the risk of accidental start by unau- thorized persons. -
Page 116: Maintenance
(main switch set to position "O") and re- move the power plug to prevent accidental starting of the machine. Long lasting and efficient operation of machine SADE is dependent on the skillful han- dling, systematic cleaning and the immediate removal of apparent defects. -
Page 117: Lubrication
8.2 Lubrication The machine has a single point requiring lubrication. Lubrication procedure Fill the oil tank with JUKI NEW DEFRIX OIL No.1 (Part No.: MDFRX1600C0) or JUKI MACHINE OIL #7 (Part No.: MML007600CA) using the oiler supplied with the machine from section end of oil amount indicating rod ❷... - Page 118 After that, adjust the quantity of oil to the adequate one. (Refer to "Adjusting the oil quantity in the hook" p.13.) For the oil for hook lubrication, purchase JUKI NEW DEFRIX OIL No. 1 (Part No.: MDFRX1600C0) or JUKI MACHINE OIL #7 (Part No.: MML007600CA).
-
Page 119: Transport And Handling
Industrial Sewing Machine SADE 1) Remove metal fixture ❶ from the filter 2) Remove filter clamp ❷. clamp. 3) Remove filter ❸. 4) Clean up filters ❸, ❹ and oil reservoir ❺ of the oil pan. Be sure to clean up the oil reservoir of the oil pan and the filter case approx- imately once a month. -
Page 120: Troubleshooting
Industrial Sewing Machine SADE 10 TROUBLESHOOTING NOTE! Any failure, regardless of whether it turns off the engine or allows you to continue working, should be reported to an authorized ser- vice center for its removal. If any faults have occurred, check whether you are able to correct the problem by your- self. - Page 121 Industrial Sewing Machine SADE Troubles Causes Corrective measures ① Timing between the needle ○ Refer to "6.5. Needle-to-hook re- 2. Stitch skipping lation" p. 61. and the hook is excessively ad- ② Pressure of the presser foot is vanced or retarded.
- Page 122 At start or during the sewing Sade might detect an anomaly. The nature of the fault is indicated with a red bar in the fault column at the left side of the screen.
-
Page 123: Dismantling And Withdrawal
Call for maintenance assistance if sensor has to be readjusted. Back tack After ending the actual tear o No action required, Sade will not seam, the amount of stitches in allow reverse sewing into the tear reverse direction would enter the seam. - Page 124 Industrial Sewing Machine SADE NOTE! There is required to putting electrical/electronical wastes to the points authorized to receive them. When disposing follow the safety regulations concerning disassembly of electrical equipment, electronics and disposal procedures to prevent environmental contamina- tion. All parts of machinery must be segregated and subjected to proper disposal.
-
Page 125: Warranty
These parts are available for purchase from the machine supplier. The user can replace components by himself. If you have any doubt how to make parts replace- ment, please contact the machine manufacturer. Manufacturer address: JUKI CENTRAL EUROPE Sp. z o. o. Platan Park C ul. Poleczki 21, 02-822 Warszawa, POLAND...
Need help?
Do you have a question about the SADE and is the answer not in the manual?
Questions and answers