
Related Manuals for Fritsch PULVERISETTE 7 classic line


Summary of Contents for Fritsch PULVERISETTE 7 classic line
- Page 1 Operating instructions PLANETARY MICRO MILL classic line PULVERISETTE 7 Valid starting with: 07.4000/0487 Read the instructions prior to performing any task! Translation of the original operating instructions...
- Page 2 Fritsch GmbH Milling and Sizing Industriestraße 8 D - 55743 Idar-Oberstein Telephone: +49 6784 70-0 Email: info@fritsch.de Internet: www.fritsch.de Version 04/2022 Index 020...
- Page 3 Certifications and CE conformity Certification Fritsch GmbH has been certified by the SGS-TÜV Saar GmbH. An audit certified that Fritsch GmbH conforms to the requirements of the DIN EN ISO 9001:2015. CE Conformity The enclosed Conformity Declaration lists the guidelines the FRITSCH instrument...
-
Page 4: Table Of Contents
Table of contents Table of contents Basic structure..........Safety information and use. - Page 5 Table of contents Initial start-up..........Switching on.
- Page 6 Table of contents Repairs........... . . Checklist for troubleshooting.
- Page 7 List of tables List of tables Grinding balls ≤ 3 mm: Recommended ball mass per grinding Tab. 1: bowl in grams.........
-
Page 8: Basic Structure
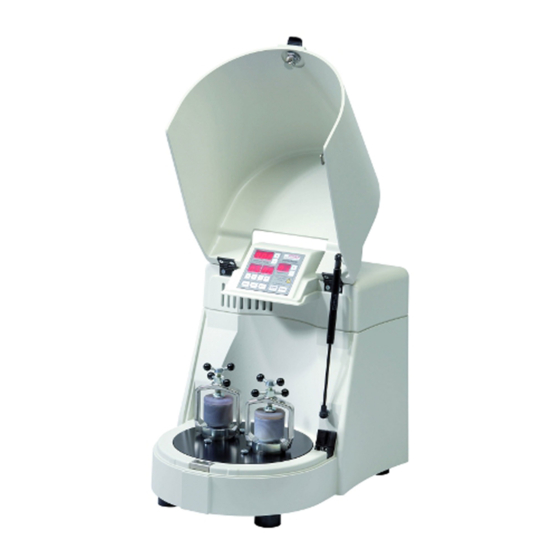
Basic structure Basic structure Hood handle Voltage rotary switch Latch Main switch Hood Mains connection Membrane keyboard 10 Device fuse 2x 10 A T Spindle clamping device 11 RS232 - interface Lock 12 Support disc... -
Page 9: Safety Information And Use
People with health problems or under the influence of medication, drugs, alcohol or exhaustion must not operate this device. The PULVERISETTE 7 classic line may only be operated by authorised persons and serviced or repaired by trained specialists. All commissioning, maintenance and repair work may only be carried out by technically qualified personnel. -
Page 10: Operating Principle
Obligations of the operator Before using the PULVERISETTE 7 classic line, this manual is to be carefully read and understood. The use of the PULVERISETTE 7 classic line requires technical knowledge; only commercial use is permitted. -
Page 11: Information On Hazards And Symbols Used In This Manual
Safety information and use The PULVERISETTE 7 classic line may exclusively be used within the scope of applications set down in this manual and within the framework of guidelines put forth in this manual. In case of non-compliance or improper use, the customer assumes full liability for the functional capability of the PULVERISETTE 7 classic line and for any damage or injury arising from failure to fulfil this obligation. - Page 12 Safety information and use Special safety information To call attention to specific hazards, the following symbols are used in the safety information: DANGER This symbol and keyword combination points out a directly haz- ardous situation due to electrical current. Ignoring information with this designation will result in serious or fatal injury.
-
Page 13: Device Safety Information
Safety information and use Tips and recommendations This symbol emphasises useful tips and recommendations as wells as information for efficient operation without malfunc- tion. Further designations To emphasise procedure instructions, results, lists, references and other ele- ments, the following designations are used in this manual: Designation Explanation Step-by-step procedure instructions... -
Page 14: Protective Equipment
European directives and void the guarantee. ■ Only use the PULVERISETTE 7 classic line when it is in proper working order, as intended and in a safety- and hazard-conscious manner adhering to the operating manual. In particular, immediately rectify any malfunctions that could pose a safety hazard. -
Page 15: Opening The Hood Without Mains Connection
Safety information and use 2.6.1 Opening the hood without mains connection CAUTION The emergency release must not be activated while the machine is running! Disconnect the machine from the mains before the emergency release. Failure to observe this will render void the guarantee, and releases us from liability for any resulting damage to the device as well as for any resulting personal injury. -
Page 16: Overload Protection
Safety information and use 2.8.3 Overload protection ■ In the event of an overload, the device reduces the speed in a controlled manner. The REDUCED SPEED light is lit as a warning. The device can be used again with the reduced speed. ■... -
Page 17: Technical Data
Technical data Technical data Dimensions 500 x 370 x 530 mm (height x width x depth) Weight Net: approx. 35 kg Gross: approx. 55 kg Operating noise Emissions value of workplace according to DIN EN ISO 3746:2005 is up to 96dB (A). -
Page 18: Material
Technical data Material ■ Maximum feeding size 5 mm ■ Maximum feed amount 2 x 20 ml 3.10 Final fineness ■ Dry grinding up to d < 20 µm (depending on the material) ■ Wet grinding up to d < 1 µm (depending on the material) -
Page 19: Installation
■ Please store the transport packaging so that it can be reused if you need to return the product. Fritsch GmbH accepts no liability for damage caused by improper packaging (packaging that is not from Fritsch). ■... -
Page 20: Ambient Conditions
Installation DANGER Do not step under the transport pallet during transport. CAUTION The weight of the planetary micro mill is approx. 35 kg! CAUTION Crushing hazard! Always lift with 2 persons. Hold the bottom edge of the housing when lifting. NOTICE Never operate the mill while it is standing on the transport pallet! -
Page 21: Electrical Connection
Chapter 4.5.1.2 ‘Adjusting the mains voltage in setup mode’ ⮫ on page 22. NOTICE Fritsch mills are speed controlled. The devices are equipped for this with frequency converters. In order to comply with the EMC directive, many measures must be taken to prevent operational transient emissions. -
Page 22: Adjusting The Mains Voltage
Installation 4.5.1 Adjusting the mains voltage 4.5.1.1 Adjusting the mains voltage with the rotary switch (7) CAUTION Only qualified personnel may change the voltage range on the device! CAUTION The voltage range may only be adjusted after the mains has been disconnected. -
Page 23: Setting Device Specifications
(90-260 V) for the existing mains system. To save and exit setup mode, press the STOP button. 4.5.2 Setting device specifications NOTICE "P7" must always be displayed in the REPETITIONS field. The Fritsch company assumes no guarantee for damage resulting from changing this setting. -
Page 24: Initial Start-Up
Initial start-up Initial start-up Perform initial start-up only after all work as described in ⮫ Chapter 4 ‘Installa- tion’ on page 19 has been carried out. Switching on ■ The device must be connected to the power supply if this has not been done already. -
Page 25: Using The Device
Using the device Using the device DANGER Before starting the machine, make sure that the grinding bowl has been tensioned correctly and that there are no loose parts inside the device. There is a risk of loose grinding bowls or parts being projected. - Page 26 Using the device NOTICE Each grinding process means wear to the grinding element. Therefore, please pay attention to what components the material of the grinding element contains and whether these could react with the sample. Such reactions may have conse- quences.
-
Page 27: Size Of The Grinding Balls
Using the device 6.1.1 Size of the grinding balls Type of feed material Suitable ball diameter Coarse feed size of £ 5 mm 15 mm or 10 mm Fine material 0.5 mm 10 mm or smaller Homogenisation of dry or liquid samples 10 mm or smaller These are reference values: The size of bowls and grinding balls may need to be determined through experimentation. -
Page 28: Calculated Weight Of A Ball
Using the device 6.1.3 Calculated weight of a ball Ball diameter in mm Material Density in g/cm Calculated weight of a ball in g Agate 2.65 0.17 1.39 4.68 Silicon nitride 3.25 0.20 5.48 Sintered corundum 0.25 1.99 6.72 Zirconium oxide 0.37 2.98 10.07... -
Page 29: Filling The Grinding Bowl
Using the device Grinding bowl min. filling max. filling 45 ml 3 ml 20 ml 12 ml 0,5 ml 5 ml Filling the grinding bowl CAUTION Do not fill in any dry ice of liquid nitrogen in the grinding bowls! Adding dry ice or liquid nitrogen into the grinding bowls can lead to a sudden increase in volume with a high static pressure. -
Page 30: Speed
This means that the overall working time may remain the same. The wear is increased in this case though. Fritsch recommends however to use the maximum speed and to plan for enough pauses so that the wear is minimised. -
Page 31: Weight Of The Balls (Type Of Material)
Using the device 6.4.5 Weight of the balls (type of material) A higher mass (specific weight) of the grinding balls accelerates grinding. (see table in ⮫ Chapter 6.1 ‘Choice of grinding bowls and grinding balls’ on page 25 ). 6.4.6 Dry grinding DANGER Dust explosion! -
Page 32: Clamping The Grinding Bowls
Using the device During the transition to grinding in suspension, you can add a liquid auxiliary agent with high boiling point and low vapour pressure, e.g. water, white spirits (boiling point 100 - 140°C), or alcohols with a high boiling point (e.g. isopropanol) We recommend that you only use so much liquid that the suspension has the same consistency as motor oil. -
Page 33: Grinding Duration
Using the device NOTICE If the weights of the bowls differ too much, this may result in the planetary micro mill shifting position on the supporting surface. Grinding duration WARNING Burn hazard! Grinding bowls can get very hot after long grinding durations. Wear protective gloves for removal after grinding or during the grinding breaks. -
Page 34: Setting The Speed
Using the device To reduce the grinding time, you can use a grinding bowl and grinding balls with a higher density, and thus a higher impact energy. The mill can also run for several hours during low-speed operations for mixing and homogenisation. -
Page 35: Changing The Time Unit In Setup Mode
Using the device − If the combination minutes/seconds is set in setup mode instead of hours/minutes (see ⮫ Chapter 6.9.1 ‘Changing the time unit in setup mode’ on page 35), the numbers at h indicate the minutes and at min the seconds! The factory setting for the time unit is minutes and sec- onds. -
Page 36: Reverse Mode
Using the device 6.10 Reverse mode ®Press the REVERSE button. If the REVERSE button is illuminated, reverse mode is activated. After the selected running time expires, the mill will change its direction of rotation. For this, REPETITIONS has to be at least 1. "Reverse"... -
Page 37: Switching Off
Using the device 6.12.2 Switching off ■ Press the STOP button on the control panel. ■ Shortly after the mill comes to a standstill, the hood is unlocked and can be opened. ■ Switch off the device with the main switch (8) on the back of the device. 6.13 Cooling the grinding bowl WARNING... -
Page 38: Cleaning
Cleaning Cleaning DANGER Mains voltage! − Before beginning with cleaning work, disconnect the mains plug and protect the device against being unintentionally switched back on! − Do not allow any liquids to flow into the device. − Indicate cleaning work with warning signs. −... -
Page 39: Mill
Cleaning Mill ■ The Planetary Micro Mill can be wiped down with a damp cloth when it is switched off. -
Page 40: Maintenance
Put safety equipment back into operation after mainte- nance or repair work NOTICE Send all Safe-Lock clamping systems to Fritsch GmbH once a year for inspection. The customer must bear the costs of this maintenance itself. We recommend keeping a safety logbook ⮫ Chapter 13 ‘Safety logbook’... - Page 41 Maintenance Functional part Task Test Maintenance interval V-belt Motor to planetary disc Check the voltage; remove Once a year the housing; the belt must not slacken by more than approx. 10 mm when pushed with your thumb. Grinding chamber cooling Proper function, clean when Twice a year and electronics...
-
Page 42: Repairs
Repairs Repairs DANGER Mains voltage! − Before beginning with repair work, unplug the mains plug and protect the device against being unintentionally switched back on. − Indicate repair work with warning signs. − Repair work may only be performed by specialised per- sonnel. - Page 43 Repairs Fault description Cause Remedy Grinding stock escapes Sealing ring defective Replace the sealing ring Soiling on sealing ring, or dirt has penetrated it Clean or replace if necessary Runs unevenly with strong vibra- Inadequate mass balancing Correct the mass balancing tions...
-
Page 44: 10 Disposal
FRITSCH is not obliged to take back used FRITSCH devices. FRITSCH declares it is prepared to take back used FRITSCH devices for recycling or disposal free of charge whenever a new device is purchased. The used FRITSCH device must be delivered free of charge to a FRITSCH establishment. -
Page 45: 11 Guarantee Terms
Rectification may take the form of either repair or replacement of the device, at our sole discretion. The guarantee may be redeemed in all countries in which this FRITSCH device is sold with our authorisation. - Page 46 NOTICE Please note that in the event that the device must be returned, the device must be shipped in the original Fritsch packaging. Fritsch GmbH denies all liability for any damage due to improper packaging (packaging not from Fritsch).
-
Page 47: 12 Exclusion Of Liability
The supplied products as well as this operating manual conform to the current state of the art when they leave the sphere of influence of FRITSCH GMBH. - Page 48 Neither compliance with this operating manual nor the conditions and methods used during installation, operation, use and maintenance of the product can be monitored by Fritsch GmbH. Improper execution of the installation can result in property damage and thus endanger persons. Therefore, we assume absolutely...
-
Page 49: 13 Safety Logbook
Safety logbook 13 Safety logbook Date Maintenance / Repair Name Signature... -
Page 50: 14 Index
Index 14 Index Accident prevention........9 Opening the hood without mains connection. - Page 52 © 2014 Fritsch GmbH Milling and Sizing Industriestraße 8 D - 55743 Idar-Oberstein Telephone: +49 6784 70-0 Email: info@fritsch.de Internet: www.fritsch.de...
Need help?
Do you have a question about the PULVERISETTE 7 classic line and is the answer not in the manual?
Questions and answers