
Related Manuals for Verkada AC42


Summary of Contents for Verkada AC42
- Page 1 Install Guide AC42 Door Controller Verkada Inc. 406 E 3rd Ave, San Mateo, CA 94401 All specifications are subject to change without notice sales@verkada.com Copyright © 2023 Verkada Inc. All rights reserved.
-
Page 2: Document Details
● Line Security Level: Level I ● Standby Power Level: Level I CAN/ULC-60839-11-1 ● Grade assignment: Grade I Verkada Inc. 406 E 3rd Ave, San Mateo, CA 94401 All specifications are subject to change without notice sales@verkada.com Copyright © 2023 Verkada Inc. All rights reserved. - Page 3 Note This equipment is for use in an indoor and a restricted access area. Verkada Inc. 406 E 3rd Ave, San Mateo, CA 94401 All specifications are subject to change without notice sales@verkada.com...
- Page 4 After connecting the AC42 to network and power, visit: verkada.com/start For detailed installation instructions, visit: verkada.com/support Verkada Inc. 406 E 3rd Ave, San Mateo, CA 94401 All specifications are subject to change without notice sales@verkada.com Copyright © 2023 Verkada Inc. All rights reserved.
- Page 5 FAI in triggered state Controller is managing doors and connected to the server Flashing Pink Identify Verkada Inc. 406 E 3rd Ave, San Mateo, CA 94401 All specifications are subject to change without notice sales@verkada.com Copyright © 2023 Verkada Inc. All rights reserved.
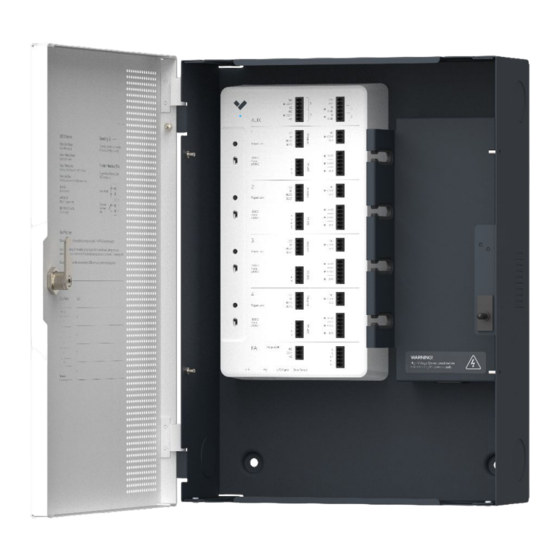
- Page 6 Trigger lock and current select Door ports FAI ports Ethernet UPS Signal Door Tamper Verkada Inc. 406 E 3rd Ave, San Mateo, CA 94401 All specifications are subject to change without notice sales@verkada.com Copyright © 2023 Verkada Inc. All rights reserved.
-
Page 7: Recommended Testing
Introduction Recommended Testing To ensure ongoing functionality of AC42, it is recommended to check the following interfaces every 6 months: ● Short each input to its adjacent GND port and verify that LED illuminates. ● Use multimeter to confirm expected impedance across relay outputs. - Page 8 Lock key and flat head screwdriver Accessories Mounting Options Mounting plate and 4 wood screws Verkada Inc. 406 E 3rd Ave, San Mateo, CA 94401 All specifications are subject to change without notice sales@verkada.com Copyright © 2023 Verkada Inc. All rights reserved.
- Page 9 Installation Mounting 1/4 Use the paper mounting template from the hardware box to get a sense of the wall space AC42 will occupy. Use the mounting template to drill pilot holes for the mount plate. Please Note Leave at minimum 2” clearance on the...
- Page 10 Remove the door by sliding it upwards. Verkada Inc. 406 E 3rd Ave, San Mateo, CA 94401 All specifications are subject to change without notice sales@verkada.com Copyright © 2023 Verkada Inc. All rights reserved.
- Page 11 Verkada Inc. 406 E 3rd Ave, San Mateo, CA 94401 All specifications are subject to change without notice sales@verkada.com Copyright © 2023 Verkada Inc. All rights reserved.
- Page 12 Reattach the door to the enclosure. Connect the grounding cable from the enclosure to the door Verkada Inc. 406 E 3rd Ave, San Mateo, CA 94401 All specifications are subject to change without notice sales@verkada.com Copyright © 2023 Verkada Inc. All rights reserved.
-
Page 13: Recommended Wiring
It is recommend to connect one of the chassis grounding screws to the building ground at the installation site. Required Network Settings An Ethernet connection with DHCP must be used to connect the AC42 to the Local Area Network (LAN). You also need to configure firewall settings to communicate with the AC42. ● TCP port 443 ●... - Page 14 Connecting a Door 1/5 The door ports’ Form C relays can be driven dry or wet. Warning AC42 is rated to power 12V locks up to 700mA and 24V locks up to 350mA. Ensure power is disconnected from the None/Dry...
- Page 15 ● Set it to “24VDC” for 24 volt locking hardware configuration, ensure the negative of the lock goes into the COM port as shown in the diagrams below. The AC42 is rated to power 12V locks up to 1A and 24V locks up to 500mA. Fail Safe Fail Secure...
-
Page 16: Connecting The Reader
3. Connecting the Reader The AC42 is rated to power readers at 12V up to 250mA via the + (VIN) and – (GND) connection. Standard Wiegand readers use the top 4-port inputs (powered from + and - of the bottom port) while Verkada/RS-485 readers use the bottom 4-port inputs. -
Page 17: Connecting The Inputs
NORMALLY CLOSED (NC) NORMALLY CLOSED (NO) The REX can be configured in Verkada Command to release the lock; this is most commonly seen in electromagnetic locks. The REX unlock time can also be configured. Verkada Inc. 406 E 3rd Ave, San Mateo, CA 94401 All specifications are subject to change without notice sales@verkada.com... - Page 18 For safety-related applications, wire the REX directly to the mag lock. You can wire additional REX switches and sensors to the door cassette if needed. Configuration Configuration Verkada Inc. 406 E 3rd Ave, San Mateo, CA 94401 All specifications are subject to change without notice sales@verkada.com Copyright © 2023 Verkada Inc. All rights reserved.
-
Page 19: Aux Inputs
NORMALLY CLOSED (NC) in command With the AC42’s AUX inputs you can hook up devices such as intercoms and panic buttons. All associated events will be logged in Command. The AUX Inputs can be programmed in Command to initiate a lockdown or unlock a door (or a set of doors). - Page 20 4 relay outputs. In other words all wet locks will be effectively dry while the FAI is triggered. Verkada Inc. 406 E 3rd Ave, San Mateo, CA 94401 All specifications are subject to change without notice sales@verkada.com...
-
Page 21: Daisy Chaining
FAI+ and FAI_P must be locally jumpered in this config Daisy Chaining Two AC42 FAI may be daisy chained. The FAI (and latching states) from the primary AC42 will be repeated in the secondary (daisy chained) unit. AC42 AC42 Important -... - Page 22 Connect the AC42 to your network using the Ethernet port located at the bottom of the controller. Connect the AC42 power supply to your standard power outlet (100-240VAC). To add the AC42 to your Verkada Command account, enter the serial number printed on the AC inlet (or the order number) to the “Add Device” page: command.verkada.com/add-device...
-
Page 23: Battery Backup (Optional)
Installation Battery backup (Optional) A 12 volt 4.5Ah battery can be connected to the female F2 connectors located in the AC42. You can place one battery at the bottom-right of the AC42 enclosure. We recommend to use and sell a 12 volt 4.5Ah sealed lead acid rechargeable battery that is UL1989 recognized. - Page 24 Appendix Support Thank you for purchasing this Verkada product. If for any reason you're experiencing issues or need assistance, please contact our 24/7 Technical Support Team immediately. Sincerely, The Verkada Team verkada.com/support Verkada Inc. 406 E 3rd Ave, San Mateo, CA 94401 All specifications are subject to change without notice sales@verkada.com...
Need help?
Do you have a question about the AC42 and is the answer not in the manual?
Questions and answers