
Related Manuals for Futech PARA RED


Summary of Contents for Futech PARA RED
- Page 1 USER MANUAL EN ENGLISH 052.02R PARA RED Manual 052.02G PARA GREEN in your language? Check the back cover...
- Page 2 OVERVIEW PARA...
-
Page 3: Remote Control
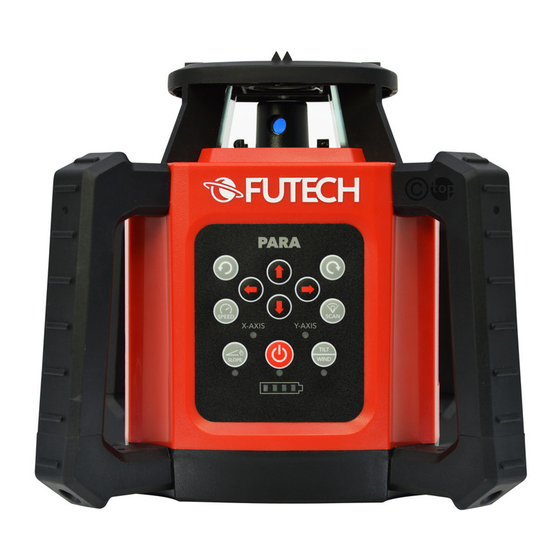
HOUSING KEYPAD REMOTE CONTROL 01 Laser head Power button Power / standby button 02 Plumb point up (Z-axis) Arrow UP button Arrow UP button / Turn RIGHT button 03 Keypad Arrow DOWN button Arrow DOWN button / 04 X-axis D Arrow LEFT button Turn LEFT button 05 Y-axis Arrow RIGHT button... - Page 4 QUICK START GUIDE Power button Switch ON/OFF the device Arrow UP button Change the slope. Y-axis rises on the side indicated by the arrow Arrow DOWN button Change the slope. Y-axis descends on the side indicated by the arrow Arrow LEFT button Horizontal mode Change the slope.
- Page 5 LED indicator Y-axis green, continuous Levelled green, flashing Levelling in progress Levelling not active red, continuous Levelling not active, a slope was selected. LED Slope indicator Slope modus OFF Red, continuous Slope modus ON Red, flashing Laser out of levelling range LED Tilt/Wind indicator Tilt security &...
-
Page 6: Automatic Functions
SAFETY AUTOMATIC FUNCTIONS Please read the safety instructions provided as AUTO-LEVELLING separate booklet with the device. This rotation laser first levels itself automatically LASER RADIATION – Class 2 Laser product. – Do after turning on the device. After being levelled, not stare into beam the laser starts spinning. -
Page 7: Horizontal Alignment
start before the Tilt-security is active. Tilt-security is the best choice if accuracy is the Press the power button [A] to activate the device. most important. NOTE BASIC MODE (TILT-SECURITY AND WIND The choice of the tripod defines in a large way FUNCTION OFF) the user-friendliness of the device. -
Page 8: Vertical Alignment
VERTICAL ALIGNMENT By default, the Tilt security will prepare after turning on the device. NOTE The device should not be placed on a surface with a slope of more than 5°. If this is the case, the laser is outside the self-levelling range, in which case the laser diode will continue to blink and the LED indicator slope [N] will flash red. - Page 9 POSITIONING THE VERTICAL LASER LINE above the starting point, the place where the corner of 90° is made. It can be helpful to change the spinning speed to zero when positioning the laser above the starting point. · Bring the rotating laser beam with the help of the arrow LEFT button [D, d] or arrow RIGHT button [E, e] to your first mark.
-
Page 10: Scan Function
A speed of 0 RPM projects a stationary laser · Press the scan button [G, g] to select the de- point. This can be positioned exactly at the meas- sired angle of the scan function. Each time you uring point with the turn LEFT button [J, c] or turn press this button, the angle will change. - Page 11 HORIZONTAL SLOPE, <5° · Next, you position the receiver at the desired slope. (e.g. 2% slope on 10m = height differ- ence of 20cm up or down) · Search the zero level of the receiver with the laser beam using OR the arrow UP [B, b] or DOWN [C, c] button (for a slope on the Y-axis) OR the arrow LEFT [D, d] / RIGHT [E,e] button <...
- Page 12 · Activate the Slope function with the slope but- parallel with the slope line you like to make. ton [H]. (LED slope indicator [N], LED indicator · Turn on the device and wait until it is levelled X-axis [L] and LED indicator Y-axis [M] are solid (LED indicator X-axis [L] and LED indicator red).
- Page 13 do this, use the supplied laser cover pieces [16] by sliding them into the metal window cover [17]. Simply remove this laser cover piece [16] when covering is no longer needed.
-
Page 14: Specifications
SPECIFICATIONS 052.02R 052.02G PARA RED PARA GREEN Visibility Precision 1mm / 10m Range (with receiver) 2x ± 300m Dust- and water resistance IP66 Levelling Motorised Plumb bob ✔ Rotations per minute 0, 60, 300, 600, 800 Scan function 0°, 10°, 45°, 90°, 180°... - Page 15 NOTES...
- Page 16 USER MANUAL other languages: DANSK ITALIANO DEUTSCH NEDERLANDS ESPAÑOL NORSK EESTI KEEL PORTUGUÊS SUOMEN KIELI SL SLOVENŠČINA FRANÇAIS SVENSKA ÍSLENSKA Facebook @futechtools LinkedIn futechtools World Wide Web futech-tools.com YouTube @futechtools...
Need help?
Do you have a question about the PARA RED and is the answer not in the manual?
Questions and answers