
Subscribe to Our Youtube Channel
Related Manuals for Proline P60IMCIX


Summary of Contents for Proline P60IMCIX
- Page 1 P60IMCIX Cuisinière Électrique Pose Libre Freestanding Electric Cooker Vrijstaand elektrisch fornuis NOTICE D’UTILISATION INSTRUCTION MANUAL GEBRUIKSAANWIJZING...
-
Page 2: Table Of Contents
Table des matières AVERTISSEMENTS ......................2 CONSIGNES DE SÉ CURITÉ IMPORTANTES ..............5 DESCRIPTION ........................6 INSTALLATION ......................... 7 Positionnement de la cuisinière ................8 Mise à niveau de la cuisinière ................8 Installer les crochets et les chaî nes anti-basculement ........9 Branchements électriques .................. -
Page 3: Avertissements
AVERTISSEMENTS Cet appareil est destiné à un usage domestique uniquement. Toute utilisation autre que celle prévue pour cet appareil, ou pour une autre application que celle prévue, par exemple une application commerciale, est interdite. Si le câble d'alimentation est endommagé, il doit être remplacé par le fabricant, son service après-vente ou des personnes de qualification similaire afin d'éviter un danger. - Page 4 Ne pas utiliser d’appareil de nettoyage à la vapeur. Il est recommandé de ne pas déposer d'objets métalliques tels que couteaux, fourchettes, cuillères et couvercles sur le plan de cuisson, car ils peuvent devenir chauds. En ce qui concerne les informations détaillées sur l'utilisation de l'appareil en toute sécurité, des précautions qui concerne l’entretien par l’usager et le remplacement de l’ampoule, référez-vous aux sections “UTILISATION’’...
- Page 5 MISE EN GARDE: Les parties accessibles peuvent devenir chaudes au cours de l'utilisation. Il est recommandé d’éloigner les jeunes enfants. La température des surfaces accessibles peut être élevée lorsque l'appareil est en fonctionnement. Toutes les cuissons se font porte fermée de préférence. ...
-
Page 6: Consignes De Sécurité Importantes
CONSIGNES DE SÉCURITÉ IMPORTANTES Lisez toutes les instructions avant d’utiliser cet appareil. Conservez-les pour consultation ultérieure. L'appareil doit être utilisé uniquement pour l'usage décrit dans cette notice d'utilisation. Le fabricant décline toute responsabilité liée à des dommages résultant d'un usage impropre ou irresponsable. -
Page 7: Description
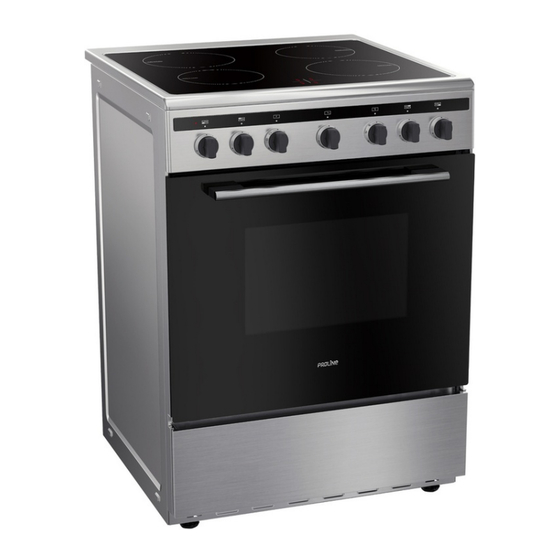
DESCRIPTION 1. Zones de cuisson à induction 2. Panneau de contrôle 3. Grille 4. Lèchefrite 5. Porte du four 6. Poignée de porte 7. Pieds réglables 8. Tiroir de rangement Accessoires du four 2 grilles Pour les plats et les articles à rôtir et à griller. Lèchefrite : Pour cuire de grandes quantités d'aliments, par exemple des gâteaux moelleux, des pâtisseries, des... -
Page 8: Installation
Panneau de contrôle 1. Boutons de contrôle des zones de cuisson à induction 2. Bouton de sélection de la fonction du four 3. Bouton de réglage du minuteur 4. Voyant de fonctionnement du four 5. Bouton de réglage de la température du four INSTALLATION Les instructions suivantes doivent être lues par un technicien qualifié... -
Page 9: Positionnement De La Cuisinière
Positionnement de la cuisinière 600 mm minimum Installez l’appareil près de meubles dont la hauteur est inférieure à celle de la plaque de cuisson. Pour une installation correcte de la cuisinière, les précautions suivantes doivent être prises : Si vous installez une hotte, suivez la notice d'installation de celle-ci et respectez dans tous les cas à... - Page 10 Installation des crochets et des chaî nes anti-basculement Pour éviter que la cuisinière ne bascule vers l'avant si un enfant monte sur la porte du four ou si les utilisateurs placent un poids extrême sur la porte ouverte, les deux chaî nes fournies DOIVENT ÊTRE fixées au dos de la cuisinière et doivent en permanence être attachées aux crochets filetés solidement ancrés dans le mur.
-
Page 11: Branchements Électriques
3. Poussez la cuisinière dans son emplacement en insérant solidement le pied gauche ou droit dans le support anti-basculement. Branchements électriques IMPORTANT ! Les branchements électriques ne doivent être effectués que par un électricien qualifié et agréé. AVERTISSEMENT : CET APPAREIL DOIT ÊTRE MIS À LA TERRE. La cuisinière est livrée sans câble d'alimentation. -
Page 12: Utilisation
3. Retirez le couvercle en insérant un tournevis dans le côté du couvercle. 4. Retirez les vis de contact des fils, puis branchez les fils sous les têtes de vis en respectant le code couleur. Le fil marron doit être raccordé à la borne portant la lettre L. Le fil bleu doit être raccordé... - Page 13 Certains ustensiles de cuisson peuvent faire du bruit quand ils sont placés sur un foyer à induction. Ce bruit n'indique pas un dysfonctionnement de l'appareil et n'impacte pas la cuisson. DESCRIPTION DE LA PLAQUE DE CUISSON 1. Zones de cuisson à induction 1500 W 2.
- Page 14 BOUTONS DE CONTRÔ LE Chaque bouton contrôle une zone de cuisson à induction spécifique. Quand vous n'utilisez pas l'appareil, veillez toujours à ce que tous les boutons de contrôle soient dans leur position d'arrêt et à ce que l'écran affiche le chiffre 0. Arrêt INSTRUCTIONS D’UTILISATION 1.
-
Page 15: Utiliser Le Four
CODES D’ERREUR Ces codes d'erreur ne sont qu'indicatifs et tous les dysfonctionnements doivent être diagnostiqués et réparés par un technicien qualifié. Affichage Causes possibles Solution possible Dysfonctionnement du capteur de Contactez le magasin d'achat de l'appareil. F3 – F8 température. Dysfonctionnement du capteur de Contactez le magasin d'achat de l'appareil. - Page 16 2. Tournez le bouton de réglage du minuteur sur la durée de cuisson désirée (jusqu’à 120 minutes). Si vous utilisez le four sans le minuteur, tournez le bouton de réglage du minuteur sur la position 3. Tournez le bouton de réglage de la température pour régler la température désirée. ...
- Page 17 ENTRETIEN ET NETTOYAGE Avant de nettoyer le four, éteignez-le et débranchez-le de l’alimentation électrique et attendez qu’il ait complètement refroidi. Nettoyer les surfaces extérieures Nettoyez l’extérieur de l’appareil avec un chiffon légèrement humide. Séchez-le soigneusement. N’utilisez jamais de nettoyant chimique ou abrasif. Nettoyer l’intérieur du four (après chaque utilisation) Sortez la grille et la lèchefrite.
-
Page 18: Spécifications
SPÉCIFICATIONS Fiche de la plaque de cuisson domestique conformément au règlement UE N° 66/2014. Identification du modèle P60IMCIX Type de plaque de cuisson Plaque électrique Nombre de foyers et/ou de zones de cuisson Technologie de chauffe (Foyers de cuisson et zones Foyers de cuisson et zones de cuisson de cuisson à... - Page 19 Exigences Ecodesign conformément au règlement UE N° 66/2014 Paramètre Valeur Étape 1 Étape 2 Étape 3 mesurée 1 an après 2 ans après 5 ans après l'entrée 113.4 l'entrée en l'entrée en vigueur en vigueur < 96 cavité vigueur < 121 <...
-
Page 20: Mise Au Rebut
MISE AU REBUT En tant que revendeur, nous nous préoccupons de l'environnement. Aidez-nous en observant toutes les instructions de mise au rebut de vos produits, emballages et, le cas échéant, accessoires et piles. Nous devons tous œuvrer pour la protection des ressources naturelles et nous efforcer de recycler tous les matériaux d'une manière qui ne puisse nuire ni à... - Page 21 Table of Contents WARNINGS ............................... 2 IMPORTANT SAFETY INSTRUCTIONS ....................4 OVERVIEW ..............................5 INSTALLATION ............................6 Positioning the Cooker ........................ 7 Levelling the Cooker ........................7 Fitting the Anti-tilt Chains and Hooks ..................8 Electrical Connection ........................9 OPERATION ............................
-
Page 22: Warnings
WARNINGS This appliance is intended for domestic household use only and should not be used for any other purpose or in any other application, such as for non-domestic use or in a commercial environment. If the supply cord is damaged, it must be replaced by the manufacturer, its service agent or similarly qualified persons in order to avoid a hazard. - Page 23 Regarding the method of fixing and cables connection, refer to the section “ELECTRICAL CONNECTION”. After use, switch off the hob element by its control and do not rely on the pan detector. WARNING: Ensure that the appliance is switched off before replacing the lamp to avoid the possibility of electric shock.
-
Page 24: Important Safety Instructions
IMPORTANT SAFETY INSTRUCTIONS Please read all instructions before using this appliance. Keep them for future reference. The appliance should only be used for its intended purpose as described in the instruction manual. The manufacturer declines all responsibility for damage resulting from improper and irresponsible use. -
Page 25: Overview
OVERVIEW 1. Induction cooking zones 2. Control panel 3. Rack 4. Tray 5. Oven door 6. Oven handle 7. Levelling feet 8. Storage drawer Oven accessories 2 Racks : for dishes and items for roasting and grilling Tray: for cooking large quantities of food such as moist cakes, pastries, frozen food etc. -
Page 26: Installation
Control panel 1. Control knobs for induction cooking zones 2. Function selector 3. Timer control knob 4. Operating indicator light 5. Temperature control knob INSTALLATION The following instructions should be read by a qualified technician to ensure that the appliance is installed, regulated and technically serviced correctly in compliance with current regulations. -
Page 27: Positioning The Cooker
Positioning the Cooker Min. 600mm The appliance can be installed next to furniture units which are no taller than the top of the cooker hob. For proper installation of the cooker, the following precautions must be taken: Hoods must be installed according to the requirements in the installation manual for the hoods themselves and in any case at a minimum distance of 650mm from the hob. -
Page 28: Fitting The Anti-Tilt Chains And Hooks
Fitting the Anti-tilt Chains and Hooks To prevent the cooker from tipping forwards in the event of children standing on the oven door or users putting extreme weight on the door when in open position, two supplied chains MUST BE fixed to the back of the cooker which should at all times be secured to the threaded hooks which are securely fixed to the wall. -
Page 29: Electrical Connection
3. Slide the cooker into place, ensuring that the left or right foot is securely slided into the anti-tilt bracket. Electrical Connection IMPORTANT! Electrical connections must only be performed by a qualified and authorised electrician. WARNING: THIS APPLIANCE MUST BE EARTHED. The cooker comes without a power supply cable. -
Page 30: Operation
3. Remove the cover by inserting a screwdriver into the side of the cover. 4. Remove the wire contact screws and then fasten the wires under the screw heads, respecting colour code. The brown wire must be connected to the terminal marked L. The green and yellow wire must be connected to the terminal marked E or the earth symbol 5. - Page 31 Certain pans can make noise when they are placed on an induction cooking zone. This noise does not mean any failure on the appliance and does not influence the cooking operation. COOKING SURFACE LAYOUT 1. Induction cooking zone 1500 W 2.
- Page 32 OPERATING INSTRUCTIONS 1. Turn the control knob to the desired power level for the selected hotplate. The display will show the number from 1-9 to indicate the corresponding power level. You can turn the control to 9 for fast cooking. To cook more slowly or simmer, turn the control to a lower setting according to the pan and the amount of liquid.
-
Page 33: Using The Oven
ERROR CODES These error codes are for guidance only and all faults should be diagnosed and repaired by a qualified technician. Display Possible causes Possible solution Contact the store where you have F3 – F8 Temperature sensor failure purchased the appliance. Temperature sensor of the IGBT Contact the store where you have F9 –... - Page 34 2. Turn the timer control knob to set the desired cooking time up to 120 minutes. If you want to use the oven without timer control, turn the timer control knob to the position. 3. Turn the temperature control knob to select the desired temperature. ...
-
Page 35: Cleaning And Maintenance
CLEANING AND MAINTENANCE Switch off and disconnect the appliance from the power supply and allow it to cool completely before cleaning. Cleaning the outer surface Clean the outside of the appliance with a slightly damp cloth. Dry it thoroughly. Never use abrasive or chemical cleaning agents. Cleaning the inside of the oven (after each use) Remove rack and tray. -
Page 36: Specifications
SPECIFICATIONS Below is the sheet of domestic hob according to EU regulation No. 66/2014. Model identification P60IMCIX Type of hob Electric hob Number of cooking zones and/or areas Heating technology (induction cooking zones and Induction cooking zones and cooking areas, radiant cooking zones, solid plates) - Page 37 Ecodesign requirements according to EU regulation No. 66/2014 Item Measured Stage 1 Stage 2 Stage 3 Value 1 year after enter 2 years after 5 years after entry entry into force into force <146 113.4 into force cavity <121 <96 Freestanding cooker specifications: Rating / Supply Voltage and frequency 220V-240V~ 50/60Hz...
-
Page 38: Disposal
DISPOSAL As a responsible retailer we care about the environment. As such we urge you to follow the correct disposal procedure for the appliance and packaging materials. This will help conserve natural resources and ensure that it is recycled in a manner that protects health and the environment. - Page 39 Inhoudsopgave WAARSCHUWINGEN ............................. 2 BELANGRIJKE VEILIGHEIDSINSTRUCTIES ....................4 OVERZICHT ..............................5 INSTALLATIE ..............................6 Het fornuis op een juiste positie plaatsen ..................7 Het fornuis waterpas zetten ......................... 7 De anti-kantelkettingen en haken installeren ..................8 De anti-kantelbeugel aan de grond bevestigen .................
-
Page 40: Waarschuwingen
WAARSCHUWINGEN Dit apparaat is alleen bestemd voor huishoudelijk gebruik en mag niet voor andere doeleinden of toepassingen worden gebruikt, zoals niet-huishoudelijk gebruik of in een commerciële omgeving. Als het snoer beschadigd is, moet het worden vervangen door de fabrikant, een erkend servicecentrum of een gelijkwaardig vakbekwaam persoon om elk gevaar te vermijden. - Page 41 Voor gedetailleerde instructies en waarschuwingen om het apparaat op een juiste manier te gebruiken en te onderhouden en het vervangen van de lamp, raadpleeg de secties "Bediening" en "Reiniging en onderhoud". Voor de bevestigingsmethode en het aansluiten van de kabels, raadpleeg de sectie ELEKTRISCHE AANSLUITING “...
-
Page 42: Belangrijke Veiligheidsinstructies
BELANGRIJKE VEILIGHEIDSINSTRUCTIES Lees alle instructies voordat u dit apparaat gebruikt. Bewaar de gebruiksaanwijzing voor toekomstige raadpleging. Gebruik dit apparaat alleen waarvoor het is bedoeld, zoals beschreven in deze gebruiksaanwijzing. De fabrikant aanvaardt geen enkele aansprakelijkheid voor schade die het gevolg is van verkeerd en onverantwoord gebruik. -
Page 43: Overzicht
OVERZICHT 1. Inductiekookvelden 2. Bedieningspaneel 3. Rooster 4. Ovenplaat 5. Ovendeur 6. Handvat van ovendeur 7. Stelvoetjes 8. Opberglade Oventoebehoren 2 rekken: voor schotels en items om te roosteren en te grillen Ovenplaat: voor het bakken van grote hoeveelheden levensmiddelen zoals cakes, gebak, bevroren levensmiddelen, etc. -
Page 44: Installatie
Bedieningspaneel 1. Bedieningsknoppen voor inductiekookvelden 2. Functieschakelaar 3. Timerknop 4. Aan/uit-controlelampje 5. Temperatuurregelaar INSTALLATIE De volgende instructies moeten door een vakbekwame technicus worden gelezen om te verzekeren dat het apparaat volgens de geldende voorschriften wordt geï nstalleerd, geregeld en technisch wordt onderhouden. -
Page 45: Het Fornuis Op Een Juiste Positie Plaatsen
Het fornuis op een juiste positie plaatsen Min. 600mm Het apparaat kan worden geï nstalleerd naast meubilair dat maximaal de hoogte van de bovenkant van de kookplaat heeft. Voor een juiste installatie van het fornuis, houd rekening met de volgende voorzorgsmaatregelen: ... -
Page 46: De Anti-Kantelkettingen En Haken Installeren
De anti-kantelkettingen en haken installeren Om te vermijden dat het fornuis naar voren kantelt wanneer een kind op de ovendeur staat of gebruikers overmatig veel gewicht op de deur plaatsen wanneer deze open is, MOETEN de twee meegeleverde kettingen aan de achterkant van het fornuis altijd aan de haken met schroefdraad, die stevig in de muur zich vastgemaakt, worden bevestigd. -
Page 47: Elektrische Aansluiting
3. Schuif het fornuis naar de gewenste plaats. Zorg dat de linker of rechter voet stevig in de anti-kantelbeugel wordt geschoven. Elektrische aansluiting BELANGRIJK! Elektrische aansluitingen mogen alleen door een vakbekwame en erkende elektricien uitgevoerd worden. WAARSCHUWING: DIT APPARAAT MOET GEAARD ZIJN. Het apparaat wordt zonder stroomkabel geleverd. -
Page 48: Bediening
3. Verwijder het deksel door een schroevendraaier in de zijkant van het deksel te steken. 4. Verwijder de draadcontactschroeven en maak de draden vervolgens onder de schroefkoppen volgens de juiste kleurcode vast. Sluit de bruine draad aan op de aansluitklem gemarkeerd met de letter L. Sluit de blauwe draad aan op de aansluitklem... - Page 49 Bepaalde pannen kunnen lawaai maken wanneer deze op een inductiekookveld worden geplaatst. Dit lawaai duidt geen defect van het apparaat aan en heeft geen invloed op het kookproces. INDELING VAN HET KOOKOPPERVLAK 1. Inductiekookveld 1500 W 2. Inductiekookveld 2000 W 3.
- Page 50 BEDIENINGSKNOPPEN Elke knop bedient een bepaald inductiekookveld. Als u het apparaat niet gebruikt, zorg altijd dat alle bedieningsknoppen zich in de stand UIT bevinden en het scherm het cijfer 0 weergeeft. GEBRUIKSWIJZE 1. Draai de bedieningsknop naar het gewenste vermogenniveau voor het geselecteerde kookveld.
- Page 51 FOUTCODES Deze foutcodes zijn louter indicatief. Alle fouten moeten door een vakbekwame technicus gecontroleerd en gerepareerd worden. Scherm Mogelijke oorzaken Mogelijke oplossing Neem contact op met de winkel waar u het Temperatuursensor is defect – apparaat hebt gekocht. Temperatuursensor van de IGBT is Neem contact op met de winkel waar u het –...
-
Page 52: De Oven Gebruiken
2. Draai aan de timerregelknop om de gewenste kooktijd te selecteren (tot 120 minuten). Als u de oven zonder timer wilt gebruiken, stel de timerregelknop in op de stand 3. Draai de temperatuurregelaar om de gewenste temperatuur te selecteren. ... - Page 53 De ovenruimte reinigen (na elk gebruik) Verwijder het rooster en de ovenplaat. Maak de binnenkant van de oven schoon met een mild reinigingsmiddel. Veeg schoon met een licht bevochtigde doek en droog vervolgens grondig. Het afneembaar toebehoren reinigen Reinig het rooster en de bakplaat in warm zeepwater. Spoel en droog vervolgens grondig voor gebruik.
-
Page 54: Technische Gegevens
TECHNISCHE GEGEVENS Hieronder vindt u de technische fiche van de huishoudelijke kookplaat overeenkomstig EU-verordeningsnr. 66/2014 Identificatie van model P60IMCIX Type kookplaat Elektrische kookplaat Aantal kookvelden en/of -zones Verwarmingstechnologie (inductiekookvelden en Inductiekookvelden en -kookzones -kookzones, stralingselementen, volle platen) Voor cirkelvormige kookvelden of -zones: diameter... - Page 55 Ecodesign-vereisten overeenkomstig het EU-verorderingsnr. 66/2014. Item Gemeten Fase 1 Fase 2 Fase 3 waarde 2 jaar na de 1 jaar na de 5 jaar na de 113.4 inwerkingtreding inwerkingtreding inwerkingtreding <96 ruimte <121 <146 Specificaties van het vrijstaand fornuis: Voedingsspanning en frequentie 220V-240V~ 50/60Hz Vermogen oven 3000W...
-
Page 56: Verwijdering
Als een verantwoordelijke verdeler hechten wij waarde aan het milieu. Daarom raden wij U aan om de correcte verwijderingprocedure te volgen voor uw product, verpakkingsmaterialen, en indien van toepassing, accessoires en batterijen. Dit draagt bij tot de instandhouding van natuurlijke bronnen en zorgt ervoor dat de materialen gerecycleerd worden op een manier die de gezondheid en het milieu beschermt.
Need help?
Do you have a question about the P60IMCIX and is the answer not in the manual?
Questions and answers