
Related Manuals for Proline VH605


Summary of Contents for Proline VH605
- Page 1 MANUEL PROLINE VH605 NOTICE D’UTILISATION Tous nos magasins Tous nos Tutos vidéo Communauté SAV Darty...
-
Page 4: Table Of Contents
TABLE DES MATIÈRES MISES EN GARDE IMPORTANTES..........p. 02 DESCRIPTION................p. 06 INSTALLATION ................p. 07 CONNEXION ÉLECTRIQUE............p. 10 UTILISATION.................p. 12 CONSEILS DE CUISSON..............p. 19 NETTOYAGE ET ENTRETIEN............p. 21 DÉPANNAGE.................p. 23 DONNÉES TECHNIQUES..............p. 24 MISE AU REBUT................p. 26... -
Page 5: Mises En Garde Importantes
MISES EN GARDE IMPORTANTES MERCI DE BIEN VOULOIR LIRE LES CONSIGNES DE SÉCURITÉ ATTENTIVEMENT AVANT D’UTILISER L’APPAREIL ET DE LES CONSERVER POUR RÉFÉRENCE ULTÉRIEURE. AVERTISSEMENTS • Cet appareil est destiné à être utilisé dans des applications domestiques et analogues telles que: –... - Page 6 • MISE EN GARDE: Les parties accessibles peuvent devenir chaudes au cours de l’utilisation. Il est recommandé d’éloigner les jeunes enfants. • Ces surfaces sont susceptibles de devenir chaudes. • Ne pas utiliser un nettoyeur à vapeur pour les opérations de nettoyage.
- Page 7 • L’appareil doit être installé en respectant les règles nationales d’installation électrique NF C 15-100. • En ce qui concerne les informations détaillées sur la méthode de la fixation et les dimensions nécessaires, référez-vous à la section “INSTALLATION”. • En ce qui concerne les informations détaillées sur la méthode d’installation et le raccordement du câble électrique, référez- vous à...
- Page 8 • N’utilisez pas d’ustensile de cuisson comportant des bords irréguliers et ne faites pas traîner les ustensiles de caisson sur la surface en vitrocéramique, car cela peut rayer le verre. • Ne nettoyez pas la plaque de cuisson avec des nettoyants abrasifs.
-
Page 9: Description
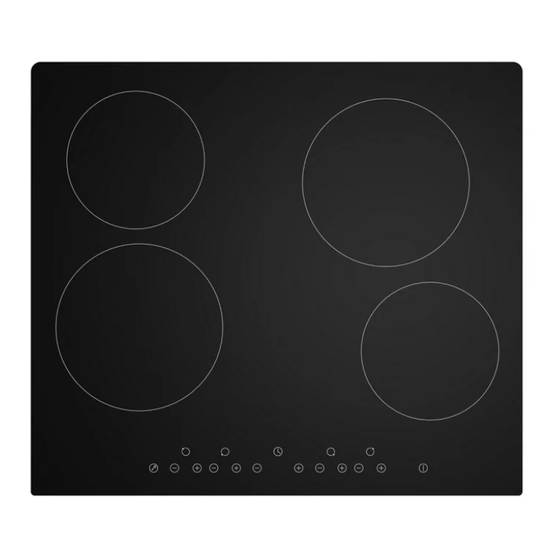
DESCRIPTION Vue supérieure Foyer max. 1200 W Foyer max. 1800 W Plaque en verre Foyer max. 1800 W Foyer max. 1200 W Bouton marche/ arrêt Panneau de contrôle Panneau de contrôle Touches de réglage de la minuterie Touche de verrouillage Touches de réglage Bouton de puissance... -
Page 10: Installation
INSTALLATION Découpez dans le plan de travail un trou dont les dimensions sont indiquées ci-dessous. Le trou doit être à au moins 5 cm de tous les bords. Le plan de travail doit avoir une épaisseur d’au moins 3 cm et être fabriqué... - Page 11 A (mm) B (mm) C (mm) Min. 50 Min. 20 Entre d’air Sortie d’air 5mm AVERTISSEMENT : Assurez une ventilation appropriée. Veillez à ce que la plaque de cuisson soit bien ventilée et à ce que ses entrées et sorties d’air ne soient pas bouchées. Pour éviter que des objets ne touchent accidentellement la base de la plaque de cuisson, il est nécessaire de placer une plaque en bois, fixée par des vis, à...
- Page 12 Support Trou de vis Base La position des supports peut s’ajuster selon l’épaisseur du plan de travail. Table de cuisson Table de cuisson Plan de travail Plan de travail Support Support Attention : • Cette table de cuisson en céramique doit être installée par un professionnel qualifié.
-
Page 13: Connexion Électrique
CONNEXION ÉLECTRIQUE Attention ! • La plaque de cuisson doit être installée par un électricien qualifié en respectant les normes et réglementations locales concernant les câbles électriques. • Avant tout travail sur une partie électrique de l’appareil, celui-ci doit être débranché du secteur. •... - Page 14 de charge et de courant. • L’installateur doit s’assurer que le bon raccordement électrique a été effectué et qu’il est totalement conforme aux consignes de sécurité. Jaune/Vert Noir Marron Bleu AVERTISSEMENTS : • Avant de brancher l’appareil au secteur, assurez-vous que : –...
-
Page 15: Utilisation
UTILISATION Ustensiles de cuisine N’utilisez pas d’ustensiles avec des bords dentelés ou un fond bombé. La base de l’ustensile doit être lisse, reposer à plat sur la plaque de cuisson et être de même taille que celle-ci. Placez toujours l’ustensile bien au centre de la plaque. - Page 16 objet (par exemple un ustensile ou un chiffon) ne les recouvre. Lancer la cuisson Mettez les aliments dans la poêle/casserole et positionnez celle ci au centre du cercle dessiné sur la plaque. REMARQUE : • Les ustensiles de cuisson doivent comporter un couvercle. •...
- Page 17 exacts dépendront de plusieurs facteurs, dont votre ustensile de cuisson et la quantité d’aliments à cuire. Faites des tests avec la plaque de cuisson pour trouver les réglages les plus appropriés. Niveau de puissance Adapté à • Chauffer de petites quantités d’aliments •...
- Page 18 Minuterie La minuterie a deux fonctions différentes : • Indiquer le temps de cuisson restant • Programmer l’heure d’extinction automatique d’une plaque. La minuterie peut être réglée jusqu’à 99 minutes maximum. Affichage des minutes, indique le nombre de minutes Contrôle de restantes la minuterie Vous pouvez l’utiliser comme minuteur...
- Page 19 Réglage du minuteur pour éteindre une zone de cuisson 1. Appuyez sur pour sélectionner la zone de cuisson dont vous souhaitez régler la durée. 2. Appuyez plusieurs fois sur pour régler la durée. 3. Lorsque la durée est réglée, le compte à rebours commence immédiatement. L’écran affichera la durée restante et l’indicateur de la minuterie clignotera pendant environ 5 secondes.
- Page 20 Annuler le minuteur Appuyez simultanément sur , le minuteur est annulé. Verrouillage des commandes • Vous avez la possibilité de verrouiller les boutons afin d’empêcher tout risque de démarrage inopiné (ex : enfant allumant accidentellement l’une des plaques). • Lorsque le verrouillage est activé, tous les boutons sont inopérants à l’exception du bouton marche/arrêt Pour verrouiller les boutons Appuyez sur la touche de verrouillage...
- Page 21 quantité de chaleur résiduelle. “H” clignote à l’écran pour indiquer qu’il ne faut pas toucher les plaques. Extinction automatique Cette fonction s’active chaque fois que vous oubliez d’éteindre une des plaques. Les délais d’extinction par défaut figurent dans le tableau ci-dessous: Les plaques de cuisson s’éteignent automatique- Niveau de puissance ment au bout de...
-
Page 22: Conseils De Cuisson
CONSEILS DE CUISSON • Lorsque les aliments arrivent à ébullition, baissez la température. • La cuisson avec couvercle permet de retenir la chaleur et donc de réduire le temps de cuisson et économiser l’énergie. • Minimisez les quantités de graisse et de liquide afin de réduire les temps de cuisson. - Page 23 Faire sauter 1. Choisissez une grande poêle ou un wok plat compatible avec les tables en céramique. 2. Préparez tous les ingrédients et ustensiles dont vous aurez besoin. Ce mode de cuisson est rapide. Si vous voulez faire cuire de grandes quantités d’aliments de cette manière, procédez par petites fournées.
-
Page 24: Nettoyage Et Entretien
NETTOYAGE ET ENTRETIEN Quoi ? Comment ? Important ! • Lorsque la table est éteinte, le témoin ‘surface chaude’ disparaît mais la plaque peut être encore Éteignez table brûlante ! Soyez très vigilant. Souillure cuisson. • Les produits de nettoyage durs/ quotidienne Appliquez un produit pour abrasifs et les tampons à... - Page 25 Éteignez table cuisson. Épongez. Essuyez le panneau de Résidus sur commande avec Faites attention aux éclaboussures les boutons de éponge (ou un chiffon) brûlantes. commande propre et mouillée. Séchez complètement le panneau avec du Sopalin. Rallumez la table.
-
Page 26: Dépannage
DÉPANNAGE Problème Causes possibles Solution possible Vérifiez que la table est branchée et que la prise est bien sous tension. Il peut y avoir eu une coupure de La table ne s’allume courant chez vous ou dans votre Pas d’alimentation. pas. -
Page 27: Données Techniques
No 66/2014. Informations concernant les plaques de cuisson domestiques électriques Symbole Valeur Unité Identification du modèle VH605 Type de plaque Plaque de cuisson encastrable Nombre de zones et/ou aires de cuisson Technologie de chauffage (zones et aires de cuisson par induction, zones... - Page 28 Marque Proline Référence VH605 Catégorie Plaque avec 4 zones de cuisson 220-240V~ 380V-415V, 3N~ Tension / fréquence V / Hz 50Hz ou 60Hz Puissance nominale totale (W) 5500 – 6600W Dimensions du produit (mm) 590 x 520 x 55 (Longueur x Largeur x Hauteur) Dimensions (intégrée)
-
Page 29: Mise Au Rebut
MISE AU REBUT En tant que distributeur responsable, nous accordons une grande importance à la protection de l’environnement. Nous vous encourageons à respecter les procédures correctes de mise au rebut de votre appareil, des piles et des éléments d’emballage. Cela aidera à préserver les ressources naturelles et à... - Page 30 En raison des mises au point et améliorations constamment apportées à nos produits, de petites incohérences peuvent apparaître dans ces instructions. Veuillez nous excuser pour la gêne occasionnée. Etablissements Darty & fils ©, 9 Rue des Bateaux-Lavoirs, 94200 Ivry-sur-Seine, France 29/01/2024...
- Page 31 INHOUDSOPGAVE BELANGRIJKE VEILIGHEIDSINSTRUCTIES.........p. 29 OVERZICHT...................p. 32 INSTALLATIE ................p. 33 ELEKTRISCHE AANSLUITING............p. 36 WERKING..................p. 38 TIPS VOOR BEREIDINGEN............p. 45 SCHOONMAKEN EN ONDERHOUD..........p. 47 PROBLEEMOPLOSSING............p. 49 TECHNISCH GEGEVENSBLAD............p. 50 VERWIJDERING................p. 52...
-
Page 32: Belangrijke Veiligheidsinstructies
BELANGRIJKE VEILIGHEIDSINSTRUCTIES LEES DE VOLGENDE VEILIGHEIDSINSTRUCTIES AANDACHTIG DOOR VOORDAT U HET APPARAAT IN GEBRUIK NEEMT EN BEWAAR ZE VOOR TOEKOMSTIG GEBRUIK. WAARSCHUWINGEN • Dit apparaat is bestemd voor huishoudelijk gebruik of gelijksoortige toepassingen zoals: – personeelskeukens in winkels, kantoren en andere werkomgevingen;... - Page 33 • Deze oppervlakken kunnen heet worden. • Gebruik geen stoomreiniger. • Na gebruik, schakel de kookveld uit via de bedieningsknop en vertrouw niet enkel op de pandetector. • Dit apparaat is niet bedoeld om te worden gebruikt met een externe timer of een afzonderlijke afstandsbediening. •...
- Page 34 • Voor gedetailleerde instructies en waarschuwingen om het apparaat op een juiste manier te gebruiken en te onderhouden en het vervangen van de lamp, raadpleeg de secties “WERKING” en “SCHOONMAKEN EN ONDERHOUD”. • OPGELET: Houd toezicht op het kookproces. Houd continu toezicht op een kort kookproces.
-
Page 35: Overzicht
OVERZICHT Bovenaanzicht Max. 1200 W zone Max. 1800 W zone Glasplaat Max. 1800 W zone Max. 1200 W zone Toets stroom AAN/ Bedieningspaneel Bedieningspaneel Toetsen voor de timer - instelling Vergrendeltoets Toetsen voor de Toets stroom warmte - instelling AAN/UIT... -
Page 36: Installatie
INSTALLATIE Zaag een gat met afmetingen als in het onderstaande diagram in het aanrecht. Laat minimaal 50 mm ruimte rondom de opening. Het werkblad moet minstens 30 mm dik en uit hittebestendig material vervaardigd zijn. Opmerking: De veiligheidsafstand tussen de zijkant van de kookplaat en de binnenkant van het aanrecht moet minstens 3 mm zijn. - Page 37 A (mm) B (mm) C (mm) Min. 50 Min. 20 Luchtinlaat Luchtuitlaat 5mm WAARSCHUWING: Zorg voor voldoende ventilatie Zorg dat de kookplaat goed wordt geventileerd en dat de luchtinlaat en -uitlaat niet worden belemmerd. Om te vermijden dat er voorwerpen de onderkant van de kookplaat per ongeluk aanraken, is het nodig om een houten inzetstuk, dat met schroeven is vastgemaakt, op een afstand van minstens 50mm van de onderkant van de kookplaat aan...
- Page 38 Schroef Haak Schroefgat Onderkant De stand van de haken kan worden aangepast aan de dikte van het aanrecht. KOOKPLAAT KOOKPLAAT AANRECHT AANRECHT HAAK HAAK Opgelet: • De keramische kookplaat moet door een gekwalificeerde, erkende vakman worden geïnstalleerd. Probeer dit apparaat niet zelf te installeren.
-
Page 39: Elektrische Aansluiting
ELEKTRISCHE AANSLUITING Opgelet! • Laat de installatie van de kookplaat uitvoeren door een vakbekwame elektricien en overeenkomstig alle lokale richtlijnen en voorschriften inzake elektrische bedrading. • Voordat u elektrische werkzaamheden aan het apparaat uitvoert, moet u het ontkoppelen van de netvoeding. •... - Page 40 correct tot stand is gebracht en dat deze volledig voldoet aan de veiligheidswetgeving. Geel / groen Zwart Bruin Blauw WAARSCHUWINGEN: • Zorg er voordat u het apparaat op het stroomnet aansluit voor dat: – Het apparaat is geaard en de stekker in overeenstemming met de wetten is.
-
Page 41: Werking
WERKING Kookgerei Gebruik geen kookgerei met scherpe randen of een ronde bodem. Controleer of de bodem van uw pannen glad is, vlak tegen de kookplaat zit en even groot is als de kookzone. Zet uw pannen altijd op het midden van de kookzone. - Page 42 (bijv. een keukengerei of doek) worden afgedekt. Aan de slag met koken Doe het voedsel in een pan en zet deze neer op het midden van de cirkelvorm op de kookplaat OPMERKINGEN: • Gebruik altijd een deksel tijdens het koken. •...
- Page 43 en de hoeveelheid te koken levensmiddelen. Experimenteer met de kookplaat om de meest gepaste instellingen te vinden. Vermogenniveau Geschikt voor • Opwarmen van kleine hoeveelheden levensmiddelen • Chocolade en boter smelten 1 ~ 2 • Zachtjes sudderen • Langzaam verwarmen •...
- Page 44 Timer De timer kan voor twee verschillende functies worden gebruikt: • als kookwekker • om een kookzone automatisch te laten uitschakelen. U kunt de timer instellen tot 99 minuten. De minutendisplay geeft het aantal minuten aan Instelling van de timer De timer als kookwekker gebruiken 1.
- Page 45 De timer instellen om een kookzone uit te schakelen 1. Tik op om de kookzone te selecteren waarvoor u de tijd wilt instellen. 2. Tik om de tijd in te stellen op 3. Zodra de tijd is ingesteld, begint deze onmiddellijk af te tellen. Het display geeft de resterende tijd weer en de timerindicator knippert gedurende ongeveer 5 seconden.
- Page 46 De timer annuleren Tik tegelijkertijd op . De timer wordt geannuleerd. De toetsen vergrendelen • U kunt de toetsen vergrendelen om onbedoeld gebruik te voorkomen (bijvoorbeeld dat kinderen de kookzones per ongeluk aanzetten). • Alle toetsen behalve de AAN/UITKNOP zijn uitgeschakeld wanneer de toetsen vergrendeld zijn.
- Page 47 zijn. “H” knippert dan op de display om u te waarschuwen dat u de kookplaat niet mag aanraken. Automatisch uitschakelen Deze functie treedt in werking als u een kookzone vergeet uit te schakelen. U vindt de standaard uitschakeltijd in de onderstaande tabel: Vermogensniveau De kookzones schakelen automatisch uit na 1 ~ 3...
-
Page 48: Tips Voor Bereidingen
TIPS VOOR BEREIDINGEN • Verminder de warmte instelling zodra het voedsel begint te koken. • Het gebruik van een deksel zal de bereidingstijd verkorten en energie besparen door te voorkomen dat de warmte kan ontsnappen. • Beperk de hoeveelheid vloeistof of vet om de bereidingstijd te erkorten. •... - Page 49 Roerbakken 1. Neem een wok met platte bodem die ge schikt is voor keramische kookplaten of een grote braadpan. 2. Zet alle ingrediënten en kookgerei vooraf klaar. Roerbakken moet snel gaan. Voor het bereiden van grote hoeveelheden verdeelt u het eten in verschillende kleinere porties.
-
Page 50: Schoonmaken En Onderhoud
SCHOONMAKEN EN ONDERHOUD Wat? Hoe? Belangrijk! • Er is geen waarschuwing “hete kookplaat” wanneer de kookplaat is uitgeschakeld, hoewel de kookzone nog steeds zeer warm kan zijn! Wees uiterst voorzichtig. Schakel de kookplaat uit. • Schuursponsjes voor Breng een reiniger voor Dagelijkse bevuiling zwaar gebruik,... - Page 51 Schakel de kookplaat uit. Week de vlek op. Veeg tiptoetsen schoon met een schone, Gemorste vochtige spons of doek. Wees voorzichtig met gemorst levensmiddelen op Veeg het hele oppervlak voedsel dat heet is. de tiptoetsen volledig droog keukenpapier. Schakel kookplaat weer in.
-
Page 52: Problemen Oplossen
PROBLEMEN OPLOSSEN Probleem Mogelijke oorzaak Mogelijke oplossing Controleer of de kookplaat op de netvoeding is aangesloten en of het stopcontact is ingeschakeld. Controleer of er bij u thuis of in De kookplaat Geen stroom. uw buurt geen stroomstoring is. schakelt niet in. Raadpleeg gekwalificeerd elektricien... -
Page 53: Technisch Gegevensblad
De volgende productinformatie zijn volgens de verordening (EU) Nr. 66/2014. Informatie met betrekking tot huishoudelijke elektrische kookplaten Symbool Waarde Eenheid Identificatie van het model VH605 Type kookplaat Ingebouwde kookplaat Aantal kookzones en/of -gebieden Verwarmingstechnologie (inductie- kookzones en -kookgebieden, keramische en halogeenkookzones... - Page 54 Merk Proline Referentie VH605 Category Keramische kookplaat met 4 kookvelden 220-240V~ 380V-415V, 3N~ Spanning/frequentie V / Hz 50Hz of 60Hz Nominaal – Totaal vermogen (W) 5500 – 6600W Afmetingen product (mm)(L*B*H) 590 x 520 x 55 Inbouwafmetingen L x B (mm)
-
Page 55: Verwijdering
VERWIJDERING Als verantwoordelijke handelaar dragen we zorg voor het milieu. We moedigen u aan om de juiste verwijderingsprocedure voor uw apparaat en verpakkingsmateriaal te volgen. Dit draagt bij tot het behoud van de natuurlijke rijkdommen door deze te recyclen zodat zowel de menselijke gezondheid en het milieu worden beschermd. - Page 56 TABLE OF CONTENTS INSTRUÇÕES DE SEGURANÇA IMPORTANTES......p. 54 VISTA PORMENORIZADA............p. 57 INSTALAÇÃO.................p. 58 LIGAÇÃO ELÉTRICA..............p. 61 FUNCIONAMENTO................p. 63 DICAS PARA COZINHAR...............p. 70 LIMPEZA E MANUTENÇÃO............p. 72 RESOLUÇÃO DE PROBLEMAS.............p. 74 FOLHA DE DADOS TÉCNICOS............p. 75 ELIMINAÇÃO..................p. 77...
-
Page 57: Instruções De Segurança Importantes
INSTRUÇÕES DE SEGURANÇA IMPORTANTES LEIA OS SEGUINTES AVISOS DE SEGURANÇA E AS INSTRUÇÕES CUIDADOSAMENTE ANTES DE UTILIZAR O APARELHO E GUARDE PARA FUTURAS REFERÊNCIAS. AVISOS • Este aparelho foi criado para ser usado em aplicações domésticas e semelhantes, como: – Cozinhas em lojas, escritórios e outros ambientes de trabalho;... - Page 58 • Estas superfícies podem ficar quentes. • Não deve ser utilizado um aparelho de limpeza a vapor. • Após a utilização, desligue o elemento da placa no respetivo controlo e não se baseie no detetor de panelas. • Este aparelho não foi criado para ser utilizado com um temporizador externo ou um sistema de comando à...
- Page 59 segura do aparelho, às precauções a tomar durante a manutenção pelo utilizador e à substituição das lâmpadas, consulte as secções “FUNCIONAMENTO” e “LIMPEZA E CUIDADOS”. • CUIDADO: O processo de cozedura tem de ser supervisionado. Um processo de cozedura a curto prazo tem de ser supervisionado continuamente.
-
Page 60: Vista Pormenorizada
VISTA PORMENORIZADA Vista superior Máx. Zona de 1200 W Máx. Zona de 1800 W Placa de vidro Máx. Zona de 1800 W Máx. Zona de 1200 W Tecla para Ligar/ desligar Painel de controlo Painel de controlo Teclas de definição do temporizador Tecla de bloquear Teclas de regulação Tecla para... -
Page 61: Instalação
INSTALAÇÃO Faça um orifício na bancada com a dimensão indicada no diagrama abaixo. Deve ser deixado um espaço mínimo de 50 mm à volta do orifício. A bancada deve ter, pelo menos, 30 mm de espessura e ser feita de material resistente ao calor. Nota:A distância de segurança entre os lados da placa e as superfícies interiores da bancada deve ser de pelo menos 3 mm. - Page 62 A (mm) B (mm) C (mm) Mín 50 Mín 20 Entrada de ar Saída de ar 5mm AVISO: Assegurar uma ventilação adequada Certifique-se de que a placa está bem ventilada e que a entrada e a saída de ar não estão bloqueadas. Para evitar que os objetos toquem acidentalmente na base da placa, é...
- Page 63 Instalação dos suportes Fixe a placa à bancada utilizando 4 suportes na base da placa. Parafuso Suporte Orifício do parafuso Base A posição dos suportes pode ser ajustada de acordo com a espessura da parte superior. PLACA PLACA BANCADA BANCADA SUPORTE SUPORTE Precauções:...
-
Page 64: Ligação Elétrica
LIGAÇÃO ELÉTRICA Atenção! • A instalação da placa deve ser realizada por um eletricista qualificado, respeitando todas as normas e os regulamentos locais relativos à instalação elétrica. • Antes de qualquer intervenção na parte elétrica do aparelho, este deve ser desligado da rede. •... - Page 65 disjuntor omnipolar com uma abertura mínima de 3mm entre os contactos, em conformidade com as normas de carga e corrente. • O instalador deve certificar-se de que foi feita a ligação elétrica correta e que esta está totalmente em conformidade com os regulamentos de segurança.
-
Page 66: Funcionamento
FUNCIONAMENTO Acessórios de cozinha Não utilize panelas com rebordos dentados ou uma base curva. Certifique-se de que a base da panela é suave, assenta de forma estável na placa quente e que tem o mesmo tamanho da área de confeção. Centre sempre a sua panela relativamente à... - Page 67 Para começar a cozinhar Coloque os alimentos num recipiente para cozinhar e coloque-os no centro do desenho circular na placa. NOTA: • É necessário utilizar uma tampa quando cozinhar. • Nunca coloque utensílios de cozinha vazios sobre o aparelho quando este estiver ligado.
- Page 68 dependerá de vários fatores, incluindo o seu acessório de cozinha e a quantidade de alimentos que está a cozinhar. Experimente a placa para encontrar as definições que melhor se adequam a si. Nível de potência Adequado para • Aquecimento de pequenas quantidades de alimentos •...
- Page 69 Temporizador O temporizador pode ser utilizado para duas funções diferentes: • Definir o contador de minutos • Definir uma zona de cozedura para se desligar automaticamente. Pode definir o temporizador até 99 minutos. O visor dos minutos indica o número de Controlo de minutos regulação do...
- Page 70 Definir o temporizador para desligar uma zona de cozedura 1. Toque em para selecionar a zona de cozedura para a qual pretende definir o tempo. 2. Toque repetidamente em para definir o temporizador. 3. Quando a hora é definida, começa imediatamente a contagem decrescente. O visor apresentará...
- Page 71 Cancelar o temporizador Toque em em simultâneo, e o temporizador é cancelado. Bloquear os controlos • É possível bloquear os controlos para evitar uma utilização não intencional (por exemplo, crianças que ligam acidentalmente as zonas de cozedura). • Quando os controlos são bloqueados, todos os controlos, exceto o controlo LIGAR/DESLIGAR são desativados.
- Page 72 Aparecerá um “H” para o avisar de que deve manter-se afastado. Desligamento automático A função ocorre sempre que se esquece de desligar uma zona de cozedura. Os tempos de encerramento predefinidos são apresentados na tabela seguinte: As zonas de cozedura desligam automaticamente Nível de potência após 1 ~ 3...
-
Page 73: Dicas Para Cozinhar
DICAS PARA COZINHAR • Quando os alimentos começarem a ferver, reduza a definição da temperatura. • A utilização de uma tampa permite reduzir os tempos de confeção e economizar energia através da retenção de calor. • Minimize a quantidade de líquido ou gordura para reduzir os tempos de confeção. - Page 74 Para fritar 1. Escolha uma frigideira de fundo plano compatível com a indução. 2. Prepare todos os ingredientes e o equipamento. A fritura deverá ser rápida. Se cozinhar grandes quantidades, cozinhe os alimentos em vários lotes mais pequenos. 3. Pré-aqueça rapidamente a panela e adicione duas colheres de sopa de óleo. 4.
-
Page 75: Limpeza E Manutenção
LIMPEZA E MANUTENÇÃO O quê? Como? Importante! • Quando placa estiver desligada, não haverá qualquer aviso de “superfície quente”, mas a zona de Desligue a placa. cozedura pode ainda estar Aplique produto quente! Tenha muito cuidado. Sujidade quotidiana de limpeza para placas •... - Page 76 Desligue a placa. Absorva o derrame. Limpe a área de controlo Os controlos tátil com uma esponja ou tácteis não um pano limpo e húmido. Cuidado com os derrames quentes. respondem. Seque completamente a área com uma toalha de papel. Volte a ligar a placa.
-
Page 77: Resolução De Problemas
RESOLUÇÃO DE PROBLEMAS Problema Possíveis Causas Possível solução Certifique-se de que a placa está conectada à alimentação e que está ligada. Verifique se há um Não é possível ligar Não há energia. corte de energia na sua casa ou na a placa. -
Page 78: Folha De Dados Técnicos
Regulamento UE n.º 66/2014. Informações para placas elétricas domésticas Símbolo Valor Unidade Identificação do modelo VH605 Tipo de placa Placa de embutir Número de áreas de cozedura Tecnologia de aquecimento (áreas de cozedura a indução, áreas de cozedura Zonas de cozedura radiantes radiante, placas sólidas) - Page 79 Marca Proline Referência VH605 Categoria Placa de fogão de 4 zonas 220-240V~ 380V-415V, 3N~ Tensão/frequência V / Hz 50Hz or 60Hz Potência nominal - Potência total (W) 5500 – 6600W Dimensão do produto CxLxA (mm) 590 x 520 x 55...
-
Page 80: Eliminação
ELIMINAÇÃO Como retalhista responsável, preocupamo-nos com o ambiente. Como tal, aconselhamos que cumpra os procedimentos adequados para eliminação do aparelho e dos respectivosmateriais de embalamento. Dessa forma, irá ajudar a conservar recursos naturais e assegurar que são reciclados de uma forma que protege a saúde e o ambiente. - Page 81 TABLE OF CONTENTS IMPORTANT SAFETY INSTRUCTIONS........p. 79 OVERVIEW..................p. 82 INSTALLATION................p. 83 ELECTRICAL CONNECTION ............p. 86 OPERATION...................p. 88 COOKING TIPS................p. 95 CLEANING AND MAINTENANCE..........p. 97 TROUBLESHOOTING..............p. 98 TECHNICAL DATA SHEET.............p. 99 DISPOSAL..................p. 101...
-
Page 82: Important Safety Instructions
IMPORTANT SAFETY INSTRUCTIONS PLEASE READ THE FOLLOWING SAFETY WARNINGS AND THE INSTRUCTIONS CAREFULLY BEFORE USING THE APPLIANCE AND KEEP FOR FUTURE REFERENCE. WARNINGS • This appliance is intended to be used in household and similar applications such as: – staff kitchen areas in shops, offices and other working environments;... - Page 83 • These surfaces can get hot. • A steam cleaner is not to be used. • After use, switch off the hob element by its control and do not rely on the pan detector. • The appliance is not intended to be operated by means of an external timer or separate remote-control system.
- Page 84 • CAUTION: The cooking process has to be supervised. A short term cooking process has to be supervised continuously. • The plug must be remained easily accessible after installation of the appliance. Precautions • Do not place combustible material or products on the hob at any time.
-
Page 85: Overview
OVERVIEW Top View Max. 1200 W zone Max. 1800 W zone Glass plate Max. 1800 W zone Max. 1200 W zone Power ON/OFF Control panel Control Panel Timer setting keys Lock key Power regulation keys Power ON/ OFF key... -
Page 86: Installation
INSTALLATION Cut a hole in the worktop of the dimension shown in the diagram below. A minimum of 50 mm space should be left around the hole. The worktop should be at least 30 mm thick and made of heat- resistant material. - Page 87 A (mm) B (mm) C (mm) Min. 50 Min. 20 Air intake Air exit 5mm WARNING: Ensuring Adequate Ventilation Make sure the hob is well ventilated and the air inlet and outlet are not blocked. To prevent items accidently touching the base of the hob, it is necessary to put a wooden insert, fixed by screws, at a minimum distance of 50mm from the bottom of the hob.
- Page 88 Screw Bracket Screw hole Base The position of the brackets can be adjusted according to the thickness of the top. Cautions: • The ceramic cooker hob must be installed by a qualified authorised person. Never try to install the appliance by yourself. •...
-
Page 89: Electrical Connection
ELECTRICAL CONNECTION Attention! • The hob must be installed by a qualified electrician in line with all local standards and regulations for electrical wiring. • Before any work on the electrical section of the appliance, it must be disconnected from the mains. •... - Page 90 connection has been made and that it is fully compliant with safety regulations. WARNINGS: • Before connecting the appliance to the power supply, make sure that: – The appliance is earthed and the plug is compliant with the law. – The socket can withstand the voltage and maximum power of the appliance, which are indicated on the data plate located on the bottom of the appliance.
-
Page 91: Operation
OPERATION Cookware Do not use cookware with jagged edges or a curved base. Make sure that the base of your pan is smooth, sits flat against the hot plate, and is the same size as the cooking zone. Always centre your pan on the cooking zone. - Page 92 To start cooking Put the food into a cookware and position it on the centre of the circular design on the plate. NOTE: • A lid must be used when cooking. • Never place empty cookware on the appliance, when the appliance is switched on.
- Page 93 Power level Suitable for • Warming small quantities of food • Melting chocolate and butter 1 ~ 2 • Gentle simmering • Slow warming • Reheating 3 ~ 4 • Rapid simmering • Cooking rice 5 ~ 6 Pancakes • Sautéing 7 ~ 8 •...
- Page 94 Timer The timer can be used for two different functions: • To set the minute minder • To set a cooking zone to switch off automatically. You can set the timer up to 99 minutes. Minute display shows the number Timer of minutes regulating...
- Page 95 Setting the timer to turn one cooking zone off 1. Touch to select the cooking zone you want to set the time for. 2. Repeatedly touch to set the time. 3. When the time is set, it will begin to count down immediately. The display will show the remaining time and the timer indicator will flash for about 5 seconds.
- Page 96 Cancelling the timer Touch together, and the timer is cancelled Locking the controls • You can lock the controls to prevent unintended use (for example children accidentally turning cooking zones on). • When the controls are locked, all controls except the ON/OFF control disabled.
- Page 97 Auto Shut Down The feature occurs whenever you forget to switch off a cooking zone. The default shutdown times are shown in the table below: Power Level The cooking zones shut down automatically after 1 ~ 3 8 hours 4 ~ 6 4 hours 7 ~ 9 2 hours...
-
Page 98: Cooking Tips
COOKING TIPS • When food comes to the boil, reduce the temperature setting. • Using a lid will reduce cooking times and save energy by retaining the heat. • Minimize the amount of liquid or fat to reduce cooking times. •... - Page 99 4. Cook any meat first and then put it aside and keep warm. 5. Stir-fry the vegetables. When they are hot but still crisp, turn the cooking zone to a lower power level, return the meat to the pan and add your sauce. 6.
-
Page 100: Cleaning And Maintenance
CLEANING AND MAINTENANCE What? How? Important! • When the hob is switched off, there will be no ‘hot surface’ warning but the cooking zone may still be Switch the hob off. hot! Take extreme care. Everyday soiling on Apply a hob cleaner while •... -
Page 101: Troubleshooting
TROUBLESHOOTING Problem Possible Cause Possible Solution Make sure the hob is connected to the power supply and that it is switched on at the mains socket. The hob cannot be Check whether there is a power No power. turned on. outage in your home or area. -
Page 102: Technical Data Sheet
Below is the sheet of household induction hob according to EU regulation No. 66 / 2014. Information for domestic electric hobs Symbol Value Unit Model identification VH605 Type of hob Built-in hob Number of cooking zones and/or areas Heating technology (induction cooking zones and cooking areas, Radiant cooking zones... - Page 103 Brand Proline Reference VH605 Category 4-zone cooker hob 220-240V~ 380V-415V, 3N~ Voltage/frequency V / Hz 50Hz or 60Hz Rated – Total power (W) 5500 – 6600W Product Size L×W×H (mm) 590 x 520 x 55 Built-in Size L x W (mm)
-
Page 104: Disposal
DISPOSAL As a responsible retailer we care about the environment. As such we urge you to follow the correct disposal procedure for the appliance and packaging materials. This will help conserve natural resources and ensure that it is recycled in a manner that protects health and the environment. You must dispose of this appliance and its packaging according to local laws and regulations. - Page 108 Etablissements Darty & fils ©, 9 Rue des Bateaux-Lavoirs, 94200 Ivry-sur-Seine, France...
Need help?
Do you have a question about the VH605 and is the answer not in the manual?
Questions and answers