Table of Contents
Advertisement
USER MANUAL
EMD200DP-T, EMD200DV-T, EMD2000PE-DP-T, EMD2000PE-R, EMD2000PE-R-P, EMD2000PE-T,
EMD2000SE-DP-T. EMD2000SE-R, EMD2000SE-T, EMD2002PE-DP-T, EMD2002PE-R, EMD2002PE-R-P,
EMD2002PE-T, EMD2002SE-DP-T, EMD2002SE-R, EMD2002SE-T
EMERALD
KVM OVER IP
TECHNOLOGY
24/7 TECHNICAL SUPPORT AT 1.877.877.2269 OR VISIT BLACKBOX.COM
EMERALD
EMERALD
Advertisement
Table of Contents

Related Manuals for Black Box EMERALD EMD200DP-T


Summary of Contents for Black Box EMERALD EMD200DP-T
- Page 1 USER MANUAL EMD200DP-T, EMD200DV-T, EMD2000PE-DP-T, EMD2000PE-R, EMD2000PE-R-P, EMD2000PE-T, EMD2000SE-DP-T. EMD2000SE-R, EMD2000SE-T, EMD2002PE-DP-T, EMD2002PE-R, EMD2002PE-R-P, EMD2002PE-T, EMD2002SE-DP-T, EMD2002SE-R, EMD2002SE-T EMERALD KVM OVER IP TECHNOLOGY 24/7 TECHNICAL SUPPORT AT 1.877.877.2269 OR VISIT BLACKBOX.COM EMERALD EMERALD...
-
Page 2: Table Of Contents
NEED HELP? LEAVE THE TECH TO US LIVE 24/7 TABLE OF CONTENTS TECHNICAL SUPPORT 1.877.877.2269 1. SPECIFICATIONS ................................... 5 1.1 General Specifications .....................................5 1.2 What’s Included in the Kits ..................................8 1.3 Licensing .........................................10 2. OVERVIEW ....................................11 2.1 Emerald System Features ..................................11 2.2 Overview of Emerald Devices................................ - Page 3 NEED HELP? LEAVE THE TECH TO US LIVE 24/7 TABLE OF CONTENTS TECHNICAL SUPPORT 1.877.877.2269 5.8.2 Emerald PE or POE Transmitter ................................28 5.8.3 Emerald PE Single-Head DisplayPort™ Transmitter ..........................30 5.8.4 Emerald PE Dual-Head DisplayPort ™Transmitter ..........................31 5.8.5 Emerald SE Single-Head DisplayPort™ Transmitter ..........................32 5.8.6 Emerald SE Dual-Head DisplayPort™...
- Page 4 NEED HELP? LEAVE THE TECH TO US LIVE 24/7 TABLE OF CONTENTS TECHNICAL SUPPORT 1.877.877.2269 APPENDIX D. TROUBLESHOOTING ............................... 65 APPENDIX E. REGULATORY INFORMATION ..........................67 E.1 FCC Statement .......................................67 E.2 NOM Statement......................................68 APPENDIX F. DISCLAIMER/TRADEMARKS ..........................69 F.1 Disclaimer ........................................69 F.2 Trademarks Used in this Manual ................................69 WARNING (PoE): The EMD-PE units conform to IEEE 802.3af but do not meet the isolation barrier requirements specified in subsection 33.4.1 –...
-
Page 5: Specifications
NEED HELP? LEAVE THE TECH TO US LIVE 24/7 CHAPTER 1: SPECIFICATIONS TECHNICAL SUPPORT 1.877.877.2269 1.1 GENERAL SPECIFICATIONS TABLE 1-1. SPECIFICATIONS SPECIFICATION DESCRIPTION Approvals Unit FCC, CE, CSA, RoHS, WEEE Power Supply TUV, UL Physical EMD2000SE-R, EMD2000SE-T, EMD2002SE-R, and EMD2002SE-T: (1) Power LED button (deactivated, not used); EMD200DV-T, EMD2000PE-DP-T, EMD2000PE-R, EMD2000PE-R-P, EMD2000PE-T, EMD2000SE-DP-T, EMD2002PE-DP-T, EMD2002PE-R, EMD2002PE-R-P, EMD2002PE-T, EMD2002SE-DP-T (1) Power LED (green);... - Page 6 NEED HELP? LEAVE THE TECH TO US LIVE 24/7 CHAPTER 1: SPECIFICATIONS TECHNICAL SUPPORT 1.877.877.2269 TABLE 1-1 (CONTINUED). SPECIFICATIONS SPECIFICATION DESCRIPTION Physical (continued) EMD200DP-T: (1) DisplayPort input, (2) USB Type A female, (1) RJ-45 network, (1) 2.5 mm barrel for power; NOTE: The ZeroU Transmitter can be powered via (2) USB Type A connectors or via an optional DC power adapter.
- Page 7 NEED HELP? LEAVE THE TECH TO US LIVE 24/7 CHAPTER 1: SPECIFICATIONS TECHNICAL SUPPORT 1.877.877.2269 TABLE 1-1 (CONTINUED). SPECIFICATIONS SPECIFICATION DESCRIPTION Operation EMD200DV-T, EMD2000PE-DP-T, EMD2000PE-T, EMD2000SE-DP-T, EMD2000SE-T, EMD2002PE-DP-T, Default IP Address EMD2002PE-T, EMD2002SE-DP-T, EMD2002SE-T: 192.168.1.22; EMD2000PE-R, EMD2000PE-R-P, EMD2000SE-R, EMD2002PE-R, EMD2002PE-R-P, EMD2002SE-R: 192.168.1.21 Encryption Secure Sockets Layer (SSL) over TCP/IP, 128-bit between TX and RX, user set between RX and Hyper-V Default Username...
-
Page 8: What's Included In The Kits
NEED HELP? LEAVE THE TECH TO US LIVE 24/7 CHAPTER 1: SPECIFICATIONS TECHNICAL SUPPORT 1.877.877.2269 1.2 WHAT’S INCLUDED IN THE KITS NOTE: Does not include local CPU cables, order separately. EMD2002SE-T includes: EMD2000SE-T includes: Š (1) Emerald SE Transmitter, Dual-Head ... - Page 9 NEED HELP? LEAVE THE TECH TO US LIVE 24/7 CHAPTER 1: SPECIFICATIONS TECHNICAL SUPPORT 1.877.877.2269 EMD2002PE-K includes: EMD2000PE-K includes: Š (1) Emerald PE Transmitter, Dual-Head Š (1) Emerald PE Transmitter, Single-Head Š (1) Emerald PE PoE Receiver, Dual-Head ...
-
Page 10: Licensing
NEED HELP? LEAVE THE TECH TO US LIVE 24/7 CHAPTER 1: SPECIFICATIONS TECHNICAL SUPPORT 1.877.877.2269 1.3 LICENSING There are 2 options for managing Emerald Transmitters and Receivers: Š Option 1 (for small unmanaged matrices): Using built-in receiver manager Š Option 2 (for large managed matrices): Using Boxilla BXAMGR or BXAMGR-R2 ... -
Page 11: Overview
NOTE: Not all USB 2.0 devices are supported depending on how they negotiate/communicate with the host. If you find your USB 2.0 device isn’t working properly, please report these devices to Black Box. NOTE: References to the Emerald system in this document refer to both Receivers (EMD2000PE-R, EMD2000SE-R, EMD2002PE-R, EMD2000PE-R-P, EMD2002PE-R-P, EMD2002SE-R ) and Transmitters (EMD200DV-T, EMD2000PE-DP-T, EMD2000PE-T, EMD2000SE-DP-T, EMD2000SE-T, EMD2002PE-DP-T, EMD2002PE-T, EMD2002SE-DP-T, EMD2002SE-T). - Page 12 NEED HELP? LEAVE THE TECH TO US LIVE 24/7 CHAPTER 2: OVERVIEW TECHNICAL SUPPORT 1.877.877.2269 and virtual resources from the same Receiver unit. IT professionals use this capability to optimize their deployments and migrations to cloud services. Š High Reliability and Highly Secure: The Emerald system minimizes maintenance for administrators. The intuitive On-Screen- ...
-
Page 13: Overview Of Emerald Devices
NEED HELP? LEAVE THE TECH TO US LIVE 24/7 CHAPTER 2: OVERVIEW TECHNICAL SUPPORT 1.877.877.2269 2.2 OVERVIEW OF EMERALD DEVICES The Emerald family is composed of six Receivers, six Transmitters, and a Boxilla Manager. TABLE 2-1. EMERALD MODELS DVI CPU DISPLAYPORT USB CPU NUMBER OF... -
Page 14: Video
NEED HELP? LEAVE THE TECH TO US LIVE 24/7 CHAPTER 2: OVERVIEW TECHNICAL SUPPORT 1.877.877.2269 Some of the key capabilities and operation of Emerald devices are described next. These capabilities are supported across all Emerald devices. 2.2.1 VIDEO The Emerald system supports 24-bit color depth digital video up to a maximum resolution of 1920 x 1200 at 60 Hz for any ®... -
Page 15: Ip Addressing
NEED HELP? LEAVE THE TECH TO US LIVE 24/7 CHAPTER 2: OVERVIEW TECHNICAL SUPPORT 1.877.877.2269 2.2.4 IP ADDRESSING The Emerald devices are IP-addressable, giving you the flexibility to locate workstations anywhere within your enterprise and at any distance from your desktop users. The Emerald devices use standard network protocols to transfer data between the remote Workstation/Virtual Desktop and the peripheral devices located at the user’s desk. -
Page 16: Video, Audio, And Usb Switching
NEED HELP? LEAVE THE TECH TO US LIVE 24/7 CHAPTER 2: OVERVIEW TECHNICAL SUPPORT 1.877.877.2269 WORKSTATION TRANSMITTER RECEIVER HOST COMPUTER FIGURE 2-2. BASIC EXTENDER APPLICATION 2.3.2 VIDEO, AUDIO, AND USB SWITCHING Numerous applications require being able to switch between different target PCs or Virtual Desktops. The user wants to be able to change the source of Video, Audio, or USB extension (or all three together). -
Page 17: Configuration
All data communication uses 128-bit encryption. The Transmitter uses Black Box’s compound compression algorithm for video called Dynamic Content Optimized Compression (DCOC). This algorithm optimizes compression and latency on a frame-by-frame basis, depending on content in the video stream and on available network bandwidth. -
Page 18: Configuration Of Boxilla Manager
Boxilla is supplied pre-loaded and is straightforward to deploy, requiring only a network connection and a power input to begin operation. The current version of Boxilla provides management of Black Box’s Emerald system. For more information on Boxilla, refer to the Boxilla user manual. -
Page 19: Modes Of Operation
NEED HELP? LEAVE THE TECH TO US LIVE 24/7 CHAPTER 4: MODES OF OPERATION TECHNICAL SUPPORT 1.877.877.2269 The Emerald system has various modes of operation such as Auto-Login, Auto-Connect, Private Connection, Shared Connection, and Video Source Optimization modes. 4.1 AUTO LOGIN In Auto-Login Mode, turning on the Emerald Receiver automatically causes a login as a pre-defined user. -
Page 20: Installation
NEED HELP? LEAVE THE TECH TO US LIVE 24/7 CHAPTER 5: INSTALLATION TECHNICAL SUPPORT 1.877.877.2269 5.1 EMERALD RECEIVER (EMD2000SE-R, EMD2002SE-R, EMD2000PE-R, EMD2002PE-R) CHECKLIST Before installing your Emerald SE Receiver, refer to the list below to ensure that you have all the items necessary for installation: Š... -
Page 21: Installation Options
NEED HELP? LEAVE THE TECH TO US LIVE 24/7 CHAPTER 5: INSTALLATION TECHNICAL SUPPORT 1.877.877.2269 5.6 INSTALLATION OPTIONS WARNING: To reduce the risk of electric shock or damage to your equipment, disconnect the power from the Emerald device by unplugging the power supply from the electrical outlet. To reduce the risk of electric shock or damage to your equipment, turn on the remote workstation and the Emerald Transmitter in the order described in the following procedures. - Page 22 NOTE: VGA or analog video monitors can be connected to the Emerald Receiver by using a DVI-D to VGA converter (such as Black Box part number AC1038A or KVGA-DVID). CAUTION: When using PoE to power the Emerald PE Receiver, the appliance will supply up to 1 Watt of power to attached USB devices.
-
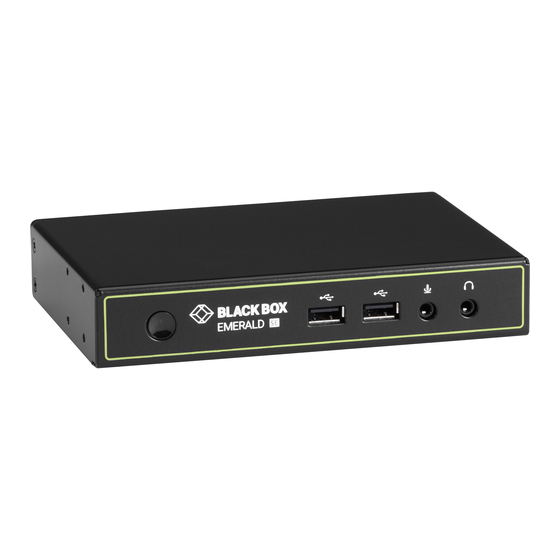
Page 23: Emerald Se Receiver
NEED HELP? LEAVE THE TECH TO US LIVE 24/7 CHAPTER 5: INSTALLATION TECHNICAL SUPPORT 1.877.877.2269 5.7.1 EMERALD SE RECEIVER FIGURE 5-1. FRONT VIEW OF EMERALD SE RECEIVER, SINGLE-HEAD (EMD2000SE-R) 7 8 9 FIGURE 5-2. REAR VIEW OF EMERALD SE RECEIVER, SINGLE-HEAD (EMD2000SE-R) FIGURE 5-3. -
Page 24: Emerald Pe Or Pe Poe Receiver
NEED HELP? LEAVE THE TECH TO US LIVE 24/7 CHAPTER 5: INSTALLATION TECHNICAL SUPPORT 1.877.877.2269 TABLE 5-1. EMERALD SE RECEIVER COMPONENTS NUMBER IN FIGURES 5-1 COMPONENT DESCRIPTION THROUGH 5-4 Disabled; Power button NOTE: The unit automatically powers on; it must be turned off at the power source. 2, 6 (4) USB Type A connectors Link to USB devices... - Page 25 NEED HELP? LEAVE THE TECH TO US LIVE 24/7 CHAPTER 5: INSTALLATION TECHNICAL SUPPORT 1.877.877.2269 FIGURE 5-7. FRONT VIEW OF EMERALD PE RECEIVER, DUAL-HEAD (EMD2002PE-R, EMD2002PE-R-P) 11 12 13 14 FIGURE 5-8. REAR VIEW OF EMERALD PE RECEIVER, DUAL-HEAD (EMD2002PE-R, EMD2002PE-R-P) TABLE 5-2.
-
Page 26: Connect The Emerald Transmitter
8. Plug the power cord into an appropriate wall outlet. The transmitter powers on automatically. 9. Turn on power for the remote workstation. NOTE: Use only the power supply provided by Black Box. 5.8.1 EMERALD SE TRANSMITTER FIGURE 5-9. FRONT VIEW OF THE EMERALD SE TRANSMITTER, SINGLE-HEAD (EMD2000SE-T) - Page 27 NEED HELP? LEAVE THE TECH TO US LIVE 24/7 CHAPTER 5: INSTALLATION TECHNICAL SUPPORT 1.877.877.2269 FIGURE 5-11. FRONT VIEW OF THE EMERALD SE TRANSMITTER, DUAL-HEAD (EMD2002SE-T) 5 6 7 FIGURE 5-12. REAR VIEW OF THE EMERALD SE TRANSMITTER, DUAL-HEAD (EMD2002SE-T) TABLE 5-3.
-
Page 28: Emerald Pe Or Poe Transmitter
NEED HELP? LEAVE THE TECH TO US LIVE 24/7 CHAPTER 5: INSTALLATION TECHNICAL SUPPORT 1.877.877.2269 5.8.2 EMERALD PE OR POE TRANSMITTER FIGURE 5-13. FRONT VIEW OF THE EMERALD PE TRANSMITTER, SINGLE-HEAD (EMD2000PE-T) 9 10 11 12 13 14 FIGURE 5-14. REAR VIEW OF THE EMERALD PE TRANSMITTER, SINGLE-HEAD (EMD2000PE-T) FIGURE 5-15. - Page 29 NEED HELP? LEAVE THE TECH TO US LIVE 24/7 CHAPTER 5: INSTALLATION TECHNICAL SUPPORT 1.877.877.2269 TABLE 5-4. EMERALD PE OR PE POE TRANSMITTER COMPONENTS NUMBER IN FIGURES 5-13 COMPONENT DESCRIPTION THROUGH 5-16 Power LED Lights when power is ON Micro USB connector Links to console 12 VDC Power In connector Connects to supplied power adapter...
-
Page 30: Emerald Pe Single-Head Displayport™ Transmitter
NEED HELP? LEAVE THE TECH TO US LIVE 24/7 CHAPTER 5: INSTALLATION TECHNICAL SUPPORT 1.877.877.2269 5.8.3. EMERALD PE SINGLE-HEAD DisplayPort™ TRANSMITTER FIGURE 5-17. FRONT VIEW OF THE EMERALD PE TRANSMITTER, SINGLE-HEAD (EMD2000PE-DP-T) TABLE 5-5. EMERALD PE DISPLAYPORT TRANSMITTER COMPONENTS NUMBER IN FIGURES 5-17 COMPONENT DESCRIPTION Factory Reset Switch... -
Page 31: Emerald Pe Dual-Head Displayport ™Transmitter
NEED HELP? LEAVE THE TECH TO US LIVE 24/7 CHAPTER 5: INSTALLATION TECHNICAL SUPPORT 1.877.877.2269 5.8.4. EMERALD PE DUAL-HEAD DisplayPort™ TRANSMITTER FIGURE 5-18. FRONT VIEW OF THE EMERALD PE TRANSMITTER, DUAL-HEAD (EMD2002PE-DP-T) TABLE 5-6. EMERALD PE DUAL HEAD DisplayPort TRANSMITTER COMPONENTS NUMBER IN FIGURE 5-18 COMPONENT DESCRIPTION... -
Page 32: Emerald Se Single-Head Displayport™ Transmitter
NEED HELP? LEAVE THE TECH TO US LIVE 24/7 CHAPTER 5: INSTALLATION TECHNICAL SUPPORT 1.877.877.2269 5.8.5 EMERALD SE SINGLE-HEAD DisplayPort™ TRANSMITTER EMERALD FIGURE 5-19. FRONT VIEW OF THE EMERALD SE TRANSMITTER, SINGLE-HEAD (EMD2000SE-DP-T) TABLE 5-7. EMERALD SE TRANSMITTER COMPONENTS NUMBER IN FIGURES 5-19 COMPONENT DESCRIPTION Factory Reset Switch... -
Page 33: Emerald Se Dual-Head Displayport™ Transmitter
NEED HELP? LEAVE THE TECH TO US LIVE 24/7 CHAPTER 5: INSTALLATION TECHNICAL SUPPORT 1.877.877.2269 5.8.6 EMERALD SE DUAL-HEAD DisplayPort™ TRANSMITTER EMERALD Console FIGURE 5-20. FRONT VIEW OF THE EMERALD SE TRANSMITTER, DUAL-HEAD (EMD2002SE-DP-T) TABLE 5-8. EMERALD SE DUAL-HEAD DisplayPort TRANSMITTER COMPONENTS NUMBER IN FIGURE 5-20 COMPONENT DESCRIPTION... -
Page 34: Connect The Emerald Zerou Dvi Or Displayport™ Transmitter
8. Optionally, plug the power cord into an appropriate wall outlet. The transmitter powers on automatically. 9. Turn on power for the remote workstation. NOTE: Use only the power supply provided by Black Box. FIGURE 5-21 FRONT VIEW OF THE EMERALD ZEROU DVI TRANSMITTER, SINGLE-HEAD (EMD200DV-T) 1.877.877.2269... - Page 35 NEED HELP? LEAVE THE TECH TO US LIVE 24/7 CHAPTER 5: INSTALLATION TECHNICAL SUPPORT 1.877.877.2269 FIGURE 5-22. FRONT VIEW OF THE EMERALD ZEROU DP TRANSMITTER, SINGLE-HEAD (EMD200DP-T) DisplayPort™ TABLE 5-9. EMERALD ZEROU DVI OR TRANSMITTER COMPONENTS NUMBER IN FIGURES COMPONENT DESCRIPTION 5-21 THROUGH 5-22 Power LED...
-
Page 36: Networked Installation
NEED HELP? LEAVE THE TECH TO US LIVE 24/7 CHAPTER 6: NETWORKED INSTALLATION TECHNICAL SUPPORT 1.877.877.2269 6.1 POINT-TO-POINT INSTALLATION In a point-to-point configuration, no administrator setup of the Emerald Transmitter or the Emerald Receiver is required. This enables you to install the system quickly, directly out-of-the-box. However, in the point-to-point configuration, you can install only one Emerald Transmitter and Emerald Receiver pair on a subnet, and both must be on the same subnet unless a router is present in the network to span subnets. -
Page 37: Operation Of Emerald System
NEED HELP? LEAVE THE TECH TO US LIVE 24/7 CHAPTER 7: OPERATION OF EMERALD SYSTEM TECHNICAL SUPPORT 1.877.877.2269 Operating a workstation through the Emerald system is no different than working directly connected to a PC desktop. All peripherals operate as if directly connected, even though the workstation is located at a distance. 7.1 LED IDENTIFICATION Front panel There is a Power button on the front panel of an Emerald SE unit. -
Page 38: Osd Functions
NEED HELP? LEAVE THE TECH TO US LIVE 24/7 CHAPTER 8: OSD FUNCTIONS TECHNICAL SUPPORT 1.877.877.2269 The Emerald Receiver and Boxilla Manager incorporate an On-Screen Display (OSD) that allows you to view information about the configuration of your system and potentially also allows for setting connections and configuration parameters such as the IP address, depending on the type of user. -
Page 39: Default Username And Password
NEED HELP? LEAVE THE TECH TO US LIVE 24/7 CHAPTER 8: OSD FUNCTIONS TECHNICAL SUPPORT 1.877.877.2269 FIGURE 8-2. LOG-ON SCREEN - REBOOT BUTTON Š System Preferences: This button has a drop down menu that allows the user to define system preferences for the Emerald ... -
Page 40: User Views And Capabilities
NEED HELP? LEAVE THE TECH TO US LIVE 24/7 CHAPTER 8: OSD FUNCTIONS TECHNICAL SUPPORT 1.877.877.2269 8.4 USER VIEWS AND CAPABILITIES There are three different types of users in the Emerald System. Your user type will determine what exactly you will see on your OSD. For the purpose of this Manual, we show the screen of an Administrator. -
Page 41: Creating A New Connection
NEED HELP? LEAVE THE TECH TO US LIVE 24/7 CHAPTER 8: OSD FUNCTIONS TECHNICAL SUPPORT 1.877.877.2269 8.5.1 CREATING A NEW CONNECTION To allow an Emerald Receiver or Manager to connect to a target Emerald Transmitter, an administrator must create a connection. The administrator clicks on the New button on the Connections screen. -
Page 42: Connection Favorites
NEED HELP? LEAVE THE TECH TO US LIVE 24/7 CHAPTER 8: OSD FUNCTIONS TECHNICAL SUPPORT 1.877.877.2269 Š Connection Mode: To allow users to connect from a 4K Receiver to connect to Emerald SE, PE, and ZeroU transmitters: The connection on the 2K transmitter must be set to Optimized. Go to Connections and create a new connection (or Edit an existing connection). -
Page 43: Connecting
NEED HELP? LEAVE THE TECH TO US LIVE 24/7 CHAPTER 8: OSD FUNCTIONS TECHNICAL SUPPORT 1.877.877.2269 Listing Connection Favorites: When a user logs in, they can view their assigned favorites. FIGURE 8-7. LISTING CONNECTION FAVORITES 8.5.3 CONNECTING To make a connection, the user highlights the required “connection” in the window and then clicks on the “ Connect” button. Alternatively, a user can double-click on the connection. -
Page 44: Bonding
NEED HELP? LEAVE THE TECH TO US LIVE 24/7 CHAPTER 8: OSD FUNCTIONS TECHNICAL SUPPORT 1.877.877.2269 8.5.6 BONDING NOTE: Bonding requires the Boxilla manager. This assumes that setup is complete on Boxilla and a user has permission to connect to a Bonded connection. See the setup instructions in the Boxilla user manual. -
Page 45: Preferences
NEED HELP? LEAVE THE TECH TO US LIVE 24/7 CHAPTER 8: OSD FUNCTIONS TECHNICAL SUPPORT 1.877.877.2269 There are five functions that can be accessed on this tab: 1. Preferences – allows users to change preference settings for: i. Resolution Settings – allows change of preferred resolution for OSD screens and Virtual connections. ii. - Page 46 NEED HELP? LEAVE THE TECH TO US LIVE 24/7 CHAPTER 8: OSD FUNCTIONS TECHNICAL SUPPORT 1.877.877.2269 Hot-Key The Hot-Key button allows the administrator to change the hot-key configuration. The hot-key is used with the “o” key to terminate the current connection and bring up the OSD. The hot-key with “p” key is used to switch to the previous connection without loading the OSD.
- Page 47 NEED HELP? LEAVE THE TECH TO US LIVE 24/7 CHAPTER 8: OSD FUNCTIONS TECHNICAL SUPPORT 1.877.877.2269 Timer Settings There are 2 timer settings available to users as shown in Figure 8-11. By default, they are turned off. If you wish to turn them on, you have to select the desired timer, set the time you wish, and click apply.
- Page 48 NEED HELP? LEAVE THE TECH TO US LIVE 24/7 CHAPTER 8: OSD FUNCTIONS TECHNICAL SUPPORT 1.877.877.2269 The Connection Label is enabled through the Control Tab. The Control Tab’s Preferences options are shown in Figure 8-12. FIGURE 8-12. CONNECTION LABEL SETTINGS OPTION IN PREFERENCES SECTION The user can toggle the label on or off by using their hotkey and pressing “L”.
- Page 49 NEED HELP? LEAVE THE TECH TO US LIVE 24/7 CHAPTER 8: OSD FUNCTIONS TECHNICAL SUPPORT 1.877.877.2269 The user can select to always display the connect label or to display it for 5 seconds. In Figure 8-14, a 5 second time out is selected. FIGURE 8-14.
-
Page 50: Network
NEED HELP? LEAVE THE TECH TO US LIVE 24/7 CHAPTER 8: OSD FUNCTIONS TECHNICAL SUPPORT 1.877.877.2269 Figure 8-16 shows the connection label located in the bottom center of the screen, based upon the location selected in Figure 8-15. FIGURE 8-16. CONNECTION LABEL SHOWN IN BOTTOM CENTER OF SCREEN 8.6.2 NETWORK The network screen shown in Figure 8-17 allows an administrator to change the settings for the Emerald Receiver or Manager. -
Page 51: System
NEED HELP? LEAVE THE TECH TO US LIVE 24/7 CHAPTER 8: OSD FUNCTIONS TECHNICAL SUPPORT 1.877.877.2269 8.6.3 SYSTEM The System screen shown in Figure 8-18 allows an administrator to upgrade the firmware in the Emerald Receiver, reset it to factory defaults, import/export the configuration to an external USB drive, and perform a system diagnostic. - Page 52 The diagnostics provides information for Black Box to debug customer encountered issues. When this button is clicked the user is asked to save the diagnostics onto a memory stick in the Receiver unit. This file should be sent back to Black Box for analysis.
- Page 53 NEED HELP? LEAVE THE TECH TO US LIVE 24/7 CHAPTER 8: OSD FUNCTIONS TECHNICAL SUPPORT 1.877.877.2269 Configuring a Transmitter To configure a Transmitter, the IP address must be defined for the target Transmitter. When there is no active IP address defined, the TX Setting window has all the buttons grayed out except for the Apply and Discover buttons.
- Page 54 NEED HELP? LEAVE THE TECH TO US LIVE 24/7 CHAPTER 8: OSD FUNCTIONS TECHNICAL SUPPORT 1.877.877.2269 If the IP address of the Receiver and Transmitter are not on the same subnet, a router is required to allow them to communicate. This is true even when the Receiver “discovers”...
- Page 55 NEED HELP? LEAVE THE TECH TO US LIVE 24/7 CHAPTER 8: OSD FUNCTIONS TECHNICAL SUPPORT 1.877.877.2269 FIGURE 8-22. TRANSMITTER PREFERENCES Transmitter Video Quality Settings The transmitter uses a progressive compression algorithm with 5 stages to reduce the bandwidth and increase the frame rate while sacrificing quality.
- Page 56 NEED HELP? LEAVE THE TECH TO US LIVE 24/7 CHAPTER 8: OSD FUNCTIONS TECHNICAL SUPPORT 1.877.877.2269 performance. “High performance” is best used when there is an analog to digital video converter between the GPU and Transmitter. It uses a low level technique. “VGA optimized” is best used when there is an analog to digital video converter between the GPU and Transmitter.
-
Page 57: Managing Users
The Transmitter provides diagnostics information for Black Box to debug customer encountered issues. When this button is clicked the user is asked to save the diagnostics onto a memory stick in the Receiver unit. Send this file back to Black Box for analysis. -
Page 58: Add A User
NEED HELP? LEAVE THE TECH TO US LIVE 24/7 CHAPTER 8: OSD FUNCTIONS TECHNICAL SUPPORT 1.877.877.2269 3. Standard Users – users of this class can only select from a list of pre-defined connections to access and view system information. They cannot change any configuration settings. The Emerald Receiver has one default user –... - Page 59 NEED HELP? LEAVE THE TECH TO US LIVE 24/7 CHAPTER 8: OSD FUNCTIONS TECHNICAL SUPPORT 1.877.877.2269 FIGURE 8-26. NEW USER WINDOW When adding a new user, the following fields are used to define the user: Š User Name: This is a unique name that uses 1–32 characters. The username can be any valid username for a Microsoft O/S. ...
-
Page 60: Edit A User
NEED HELP? LEAVE THE TECH TO US LIVE 24/7 CHAPTER 8: OSD FUNCTIONS TECHNICAL SUPPORT 1.877.877.2269 fails, a pop-up window displays the reason for the failure – and the new user is not created. After dismissing the pop-up window, the user can fix the error and click Save again. The Cancel button should be clicked if the new user is not to be created. -
Page 61: Remove A User
NEED HELP? LEAVE THE TECH TO US LIVE 24/7 CHAPTER 8: OSD FUNCTIONS TECHNICAL SUPPORT 1.877.877.2269 8.7.4 REMOVE A USER To remove a user, highlight the user’s name and press “Remove.” admin FIGURE 8-28. REMOVE USER When the Remove button is clicked, a pop-up window is displayed to prompt confirmation that this user is to be deleted. Click the Yes button to remove the user. -
Page 62: Appendix A. Emerald Video Resolutions Supported
NEED HELP? LEAVE THE TECH TO US LIVE 24/7 APPENDIX A: EMERALD VIDEO RESOLUTIONS SUPPORTED TECHNICAL SUPPORT 1.877.877.2269 Emerald supports the resolutions listed below: Š 640 x 480 @ 60 Hz Š 640 x 480 @ 75 Hz Š... -
Page 63: Appendix B. Configuring Windows 7 Virtual Machines For Emerald
NEED HELP? LEAVE THE TECH TO US LIVE 24/7 TECHNICAL APPENDIX B. CONFIGURING WINDOWS 7 VIRTUAL MACHINES SUPPORT 1.877.877.2269 A few properties must be configured on a target Windows Virtual Machine for Emerald to connect with it. On the Windows Virtual Machine click on the Start button and launch a command window. Then launch group policy editor – gpedit.msc. -
Page 64: Appendix C. Emerald Network Protocols Overview
For management purposes some other ports are used. The Black Box Discovery protocol used UDP Multicast Group 224.0.1.249 (port 39150). This is sent by the Boxilla Manager to discover Emerald devices in the network. The router must allow UDP Multicast forwarding to allow devices on subnet different to where Manager is located to be discovered. -
Page 65: Appendix D. Troubleshooting
Sluggish Mouse: When using the Emerald, you may find that the mouse is not being very responsive, or has a noticeable delay. This can typically occur if the video card is using Dithering technology. You can contact Black Box to get a small utility to disable video card dithering on AMD graphics cards or use Video Optimization, which is set on the Transmitter ->... - Page 66 NEED HELP? LEAVE THE TECH TO US LIVE 24/7 APPENDIX D. TROUBLESHOOTING TECHNICAL SUPPORT 1.877.877.2269 21 BRAND_CHECK_FAIL This is not a correct upgrade file for Emerald Please check release notes for correct version and compatibility information. 22 CLASS_CHECK_FAIL Can’t upgrade Transmitter with Receiver file or visa versa. Please check release notes for correct version and compatibility information.
-
Page 67: Appendix E. Regulatory Information
NEED HELP? LEAVE THE TECH TO US LIVE 24/7 APPENDIX E. REGULATORY INFORMATION TECHNICAL SUPPORT 1.877.877.2269 E.1 FCC STATEMENT This equipment has been tested and found to comply with the limits for a Class A digital device, pursuant to part 15 of the FCC Rules. -
Page 68: Nom Statement
NEED HELP? LEAVE THE TECH TO US LIVE 24/7 APPENDIX E. REGULATORY INFORMATION TECHNICAL SUPPORT 1.877.877.2269 E.2 NOM STATEMENT 1. Todas las instrucciones de seguridad y operación deberán ser leídas antes de que el aparato eléctrico sea operado. 2. Las instrucciones de seguridad y operación deberán ser guardadas para referencia futura. 3. -
Page 69: Appendix F. Disclaimer/Trademarks
F.1 DISCLAIMER Black Box Network Services shall not be liable for damages of any kind, including, but not limited to, punitive, consequential or cost of cover damages, resulting from any errors in the product information or specifications set forth in this document and Black Box Network Services may revise this document at any time without notice. - Page 70 NEED HELP? LEAVE THE TECH TO US LIVE 24/7 TECHNICAL SUPPORT 1.877.877.2269 © COPYRIGHT 2021, 2022. BLACK BOX CORPORATION. ALL RIGHTS RESERVED. EN_K VM_MANUAL_EMD2000SE_USER_WITH EMD2000PE-DP-T -DP-R -DP-T AND DP-R REV6.3.10_2212.PDF...
Need help?
Do you have a question about the EMERALD EMD200DP-T and is the answer not in the manual?
Questions and answers