Table of Contents
Advertisement
Quick Links
Advertisement
Table of Contents

Related Manuals for Proscend M331


Summary of Contents for Proscend M331
- Page 1 M331 Industrial 4G LTE Dual SIM Cellular Router User Manual Version 1.00...
-
Page 2: Table Of Contents
Web Menu Item > Status ..................... 11 Web Menu Item > System ....................13 Time and Date ........................13 Logging ..........................15 Alarm ..........................17 Dying Gasp .......................... 20 COM Ports .......................... 20 Ethernet ..........................23 Modbus ..........................23 M331 User Manual... - Page 3 Web Menu Item > VPN......................46 OpenVPN ..........................46 11.1 IPSec ..........................53 11.2 GRE ............................ 64 11.3 PPTP Server ......................... 66 11.4 L2TP ........................... 67 11.5 Web Menu Item > Firewall ....................69 12.1 Basic Rules .......................... 69 M331 User Manual...
- Page 4 Contacts / On Duty ....................... 93 14.3 14.4 SSH ............................ 94 Web ........................... 95 14.5 Telnet ..........................95 14.6 Firmware ..........................96 14.7 Configuration ........................96 14.8 Load Factory ........................96 14.9 Restart ..........................97 14.10 14.11 Schedule Reboot ......................97 M331 User Manual...
- Page 5 Fail2Ban .......................... 98 14.12 O’smart ........................... 99 14.13 Web Menu Item > Diagnosis ..................100 Ping ..........................100 15.1 15.2 Traceroute ........................100 Troubleshooting Guide ....................102 16.1 Troubleshooting Information ....................102 M331 User Manual...
-
Page 6: Introduction
1 Introduction Proscend M331 Industrial 4G LTE Cellular Router comes with 3 Gigabit LAN ports, 1 Gigabit WAN port and dual SIM support to enable critical industrial applications and reliable IoT connectivity for optimal performance and network redundancy. The M331 is designed with a rugged compact enclosure for DIN-rail or wall mounting to install where tight spaces. -
Page 7: Specifications
Humidity 0 ~ 95%HR Power Supply (non-condensing) Power Consumption:7 Watts (Max) Standards and Certifications DC jack power Input:12 VDC NCC & BSMI CNS15936 & CNS15598-1 Terminal block power input: 8 ~ 26 VDC M331 User Manual... -
Page 8: Hardware Installation
STEP 1: Before inserting or removing the SIM card, ensure that the power has been turned off, or the power connector has been removed from the M331 Cellular Router. STEP 2: Using a screwdriver to remove the metal protective cover first, insert the SIM card into the card slots. -
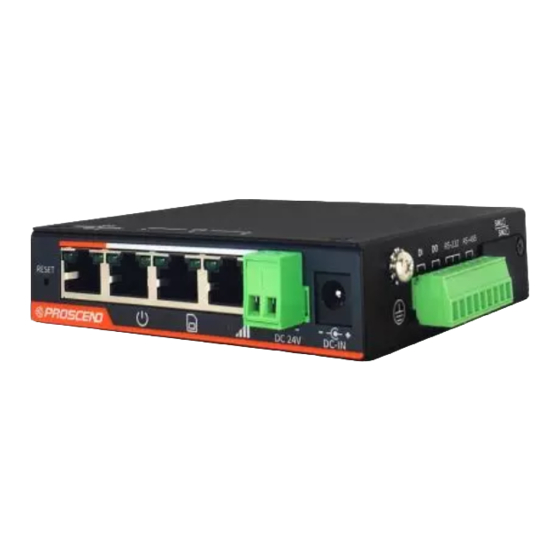
Page 9: Connecting I/O Ports
Blinking 1000M 1000Mbps 10/100Mbps LINK Data Transmitting LINK UP LINK DOWN 2.6 RS-232 and RS-485 pinouts NOTE: RS-232 and RS-485 share the common ground pin “G”. RS-232 Signal Direction Transmit Data Output Receive Data Input Signal Ground M331 User Manual... -
Page 10: Connecting The Power Supply
Signal Ground 2.7 Connecting the Power Supply Powering the M331 Cellular Router is by either a terminal block or a DC jack. One terminal block is on the front panel. The power input voltage range is 8 ~ 26 VDC. -
Page 11: Din-Rail Mounting
STEP 1: Use the screws to install the DIN-rail kit to attach at the rear side of the device. NOTE: Three screw types are flat head M3 x 4 mm. STEP 2: Hook the unit onto the DIN-rail. STEP 3: Push the bottom of the unit towards the DIN-rail until it locks in place. M331 User Manual... -
Page 12: Wall Mounting
NOTE: These screws are not included in the package. The head of each screw is less than 7 mm in diameter, the shaft is less than 3 mm in diameter, and the length is less than 10 mm in diameter. M331 User Manual... -
Page 13: Configuration Via Web Browser
Title Bar Panel > Selecting Language You can choose the different language display of web GUI. Logging in the Router In this section, please fill in the default User Name root and the default Password 2wsx#EDC and then click Login. M331 User Manual... -
Page 14: Navigate The Web Configurator
The menu items are divided into main and sub menu to configure the settings and get the status of connectivity on the navigation panel. Navigation Panel Main Menu Sub Menu Status Device overall status System Time and Date, Logging, Alarm, Dying Gasp, COM Ports, Ethernet, Modbus, Client List M331 User Manual... - Page 15 Filter, URL Filter, NAT, IPS Service SNMP, Dynamic DNS, MQTT, UPnP, SMTP, IP Alias, QoS Management Identification, Administration, Contacts / On Duty, SSH, Web, Telnet, Firmware, Configuration, Load Factory, Restart, Schedule Reboot, Fail2Ban, O’smart Diagnosis Ping, Traceroute M331 User Manual...
-
Page 16: Web Menu Item > Status
The uplink speed in Kbps. Rx Kbps The downlink speed in Kbps. Tx/Rx KBytes The accumulated TX/RX in KBytes. Tx/Rx Dropped Packets The dropped packets of Tx/Rx. IPv4 DNS Server #1/#2/#3 The DNS server address that assigned by operator. M331 User Manual... - Page 17 Status > LAN Ethernet Item Description IPv4 Address The IPv4 address of the M331 device. IPv4 Mask The IPv4 mask of the M331 device. IPv6 Address The IPv6 address of the M331 device. IPv6 Prefix The IPv6 Prefix of the M331 device.
-
Page 18: Web Menu Item > System
Ahead of standard time setting automatically when the time is at the Daylight Savings duration that you have set up before. The Time Server feature makes M331 active as Tim Server for LAN side clients to get the time through NTP/SNTP protocol. - Page 19 6 - Saturday The Hour range is 0~23; The Min range is 0~59; Time to leave Daylight Savings duration. End Date/End Time Same with Start Date/Start Time. System > Time and Date > Time Server Item Description M331 User Manual...
-
Page 20: Logging
This section allows cellular router to record the data and display the status of data. 5.2.1 Logging > Logging Logging section provides you to control all logging records. Users need to select Apply to confirm your settings. M331 User Manual... - Page 21 When you click Clear, all of the data that displays on the page will be cleared totally without any backup. When you click Refresh, the system will update and display the latest data from your cellular router. When you click Download Logs, the system will download the latest data from your cellular router. M331 User Manual...
-
Page 22: Alarm
On Duty]. If you select SNMP trap in Alarm output, you need to set up SNMP trap configuration from Service SNMP. If you select E-Mail in Alarm output, you need to set up SMTP configuration from Service SMTP. M331 User Manual... - Page 23 Alarm > Group > Create the Group Click trusted and on duty members to add trusted user who can send SMS message or receive the mail from device. Firstly, we need to create the group and assign the duty day. M331 User Manual...
- Page 24 Once the group created, we need to create the new user and assign to the group we created. Device only accepts the phone number that specify here. After submitting your setting, the interface returns to Group window setting. Now you can see your naming group and the user’s information that you have added. M331 User Manual...
-
Page 25: Dying Gasp
This section allows user to configure the COM port settings and remotely manage the device through the virtual COM setting. For the remote management, the managed device should connect to the cellular router by serial interface. The default is Disable. You can click edit button to configure your settings. M331 User Manual... - Page 26 The interface shows the setting information and click to configure. System > COM Ports Item Description Edit Configuration Select from the current Baud Rate. Baud Rate Select from 7 bit or 8 bit. Data M331 User Manual...
- Page 27 IP address (IPv4 or IPv6) to be connected. Server Mode: This network package of cellular router is on this port. Client Mode: The network package of remote device is on the Redirect Port remote host. M331 User Manual...
-
Page 28: Ethernet
Select from Auto, 100M Full, 100M Half, 10M Full, 10M Half Ethernet Ports Configurations and Disable. WAN Ethernet Allow user to configure the MTU size of Ethernet WAN port. 5.7 Modbus This section allows you to configure the Modbus. M331 User Manual... -
Page 29: Client List
For Online type, the information shows IP address and MAC address when the client is online. System > Client List Item Description DHCP Client: List all clients’ information when it is via DHCP. List Type Online: List the information when it is online. M331 User Manual... -
Page 30: Web Menu Item > Wan
Profile number. There are 3 profiles allow to set in advance. Name Name for profile Interface priority for fail over operation. Only the highest priority interface is working. Priority The other one is standby interface. 6.2 Ethernet M331 User Manual... - Page 31 Each setting DNS Server has three options, including From ISP, User Defined IPv4 DNS Server #1 and None. IPv4 DNS Server #2 When you select From ISP, the IPv4 DNS server IP will be assigned by ISP. M331 User Manual...
- Page 32 Static IPv4 Configuration IP Address Fill in the IP Address. IP Mask Fill in the IP Mask. Gateway Address Fill in Gateway Address. DNS Server Configuration IPv4 DNS Server #1~3 User can enter the IPv4 DNS server IP manually. M331 User Manual...
-
Page 33: Ipv6 Dns
When you select User Defined, the IPv6 DNS server IP is enter by user self. 6.4 Health Check This section allows user to configure the WAN healthy check for failover function between different APN of SIM slot and Ethernet WAN. M331 User Manual... - Page 34 Set the interval time to ping WAN Ethernet. The interval is from 1 to 60 Interval seconds. Retries Retry time for the check. Ping Pass Threshold The threshold value of successful check to think WAN interface is OK. M331 User Manual...
-
Page 35: Configuration > Cellular
2G Only: Connect to 2G network only. MTU is the Maximum Transmission Unit that can send over the cellular interface. It allows user to adjust the MTU size to fit into their existing network environment. 7.2 GPS M331 User Manual... - Page 36 UTC date when fixing position Time UTC time when fixing position Satellite Number of satellites Config This section allows you to set up GPS configuration and send out GPS location to TCP Server or display in log. M331 User Manual...
-
Page 37: Sim Config
If NMEA0183 is disabled, you can add prefix to identify the device Protocol Report GPS message via TCP or UDP Host Host IPv4 address Port Host port number (Default 8700) 7.3 SIM Config This section allows user to setup configuration for the SIM card. M331 User Manual... - Page 38 M331 User Manual...
- Page 39 APN setting is empty. Confirm Password Double confirm password. Auth Select the authentication method (None/PAP/CHAP). Enable IPv6 If IPv6 is not selected, then only pure IPv4 connection. Data Limitation Already Used Data (MB) Display current used Data since last reset. M331 User Manual...
-
Page 40: Sim Usage
Set up the reset time during the month. Now Time Show the current time of system. 7.4 SIM Usage This section shows the status of current SIM card, operator, APN and the charts for Real Time, Hourly, Daily, Weekly, and Monthly. M331 User Manual... -
Page 41: Sms
This section provides two settings, one is SMS Action, and the other is View SMS. (1) When enabling SMS Action, it allows trust phone numbers which in [Contacts/On Duty] list by sending key words SMS to trigger device setting/action/query status. M331 User Manual... -
Page 42: Serving Cell
Refresh button to reload the messages, or click Clear button to remove all read messages. 7.6 Serving Cell This section displays the information of Serving Cell, including the following items. M331 User Manual... -
Page 43: Dns
IPv4 DNS Server #2 When you select From ISP, the IPv4 DNS server IP will assign from ISP. IPv4 DNS Server #3 When you select User Defined, the IPv4 DNS server IP is enter by user self. M331 User Manual... -
Page 44: Web Menu Item > Lan
8 Web Menu Item > LAN This section allows you to configure LAN IPv4, LAN IPv6, VLAN and Subnet. 8.1 IPv4 Set up your IP Address and IP Mask. Also, fill in the information of DHCP Server Configuration. M331 User Manual... - Page 45 Each static IP consist of mode (on/off), MAC and IP address. Static IP Addresses Mode: Turn on/off the static IP address. MAC: The MAC address of target host or PC. IP: The desired IP address for target host or PC. M331 User Manual...
-
Page 46: Web Menu Item > Ipv6
Stateless: The cellular router uses IPv6 stateless auto configuration. RADVD Address Assign (Router Advertisement Daemon) is enable to have the cellular router send IPv6 prefix information in router advertisements periodically and in response to router solicitations. M331 User Manual... -
Page 47: Web Menu Item > Ip Routing
This section allows you to configure the Static Route. A static route is a pre-determined path that network information must follow to reach a specific host or network. Click the New button to add the static route. M331 User Manual... - Page 48 The destination field is required to fill in. The format of destination is IPv4 or IPv6. The address of gateway or the type of interface can chose one or both to fill in the field. The status tab shows the information from the settings of static route. M331 User Manual...
-
Page 49: Policy Route
10.2 Policy Route This section allows user to setup the policy route and check the status of policy route settings. Policy routing works on the activated interfaces only, but disabled on deactivated interfaces automatically. M331 User Manual... - Page 50 Source(IP/MASK) Fill in the source of a specific IP/MASK from network. Destination(IP/MASK) Fill in the destination of a specific IP/MASK from network. Gateway Fill in the gateway address of your router. Outgoing Interface Select the outgoing interface. M331 User Manual...
-
Page 51: Web Menu Item > Vpn
This section allows you to set up the connection of OpenVPN. The default mode is Disable. From Log tab, the interface will show the status of connection to make you follow the situation whenever it is successful or fail connection. M331 User Manual... - Page 52 11.1.1 OpenVPN Common Setting (1) Click button to edit OpenVPN Connection. (2) From Setting tab, you can set up the connection of OpenVPN. M331 User Manual...
- Page 53 11.1.2 OpenVPN Client Setting Select option “Client” from VPN Mode, and this section allows you configure the OpenVPN client and authentication files. The files can import by clicking button and the file should download from OpenVPN server. M331 User Manual...
- Page 54 NAT environment. 1:1 NAT When two routers’ LAN Subnet are same and create OpenVPN tunnels, this function should turn on. Client-Security Root CA The Certificate Authority file of OpenVPN server, which can download M331 User Manual...
- Page 55 OpenVPN server. The PKCS#12 file is for OpenVPN client, which can download from OpenVPN server. 11.1.3 OpenVPN Server Setting Select option “Server” from VPN Mode, and this section allows you to configure the server settings of VPN Mode. M331 User Manual...
- Page 56 OpenVPN will export the LAN network automatically. The local netmask exported by OpenVPN. When keeping this option blank, Netmask the OpenVPN will export the LAN netmask automatically. 1:1 NAT Tick to enable NAT Traversal for OpenVPN. This item must be enabled M331 User Manual...
- Page 57 Fill in the username if the imported file has already set up the username. Password Fill in the password if the imported file has already set up the password. Display the connection status of OpenVPN, such as IP address and the connected Status time. M331 User Manual...
-
Page 58: Ipsec
This section provides the information of the IPsec connections. Each connection will show the State, IKE information and Tunnel information. In the default setting, the list of connections is empty. You can create the new connection by clicking New button. (1) IPsec Phase 1 Setting M331 User Manual... - Page 59 Select from 30 minutes, 1 hour, 2 hours, 3 hours, 6 hours, 12 hours or 24 hours. The IP address of the router's public network interface. Local Host If this value is blank, the connection will automatically detect the correct IP address. M331 User Manual...
- Page 60 The IP address of the peer gateway's public network interface. Remote Host If this value is blank, the connection will act the server role to wait the incoming request. The identification for authentication on remote peer. Remote ID Select from the created authentication IDs or empty. M331 User Manual...
- Page 61 If this value is blank, the connection will set it as the “Remote Host” of Phase 1 setting. Note: This option only work on Policy-based IPsec VPN type. Restrict the VPN traffic to the particular protocol only. Service Select from the Any, TCP, UDP or L2TP. M331 User Manual...
- Page 62 DPD interval The default is 30 seconds. The max number of retry of dead peer detection. DPD retry The default is 5 times. Force NAT-T (Only for IKEv2) Enable or disable the NAT-T for selected IPSec connection. M331 User Manual...
- Page 63 RSA: Use the certificate to authenticate the connection. Pre-shared Key / The X.509 certificate for authentication. X.509 Certificate The certificate is generate or import by X.509 Certificates section. According to the above options, there are some combinations to authenticate the IPsec connection. M331 User Manual...
- Page 64 X.509 name (CN) of X.509 as the ID field. 11.2.2 IPsec > X.509 Certificates This section provides the certificates setting which is use by IPsec authentication ID. Each certificate will show the State and Subject information. M331 User Manual...
- Page 65 CAs to the router. The self-signed CA will help the router to verify the self-signed X.509 certificate, which is import in X.509 Certificates section. Each CA certificate will show the State and Subject information and provide the controlling buttons to let user could download or edit the certificate / key files. M331 User Manual...
- Page 66 4. Click the Edit button to navigate the Certificate Setting page. 5. Fill up the information of the X.509 certificate. 6. Click the Generate Certificate button and OK. 7. Click the Apply button to apply the changes. Certificate Setting M331 User Manual...
- Page 67 This option is required for certificate generation. Organization Unit Name The organization unit name. The host name associated with the certificate. e.g. example.com Common Name This option is required for certificate generation. E-mail The maintainer's E-mail. Certificate Importing M331 User Manual...
- Page 68 If the certificate is generated or imported, there will be the download button to download each certificate and key file. Note: When the connection is authenticate by RSA or EAP-TLS, the user must download the X.509 certificate, key and CA certificate, and import the files to the remote gateway. M331 User Manual...
-
Page 69: Gre
GRE keepalive packets may be sent from both sides of a tunnel or from just one side. There are two entries for user to configure, please press Edit button. M331 User Manual... - Page 70 Tunnel Device Address Prefix Set Prefix of the Tunnel Device Address. Use Tunnel Key Whether to use the key for identifying an individual traffic flow within a tunnel. Tunnel Key Number The number of the tunnel key; default is '1234'. M331 User Manual...
-
Page 71: Pptp Server
Enable or disable the PPTP Server function. Auth Select the authentication type. Server Address This IP address is use as tunnel IP at server site. Client Address Range A list of IP addresses to assign to remote PPTP clients. (2) Clients Configuration M331 User Manual... -
Page 72: L2Tp
11.5 L2TP This section allows you to set up L2TP and provides three modes for configuration, including Off, Server, and Client Mode. (1) General Mode: The default mode is Off as shown as below. (2) Server Mode: M331 User Manual... - Page 73 The begin address of L2TP client's IP pool. Remote end IP The end address of L2TP client's IP pool. Create a new user account for connecting with server. Username The username for L2TP client. Password The password for L2TP client. M331 User Manual...
-
Page 74: Web Menu Item > Firewall
This section allows you to configure Basic Rules, Port Forwarding, DMZ, IP Filter, MAC Filter, URL Filter, NAT and IPS. Basic Rules 12.1 This section allows you to set the Basic Rules configuration. Firewall > Basic Rules Item Description WAN Ping Blocking Check IPv4 or IPv6 for blocking M331 User Manual... -
Page 75: Port Forwarding
Port Forwarding 12.2 This section allows you to set up Port Forwarding and click edit button to configure. M331 User Manual... -
Page 76: Dmz
Fill in your Host IP Address. Management IP 12.4 This section allows user to setup a management IP that is able to access the device from LAN or WAN side. This IP has higher management permissions than firewall settings. M331 User Manual... -
Page 77: Acl
Firewall > Management IP Item Description Management IP Address Fill in your management IP Address. 12.5 This section allows managing access to the router's own services. M331 User Manual... -
Page 78: Ip Filter
Black List: When Black List selected, all specified IP address/port are blocked. White List: When White List selected, all specified IP address/port are accepted. Edit Black/White List (1) Click button to edit Black/White list. (2) The default is Disable mode as the following interface (Black/White). M331 User Manual... - Page 79 (4) For Source IP, there are three types to input your source IP that depends on your requirement, including single IP, IP with Mask or giving a range of IP. The following table provides some examples. Firewall > Edit IP Filter > Source IP IP Format Single IP IP with Mask Ranged IP M331 User Manual...
- Page 80 (5) For Source Port, there are two types to input your source port that depends on your requirement, including single port (e.g.1234) or giving a range of ports (e.g.1234:5678). Note: Setting up a range of source ports, please use: colon symbol to mark your ranged ports. M331 User Manual...
-
Page 81: Mac Filter
Fill in your MAC address. Note: Setting up MAC address, please use ”:” colon symbol (e.g. xx : xx : xx : xx) or “-“ hyphen symbol to mark (e.g. xx - xx - xx - xx). M331 User Manual... -
Page 82: Url Filter
Please not include “https://” or “http://” for the URL address in the Full Filter. Firewall > URL Filter Item Description Mode Select from Disable or Enable. The default is Disable. Filter Select from Key or Full. The default is Key. Key / Full Fill in your Key / Full information. M331 User Manual... -
Page 83: Nat
Also, the system allows to limit the max incoming connection retry number during a specific time period from WAN per source IP address to prevent too many unexpected connections retry event from causing system busy. M331 User Manual... - Page 84 Select the checkbox to enable or disable the function. The number default number is 10. Max incoming connection retry Select the checkbox to enable or disable the function. The number default number is 20. Duration time The default time is 120 seconds. M331 User Manual...
-
Page 85: Web Menu Item > Service
Select from Disable or Enable to configure SNMP. Community Configure community setting with three options, including # 1, # 2 and #3. Mode Select from Disable or Enable. Name Name each community. Access Select from Read-Only or Read-Write. M331 User Manual... - Page 86 This section allows you to set up the SNMP trap configuration when you select the SNMP trap function from Alarm output of system for your router. With SNMP trap setting, you can know the status of remote device. M331 User Manual...
- Page 87 Service > SNMP > SNMP trap configuration Item Description Mode Select from Disable or Enable. The default is Disable. Community Name Fill in your community name. Destination The destination (domain name/IP) of remote SNMP trap server. M331 User Manual...
-
Page 88: Dynamic Dns
Fill in your registered username from Service Provider. Password Fill in your registered password from Service Provider. Update Period Time (Sec) Fill in “0” to mean 30 days. IP Address Selection Select either Internet IP or WAN IP. M331 User Manual... -
Page 89: Mqtt
Fill in the password of manage user. ACLs Allow to specify what topic should be limited. User Select the users and identify their authority to read or write the MQTT topic/channel. Topic Name the topic of MQTT message. M331 User Manual... -
Page 90: Upnp
Port Port 465:SMTP connections secured by SSL. Port 587:SMTP connections secured by TLS. Username / Password Fill in your username and password as the same your server. Test Mail Enter the mail address for sending test mail. M331 User Manual... -
Page 91: Ip Alias
Mode: select from Off or On to use or not use this entry. Interface: the interface you want to provide the additional address. New / Edit IP Alias Entry IP Address: Enter the IP address. IP Mask: Enter the network mask. M331 User Manual... -
Page 92: Qos
13.7.2 QoS > QoS You can select QoS tab to show an overall view for QoS configuration. At right side of window, there are three buttons. M331 User Manual... - Page 93 The QoS entry configuration page has two parts for assigning bandwidth, and bandwidth of group IP address. Service > IP Alias Item Description Mode Select from Disable or Enable QoS. Name The setting can be edited or deleted the existed entries. M331 User Manual...
- Page 94 Show detail bandwidth for each IP address: show the group IP bandwidth usage. Apply Refresh Setting button: press this button to take effect with above new settings. Data part is the content of bandwidth usage. M331 User Manual...
-
Page 95: Web Menu Item > Management
This section provides you to manage the router, set up your administration and know about the status of current software and firmware. In addition, you can backup and restore the configuration. Identification 14.1 This section allows you to confirm the profile of router, current software, firmware version and system uptime. M331 User Manual... - Page 96 Show the Dual Image B MCSV. Serial Number Show the product serial number. Modem#1 Firmware Version Show the modem firmware version of the device. IMEI Show the International Mobile Equipment Identity number. Uptime Show the current system uptime. M331 User Manual...
-
Page 97: Administration
System Setup Host Name Enter the device’s host name. Session TTL Minutes (0 means no timeout). Admin Password New Password Type the password you want to change. Retype to confirm Retype the password you want to change. M331 User Manual... -
Page 98: Contacts / On Duty
Click the New button to create a new group. Then enter the name for the group and select the day that should be applied. Contacts 14.3.2 Click the New button to create a new user. Enter the user’s information and select the group which created by above step. M331 User Manual... -
Page 99: Ssh
Secure Shell (SSH) allows user to configure system via a secure channel. Management > SSH Item Description Mode Select from Disable or Enable SSH function. LAN Server Port The listen port on LAN interface. WAN Server Port The listen port on WAN interface. M331 User Manual... -
Page 100: Web
The TCP port listened by HTTPS daemon. Telnet 14.6 This section allows user to choose whether offer the telnet via LAN/WAN. Default is disale. Management > Telnet Item Description Whether or not offer the telnet service. Whether or not offer the telnet service. M331 User Manual... -
Page 101: Firmware
(2) Click Select the configuration file to restore button to import the configuration file. Load Factory 14.9 This section supports you to load the factory default configuration and restart the device immediately. You can click the Load Factory and Restart button. M331 User Manual... -
Page 102: Restart
14.10 Restart This section allows you to click Restart button to restart immediately. 14.11 Schedule Reboot The setting allows you to schedule the reboot time regularly. M331 User Manual... -
Page 103: Fail2Ban
Moreover, if it keeps to attempt a login and still fail then the banned time will be extended automatically. Time The count of login failure The banned time (s) 2019/1/1 12:00:00 2019/1/1 12:00:01 2019/1/1 12:00:03 2019/1/1 12:00:10 2019/1/1 12:00:30 M331 User Manual... -
Page 104: O'smart
Enter the listen port of O’smart server. Token Enter the token that generated by O’smart server. TLS Mode Enable or disable the secure connection with O’smart server. Advance Setting MQTT Keep alive Alive Period Time Timeout Insecure Mode M331 User Manual... -
Page 105: Web Menu Item > Diagnosis
When set to Yes, it will use the selected interface as source IP. Use Interface Specify the IP address of selected interface as source IP. Host The host name or the host IP address 15.2 Traceroute Please assign the Host you want to traceroute. M331 User Manual... - Page 106 Use Interface as Source When set to Yes, it will use the selected interface as source IP. Use Interface Specify the IP address of selected interface as source IP. Host The host name or the host IP address M331 User Manual...
-
Page 107: Troubleshooting Guide
If ping is OK, please try to access the Web Management page again. If the above didn’t solve your Access Issue then please contact your MIS or anyone that build your network infrastructure to fix the ping fail problem. M331 User Manual... - Page 108 (by contacting your SIM card provider or by trying that SIM card in another device). If you are still experiencing the “No internet issue” then please contact your support engineer for further advanced trublesooting (This could involve a posible Software or Hardware problem that needs to be identified and solved). M331 User Manual...
Need help?
Do you have a question about the M331 and is the answer not in the manual?
Questions and answers