Table of Contents
Advertisement
Advertisement
Table of Contents

Related Manuals for Proscend M302-L


Summary of Contents for Proscend M302-L
- Page 1 Industrial 4G LTE Cellular Router M302-L / M302-LG User Manual Version 1.1.0...
-
Page 2: Table Of Contents
Table of Contents Introduction........................ 1 Features ......................1 Specifications ....................... 2 Mechanical Dimensions ..................2 Ordering Information .................... 3 Hardware Installation....................4 LED Indicators ..................... 4 Ethernet Port ......................4 Serial Port COM1 (Console-RS232) ..............5 Install the SIM Card ..................... 6 Reset Button ...................... - Page 3 LTE > Usage Display ..................35 LTE > SMS ......................41 LTE > Engineer Info ................... 42 LTE > DNS ......................43 Configuration > LAN ....................44 LAN > IPv4 ......................44 LAN > IPv6 ......................44 IP Routing......................... 46 IP Routing >...
- Page 4 12.6 Service > UPnP ....................90 12.7 Service > SMTP ....................90 12.8 Service > IP Alias ....................91 Configuration > Management ................92 13.1 Management > Identification ................92 13.2 Management > Administration ................93 13.3 Management > SSH ................... 95 13.4 Management >...
-
Page 5: Introduction
The M302-LG model is equipped with GPS function and displays accurate the routers position for quickly managing existing devices. With the user-friendly interface, the M302-L and the M302-LG enable fast and easy configuration to reduce complicated settings. -
Page 6: Specifications
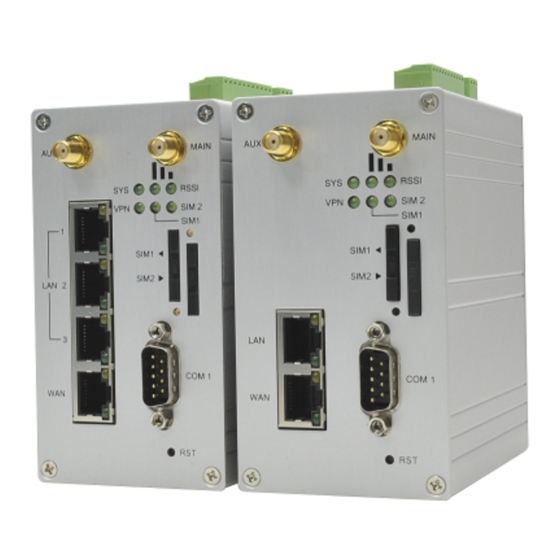
Safety : EN60950-1 Highly Accelerated Life Test (HALT) M302-L/M302-LG: 148,930 hrs (MIL-HDBK-217-FN2) 1.3 Mechanical Dimensions M302-L model : 4 x LANs, 1 x RS232 (Console Port), 2 x SIM Card Slots, -20 ~ +70°C INDUSTRIAL 4G LTE CELLULAR ROUTER – B_UM V1.1.0... -
Page 7: Ordering Information
1.4 Ordering Information Model Name Description Industrial 4G LTE Cellular Router M302-L ( 4 x LANs, 1 x RS232, 2 x SIM Card Slots, -20 ~ +70°C ) Industrial 4G LTE Cellular Router M302-LG ( 4 x LANs, 1 x GPS, 1 x RS232, 2 x SIM Card Slots, -20 ~ +70°C ) -
Page 8: Hardware Installation
Error Error Blinking NO WAN Power Down Connection Working Working Heart Reading Reading Beat 2.2 Ethernet Port (1) 10/100 Mbps Ethernet LAN1~LAN4 (M302-L/M302-LG model) The Ethernet LAN1~4 interfaces are standard RJ45 connectors. INDUSTRIAL 4G LTE CELLULAR ROUTER – B_UM V1.1.0... -
Page 9: Serial Port Com1 (Console-Rs232)
Description Function LAN TX+ 10/100 Mbps LAN, TX+ Pin LAN TX- 10/100 Mbps LAN, TX- Pin LAN RX+ 10/100 Mbps LAN, RX+ Pin LAN RX- 10/100 Mbps LAN, RX- Pin (2) LED Indicator of Ethernet Port Each Ethernet port has two LED indicators. The Green LED indicates Link/ACT, and the Yellow LED indicates Speed. -
Page 10: Install The Sim Card
2.4 Install the SIM Card SIM1/SIM2 Card Drawers and Eject Buttons Insert and Remove SIM1/SIM2 Card (1) Before inserting or removing the SIM card, ensure that the power has been turned off and the power connector has been removed from Cellular Router. (2) Press the button with a paper clip or suitable tool to eject the SIM card from the drawer. -
Page 11: Reset Button
2.5 Reset Button Reset button allows you to reboot the unit or restore to factory default setting. Function Operation Reboot Press the button for 1 second Restore to factory default setting Press the button for 5 seconds Note: Press the Reset button and count the time around 5 seconds. The LED Indicators will be blinking to show you have activated the setting successfully. -
Page 12: Grounding The Router
2.8 Grounding the Router To prevent the noise and surge effect, please connect the router to the site ground wire by the ground screw before turning on the router. INDUSTRIAL 4G LTE CELLULAR ROUTER – B_UM V1.1.0... -
Page 13: Configuration Via Web Browser
3 Configuration via Web Browser 3.1 Access the Web Configurator The web configuration is an HTML-based management interface for quick and easy set up of the cellular router. Monitoring of the status, configuration and administration of the router can be done via the Web interface. After properly connecting the hardware of cellular router as previously explained. -
Page 14: Navigate The Web Configurator
3.2 Navigate the Web Configurator The main screen is divided into three parts as below. A -Title Bar, B -Navigation Panel and C -Main Window. A : Title Bar The title bar provides some useful instructions that appear the situation of router. Title Bar Item Description... -
Page 15: Status
4 Status When you enter the web browser in the beginning and have not log in, the first item of main menu shows your status that you are a guest. This status only can view status page without any permission to log in. The interface of main window displays the status of router to show about information, including Cellular Attribute, Dual SIM information, the current connectivity of LAN Ethernet. - Page 16 Status > WAN LTE Item Description Attribute Show the SIM card which the router work with currently: Current SIM SIM Card or Backup SIM. Modem Status Show the status of modem. Operator Display the name of operator. Modem Access Show the router to access protocol type. IMSI Show the IMSI number of the current SIM cards.
-
Page 17: Status > Gps
4.1 Status > GPS For those GPS enabled router, you can see Location on the right-top banner of web interface when connecting your GPS function. After clicking Google Maps banner, a map will automatically display the current information of map according to location of router. INDUSTRIAL 4G LTE CELLULAR ROUTER –... -
Page 18: Configuration > System
5 Configuration > System This system section provides you to configure the following items, including Time and Date, COM Ports, Logging, Alarm, Ethernet, and Client List. 5.1 System > Time and Date This section allows you to set up the time and date of router and NTP server. There are two modes at Time and Date Setup, including Get from Time Server and Manual. - Page 19 II. Manual Set up the information of time and date, including year, month, date, and hour, minute, and second. Set up your local time zone. Click Apply to submit your configuration changes. INDUSTRIAL 4G LTE CELLULAR ROUTER – B_UM V1.1.0...
- Page 20 III. Time Zone Setup Set up Daylight Savings as On. Set up Ahead of standard time. Set up the information of Start Date/Time, including Month, Week, Day, Hour and Minute. Set up the information of End Date/Time, including Month, Week, Day, Hour and Minute.
- Page 21 INDUSTRIAL 4G LTE CELLULAR ROUTER – B_UM V1.1.0...
- Page 22 System > Time and Date->Daylight Savings Item Description Turn on/off the Daylight Savings feature. Select from Off or Daylight Saving On. The default is Off. The forward/backward minutes when enter/leave Daylight Ahead of standard time Savings duration.Default is 60 mins. Time to enter Daylight Savings duration.
-
Page 23: System > Logging
5.2 System > Logging This section allows cellular router to record the data and display the status of data. 5.2.1 Logging > Logging (1) Logging section provides you to control all logging records. (2) Users need to select Apply to confirm your settings. System >... -
Page 24: Logging > Log
5.2.2 Logging > Log This section displays all data status. (1) You can choose Filter function to quickly search for your data. (2) When you click Clear, all of the data that displays on the interface will be totally cleared without any backup. -
Page 25: System > Alarm
5.3 System > Alarm This section allows you to configure the alarm. Note: If you select SNMP trap in Alarm output, you need to set up SNMP trap configuration from Service SNMP. System > Alarm Item Description Turn on/off the Alarm configuration. Select from Disable or Mode Enable. -
Page 26: Alarm > Name Group
5.3.1 Alarm > Name Group (1) How to create your group Name a group: Click Group for naming and the interface will show the group’s name in the Group setting as below. 5.3.2 Alarm > Edit User (2) How to edit each user’s information in every group Select your naming group and click Add button to edit your user’s ... - Page 27 After filling in your information for each row, chose your naming group and click submit your settings. After submitting your setting, the interface returns to Group window setting. Please click your naming group to show the user’s information that you have edited. button to add the new user’s information.
-
Page 28: System > Ethernet
5.4 System > Ethernet This section allows you to configure the Ethernet. System > Ethernet Ports Item Description Status Show the connectivity status of LAN. Select from Auto, 100M Full, 100M Half, 10M Full, 10M Half Configurations and Disable. 5.5 System > Client List This section allows you to understand how many devices have been connected and their status from the router. - Page 29 For Online type, the information shows IP address and MAC address when the client is online. System > Client List Item Description DHCP Client: List all clients’ information when it is via DHCP. List Type Online: List the information when it is online. ...
-
Page 30: Configuration > Wan
6 Configuration > WAN This section allows you to configure IPv6 DNS of WAN. 6.1 WAN > IPv6 DNS You can set up IPv6 DNS Server Configuration. For IPv6 DNS Server, it provides three options to set up and each option has provided with “From ISP”, “User Defined”... -
Page 31: Configuration > Lte
7 Configuration > LTE This section allows you to configure LTE Config, GPS Config, Dual SIM, Usage Display, SMS, Engineer Info, and DNS. 7.1 LTE > LTE Config 7.1.1 LTE Configuration You can set up the LTE Configuration and LTE Ping Health. INDUSTRIAL 4G LTE CELLULAR ROUTER –... -
Page 32: Lte Ping Health
For LTE Configuration, you can select from Auto, 4G Only, 3G Only or 2G Only. LTE > LTE Config Item Description Auto: Automatically connect the possible band. 4G Only: Connect to 4G network only. LTE Config 3G Only: Connect to 3G network only. ... -
Page 33: Lte > Gps Config
LTE > LTE Config > LTE Ping Health Item Description LTE Ping Health Select from Disable or Enable. Interval Input the interval seconds of ping. IPv4 Host 1 Input the address of IPv4 Host 1. IPv4 Host 2 Input the address of IPv4 Host 2. IPv6 Host 1 Input the address of IPv6 Host 1. -
Page 34: Lte > Dual Sim
7.3 LTE > Dual SIM This section allows you to understand the status of connectivity for Dual SIM, SIM1 and SIM2. The Used SIM item has three options and the default is on Dual SIM when first connection. The Connect Retry Number field can set up the re-connecting time if your one of the SIM cards on Dual SIM mode can’t connect successfully. - Page 35 For Roaming Switch, it means Switch to another SIM when roaming is detected. System will switch SIM slot when current SIM is in roaming state and another SIM slot is in READY state. If you have selected either SIM1 or SIM2 for the Used SIM to connect, the Roaming Switch and Connect Retry Number would not to be shown in the interface.
- Page 36 INDUSTRIAL 4G LTE CELLULAR ROUTER – B_UM V1.1.0...
- Page 37 Change SIM PIN:If you want to change SIM PIN code, you can click Change button and type old SIM PIN code and new SIM PIN code. Please aware not to exceed the retry number (PIN remaining number and PUN remaining number). Note: The interface will be shown the tick symbol at the same time when each SIM Card has been connected.
- Page 38 LTE > Dual SIM Item Description Connect Policy Current SIM Card Display which SIM slot is using. Connect: After manually disconnect, user can only click Connect button to get connection or reboot the device to make it automatically connect. Status Card Disconnect: If there is one SIM slot get connection, the...
-
Page 39: Lte > Usage Display
7.4 LTE > Usage Display This section shows the status of current SIM card, operator, IMSI and the charts for Real Time, Hourly, Daily, Weekly, and Monthly. INDUSTRIAL 4G LTE CELLULAR ROUTER – B_UM V1.1.0... - Page 40 (1) Real-Time Usage: Real-Time Usage Rate: It displays real-time Download/Upload/Total MB per seconds for current using SIM card and the view window size is 60 seconds. Real-Time Usage: It displays accumulated real-time Download/Upload/Total MB per seconds for current using SIM card and the view window size is 60 seconds.
- Page 41 (2) Hourly Usage: It displays Download/Upload/Total MB per hour in one day for current using SIM card and the view window size is 24 hours. INDUSTRIAL 4G LTE CELLULAR ROUTER – B_UM V1.1.0...
- Page 42 (3) Daily Usage: It displays Download/Upload/Total MB per day in one month for current using SIM card and the view window size is 31 days. INDUSTRIAL 4G LTE CELLULAR ROUTER – B_UM V1.1.0...
- Page 43 (4) Weekly Usage: It displays Download/Upload/Total MB per day in one week for current using SIM card and the view window size is 7 days. INDUSTRIAL 4G LTE CELLULAR ROUTER – B_UM V1.1.0...
- Page 44 (5) Monthly Usage: It displays Download/Upload/Total MB per month in one year for current using SIM card and the view window size is 12 months. INDUSTRIAL 4G LTE CELLULAR ROUTER – B_UM V1.1.0...
-
Page 45: Lte > Sms
7.5 LTE > SMS This section provides two settings, one is SMS Action and the other is View SMS. (1) When enabling SMS Action, it allows you by sending key words SMS to trigger device setting/action/query status. (2) For View SMS, this section allows you to review the information of SMS that you have received, including the state, phone and date and time. -
Page 46: Lte > Engineer Info
7.6 LTE > Engineer Info This section displays Engineer Information. RSRP, RSRQ, and SINR are for LTE connection. RSCP is for WCDMA connection. INDUSTRIAL 4G LTE CELLULAR ROUTER – B_UM V1.1.0... -
Page 47: Lte > Dns
7.7 LTE > DNS This section allows you to setup LTE specific DNS setting. WAN > Ethernet > DHCP Client Item Description Each setting DNS Server has three options, including From ISP, User Defined and None. IPv4 DNS Server #1 When you select From ISP, the IPv4 DNS server IP is ... -
Page 48: Configuration > Lan
8 Configuration > LAN This section allows you to configure LAN IPv4, and LAN IPv6. 8.1 LAN > IPv4 Set up your IP Address and IP Mask. Also, fill in the information of DHCP Server Configuration. LAN > IPv4 Item Description IP Address:192.168.1.1 ... - Page 49 LAN > IPv6 Item Description This section provides two types, including Delegate Prefix from WAN and Static. LAN IPv6 Static Address: You need to input the static address when you select the static type. Delegate Prefix Select this option to automatically obtain an IPv6 network prefix from the ...
-
Page 50: Ip Routing
9 IP Routing This section allows you to configure the Static Route, RIP, OSPF, and BGP. 9.1 IP Routing > Static Route This section allows you to configure the Static Route. A static route is a pre-determined path that network information must follow to reach a specific host or network. INDUSTRIAL 4G LTE CELLULAR ROUTER –... - Page 51 IP Routing > Static Route Item Description Mode The setting is for full network. Select from Off or On. Settings Mode The setting is for the specific network. Select from Off or On. Name Set up each name for your running host or network. Destination Fill in the destination of a specific subnet or IP from network.
-
Page 52: Ip Routing > Rip
The status tab shows the information from the settings of static route. IP Routing > Static Route Item Description Mode The setting is open for full network. Select from Off or On. Status Destination Show the status of destination from the setting section. Gateway Show the status of gateway from the setting section. - Page 53 IP Routing > RIP > General Item Description General Mode Select from Off or On to open or close RIP function. Redistribute local routes Select from Off or On to open or close redistribute local routes. Redistribute connected Select from Off or On to open or close redistribute connected routes routes.
-
Page 54: Ip Routing > Ospf
IP Routing > RIP > Interfaces Item Description Interfaces Select from Off or On to use or not to use the RIP function in the Mode interface. Select the option of LAN. Interface Note: Not to support eth1 (WAN Ethernet) for WAN port. Select from none or md5 to approve authentication. - Page 55 IP Routing > OSPF > General Item Description General Off:OSPF function is off. Mode On:OSPF function is on. Off:Not redistribute local routes from the device's own routing table. Redistribute local routes On: Redistribute local routes from the device's own routing ...
- Page 56 IP Routing > OSPF > Interfaces Item Description Interfaces Select from Off or On to use or not to use the OSPF function in Mode the interface. Select the option of LAN. Interface Note: Not to support eth1 (WAN Ethernet) for WAN port. Select from none or md5 to approve authentication.
- Page 57 (3) Networks Configuration There are 2 parts for OSPF Networks configuration. OSPF Networks Summary You can edit and delete the existed OSPF networks. OSPF Networks Add/Edit This sub configuration is used to configure all the networks, the maximum is 2. IP Routing >...
-
Page 58: Ip Routing > Bgp
9.4 IP Routing > BGP This section allows you to set up BGP with three sub configurations, including General, Neighbors and Networks configuration. (1) General Configuration IP Routing > BGP > General Item Description General Off:BGP function is off. Mode On:BGP function is on. - Page 59 (2) Neighbor Configuration The neighbors sub configuration is used to configure all the BGP routers to peer with and the maximum neighbors is 16. IP Routing > BGP > Neighbor Item Description Neighbor Mode Select from Off or On to enable the neighbor setting IP Address Set IP address of the peer router AS Number...
- Page 60 IP Routing > BGP > Networks Item Description Networks Mode Select from Off or On to enable the network Prefix Set Prefix of the network Prefix Length Set Length of the prefix INDUSTRIAL 4G LTE CELLULAR ROUTER – B_UM V1.1.0...
-
Page 61: Configuration > Vpn
10 Configuration > VPN This section allows you to configure OpenVPN, IPSec, GRE, PPTP Server, and L2TP. 10.1 VPN> OpenVPN 10.1.1 Edit OpenVPN Connection (1) This section allows you to configure the OpenVPN parameters. The default mode is Disable. Click button to edit OpenVPN Connection. - Page 62 (2) From Setting tab, you can set up the connection of OpenVPN. INDUSTRIAL 4G LTE CELLULAR ROUTER – B_UM V1.1.0...
- Page 63 From Log tab, the interface will be shown the status of connection to make you follow the suitation whenever is successful or fail connection. VPN > OpenVPN Item Description Mode Turn on/off OpenVPN to select Disable or Enable. Server: Tick to enable OpenVPN server tunnel. ...
-
Page 64: Set Up Openvpn Client
10.1.2 Set up OpenVPN Client This section allows you configure the OpenVPN client route and authentication files. The files could be imported by clicking Import button and the file should be downloaded from OpenVPN server. VPN > OpenVPN > Client VPN Mode Item Description Client... -
Page 65: Set Up Openvpn Server
10.1.3 Set up OpenVPN Server This section allows you to configure the server status of VPN Mode. Note: When selecting the On option of Route Client Networks, the OpenVPN server will route the client traffic or not. You should fill in the client IP and netmask when this option is enabled. INDUSTRIAL 4G LTE CELLULAR ROUTER –... -
Page 66: Set Up Openvpn Custom
VPN > OpenVPN > Server VPN Mode Item Description Server Client Mode Only support the Roadwarrior mode. VPN Network The network ID for OpenVPN virtual network. VPN Netmask The netmask for OpenVPN virtual network. Select from Off or On. The OpenVPN server will route the client Roadwarrior: traffic or not. - Page 67 VPN > OpenVPN > Custom VPN Mode Item Description Select from Disable or Enable. The default is Disable. Mode VPN Mode Select from custom mode. Custom Config Import OpenVPN configuration. Username Fill in the username if the imported file has already set up the username.
-
Page 68: Vpn > Ipsec
10.2 VPN > IPSec This section allows you to set up IPSec Tunnel. The seting has two tags, General setting and Connections. 10.2.1 IPSec > General setting For General setting, you can set up IKE, Encryption and Authentication. The General setting for the local and remote side should be the same when using Net-to-Net application. -
Page 69: Ipsec > Connections
VPN > IPSec > General setting Item Description Mode Select from Disable or Enable. The default is Disable. Protocol Select from IKEv1 or IKEv2. Aggressive mode Select from Enable or Disable (default). (Note: The Aggressive mode is for IKEv2.) Encryption Select from AES128 (default), AES192, AES256 or 3DES. - Page 70 INDUSTRIAL 4G LTE CELLULAR ROUTER – B_UM V1.1.0...
- Page 71 Service > IPSec > Connections Item Description Mode Select from Disable or Enable. The default is Disable. Name Fill in the name of IPSec Tunnel. Status Display the connection status of IPSec. Local Host Fill in the WAN IP of cellular router. Subnet Fill in the subnet for the LAN of cellular router.
-
Page 72: Ipsec > The Setting Of X.509 Certificates
10.2.3 IPSec > The setting of X.509 Certificates The interface shows the setting items of X.509 Certificates. You need to create the IPSec Security Keys by clicking Create button, including Root CA, Local, Remote and Remote CA. E.g. To create Root CA file, click the Root CA button. For the IPSec connection, the client should set up properly Root CA, Local, Remote and ... -
Page 73: Vpn > Pptp Server
The GRE Mode is on. VPN > GRE Item Description Mode Select from Off or On to enable GRE. Local Address Set local address of the GRE tunnel. Remote Address Set remote address of the GRE tunnel. Tunnel Device Address Set IP address of this GRE tunnel device. -
Page 74: Vpn > L2Tp
(2) Clients Configuration There are two parts for Clients configuration. Summary part: User can delete and edit the existed PPTP clients. Add/Edit part: VPN > PPTP Server > Clients Item Description Mode Select from Off or On to set the client setting. Username The username of this client. - Page 75 VPN> L2TP > Server Mode Item Description Mode Select from Off or On to set the client setting. Auth The authentication method for L2TP connection. Available options: PAP, CHAP, MS-CHAP, MS-CHAPv2 Local IP The virtual IP for L2TP server. Remote begin IP The begin address of L2TP client's IP pool.
- Page 76 (3) Client Mode: Choose the Client mode and the interface will be changed as below. VPN> L2TP > Client Mode Item Description Mode Turn on/off this L2TP connection Server The L2TP server address or hostname. Auth The authentication method for L2TP connection. Should same as L2TP server's auth type.
- Page 77 Tip 1: There are two steps to manage the L2TP connection under client mode, First, Fill in the required parameters. Second, Click the Add button to create the L2TP connection. Tip 2: There are two steps to update the L2TP connection. First, Click the Edit button. Second, Update the parameters.
-
Page 78: Configuration > Firewall
11 Configuration > Firewall This section allows you to configurate Port Forwarding, DMZ, IP Filter, MAC Filter, URL Filter, and NAT. 11.1 Firewall > Port Forwarding This section allows you to set up Port Forwarding and click edit button to configure. INDUSTRIAL 4G LTE CELLULAR ROUTER –... -
Page 79: Firewall > Dmz
Firewall > Port Forwarding Item Description Turn on/off Port Forwarding to select Disable or Enable. The Mode default is Disable. Descript the name of Port Forwarding. Description Select from UDP or TCP Client which depends on the Protocol application. Fill in the beginning of source port. Source Port Begin Fill in the end of source port. -
Page 80: Firewall > Ip Filter
11.3 Firewall > IP Filter This section allows you to configure IP Filter. After clicking button, you can edit your IP protocol, source/port and destination/port. INDUSTRIAL 4G LTE CELLULAR ROUTER – B_UM V1.1.0... - Page 81 (1) The default is Disable Mode as the following interface. Firewall > IP Filter Item Description Mode Select from Disable or Enable. The default is Disable. Protocol Select from All, ICMP, TCP or UDP. Source IP Fill in your source IP address. Source Port Fill in your source port.
-
Page 82: Firewall > Mac Filter
11.4 Firewall > MAC Filter This section allows you to set up MAC Filter. After clicking button, you can edit your MAC address. Service > MAC Filter Item Description Mode Select from Disable or Enable. The default is Disable. MAC Address Fill in your MAC address. -
Page 83: Firewall > Url Filter
11.5 Firewall > URL Filter This section allows you to set up URL Filter. After clicking button, you can edit the type of filter and information. INDUSTRIAL 4G LTE CELLULAR ROUTER – B_UM V1.1.0... -
Page 84: Firewall > Nat
Please not include “https://” for the URL address in the Full Filter. Note: Firewall > URL Filter Item Description Mode Select from Disable or Enable. The default is Disable. Filter Select from Key or Full. The default is Key. Key/Full Fill in your Key/Full information. -
Page 85: Configuration > Service
12 Configuration > Service This section allows you to configure the SNMP, TR069, Dynamic DNS, VRRP, MQTT, UPnP, SMTP, and IP Alias. 12.1 Service > SNMP 12.1.1 SNMP configuration This section allows you to set the SNMP configuration. INDUSTRIAL 4G LTE CELLULAR ROUTER – B_UM V1.1.0... -
Page 86: Snmp V3 User Configuration
Service > SNMP > Community Item Description Mode Select from Disable or Enable to configure SNMP. Configure community setting with three options, including # 1, # 2 Community and #3. Mode Select from Disable or Enable. Name Name each community. Access Select from Read-Only or Read-Write. -
Page 87: Snmp Trap Configuration
12.1.3 SNMP trap configuration This section allows you to set up the SNMP trap configuration when you select the SNMP trap function from Alarm output of system for your router. With SNMP trap setting, you can know the status of remote device. Service >... -
Page 88: Service > Tr069
12.2 Service > TR069 This section allows you to set up TR069 client configuration. You can get information how to install TR069 Server (GenieACS Installation) from the application configuration chapter. Service > TR069 Item Description Mode Select from Disable or Enable. The default is Disable. ACS URL Fill in the URL address of ACS (Auto-Configuration Server). -
Page 89: Service > Dynamic Dns
12.3 Service > Dynamic DNS This section allows you to set up Dynamic DNS. Service > Dynamic DNS Item Description Mode Turn on/off this function to select Disable or Enable. The default is Disable. Service Provider Select the Service Provider of Dynamic DNS. Fill in your registered Host Name from Service Provider. - Page 90 Note: There are five options of Service Provider as below to explain the information. Service Provider dynv6.com Host Name Register hostname, e.g. tester.dynv6.net Token ID The token ID, e.g. v_ABjMMQxeAnWv5UwtuVn1QBriynzq Service Provider www.nsupdate.info Host Name Register hostname, e.g. tester.nsupdate.info Host Secret ID The Host Secret ID, e.g.
-
Page 91: Service > Vrrp
12.4 Service > VRRP This section allows you to configure VRRP. Service > VRRP Item Description Mode Select from Disable or Enable. The default is Disable. Specify which VRRP group of this router belong to (1-255). The Group ID default is 1. Enter the priority value from 1 to 254. -
Page 92: Service > Mqtt
12.5 Service > MQTT This section makes you configure MQTT which allows the MQTT client to send the message within specific topic or channel. By default, the router does not allow anonymous to read/write the MQTT topic or channel. Thus, you need to create the account with username and password for MQTT client in the web UI. - Page 93 Take for example, the interface is shown as below. The Manage Users section will show all users that you create. Moreover, each user can use the delete button to delete it. For the ACL control, user can specify what topic should be limited. In this case, we set up the publisher pub1 to write the critical topic.
-
Page 94: Service > Upnp
12.6 Service > UPnP This section allows you to set up UPnP confirguration to select the mode from Disable or Enable. The default UPnP is enabled for the cellular router. Note: UPnP™ (Universal Plug and Play) is a set of protocols that allows a PC to automatically discover other UPnP devices (anything from an Internet gateway device to a light switch), retrieve an XML description of the device and its services, control the device, and subscribe to real-time event notification. -
Page 95: Service > Ip Alias
12.8 Service > IP Alias This section allows you to set IP Alias configuration. IP Alias is associating more than one IP address to a network interface. With IP Alias, one node on a network can have multiple connections to a network, each serving a different purpose. IP Alias can be used to provide multiple network addresses on a single physical interface. -
Page 96: Configuration > Management
13 Configuration > Management This section provides you to manage the router, set up your administration and know about the status of current software and firmware. Also, you can back up and restore the configuration. 13.1 Management > Identification This section allows you to confirm the profile of router, current software, firmware version and system uptime. -
Page 97: Management > Administration
13.2 Management > Administration This section allows you to set up the name of router and change your new password. For the Session TTL, you can set up what duration of time will be logout. If you don’t need to have this timeout limitation, you can fill in “0“(Zero). - Page 98 INDUSTRIAL 4G LTE CELLULAR ROUTER – B_UM V1.1.0...
-
Page 99: Management > Ssh
13.3 Management > SSH Secure Shell (SSH) allows user to configure system via a secure channel. User can configure system from either public domain or local LAN. Management > SSH Item Description Mode Select from Disable or Enable SSH function. Server Port The port number is where SSH server works on. -
Page 100: Management > Firmware
13.4 Management > Firmware This section provides you to upgrade the firmware of router. (1) Click Select the firmware to upgrade button to choose your current firmware version in your (2) Select Upgrade button to update. (3) After upgrading successfully, the router will reboot automatically. 13.5 Management >... -
Page 101: Configuration > Diagnosis
14 Configuration > Diagnosis This section allows you to diagnose Ping and Traceroute for your Host (IP address or Domain Name). 14.1 Diagnosis > Ping Please assign the Host you want to ping. The result of the ping is as below. 14.2 Diagnosis >... -
Page 102: Configuration Applications
15 Configuration Applications This section explains specific examples how to configure your applications. 15.1 LAN > IPv4/IPv6 Dual Stack The router supports IPv4/IPv6 dual stack by default, it means IPv4 packages route to IPv4 network and IPv6 route to IPv6 network. Since IPv6 is global IP, there is no NAT between WAN site and LAN site. - Page 103 The router automatically detects IPv6 environment and query IP. After the IP is obtained successfully, it will distribute to LAN site hosts. INDUSTRIAL 4G LTE CELLULAR ROUTER – B_UM V1.1.0...
-
Page 104: Mqtt Broker
15.2 MQTT Broker The cellular router provides the MQTT broker feature which allow the MQTT client sending the message within specific topic (channel). By default, the cellular router does not allow anonymous to read/write the MQTT topic (channel). Thus, you need to create the account with username and password for MQTT client in the web UI. INDUSTRIAL 4G LTE CELLULAR ROUTER –... -
Page 105: Alarm Configuration
The Manage Users section will show all created users. Each user can use the delete button to delete it. For the ACL control, you can specify what topic should be limited. For example, we set the publisher pub1 to write the critical topic. Additionally, we also the subscribers sub1 and sub3 can read the critical topic. -
Page 106: Openvpn Configuration
(2) Alarm Output: In case of SMS is selected then only user’s phone number is in selected group and on selected working day would receive alarm SMS. In case of SNMP trap is selected, please make sure you enable SNMP trap (Service→SNMP) ... -
Page 107: Openvpn Server Mode
15.4.1 OpenVPN Server Mode OpenVPN server certificate generation For the OpenVPN server mode, the OpenVPN web UI provides the buttons to generate the required files. The files include Root CA, Cert, Key and OpenVPN client files. The file will be generated when you click the corresponded Create button. -
Page 108: Openvpn Client Mode
And you can click the info button to show the detail for each files, or click the download button to download the file to PC. 15.4.2 OpenVPN Client Mode OpenVPN client certificate import For the OpenVPN client mode, the OpenVPN web UI provides the buttons to import the required files.The OpenVPN client can use the Root CA, User Key and User Cert files from OpenVPN server to authenticate the VPN tunnel. -
Page 109: Openvpn With Third-Party Server
15.4.3 OpenVPN with third-party server A VPN enables you to send and receive data across shared networks. For some users, they will use the VPN to access the limited network service from the different country. But normally, the third-party OpenVPN server will provide the .ovpn configuration files for the OpenVPN client. -
Page 110: Install Openvpn Access Server On Docker
If the third-party OpenVPN server is reachable, the VPN tunnel will be established. When the OpenVPN VPN tunnel is established, the status shows Connected and the information for IP address and the time. In this moment, the PC1 can visit the http://www.vpngate.net and the web UI should indicate the PC1 in the Japan at now as the below figure. - Page 111 Install via curl sh -c "$(curl -fsSL https://bit.ly/2GrzYyS)" Install via wget sh -c "$(wget https://bit.ly/2GrzYyS -O -)" Install Docker on Ubuntu 16.04 64bit Reference: https://docs.docker.com/engine/installation/linux/docker-ce/ubuntu/ Set up the repository sudo apt-get remove docker docker-engine docker.io sudo apt-get update sudo apt-get install \ apt-transport-https \ ca-certificates \ curl \...
- Page 112 After logged, please change the user authentication type to Local like the following figure. And switch to the User Permission page to create the user for Cellular Router. (In this case, we use the test/test to be the example.) INDUSTRIAL 4G LTE CELLULAR ROUTER – B_UM V1.1.0...
- Page 113 Also check the Access From all other VPN clients to make the Cellular Router could be reachable. INDUSTRIAL 4G LTE CELLULAR ROUTER – B_UM V1.1.0...
- Page 114 Setup Cellular Router OpenVPN client Use the user test/test to login https://<server_ip_or_domain>:943 Please make sure to change the type from Connect to Login. INDUSTRIAL 4G LTE CELLULAR ROUTER – B_UM V1.1.0...
- Page 115 After logged, please download the .ovpn configuration by click the user-locked profile. Upload the .ovpn configuration to Cellular Router OpenVPN custom mode, and input the username and password. When the VPN tunnel established, the Cellular Router can be managed/accessed by the other VPN clients.
-
Page 116: Install Pritunl Openvpn Server On Docker
15.4.5 Install Pritunl OpenVPN server on Docker Pritunl OpenVPN server on Docker installation Pritunl is a distributed enterprise vpn server built using the OpenVPN protocol. Quick Installation Prerequisites Ubuntu 16.04 curl or wget should be installed Install via curl ... - Page 117 - pritunl:/var/lib/pritunl - mongo:/var/lib/mongodb privileged: true network_mode: "host" ports: - "1194:1194/tcp" - "1194:1194/udp" - "80:80/tcp" - "443:443/tcp" volumes: mongo: pritunl: (3) Run the command docker-compose up -d to start the server (4) Check the Pritunl OpenVPN Server by visiting https://<server_ip_or_domain> Setup Pritunl OpenVPN Server for Cellular Router The server will running on https://<server_ip_or_domain>.
- Page 118 OpenVPN user setup Please navigate to the User page to setup the OpenVPN user account. Add the organization by click the Add Organization button. (In this document, we use the MR to be the organization example.) When the organization be created, the Users page should be like the following figure. INDUSTRIAL 4G LTE CELLULAR ROUTER –...
- Page 119 Then add the OpenVPN user by click the Add User button. Note: In this OpenVPN server, the PIN must contain only digits. Note: In this document, we use the test/123456 OpenVPN user to be the example. INDUSTRIAL 4G LTE CELLULAR ROUTER – B_UM V1.1.0...
- Page 120 OpenVPN server setup Please navigate to the Server page to setup the OpenVPN server. And click the Add Server button to create the OpenVPN server. Note: Please click the Advanced tab and make sure the Inter-Client Communication be checked INDUSTRIAL 4G LTE CELLULAR ROUTER – B_UM V1.1.0...
- Page 121 When the OpenVPN server created, the Servers page should like the following figure. And click Attach Organization button to setup the OpenVPN server. Start the OpenVPN server by click Start Server button. INDUSTRIAL 4G LTE CELLULAR ROUTER – B_UM V1.1.0...
- Page 122 Cellular Router setup First, please navigate to the Users page and download the user configuration file and extract it. Note: In this document, you should get the MR_test_router.ovpn file. And visit the Cellular Router OpenVPN custom page then import the .ovpn file. Fill up the username/password which be setup in OpenVPN user setup part.
- Page 123 When the Cellular Router OpenVPN connected, the Pritunl OpenVPN server also update the user status. INDUSTRIAL 4G LTE CELLULAR ROUTER – B_UM V1.1.0...
-
Page 124: Vrrp Topology
15.5 VRRP Topology Basic VRRP Topology Base on this topology and VRRP Parameter settings, Router A and Router B will offer a virtual router service with virtual IP = 192.168.1.200 for the client. 15.6 TR069 Server (GenieACS Installation) Server OS: Ubuntu 14.04 on Virtualbox Installation: 1) Login ubuntu 2) Change to root by 'su -' and enter your root password. - Page 125 cd ruby-2.4.1 ./configure make && make install ruby -v ruby 2.4.1p111 (2017-03-22 revision 58053) [i686-linux] cd /opt gem install rails --no-ri --no-rdoc gem install bundle --no-ri --no-rdoc 7) Install node.js cd /opt wget http://nodejs.org/dist/v8.2.1/node-v8.2.1.tar.gz tar zxvf node-v8.2.1.tar.gz cd node-v8.2.1 ./configure make &&...
- Page 126 npm run compile Modify FS_HOSTNAME field in genieacs/config/config.json for device retrieve firmware file Original configuration: "FS_HOSTNAME" : "acs.example.com" New configuration example.: "FS_HOSTNAME" : "192.168.0.199" Note: It is the place where the device firmware file stored. Generally, it is the IP address on where your GenieACS server installed.
- Page 127 GenieACS startup script: #!/bin/sh GENIE_PATH=/opt/genieacs/bin GENIE_GUI_PATH=/opt/genieacs-gui echo "start mongod." pidof mongod if [ $? != 0 ]; then /opt/mongodb-linux-i686-3.3.3/bin/mongod --dbpath /data/db --journal --storageEngine=mmapv1 --fork --syslog echo "start North Bound/RESTful Interface service." $GENIE_PATH/genieacs-nbi & echo "start ACS/CWMP service." $GENIE_PATH/genieacs-cwmp & echo "start HTTP/File streaming service." $GENIE_PATH/genieacs-fs &...
- Page 128 2) GenieACS Operation Input http://GenieACS server IP:3000 on browser url bar and Enter. Press Home tab to refresh Online devices status. 2.1) Login Username and Password are admin/admin. INDUSTRIAL 4G LTE CELLULAR ROUTER – B_UM V1.1.0...
- Page 129 3) Device information Press Devices tab Move mouse to line end of your device, the Show link show up. Press Show link, the device information show up. INDUSTRIAL 4G LTE CELLULAR ROUTER – B_UM V1.1.0...
- Page 130 4) Access parameters Scroll up/down on Device parameters list, the Refresh Edit link show up at line end of parameter. For Readable parameter For Readable and Writable parameter 4.1) Get parameter value Press on the Refresh link, the Pending tasks window will pop up on right top to ask you to allow or Cancel this action.
- Page 131 Press Commit to get this parameter value. Note: If the GenieACS can reach the device, the parameter value will be updated immediately. Otherwise, this request will be queued on Task queue list until next time device connect to GenieACS. Note: To update the whole tree, refresh the root parameter (InternetGatewayDevice.).
- Page 132 Input new value and press OK. The Pending tasks window will pop up to ask you to allow or Cancel this action. INDUSTRIAL 4G LTE CELLULAR ROUTER – B_UM V1.1.0...
- Page 133 Press Commit to set this parameter value. Note: If the GenieACS can reach the device, the parameter value will be set immediately. Otherwise, this request will be queued on Task queue list until next time device connect to GenieACS. 5) Reboot device Press on Reboot link.
- Page 134 The Pending tasks window will popup to ask you to allow or Cancel this action. Press Commit to reboot device. Note: If the GenieACS can reach the device, the device will reboot immediately. Otherwise, this request will be queued on Task queue list until next time device connect to GenieACS. 6) Reset to default Similar to Reboot device except pressing on Factory reset...
- Page 135 The link will redirect to Files tab Press File: browse button, select the firmware, and then press Upload button. The firmware will be added to listing files as below. 7.2) Upgrade Move mouse to the Push file>> link, the upgrade firmware name will pop up as below picture. INDUSTRIAL 4G LTE CELLULAR ROUTER –...
- Page 136 Move mouse to the upgrade firmware name and press it. The Pending tasks window will pop up to ask you to allow or Cancel this action. Press Commit, then firmware upgrade started. Note: If the GenieACS can reach the device, the firmware upgrade will be started immediately. Otherwise, this request will be queued on Task queue list until next time device connect to GenieACS.
-
Page 137: Test Case Example
16 Test Case Example 16.1 MQTT Topology This MQTT Topology shows the cellular router to connect PC-A and PC-B’s LANs and have two results are as below. Expect Result: (1) PC-A sends message to PC-B and PC-B should not receive any message. (2) PC-B sends message to PC-A and PC-A should receive message. - Page 138 Step2: Configure MQTT for the Cellular Router You need to add two users. For example, we create the users for test and test2. INDUSTRIAL 4G LTE CELLULAR ROUTER – B_UM V1.1.0...
- Page 139 You need to add two ACLs based on the users you created. For instance, we create two ACLs for test user and test2 user. INDUSTRIAL 4G LTE CELLULAR ROUTER – B_UM V1.1.0...
- Page 140 Note: For Receive message command format: Mosquitto_sub -h <M300 IP> -t <Topic> -u <username> -P <password> For Send message command format: Mosquitto_pub -h <M300 IP> -t <Topic> -u <username> -P <password> -m <message> Step3: There are two test MQTT examples. Example 1: PC-A sends message to PC-B and PC-B should not receive any message.
- Page 141 For PC-A, command "mosquitto_pub -h 192.168.1.1 -t abc -u test -P test -m test" and confirm the message on PC-B. It won’t receive any message on PC-B. INDUSTRIAL 4G LTE CELLULAR ROUTER – B_UM V1.1.0...
- Page 142 Example 2: PC-B sends message to PC-A and PC-A should receive message. For PC-A, command "mosquitto_sub -h 192.168.1.1 -t abc -u test -P test" For PC-B, command "mosquitto_pub -h 192.168.1.1 -t abc -u test2 -P test2 -m test" and confirm the message on PC-A.
-
Page 143: Ip Routing Topology
16.2 IP Routing Topology This IP Routing topology that the cellular router connects Router-1 as result. (1) PC-A sends ICMP packet to Router-1 LAN and WAN IP and they should have response. Note: Router-1 is pure router and should be supported "NAT enable / disable". ... - Page 144 Result: PC-A sends ICMP packet to Router-1 LAN and WAN IP and they should have response. INDUSTRIAL 4G LTE CELLULAR ROUTER – B_UM V1.1.0...
Need help?
Do you have a question about the M302-L and is the answer not in the manual?
Questions and answers