
Related Manuals for fantastic furniture Cabin King Single Loft Bed


Summary of Contents for fantastic furniture Cabin King Single Loft Bed
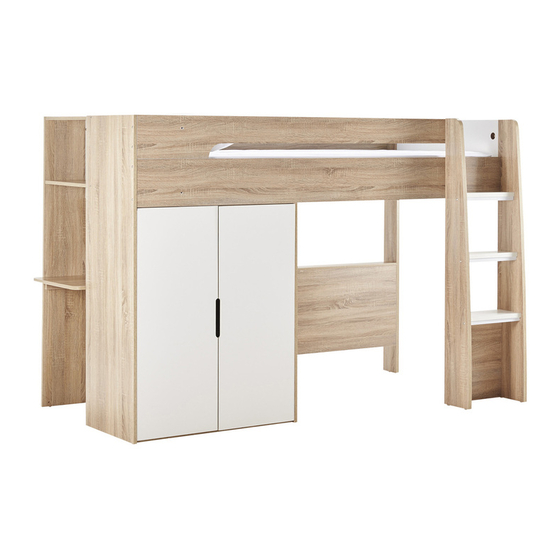
- Page 1 I ,� � Fantastic Furniture Version 1.3 Two People Note: Assembly has two options: A or B Cabin King Single Loft Bed www.fantasticfurniture.com.au Required...
- Page 2 Fantastic Furniture Love it? Share it! Fantastic buy! Share how it looks at home on Instagram for your chance to win a $250 Fantastic Furniture Gift Card! @fantasticfurniture Fantastic Furniture www.fantasticfurniture.com.au Page 2...
-
Page 3: Assembly Checklist
Assembly checklist Read through the instructions carefully Make sure you have all the required tools. before you begin. Never use power tools unless instructed. Identify and lay out all of the components Unless instructed, do not fully tighten screws before you begin assembly. until the item is fully assembled. - Page 4 Other tools you need: Flat head screwdriver, Phillips head screwdriver, Mallet (soft headed); 39 x Cam Bolts (07x35) 43 x Cam Nuts (015x12) 2 x Cam Bolts (06x64) 56 x Dowels (L30mm) (H1) (H2) (H3) (H4) � 2 x Bolts (M6x12) 26 x Nuts 32 x Bolts (M6x60) 6 x Bolts (M6x35) 33 x Bolts (M6x30)
- Page 5 Parts list Box 1: Right Front Leg (P8); Right Middle Panel (P9); Right Back Leg (P10); Left Back Support (P16); Left Ladder Post (P29); Box 2: Front Bedside Down Panel (P6); Long Support Rails (P7); 2 x Short Support Rails (P11); Front Bedside Up Panel (P12);...
-
Page 6: Parts List
Parts list Fantastic Furniture www.fantasticfurniture .com.au Page 6... - Page 7 Step1 You will need 18 x Cam Bolts 12 x Dowels (H1) (H4) Phillips head screwdriver Hammer Insert 18 x Cam Bolts (H1) to Panels (P2), (P3), (P4) & (P5) and 12 x Dowels (H4) to Panels (P1), (P2) & (P3) as shown. Step2 You will need �...
- Page 8 Step3 Two People You will need � Required · , 4 x Cam Nuts (H2) Phillips head screwdriver Thi.s i.s how a cam nuts works ..The head of the cam bolt goes into the open mouth of the cam nuts. You then turn the cam nuts so it Insert 4 x Cam Nuts (H2) to Panels (P1), rotate the Cam Nuts, tightens over the bolt.
- Page 9 Step5 Two People You will need Required � · , 7x Cam Nuts (H2) Phillips head screwdriver Insert 7 x Cam Nuts (H2) to Panels (P1), (P2) & (P3), rotate the Cam Nuts, so the arrow point towards the incoming Cam Bolts. Attach (P5) to (P1), (P2) &...
- Page 10 Step7 You will need 32 x Dowels Hammer (H4) Insert 26 x Dowels (H4) to Panels (P9), (P14), (P15), (P18), (P19), (P20), (P21), (P22), (P25), (P26), (P27) & (P28) as shown. Steps You will need � · , 21 x Cam Bolts (H1) Phillips head screwdriver...
- Page 11 Step9 You will need � 4 x Bolts 8 x Half Moon 8 x Hex Nuts (H10) Nuts(H11) (H12) � 2 x Spanner (H24) --- - - ' , ' , , , , , , , , , , , , �=-- - - - - , : �...
- Page 12 Step 11 Insert 10 x Cam Nuts (H2) to Panel You will need (P25), (P26), (P27), (P28), rotate the Cam Nuts, so the arrow point towards the incoming Cam Bolts. � Attach (P25), (P26), (P27), (P28) to (P29) & (P8), turn the Cam Nuts ·...
- Page 13 Step 13 ---� Ensure the slot on nut is facing inco in bolt -- - � x You will need � 4 x Nuts 4 x Bolts (H5) (H6) 1 xAllen Key (H23) Two People Insert 4 x Nuts (HS) to Panel (P6). Then attach (P6) to (P4) & (P8) with 4 x Bolts (H6) by using a Allen Key.
- Page 14 Step 14 You will need � 5 x Nuts 5 x Bolts (H5) (H6) � 1 x Allen Key (H23) Insert 5 x Nuts (H5) to Panel (P12) and (P29). Then attach (P12) to (P4) & (P29) with 5 x Bolts (H6) by using a Allen Key (H23).
- Page 15 Step 16 You will need 4 x Nuts 4 x Bolts (H5) (H6) 1 x Allen Key (H23) " " " Two People Insert 4 x Nuts (H5) to Panel (P17). Then attach (P17) to (P10) & (P13) with 4 x Bolts (H6) by using a Allen Key (H23). Fantastic Required Furniture...
- Page 16 Step 17 You will need Nuts Bolts (H5) (H6) 1 xAllen Key (H2 3 ) " Two People Insert 3 x Nuts (H5) to Panel (P14). Then attach (P14) to (P4) & (P13) with 3 x Bolts (H6) by using a Allen Key (H23). Fantastic Required Furniture...
- Page 17 Step 18 Two People You will need Required 3 x Nuts 2 xCam Nuts 3 x Bolts (H2) (H5) (H6) 1 x Allen Key Philli p s head (H23) screwdriver , ,__ - - , , (H23) -� - - - -- - - - - - - - - - - � ' , , , , /�...
- Page 18 Step 19 You will need 4xCam Nuts (H2) Phillips head screwdriver " " Insert 4 x Cam Nuts (H2) to Panels (P14) & (P15), rotate the Cam Nuts, so the arrow point towards the incoming Cam Bolts, then attach (P16) to (P14) & (P15), turn the Cam Nuts clockwise to tighten.
- Page 19 Step 20 You will need 2 x Bolts 2 x Bolts (H8) (H9) Phillips head screwdriver Flat head screwdriver Insert 2 x Bolts (H8) to panel (P16) & (P17), then lock with 2 x Bolts (H9) by using a Phillips head screwdriver and a Flat head screwdriver as shown. Fantastic Furniture www.fantasticfurniture.com.au...
- Page 20 Step 21 You will need � Cam Nuts (H2) · , Cam Bolts (H3) Phillips head screwdriver _ _ ___ _ _ _ ... Insert (H3) half length of the bolt into the hole, then put Cam Nuts (H2) to (P20), rotate the Cam Nuts, so the arrow point towards the incoming Cam Bolts, turn the °...
- Page 21 Step 23 You will need 5 x Nuts 1 x Cam Nut 5 x Bolts (H5) (H2) (H6) 1 x Allen Key (H23) Phillips head screwdriver "" , .. , , ' "- :�� (-��) \(H5) ..____ _ ..Insert 1 x Cam Nut (H2) to (P19), rotate the Cam Nut, so the arrow point towards the incoming Cam Bolts, insert 5 x Nuts (H5) to (P18) &...
- Page 22 Step 24 You will need 2 x Cam Nuts (H2) Phillips head screwdriver Required Insert 2 x Cam Nuts (H2) to (P5), rotate the Cam Nut, so the arrow point towards the incoming Cam Bolts, push (P20) tightly to (P5), then turn the Cam Nuts clockwise to tighten.
- Page 23 Step 26 Option A Shelf height is higher You will need · , 7 x Bolts (H8) Phillips head screwdriver Attach (P21), (P22), (P23) & (P24) to (P1), (P16) & (P20) with 7 x Bolts (HS) by using a Phillips head screwdriver. Do not fully tighten the bolts at beginning, until all bolts are well aligned.
- Page 24 Step 27 ----- You will need /(H15 � � 4x Screws 8 x Bolts (H14) (H15) "" "' /"" .. __ ,.., ,.L, � 4 x Hinges (H18) e� � �� � · , 2 x Door Catch (\4�:if (H 2 1) (H21)
- Page 25 Step 29 You will need 8 x Screws 8 x Bolts (H14) (H15) Phillips head screwdriver = = = = = = = = = � R � - - - - - - - -- - - - - - - - \ .,.
- Page 26 Fix the Metal Support Bar (H37) with 4 x Bolts (H25) Step 30 .. - - - - ..by using a Phillips head screwdriver . ' 2 5 ) · � You will need .."""\ 4 x Bolts Phillips head (H25) screwdriver...
- Page 27 Step 31 Make sure the bed is square before fix the bedbase You will need 16 x Screws (H13) Option A Option B Fantastic Furniture www.fantasticfurniture.com.au Page 27...
-
Page 28: Job Complete
Step 32 Option A Job Complete! In the interest of our environment please dispose of all packaging thoughtfully Fantastic Furniture www.fantasticfurniture.com.au Page 28... - Page 29 Step 33 You will need Wardrobe Rail Screws Support (H19) (H14) Phillips head screwdriver Wardrobe Rail Support B (H19) Option B Fix 2 x Wardrobe Rail Support A (H19) to (P16) & (P1) with 4 x Screws (H14) by using a Phillips head screwdriver.
- Page 30 Step 34 Option B Job Complete! In the interest of our environment please dispose of all packaging thoughtfully Fantastic Furniture www.fantasticfurniture.com.au Page 30...
- Page 31 Step 35 TO ADJUST YOU DOORS TO MAKE THE GAPS MORE EVEN (OPTIONAL). You will need Side panel STEP 35.1 Open the door. Phillips head screwdriver / / / / �½ ✓ ,"/, / / MOVE DOOR UPWARD OR DOWNWARD STEP 35.2 Unscrew 2 screws in round Tighten 2 screws in...
Need help?
Do you have a question about the Cabin King Single Loft Bed and is the answer not in the manual?
Questions and answers