Amico Alert-4 Operation & Maintenance Manual
Lcd ethernet master alarm
Hide thumbs
Also See for Alert-4:
- Operating & maintenance manual (25 pages) ,
- Operating & maintenance manual (36 pages)
Table of Contents
Advertisement
Quick Links
Advertisement
Table of Contents

Related Manuals for Amico Alert-4


Summary of Contents for Amico Alert-4
- Page 1 Operation & Maintenance Manual Alert-4 LCD Ethernet Master Alarm...
-
Page 2: Table Of Contents
Step 2: Frame Assembly Step 3: System Power Supply Connecting Dry Contacts Step 4: LCD Display Setup Configuration Guide Amico LCD Alert-4: Master Alarm Configuration Configuration Guide Channel Name and Alarm Conditions Network Setup Equipment Needed To Setup The Network Setup... - Page 3 Wiring Diagram: Circuit Board Appendix B Wiring Diagram: Auto-Switch Power Supply Appendix C Wiring Diagram: LCD Display Module - Alarm Buzzer Appendix D Technical Specifications Appendix E Wiring A. General Requirements B. Low Voltage Wire Type, Size, and Other Requirements www.amico.com...
-
Page 4: User Responsibility
Should such repair or replacement become necessary, please contact Amico Corporation or their distributors. All alarms should not be repaired or altered without prior written or verbal approval from Amico Corporation or its distributors. Failure to comply will void all warranty on the alarm. -
Page 5: Features
Unlimited records of history log to keep track of alert history for easy troubleshooting. Introduction The Amico Master LCD Alarm System (Alert-4) incorporates the latest microprocessor based technology for alarm and surveillance systems. The alarm has been designed to provide user flexibility and reliability. This manual shall enable the customer to install, use, and maintain the alarm appropriately. -
Page 6: Description Of The Alarm
Description of the Alarm Shipment Details When you receive an Alert-4 LCD Master Alarm from Amico Corporation, the package will consist of two main sections: the Alarm Back Box and the Frame/Module Assembly. The Alarm Back Box The Alarm Back Box contains the auto-switchable System Power Supply with an ON/OFF switch, a built-in fuse and terminal blocks (115 to 220 VAC - 50 to 60 Hz). -
Page 7: Installation Guide
Close the LCD screen with a Back Box by tightening two screws provided with divider plate. iv. Loosen the screws from the sides frame section (2 screws provided). Cover the frame and tighten the side screws. CAUTION: Do not use impact drill or screwdrivers when assembling new frame. www.amico.com... -
Page 8: Step 3: System Power Supply
Installation Guide CAUTION: 1. The microprocessor circuitry on the Alert-4 Alarm contains sophisticated integrated semiconductors. DO NOT TOUCH any of the components on the board. Static discharge can cause the modules to malfunction or become damaged. 2. Keep the shield drain wires as short as possible and taped to prevent from grounding, so they can not touch the front panel circuit board when front panel is closed. -
Page 9: Step 4: Lcd Display Setup
Select Time (HR/MlN) - press CHANGE UP/DOWN to change. Press the Select button (B4) to complete Setup. NOTE: Hold the “MUTE” button for twenty (20) seconds to display Channel ID. NOTE: Press the Setup button (B1) in order to make corrections/go back. www.amico.com... -
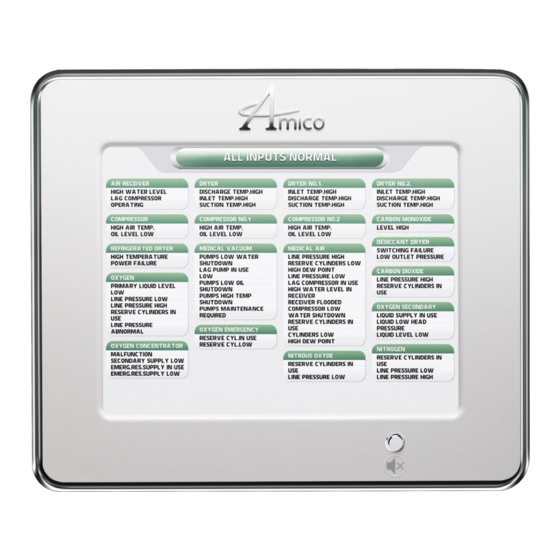
Page 10: Configuration Guide
The module allows up to 16 characters per line. To configure the alarm channels, perform the following steps: 1. Open the Master Configuration program provided by Amico Corporation on the SD Card. 2. Click “File” located at the top left corner. Then click “Start New Config”. Then click “Add Group”. - Page 11 Configuration Guide 3. Double click on the “Group 1” column. The “Edit Group” window will pop up. Close 4. Under “Group Name”, identify the medical gas source supply (e.g. Oxygen Bulk Farm). Close www.amico.com...
-
Page 12: Configuration Guide
Oxygen Primary Liquid Level Low). To set alarm conditions for a normally open or closed circuit, click the drop down arrow to change alarm conditions. Close a. To modify the Group Name, double click to open the “Edit Group” window. Revise the group name then click “Close“. Close 12 Amico Corporation... - Page 13 3. Save the Configuration file to the SD Card. The file name must be saved as master.cfg in the “Master Configuration“ file type. 4. To load the configuration file into the master alarm, follow the instructions under “Installation Guide” on page 16 of this manual. www.amico.com...
-
Page 14: Network Setup
• Amico Alert-4 Master Alarm will be set to factory default setting. The IP Address, Subnet Mask and Gateway will be set as follows: IP Address: 192.168.1.100... -
Page 15: Assign An Ip Address
Click the Network Config to assign network parameters and set up email and text notification using Master Configuration program provided by Amico Corporation on the SD Card. Provide network parameters and click OK to Save. Network file with provided network parameters will automatically generate in the SD Card. - Page 16 IP ADDRESS: 192.168.1.100 If the configured information does not appear on the screen, repeat the steps above. If the problem persists, contact Amico Corporation for further assistance. • Once the information is visible on the LCD Alarm screen, leave the SD Card in the slot for approximately 1 minute in order for the information to be completely uploaded onto the alarm, and then proceed to remove the card.
-
Page 17: Connecting To Alarm
• Enter the device IP Address eg: (http://192.168.1.1xx) in the browser’s address bar*. NOTE: To find Alarm IP Address, press reset button on the back of the Alert-4 Master Alarm. IP Address will be displayed on the screen. Email Setup CAUTION: Have the information system personnel setup the email interface. - Page 18 NOTE: IP Address has to be routable if connecting to the alarm panel to the global network. SMTP Security: Alert-4 panel will require Plain Text Authentication. It is required to have the transport layer security and basic authentication only after stating TLS and anonymous users.
-
Page 19: Text Setup
If the panel is connected to the mail server it will send email while wiring the terminals to the recipients. NOTE: SMTP Security: Alert-4 panel will require Plain Text Authentication. It is required to have the transport layer security and basic authentication only after stating TLS and anonymous users. -
Page 20: Amico Mobile Eco System App
NOTE: If Alert-4 Alarms are given with local IP Address, the phone must be connected to local WiFi before connecting the app to the Alert-4 Alarm. If Alert-4 Alarm is given with global IP Address, connecting the phone to local WiFi is not needed. - Page 21 Amico Mobile Eco System App Click to Open Manuals Click to Contact Amico Slide Left to Delete Device Display Exact Image of the Alarm Re-order mode Click to add more devices Press and hold the device screen to Device Manual move the device www.amico.com...
-
Page 22: Network Diagrams
Network Diagrams Direct Connection Simple Unmanaged Network 22 Amico Corporation... -
Page 23: Complex Managed Network
Channel 1: OXYGEN: OXY LINE PRESSURE HIGH [27/08/2019, 11:34:32] Alarm condition CLEARED Channel 1: OXYGEN: OXY LINE PRESSURE HIGH [27/08/2019, 11:35:01] Alarm condition TRIGGERED Channel 2: OXYGEN: OXY LINE PRESSURE LOW [27/08/2019, 11:35:36] Alarm condition CLEARED Channel 2: OXYGEN: OXY LINE PRESSURE LOW www.amico.com... -
Page 24: Web Audio
If the PC audio doesn’t turn on automatically, click mute and re-activate the alert to turn PC Audio ON. Mute Alarm NOTE: If muting the audio in the web page doesn’t silence audio at the alarm panel, press Mute button at the panel. 24 Amico Corporation... -
Page 25: Spare Part Numbers
Model Number Description A2P-POWER-V2 Power Supply Module Alert-2 A3X-BOX-3LCD Alarm Back Box Assembly 3-Station Alert-2 A4M-MASTER-FRAME Master Alarm Frame Assembly for Alert-4 Ethernet A3P-RIBBON-CABLE Ribbon Cable 3” long A3X-A-TERM-LAB30 Terminal Block Label 30 points A3X-X-FRM-PLT-LCD LCD Alarm Frame Maintenance Mode Factory Default –... -
Page 26: Troubleshooting
SD Card must be formatted to FAT32 system. Alarm Logs not – 32GB. recorded. **Must leave an SD Card to the SD Card slot to record alarm logs.** SD Card formatted incorrectly. **Set the DATE & TIME appropriately.** 26 Amico Corporation... -
Page 27: Wiring Diagram: Circuit Board
Keep the shield drain wires as short as possible and taped to prevent from grounding, so they cannot touch the front panel circuit board when front panel is closed. To protect from static electricity, ensure to discharge body static before installing the Medical Gas Alarm. www.amico.com... -
Page 28: Wiring Diagram: Auto-Switch Power Supply
LCD Blue (5 VDC) Module Orange (15 VDC) CAUTION: Verify that power has been switched OFF prior to working on the alarm. Risk of electric shock, disconnect power at the circuit breaker before removing power supply shield. 28 Amico Corporation... -
Page 29: Wiring Diagram: Lcd Display Module - Alarm Buzzer
Appendix C Wiring Diagram: LCD Display Module - Alarm Buzzer Optional: To Amico Manifold Universal Remote Buzzer NC COM NO 12V GND Connector NO COM NC 12V GND Optional: Abnormal Alarm To Amico: Master Module or Building Management System Reset... -
Page 30: Technical Specifications
Maximum 10,000 ft [3,000 m] Cable: Minimum #22 gauge stranded wire Signal: 5 VDC < 5 µA LCD Generic Alarm: Output: Dry Contacts NC, open on Alarm Rating: 30 VDC 1.0 Amps. 60 VDC 0.3 Amps. 125 VAC 0.5 Amps. 30 Amico Corporation... -
Page 31: Wiring
1. #22 AWG stranded, shielded twisted pair wire ONLY must be used, rated for 300 V and 60° C (140° F) minimum (Belden 8451 or equivalent). The following rules along with references to this manual’s schematics clarify wiring requirements. Two conductor cables (must be #22 gauge stranded, shielded, and twisted pair cable type) are required for each input. www.amico.com... - Page 32 Amico Accessories Inc. | 122 East Beaver Creek Road, Richmond Hill, ON L4B 1G6, Canada Toll Free Tel: 1.877.264.2697 | Tel: 905.763.7778 | Fax: 905.763.8587 Email: info@amico-accessories.com | www.amico.com ACP-SP-ALERT4-LCD-AREA-ALARM 02.27.2023...
Need help?
Do you have a question about the Alert-4 and is the answer not in the manual?
Questions and answers