
Multitech Conduit AP MTCAP-L4E1 and MTCAP-LSP3 for mLinux Quick Start
- User manual (29 pages)
Advertisement
- 1 Introduction
- 2 Package Contents
- 3 Connectors and LEDs
- 4 Installing a SIM Card
- 5 Cabling Your Device
- 6 Sprint Activation
- 7 Accessing the Terminal Interface
- 8 Setting Time Zone, Time, and Date
- 9 Set Custom IP Address, Network Information, and Ethernet Internet Access
- 10 Configuring the Cellular Connection
- 11 Starting Cellular Connection on Boot
- 12 Configuring the LoRa Network Server for mLinux
- 13 Mounting the MTCAP
- 14 Determining Location for the Device
- 15 Mounting the Device
- 16 Additional LoRa and mLinux Information
- 17 Safety and Regulatory Content
- 18 Documents / Resources
Introduction
Conduit AP (MTCAP) connects thousands of IoT assets to the cloud using the LoRaWAN® protocol.
Note: Check for an updated version of this document at https://www.multitech.com/brands/multiconnect-conduit-ap/.
Package Contents
Your MTCAP ships with the following:
1 – RJ45 Ethernet cable
1 – Power supply
1 – Quick Start

Contact MultiTech if a replacement power supply is needed. Using a different power supply may damage the device and voids the warranty.
Connectors and LEDs

Note: Some features are available only on select models. The above image shows the model with all features.
| Item | Description |
| Connectors | |
| Power | 5 Volt power jack. |
| Ethernet | RJ45 Ethernet jack. |
| Reset | Reset button. Reboots device or restores factory defaults. |
| WPS | Reserved for future use. |
| SIM | Cellular models only. SIM slot. |
| LEDs | |
| STATUS | Blinks when operating system is fully loaded. |
| LORA | Lights when LoRa software is active. |
| CELL | Cellular models only. Lights when there is power to the radio. Blinks when the SIM is registered with the carrier. |
| WIFI | Reserved for future use. |
| Ethernet Link | Left LED on the Ethernet connector. Blinks when data is sent or received on the Ethernet link. Steady light when there is a valid Ethernet connection. |
| Ethernet Speed | Right LED on the Ethernet connector. Lit when the Ethernet is linked at 100 Mbps. If not lit, the Ethernet is linked at 10 Mbps. |
Installing a SIM Card
If your device has a SIM slot, you'll need a micro SIM card from your network provider.
To install the SIM card:
- With the contact side facing down, align the notched edge as shown on the following image and slide the SIM card completely into the SIM holder.


Cabling Your Device
To cable the MTCAP:
- Connect the Ethernet cable to the device's Ethernet port and to a PC.
- Connect the power supply to the power jack and wait 30 seconds for the device to power up.
Sprint Activation
For MTCAP-LSP3 only. When you install the SIM card, the device uses Sprint's over the air activation to automatically register your SIM to their network. For information on checking your APN and PDP context, refer to the Conduit AP MTCAP User Guide for Sprint (S000704).
Accessing the Terminal Interface
- On the PC, configure a static IP address for the network interface that is connected to the device within the following range: 192.168.2.2 - 192.168.2.254
- Open an SSH connection and log in.
Default IP address: (DHCP is disabled)
192.168.2.1
Default credentials for mLinux version 4:
username: mtadm and password: root
Note: The above credentials do NOT have root privileges. Some commands will not work unless you use sudo (for super user permissions). Refer to your model's Conduit AP MTCAP User Guide for details.
To use sudo, either execute: sudo [command] or start the root shell: sudo -s
Then enter the mtadm password. The prompt changes to mtcap:/home/mtadm#
For tips on using sudo, go to
http://www.multitech.net/developer/software/mlinux/usingmlinux/log-in-as-an-admin-post-production/
Setting Time Zone, Time, and Date
To set the time zone, date, and time:
- Create a symbolic link from the zone info file for your location to /etc/localtime:
ln -fs /usr/share/zoneinfo/Europe/Zurich /etc/localtime - Update the date and time to the current time:
date "2016-12-11 14:58:01" - Update the hardware clock:
hwclock -u -w
Set Custom IP Address, Network Information, and Ethernet Internet Access
To set the IP address and network information:
- Network configuration is defined in /etc/network/interfaces:
To change the static IP, change the address and netmask fields in that file (use vi or nano).
To apply changes, either reboot the device or issue: ifdown eth0 && ifup eth0. You'll lose your SSH session. - To enable DHCP with default settings, issue mlinux-dhcpd start:
Configure the dhcp server by editing /etc/udhcpd.conf, (use vi or nano).
You can issue the above command with stop or restart. - To configure internet access via the Ethernet port, modify /etc/network/interfaces as follows:
- Add gateway 192.168.2.254 beneath the netmask line, where 192.168.2.254 is your network router's IP address.
- To apply changes, reboot the device or issue: ifdown eth0 && ifup eth0 Again, you'll lose the SSH session..
- Test for internet access with ping 8.8.8.8.
Configuring the Cellular Connection
To establish a cellular data link, you must configure and initiate a PPP connection. Sample options, files, and chat scripts are provided in the ppp peers directory /etc/ppp/peers. Anything specific to the network or connection should be placed in one of these files. Global options should be placed in /etc/ppp/options.
- For L4E1 models only, For LSP3, skip to Step 2 (Sprint users should not change the APN).
# Set "APN" to the APN for your cellular provider
$ mlinux-set-apn APN - For LSP3 models only, For L4E1, skip to Step 3.
# Before establishing PPP connection, modify the file, /etc/ppp/options
sudo -s
echo -e '+ipv6\nipv6cp-use-ipaddr' >>/etc/ppp/options - Set up cellular data connection.
# Dial the connection (using /etc/ppp/peers/xxxx config)
$ pppd call xxxx (where xxx is l4e1 or lsp3) - Use the route Linux utility to verify ppp0 is up.
![]()
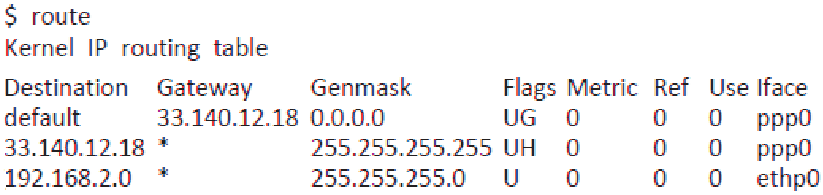
The ifconfig Linux utility can be used to inspect the ppp0 interface details.
$ ifconfig ppp0
ppp0 Link encap: Point-to-Point Protocol
inet addr: 33.140.12.18 P-t-P:33.140.12.18
Mask: 255.255.255.255
UP POINTOPOINT RUNNING NOARP MULTICAST
MTU:1500 Metric: 1
RX packets: 7 errors: 0 dropped: 0 overruns: 0 frame: 0
TX packets: 8 errors: 0 dropped: 0 overruns: 0 carrier: 0 collisions: 0 txqueuelen: 3
RX bytes: 106 (106.0 B) TX bytes: 145 (145.0 B)
Also, view the pppd logs in /var/log/messages to see the modem dialing and assigned IP address or errors if the connection was unsuccessful.
To Stop a PPP Connection
# send SIGTERM to pppd, which causes it to hang up and exit cleanly
$ killall pppd
Starting Cellular Connection on Boot
To automatically start pppd on boot requires setting the peer file to use and telling the system to run the ppp init script on boot.
- Issue ls /etc/ppp/peers to see the available peers files (l4e1, lsp3, etc.) to set the peer file.
- Edit /etc/ppp/ppp_on_boot (with vi or sudo) and change $PPPD call provider to your desired provider (l4e1).$PPPD call l4e1.
- Assuming you've set your APN, manually start the init script and check your Internet connection to test your change to: ppp_on_boot$ /etc/init.d/ppp start
- Issue this command: $ update-rc.d ppp defaults.
- Restart and test your connection.
Refer to the Conduit LoRa Access Point User Guide for instructions on stopping automatic start up.
Configuring the LoRa Network Server for mLinux
- Log in to the console, if you are not logged in.
- Establish an Internet connection via Ethernet or cellular.
- Edit the packet forwarder configuration as necessary by modifying /opt/lora/local_conf.json with vi or nano.
| Field | Setting |
| gateway_conf["server_address"] | LoRa network server address |
| gateway_conf["serv_port_up"] | LoRa network server's up port |
| gateway_conf["serv_port_down"] | LoRa network server's down port |
- Start the packet forwarder: $ /etc/init.d/lora-packetforwarder start .
Mounting the MTCAP
The device ships with a mounting bracket. You will also need:
- Four #6 screws with anchors
- Screwdriver
- Drill
Determining Location for the Device
Follow these guidelines for best performance:
- The LoRa antenna is omnidirectional, but for best results, mount the device so the LoRa antenna is in a vertical position as shown in the following image.
- Place the MTCAP as high as possible, such as near the top of a wall.
- Select a location central to all devices to be connected to this MTCAP.
- Avoid obstructions.
Thick walls and reflective surfaces, such as metal, weaken the signal between the MTCAP and other devices.
- Note the LoRa antenna location in the following image. The LoRa signal will be strongest radiating from that side of the device. The LoRa antenna is 31.2 mm long.
- We recommend conducting a site survey to test the signal strength in different locations before you mount the device.


Mounting the Device
- Determine where you want to mount the device.
- Mark where you want the screws to go.
- Drill holes for the screws and insert anchors.
- Place the mounting bracket and secure it with screws.
- Attach the device to the bracket and rotate to lock into place


Additional LoRa and mLinux Information
For additional information, including how to configure LoRa devices to communicate with your gateway, visit http://www.multitech.net.
- For an introduction to Lora, go to:
http://www.multitech.net/developer/software/lora/introductionto-lora/ - For help using mLinux, go to:
http://www.multitech.net/developer/software/mlinux/.
Safety and Regulatory Content
For safety and regulatory content, refer to the Conduit AP User Guide for your model, available at www.multitech.com.
MultiTech declares that this device is in compliance with the essential requirements and other relevant provisions of Directive 2014/53/EU. The declaration of conformity may be requested at https://support.multitech.com.

Documents / Resources
References
MultiTech Developer Resources » Log in as Admin Post-Production
MultiTech Developer Resources
MultiTech Developer Resources » mLinux
![www.multitech.com]() MultiTech: IoT Devices & Hardware Company | IoT Device Management
MultiTech: IoT Devices & Hardware Company | IoT Device ManagementMultiTech Product Support Portal
Download manual
Here you can download full pdf version of manual, it may contain additional safety instructions, warranty information, FCC rules, etc.
Download Multitech Conduit AP MTCAP-L4E1 and MTCAP-LSP3 for mLinux Quick Start
Advertisement


Need help?
Do you have a question about the Conduit AP MTCAP-L4E1 and is the answer not in the manual?
Questions and answers