Table of Contents
Advertisement
Quick Links
Advertisement
Table of Contents

Related Manuals for BRAND micro


Summary of Contents for BRAND micro
- Page 1 Pipettierhelfer | Pipette controllers...
-
Page 2: Scope Of Delivery
1 Introduction 1.1 Scope of delivery micro pipette controller, user manual 1.2 Terms of use • Carefully read the operating manual before using the device for the first time. • The operating manual is part of the device and must be kept in an easily accessible place. - Page 3 1.2.2 Operating manual symbols Symbol Meaning Symbol Meaning Danger area Wear protective gloves Wear eye protection 1.2.3 Format Format Meaning Format Meaning 1. Task Indicates a task. > Indicates a condition. a., b., c. Indicates the individual steps of Indicates a result. a task.
- Page 4 2 Safety Please read carefully! The instrument micro can be used in combination with hazardous materi- als, work processes and equipment. However, the operating manual can- not cover all of the safety issues that may occur in doing so. It is the user’s responsibility to ensure compliance with the safety and health regula- tions and to specify the corresponding restrictions before use.
-
Page 5: Operating Exclusions
2.1 Function The device serves as a pipetting aid. It reduces the risk of infection when pipetting liquids with disposable micropipettes with a ring mark, blood diluting pipettes and other pipettes with a shaft diameter < 5.5 mm and a volume of up to 1 ml. -
Page 6: Functional And Operating Elements
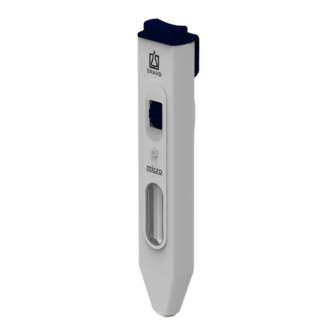
3 Functional and operating elements 3 Functional and operating elements Tip ejection key Adapter Suction bellows in micro pipette con- Adjustment wheel troller Venting button Viewing window Clip Suction system: 10a: Suction bellows Clamping jaw 10b: Plastic strip 10c: Adapter For a description of the suction system, refer to Replacing the suction sys- tem. - Page 7 4 Pipetting Correct hand position before pipetting a. Hold the device in your hand so that the setting wheel can be comfort- ably operated with your thumb. The nub on the back side of the de- vice rests between the pointer finger and middle finger. Attaching the pipette WARNING Never attach filled pipettes:...
- Page 8 4 Pipetting Regulating the suction volume Micropipettes ≤ 5 µl Micropipettes > 5 µl to 100 µl Turn the setting wheel toward the ejec- tion button until the clamping jaws are completely open. Micropipettes > 5 µl to 100 µl Turn the setting wheel toward the inspec- tion window until the clamping jaws compress the suction bellows to roughly...
- Page 9 a. Hold the device at an angle. b. Immerse the pipette into the liquid. c. Turn the setting wheel slowly toward the ejection button until the liquid reaches precisely the desired mark. (Micropipettes <5 µl fill themselves. Therefore, turn the setting wheel slowly toward the inspection window to stop the filling process at the de- sired mark on time.)
- Page 10 4 Pipetting Dispensing liquid on "In" calibrated pipettes a. Immerse the pipette into the dilution medium. b. Turn the setting wheel toward the in- spection window until the liquid is dispensed. c. Rinse out the pipette by aspirating and dispensing the dilution medium. While doing so, carefully aspirate the dilution medium up to the correct fill level of the medium being measured.
- Page 11 Dispensing liquid on "Ex" calibrated pipettes a. Hold the device vertically and place the pipette tip on the wall of a vessel held at an angle. b. Press the venting button until the liq- uid is drained. c. As soon as the meniscus in the pipette tip has come to a standstill, the wait time (if applicable) begins.
- Page 12 4 Pipetting Disposable micropipettes up to 50 µl a. Hold the device vertically above a dis- posal bag (pipette facing down). b. Press the ejection button. c. Properly dispose of the pipette. Disposable micropipettes > 50 µl and all reusable pipettes. These pipettes cannot be ejected.
- Page 13 5 Cleaning Occasionally clean the housing parts with a damp cloth. When used prop- erly, the instrument is maintenance-free. If the adapter and the suction system have been contaminated by liquid, these parts must be cleaned or disinfected immediately and replaced if necessary.
- Page 14 6 Replacing the suction system 6 Replacing the suction system Removing a suction system a. Turn the setting wheel toward the ejection button until you feel a slight resistance. Then turn the setting wheel back toward the inspec- tion window with 2 turning movements. b.
- Page 15 d. Remove the suction system with valve from the holder. e. Pull the suction bellows out from the valve. Inserting a suction system a. Slide the suction system onto the valve and insert it into the holder. b. Insert the plastic strip into both cavities of the side rails. c.
- Page 16 6 Replacing the suction system d. Position the top section of the device behind the outer adapter ridge (1) and hang it onto the hooks (2) of the bottom section of the device. e. Press both device sections together slowly and evenly. f.
- Page 17 7 Autoclaving NOTICE Check the effectiveness of autoclaving The effectiveness of autoclaving must be verified by the user. Maximum safety is achieved through vacuum sterilization. We recommend the use of sterilization bags. a. Eject or insert pipette. b. Autoclave the complete device without any further disassembling. Typical recommendation for autoclaving according to DIN EN 285: Temperature: 121 °C...
-
Page 18: Troubleshooting
8 Troubleshooting Problem Possible cause Corrective action Pipette broken off in adapter Pipette was damaged or Remove glass fragments pushed into the adapter with tweezers; replace with too much force adapter if necessary, see . Instrument suction system not work- Suction system damaged Replace suction system, ing/pipette dripping...
Need help?
Do you have a question about the micro and is the answer not in the manual?
Questions and answers