Advertisement
Quick Links
The ServView HD KVM Tray is an integrated 1U device that manages servers or KVM in data centers,
server rooms, and other space-critical environments.
Package Contents
(1) ServView HD KVM Tray
This Quick Setup Guide
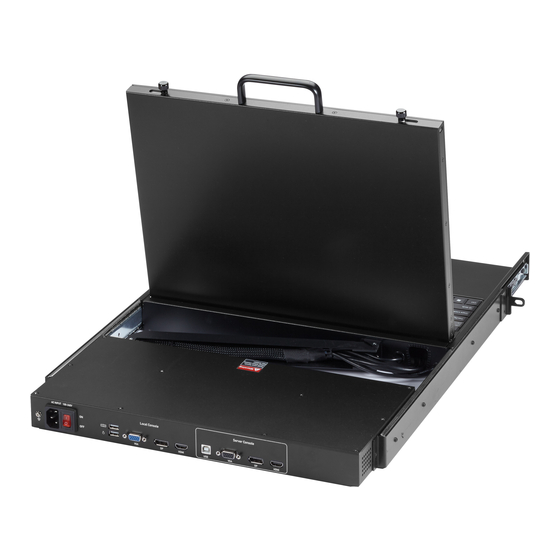
Open View
Front View
Rear View
1. Grounding Terminal
2. Power Socket
3. Power Switch
KVT617A Quick Setup Guide (V0.1)
(1)Rackmount brackets
4. USB Type A connector
5. USB Type A connector
6. VGA Connector
7. DP Connector
8. HDMI Connector
(1) Power cord
9. USB Type B Connector
10. VGA Connector
11. DP Connector
12. HDMI Connector
1
Advertisement

Related Manuals for Black Box KVT617A


Summary of Contents for Black Box KVT617A
- Page 1 KVT617A Quick Setup Guide (V0.1) The ServView HD KVM Tray is an integrated 1U device that manages servers or KVM in data centers, server rooms, and other space-critical environments. Package Contents (1) ServView HD KVM Tray (1)Rackmount brackets (1) Power cord This Quick Setup Guide Open View Front View Rear View 1. Grounding Terminal 4. USB Type A connector 9. USB Type B Connector 2. Power Socket 5. USB Type A connector 10. VGA Connector 3. Power Switch 6. VGA Connector 11. DP Connector 7. DP Connector 12. HDMI Connector 8. HDMI Connector...
- Page 2 KVT617A Quick Setup Guide (V0.1) Before Installation The surface for placing and fixing this device should be stable and level or mounted into a suitable cabinet. Make sure the place has enough ventilation, is out of direct sunlight, and is away from sources of excessive dust, dirt, heat, water, moisture, and vibration. The slide/rail-mounted equipment can be used as a shelf or a workspace. Install this product in a location that is convenient to related facilities. Rackmount Procedure Adjust the length of both brackets to match the mounting depth of your rack. * Adjustable depth from 20.4 to 35.7 inches (520 to 908 mm) Fasten the brackets to the rack pillars Slide the ServView HD KVM Tray between securely with the screws and cage nuts. the brackets. Fasten the ServView HD KVM Tray to the rack pillars by using screws.
- Page 3 KVT617A Quick Setup Guide (V0.1) Opening the ServView HD KVM Tray 1. Pull out the ServView HD KVM Tray. 2. Push the latch levers toward the center to release the locking position. 3. Flip up the ServView HD KVM Tray. Closing the ServView HD KVM Tray 1. Fold the ServView HD KVM Tray. 2. Push both latches with your index fingers in the direction as indicated before sliding the ServView HD KVM Tray into the rack. 3. Keep pushing the latches and slide the ServView HD KVM Tray in evenly until the device is back into the rack completely.
- Page 4 KVT617A Quick Setup Guide (V0.1) Connecting a Server ❶ USB 2.0 Type A Male to Type B Male USB cable ❷ VGA, DisplayPort or HDMI cable Connecting a KVM Switch ❶ USB 2.0 Type A Male to Type B Male USB cable ❷ VGA, DisplayPort or HDMI cable...
- Page 5 KVT617A Quick Setup Guide (V0.1) Connecting a Keyboard, Monitor and Mouse ❶ USB Keyboard/Mouse ❷ VGA, DisplayPort or HDMI cable Connecting a KVM Extender ❶ USB 2.0 Type A Male to Type B Male USB cable ❷ VGA, DisplayPort, or HDMI cable...
-
Page 6: Adjusting The Video Settings
KVT617A Quick Setup Guide (V0.1) Connecting an External USB Device Connecting the Power Code Adjusting the Video Settings The OSD menu controls the video quality. Use the buttons on the LCD panel to fine-tune the LCD display settings. To auto tune the LCD display: If the integrated LCD panel is not switched on, press POWER. Press UP/AUTO. An "Auto Adjusting" message appears, indicating that video settings are being fine-tuned. To manually fine-tune the LCD display: Press MENU. The OSD menu appears. Press UP/AUTO and DOWN/SOURCE to select the desired setting or option. Press MENU to confirm your selection or changes. After making the necessary changes, press EXIT to quit the current setting page or close the OSD menu. Black Box Corporation FREE 24/7 Technical Support: 877-877-2269 or techsupport@blackbox.com kvt617a_qsg_rev1.pdf...
Need help?
Do you have a question about the KVT617A and is the answer not in the manual?
Questions and answers