Table of Contents
Advertisement
Quick Links
CAT5/5e/6 LAN Performance Verifier
Digitally certify cables and devices
in Gigabit Etthernet networks.
Order toll-free in the U.S.: Call 877-877-BBOX (outside
Customer
Support
U.S. call 724-746-5500) FREE technical support 24
Information
hours a day, 7 days a week: Call 724-746-5500 or fax
724-746-0746 Mailing address: Black Box Corporation,
1000 Park Drive, Lawrence, PA 15055-1018 Web site:
www.blackbox. com • E-mail: info@blackbox.com
Chapter
TS580A-R4
BLACK BOX
®
Advertisement
Table of Contents

Subscribe to Our Youtube Channel
Related Manuals for Black Box TS580A-R4


Summary of Contents for Black Box TS580A-R4
- Page 1 Customer Support U.S. call 724-746-5500) FREE technical support 24 Information hours a day, 7 days a week: Call 724-746-5500 or fax 724-746-0746 Mailing address: Black Box Corporation, 1000 Park Drive, Lawrence, PA 15055-1018 Web site: www.blackbox. com • E-mail: info@blackbox.com...
- Page 2 FCC and IC RFI Statements FEDERAL COMMUNICATIONS COMMISSION AND INDUSTRY CANADA RADIO FREQUENCY INTERFERENCE STATEMENTS This equipment generates, uses, and can radiate radio- frequency energy, and if not installed and used properly, that is, in strict accordance with the manufacturer’s instructions, may cause inter ference to radio communication.
- Page 3 NOM Statement Normas Oficiales Mexicanas (NOM) Electrical Safety Statement INSTRUCCIONES DE SEGURIDAD 1. Todas las instrucciones de seguridad y operación deberán ser leídas antes de que el aparato eléctrico sea operado. 2. Las instrucciones de seguridad y operación deberán ser guardadas para referencia futura.
- Page 4 NOM Statement 9. El aparato eléctrico debe ser situado de tal manera que su posición no interfiera su uso. La colocación del aparato eléctrico sobre una cama, sofá, alfombra o superficie similar puede bloquea la ventilación, no se debe colocar en libreros o gabinetes que impidan el flujo de aire por los orificios de ventilación.
- Page 5 NOM Statement 18. Servicio por personal calificado deberá ser provisto cuando: A: El cable de poder o el contacto ha sido dañado; u B: Objectos han caído o líquido ha sido derramado dentro del aparato; o C: El aparato ha sido expuesto a la lluvia; o D: El aparato parece no operar normalmente o muestra un cambio en su desempeño;...
- Page 6 Trademarks Used in this Manual Trademarks Used in this Manual Black Box and the Double Diamond logo are registered trademarks of BB Technologies, Inc. Microsoft, Excel, Windows, and MS-DOS are registered trademarks of Microsoft Corporation. UNIX is a registered trademark of X/Open Company Ltd.
-
Page 7: Table Of Contents
Table of Contents Table of Contents 1. Specifications ..............8 2. Overview ................9 2.1 Introduction ...............9 2.2 Features ..............9 2.3 What’s Included ............10 2.4 Applications ............. 11 2.5 The LPV List of Functions ........... 13 3. The Three Phases of LAN Installation ......15 4. -
Page 8: Specifications
Chapter 1: Specifications 1. Specifications Power — (2) 9-V batteries (one for test unit and one for probe) Size — Test unit: 6"H x 3.125"W x 1.5"D (15.2 x 7.9 x 3.8 cm); Probe: 1.5"H x 1.5"W x 8"L (3.8 x 3.8 x 20.3 cm) Weight —... -
Page 9: Overview
Chapter 2: Overview 2. Overview 2.1 Introduction Over half of all network problems are caused by faulty cables. And with network speeds increasing exponentially, the need for affordable, sophisticated test equipment is more apparent than ever before. With the CAT5/5e/6 LAN Performance Verifier, you can check your network cabling and devices to ensure they work at the speeds promised by their manufacturers. -
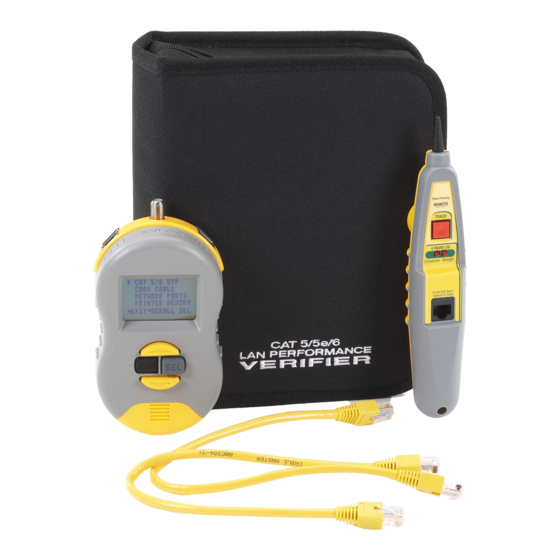
Page 10: What's Included
Chapter 2: Overview • Enables you to test in-line between two devices to determine the autonegotiated speed. • Sophisticated algorithm converts test results into easy-to-read graphs that clearly show the cable’s speed capability (CAT3/5/5e/6). • Transfer the test results from up to 250 stored tests to your PC’s Excel spreadsheet via the USB port. -
Page 11: Applications
Chapter 2: Overview Help with device installation and PoE: Installers of VoIP phones, IP cameras, or access points should use a power panel for exact measure- ments of PoE voltage and power usage, displaying the presence of 10,100,1000 switches and the pair location of each. - Page 12 Chapter 2: Overview What is LAN Performance Verification? LAN performance verification means that a UTP cable passed a prescribed battery of tests and is therefore not likely to cause problems later. The LPV has two levels of verification: LPV Level 1: Performed with the Main Unit and the Remote Probe, Level 1 tests the cable for length;...
-
Page 13: The Lpv List Of Functions
Chapter 2: Overview 2.5 The LPV List of Functions UTP CABLES. LAN Performance Verification Level 1 tests: √ Length measurement of each cable pair. √ Locates opens, shorts, and distance to the fault. √ Locates split pairs and the distance to the split. √... - Page 14 Chapter 2: Overview √ Data signal strength. Single-sided test exercises the suspect hub, switch, or PC and displays the data signal strength of active pairs. NAMING TEST RESULTS, PRINTER, AND TONER PROBE: √ Naming tests. Test names can be up to 16 characters each. √...
-
Page 15: The Three Phases Of Lan Installation
Chapter 3: The 3 Phases of LAN Installation 3. The Three Phases of LAN Installation The LPV is designed for the network installer, the network repair person, and the IT manager. The tests used during the three phases of LAN installation can also be used to troubleshoot LANs that have operational problems. -
Page 16: Faceplate Description
Chapter 4: Faceplate Description 4. Faceplate Description The CAT5/5e/6 LAN Performance Verifier is illustrated in Figure 4-1. Its components are described here. Components 1. LPV Main Unit The Main Unit connects to any CAT 5/6, coax cable or 10, 100, or 1000BASE-T device and performs tests needed for their instal- lation and repair. - Page 17 Chapter 4: Faceplate Description Figure 4-1. LAN Performance Verifier and Remote Probe. 724-746-5500 | blackbox.com Page 17...
-
Page 18: Documenting Test Results
Chapter 5: Documenting Test Results 5. Documenting Test Results The LAN Performance Verifier includes three ways to document your test results. 1. You can use a custom tablet (included) to fill in the test results. 2. You can apply “PASSED” stickers (included) to wall outlets and LAN devices to verify their capability. -
Page 19: Operation
Chapter 6: Operation 6. Operation 6.1 Powering On and Backlighting Figure 6-1 shows the tester’s backlight selection screen. Figure 6-2 illustrates the tester’s power button. Figure 6-1. Backlight selection screen (lighting the LCD display). Figure 6-2. Power/selection button. POWERING ON: Press the power button (PWR) and release to turn ON the tester. -
Page 20: The Main Unit's Navigation Button
Chapter 6: Operation 6.2 The Main Unit’s Navigation Button To navigate through the LAN Performance Verifier screen, use these keys: Figure 6-3. Navigation buttons. • PWR. Power ON/OFF (see previous page for backlighting). • SEL (SELECT). Press to perform task. Appears as on LCD. -
Page 21: Cat5/6 Utp Cable Testing
Chapter 6: Operation This menu shown in Figure 6-4 is the gateway to all the LPV’s tests. Scroll the cursor with the down arrow button and press SELECT to perform the task. CAT5/6 UTP: Test and verify UTP cables with or without LAN devices (hubs, switches, PCs) connected. -
Page 22: Cat5/6 Utp Lpv Level 1
Chapter 6: Operation When the Level 1 test is complete, you can choose to continue to Level 2 and use real data from your own hub, switch, or PC to expand the testing. Verify is designed for 4-pair cable only (use Basic Test UTP for other pairings). See Section 2.5, List of Functions for a listing of tests. - Page 23 You will need to unplug it to proceed. NO CABLE: There is no cable connected or an inactive port is plugged into the far end of the cable. NOTE: If errors persist from test to test, contact Black Box Technical Support at 724-746-5500 or info@blackbox.com.
- Page 24 Chapter 6: Operation Figure 6-8. Stranded or Solid wire selection screen. The LAN Performance Verifier has the unique ability to test both cables constructed of stranded wire (commonly called “patch” cables) and solid-core wire. Scroll to select the cable and press Select.
- Page 25 Chapter 6: Operation Figure 6-9. Testing progress is shown on the screen. Figure 6-10. Any problems will be displayed (see Appendix C). During this phase of testing, information about length, opens, shorts, split pairs, crosstalk, cable category, and speed is being gathered and computed.
- Page 26 Chapter 6: Operation Time to test: Short cables take longer to test because fewer measurements per pass are possible. The thousands of measurements required are accomplished much faster on longer cables than shorter cables. Figure 6-11. Testing is halted until the Remote Probe is connected. The Remote Probe is required for the wire map to be constructed.
- Page 27 Chapter 6: Operation Figure 6-12. Remote probe. Figure 6-13. LPV Level 1 final screen (when you see this, Level 1 is completed and available for review). When the above screen appears, the Level 1 LPV is complete. If you select REVIEW/SAVE, you will enter the Test Results Option Screen.
- Page 28 Chapter 6: Operation Figure 6-14. Test results option screen. REVIEW TEST: View results from the Level 1 test. After the review, you may return to this screen to NAME/SAVE the results. SAVE READINGS: Store the test results in PRINTER MEMORY for printing later and do not continue to Level 2 testing.
-
Page 29: Cat5/6 Utp Lpv Level 2
Chapter 6: Operation 6.3.3 CAT5/6 UTP LPV Level 2 Figure 6-15. Perform LAN Performance Verification Level 2. (UTP cables and LAN devices). Figure 6-16. If you have selected to continue with LAN Performance Verification Level 2, this screen appears. LAN Performance Verification Level 2 adds to the battery of tests conducted in Level 1 by testing the cable with real live data from any hub, switch, or PC. - Page 30 Chapter 6: Operation FAQ: What is the difference between Level 1 and Level 2 and when do I use it? Level 1 verification tests for length, opens, shorts, split pairs (including distance to the fault) along with propagation delay, skew, NEXT, FEXT, and cable category measurements.
- Page 31 Chapter 6: Operation First example (shown in Figure 6-17): The LPV has found a Gigabit device (1000 Mbps) on Pairs 1, 2 and 3, 6 that is capable of transmitting at 10, 100, and 1000 Mbps at full-duplex. 1000-Mbps devices use all 4 pairs. Second example (shown in Figure 6-18): The LPV has found a 100-Mbps device on Pairs 3, 6 that is capable of transmitting at 10 and 100 Mbps at half-duplex.
-
Page 32: Reviewing Cat5/6 Utp Test Results
Chapter 6: Operation Figure 6-20. Review, create a name for the test and/or save the test results. 6.3.4 Reviewing CAT5/6 UTP Test Results Figure 6-21. Review the readings from the most recent test or store the readings in printer memory. 724-746-5500 | blackbox.com Page 32... - Page 33 Chapter 6: Operation Figure 6-22. Cable Category is the first screen of many that are stored. The “cable category” is universally accepted as the speed capability of the cable. CAT3 was the original twisted-pair cable that connected 10-Mbps networks together. Then came CAT5 (used in networks up to 100 Mbps).
- Page 34 Chapter 6: Operation LAN Performance Verification Level 1 displays the projected speed capability of the cable. The graph is a result of thousands of measurements used to project the speed of the cable. This is one of the most useful and money-saving displays. For instance, it is possible that some shorter, installed CAT5 cable (rated for 100 Mbps) are capable of communicating at a 1000 Mbps.
- Page 35 Chapter 6: Operation Figure 6-25. LPV Level 1 Pass/Fail Summary Screen. DELAY OK: The propagation delay of the cable is within specifi- cation. SKEW OK: The skew of the cable is within specification. NEXT OK, FEXT OK: Indicates that “near end crosstalk” (at the near connector) and at “crosstalk far end”...
- Page 36 Chapter 6: Operation If tolerance is below 15%, you may wish to consider using a repeater, hub, or switch to shorten the cable run. This is especially true if you are in a “noisy” environment (large electro- mechanical machines, etc.). Figure 6-26.
- Page 37 Chapter 6: Operation Figure 6-28. Propagation and skew per pair. Timing data per pair: The next two screens give you the timing of the propagation delay and skew for each pair in the cable. Large variations between pairs indicate trouble. NOTE: A given pair’s skew is the difference in propagation delay between that pair and the slowest pair in the cable.
- Page 38 Chapter 6: Operation Figure 6-30. Signal levels of real live data from a 100-Mbps switch. The signal level screen is one the most powerful tools used during Level 2 verification. It is a live signal attenuation display. If the level is below the DATA MIN line, you may experience faulty transmissions.
- Page 39 Chapter 6: Operation LAN Performance Verification Level 2 displays the LAN Performance Verified Level 2 speed capability of the cable. The display is the result of the data gathered during Level 1 testing (simulated data) and Level 2 testing (real data) into a graph that “LAN Performance Verifies”...
-
Page 40: Cat5/6 Basic Test
Chapter 6: Operation Figure 6-33. Test results option screen “EXIT.“ See Section 6.4 for Saving and Naming instructions. NOTE: Once a reading is SAVED, it is too late to create a NAME. 6.3.5 CAT5/6 Basic Test Test UTP for opens, short, split pairs, length and distance to fault. - Page 41 Chapter 6: Operation Figure 6-35. UTP Cable Test Main menu. BASIC TEST UTP: Move the cursor to BASIC TEST and press SELECT to test a UTP cable for length, opens, shorts, split pairs (plus distance to these faults) and wire map. BASIC TEST UTP is a quick test and does not perform LAN Performance Verification.
- Page 42 Chapter 6: Operation NOTE: If the far end of the cable is connected to any device it will notify you to check the far end of the cable. When ready to proceed, press ( TEST). Error Messages: If there is a problem that stops the test from proceeding, one of the following error messages will be displayed: CABLE IS ACTIVE: There is an active network port on the far end...
- Page 43 Chapter 6: Operation Figure 6-38. UTP pairs and length are displayed. Select MAP + TRACE for wiremap and tones. Remote Probe LEDs. The Remote Probe needs to be connected only for a brief period. Flashing LED(s) indicate the test is pro- gressing.
-
Page 44: Coax Testing
Chapter 6: Operation Figure 6-40. A correct wire map for a straight through UTP cable. UTP WIRE MAP: The wire map displays the pairing of the wires. The map above indicates that the first pair ("12>"), Pins 1 and 2, is 203 feet long and terminates in Pins 1 and 2 ("<12") on the far end of the cable. - Page 45 Chapter 6: Operation Figure 6-42. Select COAX CABLE from Main Menu. COAX CABLE TESTING: Move the cursor to coax cable and press SELECT to test a coax cable for length, opens, shorts (plus dis- tance to these faults). Wire map and toning is also available from this menu.
- Page 46 Chapter 6: Operation Figure 6-44. Connect the coax cable to the F connector on the Main Unit and select coax. The test begins. At the beginning of the test, the far end of the cable should not be connected to anything. Figure 6-45.
-
Page 47: Naming/Saving Test Results
Chapter 6: Operation If the COAX CABLE TEST concludes with a wire map display and no reported errors, the cable is error free. Press SAVE to either SAVE or NAME and SAVE the test. See Section 6.4 for instructions. Press EXIT to discard the results. 6.4 Naming/Saving Test Results Figure 6-47. - Page 48 Chapter 6: Operation EXIT: Discards the test results and returns to the Main Menu. Figure 6-48. Select EDIT TEST NAME to create a custom name for the test results. Do this before saving the test in memory. To NAME a reading, you must first complete any of the LPV’s cable tests.
- Page 49 Chapter 6: Operation For the purposes of learning the naming routine, select START FRESH and follow the exercises in the next section (Naming Your Tests). Once you become proficient with START FRESH, give the EDIT OLD routine a try. It speeds creating names by allowing you to copy an “old”...
- Page 50 Chapter 6: Operation The UP and DOWN arrows rotate the “LETTERLOOP” to the right and left. The SEL key copies the letter to the TEST NAME LINE. Create a label: Rotate the letter loop until the letter or command desired appears at the leftmost of the display and press the SEL button.
-
Page 51: Reviewing/Erasing Printer Memory
Chapter 6: Operation Special characters in the LETTER LOOP: Backspace over letters without erasing them. Forward space over letters without erasing them. Space (blank). Use to erase letters or add spaces. MENU: Use to exit the EDIT TEST NAME routine and return to the MENU. - Page 52 Chapter 6: Operation Figure 6-53. To review or erase stored readings, select PRINTER MEMORY from the Main Menu. PRINTER MEMORY: “Printer memory” is the storage location for all saved test readings. It can store the results of up to 250 LPV tests (Level 1 and/or combined Level 1 and Level 2), Basic UTP tests, and coax tests for later printing.
- Page 53 Chapter 6: Operation REVIEW: Use the UP and DOWN arrow to find the reading you wish to review in Printer Memory. Press SEL to review. “BLANK TEST NAME” indicates a name has not been created for the test. Figure 6-55. Review screen. ERASE: Selecting the erase function erases all of Printer Memory.
-
Page 54: Printing From A Pc
Chapter 6: Operation 6.6 Printing from a PC Transfer the test readings from the Main Unit to the PC using the supplied cable, driver and software (requires Microsoft Excel). Figure 6-57. Printing from a PC. STEP 1: INSTALL THE LPV DRIVER ON PC: Run “install_LPV_driv- er.exe”... - Page 55 Chapter 6: Operation 4. Save the file using Excel's File>"Save as". See the Readme.doc file on the LPV software CD for more details. STEP-BY STEP INSTRUCTIONS FOR USING EXCEL: 1. After you have installed the driver and connected the LPV to the PC, launch Excel.
- Page 56 Chapter 6: Operation Figure 6-60. Import Report screen. 5. Import Report: The LPV spreadsheet’s first step is to automatically assign a COM (serial) port to your USB connection and detect the LPV tester. The COM port number selected is displayed in the window (1 through 9 is accept- able).
- Page 57 Chapter 6: Operation 8. After the readings are downloaded, press the “Edit Report” button to launch the spreadsheet. If you wish to change any NAMES that you created, do it in this opening screen. You can wait until they are in the spreadsheet, but it is quicker here. Figure 6-62.
- Page 58 Chapter 6: Operation Figure 6-63. LPV.XLS spreadsheet. Typical LPV printout NOTE: If Level 2 testing was not performed, the Data Signal Levels and the LP Verification #2 charts will have no data. 724-746-5500 | blackbox.com Page 58...
- Page 59 Chapter 6: Operation Figure 6-64. Sample LPV printout. 724-746-5500 | blackbox.com Page 59...
-
Page 60: Network Testing
Chapter 6: Operation 6.7 Network Testing Display the advertised and negotiated speeds of LAN devices and view the signal levels of real live data. Figure 6-65. Network ports. Figure 6-66. “Use right jack” alert screen. 724-746-5500 | blackbox.com Page 60... -
Page 61: Scan One Port
Chapter 6: Operation NETWORK PORTS (USE RIGHT JACK): Select Network Ports to display the capabilities of a LAN device. LAN devices broadcast their capability in terms of speed, duplex, and other features (termed “advertised capabilities”) to other LAN devices. When two LAN devices are connected together, they “negotiate”... - Page 62 Chapter 6: Operation SCAN ONE PORT: Move the cursor to SCAN ONE PORT and press SELECT if you wish to display the advertised capability of a LAN device. You can connect to any LAN device using a patch cable or any cable of your choosing. The signal data levels of all active pairs will also be displayed.
- Page 63 Chapter 6: Operation First example (previous page): The LPV has found a Gigabit device (1000 Mbps) on Pairs 1, 2 and 3, 6 that is capable of transmitting at 10 Mbps, 100 Mbps, and 1000 Mbps at full- duplex. 1000 Mbps devices use all four pairs. In Figure 6-70, the LPV has found a 100-Mbps device on Pairs 3, 6 that is capable of transmitting at 10 Mbps and 100 Mbps at half-duplex.
- Page 64 Chapter 6: Operation The signal level screen is a powerful tool. It is a live signal attenuation display. If the level is below the Data Min line, you may experience faulty transmissions. If the signal is well above the Data Min line, you have plenty of “headroom.” Press the down arrow key to continue.
-
Page 65: Monitor Inline
Chapter 6: Operation 6.7.2 Monitor Inline Move the cursor to MONITOR INLINE and press SELECT if you wish to view the negotiated results between two LAN devices. NOTE: Data communication can take place while the Main Unit is inline between two devices but after the negotiation is complete. - Page 66 Chapter 6: Operation Figure 6-76. Plug in two ports screen. CAPABILITY SCREEN. This screen (or similar) appears as the LPV monitors the devices. When complete, the LPV will automatically continue to the next screen. Figure 6-77. Capability screen. Figure 6-78. The negotiated speed of the link is automatically displayed.
-
Page 67: Send Beacon
Chapter 6: Operation The monitor inline test is complete. Data can be transmitted between the two LAN devices without removing the tester. NOTE: Most network ports negotiate to the highest possible data rate. Some ports will negotiate to a maximum of the last data rate used. - Page 68 Chapter 6: Operation Figure 6-80. Scroll down and select Send Beacon. Figure 6-81. Port beacon example. PORT BEACON: Use the Port Beacon to locate cable connections in crowded areas. To activate the port beacon, move the cursor to Port Beacon and press Select. The Port Beacon is a link pulse that the Main Unit sends to the receiving device every 3 seconds.
-
Page 69: Appendix A. Straight-Through Cable Coupler
Appendix A: Straight-Through Coupler Appendix A. Straight-Through Coupler When installing or troubleshooting a LAN, you might need a straight-through cable coupler. The LPV's Main Unit jacks makes it easy. The tester must be OFF to use this feature. Figure A-1. Straight-through coupler. NOTE: If you suspect one of the devices is capable of sourcing PoE voltage, connect the device to the RIGHT jack. -
Page 70: Appendix B. Ping And Tcp/Ip Debugging Tools
Appendix B: Ping and TCP/IP Debugging Tools Appendix B. Ping and TCP/IP Debugging Tools What is TCP/IP: TCP/IP is set of standards first developed by ARPA (USA DOD’s Advance Research Projects Agency) that define how information is routed over the Internet. And because of its Internet popularity, TCP/IP is the most popular protocol operating over twisted-pair cabling and therefore is the most popular protocol used by Ethernet (the standard for local area... - Page 71 If a DNS service is not available, you will need to use the IP address. EXAMPLE OF USE: #1: You have problems connecting to the Black Box Web site from a workstation, and you know the DNS name of the website is “www.blackbox.com”. At the workstation’s Command Prompt, enter “ping www.blackbox.com.”...
- Page 72 Appendix B: Ping and TCP/IP Debugging Tools #2: You are having a problem with one of your workstations communicating to a server. You know the server's IP address is 192.168.1.100. I enter “ping 192.168.1.100”on the workstation’s command line. If the server is connected, you will receive a response to your ping.
- Page 73 Appendix B: Ping and TCP/IP Debugging Tools Ping notes: If you want to ping another workstation or server and you do not know its DNS name or IP address use ipconfig (below). To learn all the ping command’s option, enter ping /?. ipconfig USE: Determine the IP address and other related information about a workstation.
- Page 74 Appendix B: Ping and TCP/IP Debugging Tools Executing troubleshooting programs from the command line: All the programs discussed must be executed from the com- mand line of your operating system. To reach the command line on Windows 95 and 98 systems, click on START>PROGRAMS and Select the MS-DOS prompt.
-
Page 75: Appendix C. Examples Of Utp Cable Faults
Appendix C: Examples of UTP Cable Faults Appendix C. Examples of UTP Cable Faults A good cable: A cable that passes its first set of cable tests will have summary screen similar to this: Figure C-1. Length/Timing summary screen of a good cable. Bad cable (Split pair): If errors are found, they will be displayed. - Page 76 Appendix C: Examples of UTP Cable Faults The screen shows a 330-foot cable with split pairs at 154 feet. If the cable goes through a wiring closet, it is possible the split pairs are in the closet (154 feet away). This screen shows one of the advantages the LPV has over testers costing thousands of dollars more.
- Page 77 Appendix C: Examples of UTP Cable Faults Opens in cable pairs generate errors in both in skew tests and in wire map tests. The following example shows a 200-foot cable with a break in the middle on Pair 78. The following is the fi rst screen to show a problem.
- Page 78 Appendix C: Examples of UTP Cable Faults During the wire map test, you probably noticed that the indica- tor lights on the remote probe (connected to the far end of the cable) continue to flash. This is another indication of a problem. If a cable has a short in the middle, the wire map looks like this: Figure C-7.
-
Page 79: Appendix D. Making A Correct Utp Cable
Appendix D: Making a Correct UTP Cable Appendix D. Making a Correct UTP Cable Twisted-Pair Cables: Unshielded twisted-pair cable is used for BASE-T applications because it is inexpensive, easy to use, and has excellent noise-canceling capabilities. A minimum of two pairs of twisted-pair wire are required for each computer that connects to the local area network: •... - Page 80 Appendix D: Making a Correct UTP Cable • Use good-quality connectors and tools. RJ-45 Connectors (sockets and plugs): The BASE-T Standard uses RJ-45 sockets and plugs. The RJ-45 socket has eight pins. The pins are numbered 1 to 8. Looking at the socket with insertion key facing down, Pin Number 1 is to the left.
- Page 81 NOTES 724-746-5500 | blackbox.com Page 81...
- Page 82 NOTES 724-746-5500 | blackbox.com Page 82...
- Page 83 NOTES 724-746-5500 | blackbox.com Page 83...
- Page 84 Great tech support is just 30 seconds away at 724-746-5500 or blackbox.com. About Black Box Black Box provides an extensive range of networking and infrastructure products. You’ll find everything from cabinets and racks and power and surge protection products to media converters and Ethernet switches all supported by free, live 24/7 Tech support available in 30 seconds or less.
Need help?
Do you have a question about the TS580A-R4 and is the answer not in the manual?
Questions and answers