Table of Contents
Advertisement
Quick Links
Advertisement
Table of Contents

Related Manuals for IFM PN422 Series


Summary of Contents for IFM PN422 Series
- Page 1 Operating instructions Pressure sensor PN422x...
-
Page 2: Table Of Contents
Contents 1 Preliminary note ���������������������������������������������������������������������������������������������������3 1�1 Symbols used ������������������������������������������������������������������������������������������������3 2 Safety instructions �����������������������������������������������������������������������������������������������3 3 Functions and features ����������������������������������������������������������������������������������������4 4 Function ���������������������������������������������������������������������������������������������������������������5 4�1 Switching function ������������������������������������������������������������������������������������������5 5 Installation������������������������������������������������������������������������������������������������������������6 5�1 Installation of the sensor ��������������������������������������������������������������������������������6 5�2 Installation of the grounding clamp ����������������������������������������������������������������6 6 Electrical connection ��������������������������������������������������������������������������������������������8 7 Operating and display elements ������������������������������������������������������������������������10 8 Menu ������������������������������������������������������������������������������������������������������������������... -
Page 3: Preliminary Note
11 Technical data and scale drawing ��������������������������������������������������������������������16 12 Factory setting �������������������������������������������������������������������������������������������������17 1 Preliminary note 1.1 Symbols used ► Instructions > Reaction, result […] Designation of pushbuttons, buttons or indications → Cross-reference Important note Non-compliance can result in malfunction or interference� Information Supplementary note�... -
Page 4: Functions And Features
• The manufacturer assumes no liability or warranty for any consequences caused by tampering with the product or incorrect use by the operator� • Installation, electrical connection, set-up, programming, configuration, operation and maintenance of the product must be carried out by personnel qualified and authorised for the respective activity�... -
Page 5: Function
4 Function 4.1 Switching function OUT1 changes its switching state if it is above or below the set switching limits (SP1, rP1)� The following switching functions can be selected: • Hysteresis function / normally open: [OU1] = [Hno] (→ Fig. 1). •... -
Page 6: Installation
5 Installation 5.1 Installation of the sensor Before installing and removing the unit: Make sure that no pressure is applied to the system� ► Insert the unit in a process connection with a suitable thread� ► Tighten firmly� Tightening Torque 1/4-18 NPT threads: 2���3 turns after finger tightened� To ensure leak-free joints for NPT threads, sealants and lubricants commonly used in the industry should be used�... - Page 7 ► Push the earthing strap into the clamping device until it is in close contact with the sensor sleeve� ► Use an adequate screwdriver to tighten the lower screw until the earthing strap can no longer be moved on the sensor sleeve (C)�...
-
Page 8: Electrical Connection
6 Electrical connection • The unit must be connected by a qualified electrician� • The national and international regulations for the installation of electrical equipment must be adhered to� • For the output circuit, the same protective measures as for the supply circuit must be taken�... - Page 9 ► Connect the unit as follows: Connector view (at the unit) n.c. A: Supply circuit B: Output circuit : Safe separation Core colours of ifm sockets: 1 = BN (brown), 2 = BU (blue), 4 = BK (black), 5 = WH (white)
-
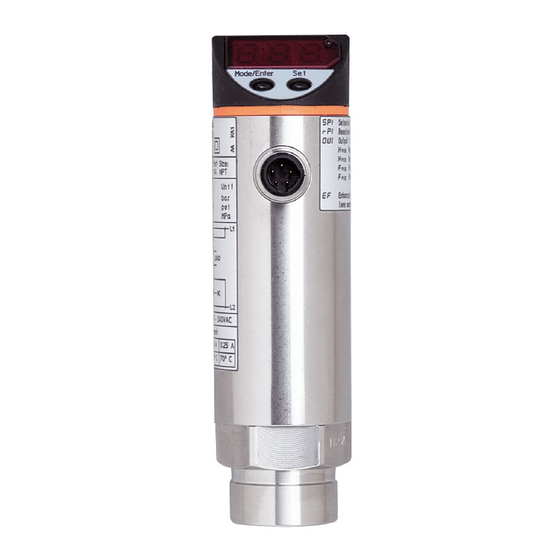
Page 10: Operating And Display Elements
7 Operating and display elements Mode/Enter 1: 7-segment display - Display of the current system pressure � - Indication of the parameters and parameter values� 2: LED red Indication of the switching status; lights when the output is switched� 3: Set button - Setting of the parameter values (scrolling by holding pressed;... -
Page 11: Menu
8 Menu 8.1 Menu structure = Mode/Enter = Set... -
Page 12: 8�2 Explanation Of The Menu
8.2 Explanation of the menu SP1/rP1 Upper / lower limit value for system pressure at which OUT1 switches� Output function for OUT1: Switching signal for the pressure limit values: hysteresis function [H ��] or window function [F ��], either normally open [� no] or normally closed [� nc]� Extended functions / opening of menu level 2�... - Page 13 Acknowledgement of the parameter value ► Briefly press [Mode/Enter]� Mode/Enter Set > The parameter is displayed again� The new setting value is saved� Setting of other parameters: ► Start again with step 1� Finishing the parameter setting: ► [Press Mode/Enter] several times until the current measured value is displayed or wait for 15 s�...
-
Page 14: 9�2 Set Output Signals
9.2 Set output signals 9.2.1 Set switching limits ► Select [SP1] and set the value at which the output switches� ► Select [rP1] and set the value at which the output switches off� rP1 is always lower than SP1� The unit only accepts values which are lower than SP1�... -
Page 15: 9�3�3 Zero-Point Calibration
9.3.3 Zero-point calibration ► Select [COF] and set a value between -5% and 5% of the final value of the measuring range� The internal measured value "0" is shifted by this value� Zero-point calibration reset: ► Press [Mode/Enter] until [CAr] is displayed� ►... -
Page 16: Operation
After another 15 s the unit returns to the Run mode� 10.3 Error indications [OL] Overload pressure (above measuring range) [UL] Underload pressure (below measuring range) 11 Technical data and scale drawing Further technical data and scale drawing at www�ifm�com�... - Page 17 12 Factory setting Factory setting User setting 25% VMR 23% VMR 0.06 bAr / mbAr MEW = final value of the measuring range More information at www�ifm�com...
Need help?
Do you have a question about the PN422 Series and is the answer not in the manual?
Questions and answers