Table of Contents
Advertisement
Quick Links
C
OMPLETE R
C
OMPLETE R
• Please read through this instruction booklet to THOROUGHLY familiarize yourself with the assembly
and flight characteristics of this airplane before beginning to assemble this model.
• Please inspect all parts carefully before starting assembly! If any parts are missing, broken or defective, or
if you have any questions about the assembly or flying of this airplane, please call us at (217) 398-8970
and we'll be glad to help.
• Hobbico
, Inc. guarantees this kit to be free from defects in both material and workmanship at the date
®
of purchase. This warranty does not cover any component parts damaged by use or modification. In no
case shall Hobbico's liability exceed the original cost of the purchased model. Further, Hobbico
reserves the right to change or modify this warranty without notice.
• In that Hobbico has no control over the final assembly, no liability shall be assumed nor accepted for
any damage resulting from the use by the user of the final user-assembled product. By the act of using
the user-assembled product, the user accepts all resulting liability.
• If the buyers are not prepared to accept the liability associated with the use of this product, they are
advised to return this kit immediately in new and unused condition to the place of purchase.
Entire Contents © Copyright 2004
TF
AIRPLANE
TF
AIRPLANE
™
ASSEMBLE ONLY WITH ADULT SUPERVISION
WARRANTY
™
Quiet Electric Flight
Requires 6 "C" and 1 "9V"
Alkaline Batteries (Not Included)
HCAZ3041 for HCAA1994 V1.0
Advertisement
Table of Contents

Related Manuals for Hobbico FlyZone Micro Ultrix Sky Screamer RTF


Summary of Contents for Hobbico FlyZone Micro Ultrix Sky Screamer RTF
- Page 1 • In that Hobbico has no control over the final assembly, no liability shall be assumed nor accepted for any damage resulting from the use by the user of the final user-assembled product. By the act of using the user-assembled product, the user accepts all resulting liability.
- Page 2 PRECAUTIONS PROTECT YOUR MODEL, YOURSELF AND OTHERS. FOLLOW THIS IMPORTANT 1. Assemble the plane according to the instructions. SAFETY PRECAUTION Do not alter or modify the model. If you make any modifications, you will void your warranty. Your MICRO ULTRIX is not a toy, but rather a ™...
-
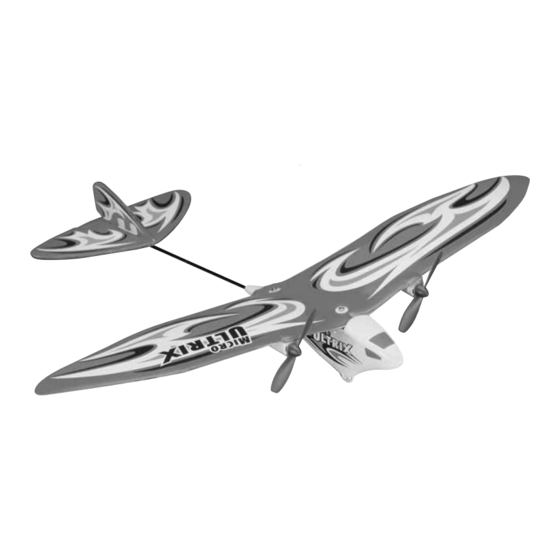
Page 3: Parts And Hardware
PARTS AND HARDWARE UNPACKING THE BOX Check the parts against the list below. If any parts are damaged or missing, give us a call at: (217) 398-8970. Transmitter Antenna (1) Items not shown: Transmitter (1) Instruction Manual (1) Airplane (1) Extra Propellers (2) Charger (1) LET’S GET STARTED... - Page 4 2. Following the diagram in the charger, install six 3. Reinstall the battery hatch, switch on the “C” size batteries. Make sure the positive (+) and transmitter and check the LEDs on the front of the negative (–) poles match up correctly with the transmitter.
-
Page 5: Battery Recycling
NOTE: DO NOT CHARGE THE AIRPLANE’S CHARGE THE MOTOR BATTERY BATTERY UNLESS BEEN FULLY DISCHARGED. To discharge the battery, turn on the airplane and the radio and apply full power until the propellers stop turning. SAFETY PRECAUTIONS FOR CHARGING BATTERIES •... - Page 6 BEFORE GOING TO THE FIELD Before attempting to operate or fly your MICRO ULTRIX, please make sure you fully understand its operation outlined in this section. 3. Move the switch located on the left side of the fuselage forward to the “ON” position. HOW DOES THE MICRO ULTRIX WORK? CAUTION: Stay clear of the propellers once the Note: The following is a detailed description of how...
- Page 7 Make sure the airplane’s battery pack is fully charged and that the transmitter has a fresh “9V” battery installed. If others are flying in the same area, make sure that they are not using the same frequency as your radio system.
- Page 8 RUDDER TRIMMING If you have an airplane that follows either path (A) or (B), cut the sides the elevator as shown in the photo above. D = Airplane turns left. E = Airplane turns right. If your airplane follows path (A), bend the elevator tab up.
-
Page 9: Range Check
the left. Moving the right stick to the right will make RANGE CHECK the plane turn to the right. Range check your radio before each flight. Switch on 6. When the plane is coming toward you, moving the the transmitter and the airplane. Have a helper hold right stick left still causes the plane to turn left, but it the airplane. -
Page 10: After The Flight
Replacement parts are not available from Product Support, but can be purchased from hobby shops or mail order/Internet order firms. If you need assistance locating a dealer to purchase parts, contact: Product Support Phone: 217-398-8970 Fax: 217-398-7721 E-mail: productsupport@hobbico.com... - Page 11 OTHER ITEMS AVAILABLE FROM HOBBICO HCAA0312 HCAA0310 HCAA0311 Hobbico ® Flyzone ™ Free Flight Electrics Enjoy virtually nonstop aerial adventures with Flyzone’s trio of futuristic foam free flights: the 18.6" span Sentinel; 21" span Revolt; and 16.1" span Regent. Adjustable trim tabs on each model add turning ability to its easy free flight operation.
- Page 12 Hobbico ® Combat Armor ™ Tank Set Combat Armor tanks capture the down-to-the-rivets detail of real King Tiger tanks, in popular 1/35 static display size. But HCAC0003 these machines take realism to the extreme, delivering exciting combat action through ready-to-run radio control!
Need help?
Do you have a question about the FlyZone Micro Ultrix Sky Screamer RTF and is the answer not in the manual?
Questions and answers