Advertisement
Available languages
Available languages
Quick Links
ASSEMBLY INSTRUCTIONS
for convertible cri b
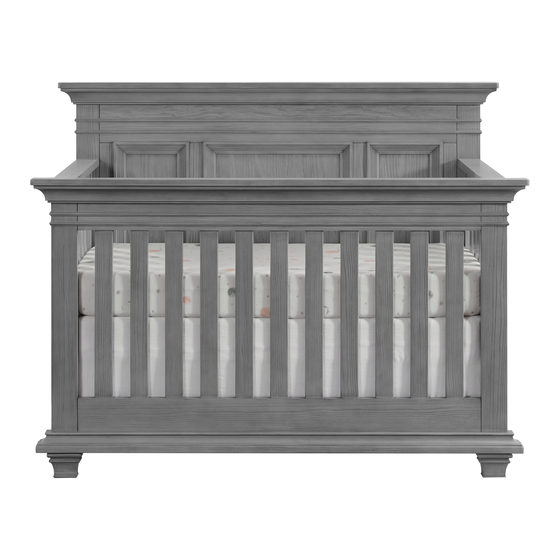
WESTON 4 IN 1 CONVERTIBLE CRIB
Model #12111
GUARDRAIL and CONVERSION KIT sold separately.
Please contact retailer
THIS PRODUCT CONFORMS TO THE APPLICABLE SECTION OF PUBLIC LAW 110-314
AND COMPLIES WITH THE REQUIREMENTS STATED IN 16 CFR 1219 AND 16 CFR 1217
(WHEN WESTON GUARDRAIL IS USED).
100-12111-V-01
1 of 6
Advertisement

Related Manuals for OXFORD BABY Weston 12111


Summary of Contents for OXFORD BABY Weston 12111
- Page 1 ASSEMBLY INSTRUCTIONS for convertible cri b WESTON 4 IN 1 CONVERTIBLE CRIB Model #12111 GUARDRAIL and CONVERSION KIT sold separately. Please contact retailer THIS PRODUCT CONFORMS TO THE APPLICABLE SECTION OF PUBLIC LAW 110-314 AND COMPLIES WITH THE REQUIREMENTS STATED IN 16 CFR 1219 AND 16 CFR 1217 (WHEN WESTON GUARDRAIL IS USED).
-
Page 2: Tools Required
Thank you for your purchase! Remove all parts and hardware from the box and lay on a carpeted or scratch -free work surface. Do not dispose of any contents until assembly is completed. Familiarize yourself with all exhibits and diagrams to facilitate the assembly of your crib. TOOLS REQUIRED: ALLEN KEY (Included) PARTS ENCLOSED IN CARTON... - Page 3 STEP 1 " ASSEMBLY OF CRIB HEADBOARD " THIS STEP REQUIRES: A. Headboard (1 pc) I. Headboard post (2 pcs) N. Allen key (1 pc) O. Allenbolt 1 1/2" (38 mm) (6 pcs) W. Spring washer (6 pcs) STEP 1: - Assembly Headboard (A) with Headboard post (I) using Allenbolt (O) and Spring washer (W).
- Page 4 STEP 2 " ASSEMBLY OF CRIB SIDES" THIS STEP REQUIRES : A. Headboard (1 pc) G. Allenbolt 2-3/4"(70 mm) (4 pcs) F. Allenbolt 2-3/8"(60 mm) (4 pcs) C. Sideboard (2 pcs) D. Stabilizer Bar (1 pc) N. Allen key (2 pcs) L.
- Page 5 STEP 3 " SPRING INSTALLATION " THIS STEP REQUIRES: E. Mattress Spring (1pc) K. Allen bolt 1"(25mm) (4 pcs) N. Allen key (2 pcs) L. Nut 3/4" (20mm) (4 pcs) FIG.2. FACE Lowest position FIG.3. Highest position Middle position Lowest position STEP 3: - Attach Mattress spring (E) to Sideboard as shown in FIG.2.
- Page 6 STEP 4 " ASSEMBLY OF FOOTBOARD " THIS STEP REQUIRES: B. Footboard (1pc) N. Allen key (1 pc) H. Allenbolt 2"(50 mm) (4 pcs) W. Spring washer (4 pcs) FIG.4. STEP 3: - Insert Allen bolt 2" [50mm] (H), Spring Washer (W) through the holes in Sideboard into the threaded holes in Footboard (B).
- Page 9 ASSEMBLY INSTRUCTIONS for toddler bed WESTON 4 IN 1 CONVERTIBLE CRIB Model #12111 GUARDRAIL and CONVERSION KIT sold separately. Please contact retailer. 100-12111-V-01...
- Page 10 STEP 1 "UNINSTALL FOOTBOARD " THIS STEP REQUIRES: Allen key (1 pc) FIG. 1. STEP 1: - Remove the Footboard by unscrewing (4 pcs) Allen bolts as shown in FIG. 1. 100-12111-V-01...
- Page 11 STEP 2 " MATTRESS SUPPORT HEIGHT ADJUSTMENT " THIS STEP REQUIRES: These hardware are included in the CRIB N. Allen key (2 pcs) K. Allen bolt 1"(25mm) (4 pcs) L. Nut 3/4" (20mm) (4 pcs) FIG.2. FIG.3. Lowest position FIG.4. STEP 2: - Remove the Allen bolt 1"(25 mm) (K) and Nut 3/4"(20 mm)(L) on the Mattress spring.
-
Page 14: Instructions De Montage
INSTRUCTIONS DE MONTAGE pour lit d'enfant en bas âge LIT D'ENFANT WESTON CONVERTIBLE 4 EN 1 Modèle n° 12111 GARDE-CORPS et KIT DE CONVERSION DE LIT COMPLET vendus séparément. Veuillez contacter le détaillant. 100-12111-V-01... -
Page 15: Outils Nécessaires
Merci pour votre achat ! Retirez toutes les pièces et le matériel de la bo ît e et posez-les sur une surface de travaile recouverte de moquette. Ne jetez aucun contenu avant la fin du montage. Familiarisez-vous avec toutes les pièces et les shémas pour faciliter le montage de votre lit d'enfant. OUTILS NÉCESSAIRES: CLÉ... - Page 16 ÉTAPE 1 " MONTAGE DES TÊTE DU LIT D'ENFANT" CETTE ÉTAPE EXIGE : A. Tête de lit (1 pièce) I. Poteau de tete de lit (2 pieces) N. Clé Allen (1 pièce) O. Boulon Allen1 1/2" (38 mm) (6 pièces) W.
- Page 17 ÉTAPE 2 " MONTAGE DES CÔTÉS DU LIT D'ENFANT" CETTE ÉTAPE EXIGE : A. Tête de lit (1 pièce) G. Boulon Allen 2-3/4"(70 mm) (4 pièces) F. Boulon Allen 2-3/8"(60 mm) (4 pièces) C. Panneau latéral (2 pièces) D. Barre stabilisatrice (1 pièce) N.
- Page 18 ÉTAPE 3 " INSTALLATION DU RESSORT " CETTE ÉTAPE EXIGE: E. Ressort de matelas (1 pièce) K. Boulon Allen 1"(25mm) (4 pièces) N. Clé Allen (2 pièces) L. Écrou 3/4" (20mm) (4 pièces) FIG.2. FACE/VISAGE TOP/HAUT Position la plus basse FIG.3.
- Page 19 ÉTAPE 3 " MONTAGE DU PIED DE LIT " CETTE ÉTAPE EXIGE: B. Pied de lit (1pièce) N. Clé Allen (1 pièce) H. Boulon Allen 2"(50 mm) (4 pièces) W. Rondelle à ressort (4 pièces) FIG.4. ÉTAPE 3: - Insérez la Boulon Allen 2" [50mm] (H), Rondelle à ressort (W) à travers les trous du panneau latéral dans les trous filetés du pied de lit (B).
- Page 22 ÉTAPE 1 "DÉSINSTALLER LE PIED DE LIT " CETTE ÉTAPE EXIGE: Clé Allen (1 pièce) FIG. 1. ÉTAPE 1: - Enlever le pied de lit en dévissant les boulons Allen (4 pièces) comme indiqué sur la FIG. 1. 100-12111-V-01...
- Page 23 ÉTAPE 2 " AJUSTEMENT DE LA HAUTEUR DU SUPPORT DE MATELAS " CETTE ÉTAPE EXIGE: Ce matériel est inclus dans le LIT D'ENFANT. N. Clé Allen (2 pièces) K. Boulon Allen 1"(25mm) (4 pièces) L. Écrou 3/4" (20mm) (4 pièces) FIG.2.
Need help?
Do you have a question about the Weston 12111 and is the answer not in the manual?
Questions and answers