Table of Contents
Troubleshooting

Related Manuals for GE SEER 1000


Summary of Contents for GE SEER 1000
- Page 1 GE Healthcare SEER™ 1000 ECG Recorder and Mobile Application Operating Manual Version 1.0 2067634-077 Revision B SEER™ 1000 ECG Recorder and Mobile Application English © 2014 General Electric Company All Rights Reserved...
- Page 2 This manual is developed and owned by GETEMED Medizin- und Informationstechnik AG, Oderstr. 77, 14513 Teltow, Germany, and it is branded by GE Healthcare. SEER and MARS are trademarks owned by GE Medical Systems Information Technol ogies, Inc., a General Electric Com- pany going to market as GE Healthcare.
-
Page 3: Table Of Contents
Contents Introduction........................9 Intended User......................10 Indications for Use ..................... 10 Intended Use ....................... 10 Contraindications ....................... 10 Prescription Device Statement................10 Regulatory and Safety Information ............... 10 Safety Conventions ..................11 Safety Hazards....................11 Medical Device Classification ..............16 Certification ....................17 Input Signal Reproduction Accuracy ............ - Page 4 Product Overview ..................... 31 Recorder and Application – General..............31 Operating Elements of the Recorder ..............32 Event Button ....................33 Event Button LED................... 34 Hookup Guidance LED ................. 34 Audible Notifications ..................35 Preparing the Recording..................37 Instructing the Patient....................38 Safety Precautions ..................
- Page 5 Applications (Apps) – General Information ............51 Functionality ........................ 52 Data Protection......................53 App Data Protection ..................53 Recorder Data Protection................53 Basic Information on Wireless Bluetooth Connection ........54 Using the Apple iOS App ..................57 Installing and Setting up the App ................57 Installing and Starting the App ..............
- Page 6 Electrode Placement and Waveform Preview........78 Verify or Change Settings................79 Start the Recording ..................80 Patients Tab ......................... 80 Devices Tab........................81 Troubleshooting ......................83 Recorder Troubleshooting..................83 Application Troubleshooting..................85 Bluetooth Troubleshooting ..................89 Bluetooth Messages from the Microsoft Windows System......90 Resetting the Recorder with the Microsoft Windows App ........
- Page 7 EMC Specifications according to IEC 60601-1-2 ..........100 General Specifications, Table 201 ............100 General Specifications, Table 202 ............101 Non Life-Sustaining Systems, Table 204..........102 Recommended Separation Distances from Portable and Mobile RF Communications Equipment, Table 206......103 Index ........................... 105 2067634-077 Revision B SEER™...
-
Page 9: Introduction
*The MARS Holter Analysis System supports the collection of up to three days of ECG data. All three SEER 1000 ECG recorders are suitable for use with both adult and pediatric patients (including those patients weighing less than 10 kg). -
Page 10: Intended User
Intended Use The SEER 1000 digital Holter recorder is intended to continuously record ECG data. The SEER 1000 performs no cardiac analysis by itself and is in- tended to be used with an ECG analysis software package. The recorded data are downloaded to a PC for analysis and subsequent evaluation by a trained physician or healthcare professional. -
Page 11: Safety Conventions
WARNINGS WARNING NO MONITORING DEVICE – The SEER 1000 recorder is not a monitor- ing device and is not intended for monitoring the clinical condition of a patient. Do NOT use the SEER 1000 as a monitoring device. - Page 12 Introduction WARNING MIXING UP RECORDINGS –The patient’s life or health may be put at risk if the patient is assigned a different patient’s examination, thus resulting in an incorrectly assigned diagnosis. Take special care to always select the correct examination and the correct patient.
- Page 13 Introduction WARNING GENERAL DANGER TO THE PATIENT – Instructions listed in this manual in no way supersede established medical practices concerning pa- tient care. Perform the established medical practices under all circumstances. WARNING RISK OF CONTAMINATION OR INFECTION – Recorder and accessories may be contaminated with bacteria or viruses after use.
- Page 14 Introduction NOTICES NOTICE CABLE DAMAGE – Bending or wrapping the cable can damage it. When attaching and affixing the ECG cable, make sure not to bend it excessively. Avoid coiling the ECG cable around the recorder, as this can damage the cable. NOTICE DAMAGE TO THE DEVICE THROUGH BATTERY LEAKAGE –...
- Page 15 Introduction NOTICE SAFETY ONLY WITH APPROVED ACCESSORIES – Safe and reliable oper- ation of the device is only possible when using the supplied and ap- proved accessories. Observe the information contained in this manual, in the supplies or accessories manual, and in the instructions provided with accessories. NOTICE SAFETY AND RELIABILITY ONLY WITH PROPER MAINTENANCE –...
-
Page 16: Medical Device Classification
If you have questions concerning the disposal of this product, contact GE Healthcare or a facility authorized by GE Healthcare. NOTICE POSSIBLE LOSS OF ECG RECORDING OR POOR SIGNAL QUALITY – The recorder might be used with insufficient results if the patient does not have all relevant information. -
Page 17: Certification
Introduction Category Classification Degree of safety of application in Equipment is not suitable for use in the the presence of a flammable anes- presence of a flammable anesthetic thetic mixture with air or with oxy- mixture with air or with oxygen or with gen or with nitrous oxide nitrous oxide. -
Page 18: Biocompatibility
The parts of the system described in this manual, including all accessories that come into contact with the patient during the intended use, fulfill the biocompatibility requirements of the applicable standards. If you have questions in this matter, contact your GE Healthcare representative. SEER™ 1000 2067634-077 Revision B... -
Page 19: Supply And Accessory Information
Supply and Accessory Information For ordering information and a list of supplies and accessories that have been approved for use with this device, see the SEER 1000 Supplies and Accessories Reference Manual that is supplied with each recorder. Manufacturer Responsibility... - Page 20 Introduction Symbol Description Catalog or Orderable Part Number Indicates the manufacturer's catalog or part number. Serial Number Indicates the manufacturer's serial number. Manufacturer Name and Address Indicates the name and address for the manufacturer of this device. Date of Manufacture (Year) Indicates the original manufacture date for this device.
- Page 21 Introduction Symbol Description CAUTION CONSULT ACCOMPANYING DOCUMENTS – There may be specific warnings or precautions associated with the device that are not otherwise found on the label. Consult the accompanying documentation for more information about safely using this device. Non-ionizing Electromagnetic Radiation Indicates that the equipment emits elevated, potentially hazardous, levels of non-ionizing radiation (electromag- netic energy) for diagnosis or treatment.
- Page 22 Introduction Symbol Description Environment Friendly Use Period (EFUP) Per Chinese standard SJ/T11363–2006, indicates the num- ber of years from the manufacturing date during which you can use the product before any restricted substances are likely to leak, causing a possible environmental or health hazard.
- Page 23 Introduction Symbol Description Humidity Limits Indicates upper and lower humidity limits. They are indi- cated next to the upper and lower horizontal lines. CE Mark With the CE marking and the certification number 0197, it is confirmed that the device complies with all relevant standards and the essential requirements listed in Annex I of the Medical Device Directive 93/42/EEC.
- Page 24 Introduction Symbol Description Start Recording This symbol is used in the Apple iOS app to start the re- cording. Start Recording This symbol is used in the Microsoft Windows app to start the recording. Stop Recording This symbol is used in the Apple iOS app to stop the re- cording.
- Page 25 Introduction Symbol Description Find This symbol is selected in the Microsoft Windows app to find a recorder for wireless connection. Event Button Pressing the button on the recorder starts the recording and, when the device is already running, marks a cardiac event.
-
Page 26: Equipment Identification
Introduction Equipment Identification GE Healthcare and GE Healthcare distributed devices have a product la- bel that identifies the product name, part number, manufacturing infor- mation, and unique serial number. This information is required when con- tacting GE Healthcare for support. -
Page 27: Serial Number Format And Product Code
This section provides information pertaining to the maintenance and ser- vicing of the system. Familiarize yourself with this information before re- questing service from GE Healthcare or its authorized representatives. Service Requirements Failure on the part of the responsible individual, hospital, or institution us- ing this equipment to implement a satisfactory maintenance schedule may cause undue equipment failure and safety hazards. -
Page 28: Warranty Information
Introduction Warranty Information This device is distributed by GE Healthcare. Only authorized GE Healthcare service personnel should service the device. Any unauthorized attempt to repair equipment under warranty voids that warranty. Additional Assistance GE Healthcare maintains a trained staff of application and technical ex- perts to answer questions and respond to issues and problems that may arise during the installation, maintenance, and use of this system. - Page 29 Introduction Convention Description Bold Text Indicates keys on the keyboard, text to enter, or hard- ware items such as buttons or switches on the equip- ment Italicized Bold Text Indicates software terms that identify menu items, buttons, or options in various windows. KEY1+KEY2 Indicates a keyboard operation.
-
Page 30: Related Documents
Part Number Title 2067634-078 SEER 1000 Supplies and Accessories Reference Manual 2067634-079 SEER 1000 Quick Start Guide SEER™ 1000 2067634-077 Revision B... -
Page 31: Product Overview
ECG waveforms, change recorder settings, and start the recording. The SEER 1000 recorders may be used as stand-alone devices without the apps. -
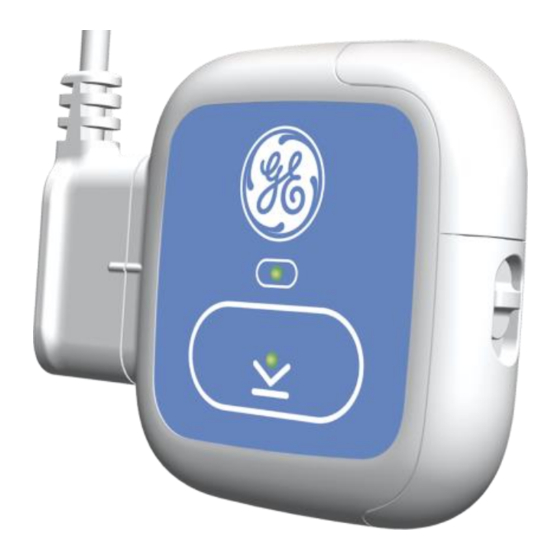
Page 32: Operating Elements Of The Recorder
Product Overview ECG recordings are transferred to the evaluation workstation using a spe- cial USB cable. Operating Elements of the Recorder Event Button Event Button LED Combined ECG Cable Connector and USB Cable Connector Hookup Guidance LED Battery Compartment Battery Compartment Latch SEER™... -
Page 33: Event Button
Product Overview Event Button This button is used to perform the following functions: Function User Action Switch on/off the re- Press and hold for more than a second until a corder beep sounds. NOTE: Once it has started recording, the recorder cannot be turned off unless the battery is removed. -
Page 34: Event Button Led
Product Overview Event Button LED This two-color LED indicates the following recorder statuses: Recorder Status Status Indicator Light Ready for recording Solid green Recording in process Intermittent flashing green Event marked (by pressing Event Green, then fades Button) Contains recording Solid yellow Low battery Slow flashing yellow... -
Page 35: Audible Notifications
After the recorder is switched on, both LEDs illuminate green and then yellow for 0.5 seconds to inform the user that they are working properly. Audible Notifications The SEER 1000 provides the following audible feedback: Status Buzzer Notification Recorder is turned on... -
Page 37: Preparing The Recording
Preparing the Recording This chapter provides information on instructing the patient as well as on the procedures for preparing the patient's skin, for properly placing elec- trodes, and for starting the recording without using the app. NOTE You find information on using the app for starting the recording in the sections “Using the Apple iOS App”... -
Page 38: Instructing The Patient
Preparing the Recording Instructing the Patient It is the responsibility of the medical doctor to provide the patient with the following information required for a safe and effective ECG recording. Safety Precautions Notify the doctor if skin problems develop. In rare cases, even when using biocompatible electrodes, allergic re- actions may occur. -
Page 39: Marking A Patient Event
Preparing the Recording At a minimum, the patient should enter the following information into the diary: activities and state of health every two hours, whenever you have pressed the Event Button, any pain, feelings of illness, sensations of numbness, dizziness, palpi- tations, and each visit to the toilet, ... -
Page 40: Placing The Electrodes
Look at the Hookup Guidance LED for indication of lead problems. NOTE: Use only electrodes and contact agents recommended by GE Healthcare. Placing the Electrodes This section describes the placement of the electrodes for 2-channel and 3-channel Holter ECG. -
Page 41: Electrode Placement With 7 Leads For 3-Channel Recordings
Preparing the Recording Electrode Placement with 7 Leads for 3-Channel Recordings To record a 3-channel ECG, seven electrodes are attached and connected to the color-coded leads. AHA Color Coding IEC Color Coding AHA Color IEC Color Channel Location Green CH 1 (+) Left anterior axillary line, 5th rib White CH 1 (–) -
Page 42: Electrode Placement With 5 Leads For 2-Channel Recordings
Preparing the Recording Electrode Placement with 5 Leads for 2-Channel Recordings To record a 2-channel ECG, five electrodes are attached and connected to the color-coded leads. AHA Color Coding IEC Color Coding AHA Color IEC Color Channel Location Green CH 1(+) Left anterior axillary line, 5th rib White CH 1 (–) -
Page 43: Electrode Placement With 3 Leads For The Recording Of
Preparing the Recording Electrode Placement with 3 Leads for the Recording of 3 Non-Independent ECG Channels To record 3 non-independent ECG channels, three electrodes are at- tached and connected to the color-coded leads. AHA Color Coding IEC Color Coding AHA Color IEC Color Location White... -
Page 44: Connecting The Ecg Cable To The Recorder And To The Electrodes
Preparing the Recording Connecting the ECG Cable to the Recorder and to the Electrodes Connect the ECG cable to the recorder and to the electrodes. NOTE If both LED alternatively flash between green and yellow three times per second, the recorder is defective and service is needed. Refer to the section “How to Notify Service if the Recorder is Defective”... -
Page 45: Inserting A Battery
Preparing the Recording Inserting a Battery NOTICE RECORDING DURATION MAY NOT BE REACHED – In order to achieve the full 7 day recording duration, a new or fully charged battery is re- quired. A low-end, non-brand named alkaline battery or a rechargea- ble battery which is not fully charged or aged may not last 7 days. -
Page 46: Reattaching Or Replacing The Battery Compartment Door
Preparing the Recording Reattaching or Replacing the Battery Compartment Door To open the Battery Compartment Door, slide back the Latch as shown in the previous section. If you further open the Battery Compartment Door, it will detach from the recorder housing. To reattach or to replace the Battery Compartment Door, hold the door as shown in the left grahic below and push it into its bearings. -
Page 47: Starting The Recording
Preparing the Recording Starting the Recording Press the Event Button in the middle of the recorder to start the record- ing. The recording only starts if no low battery and no open lead are de- tected. CAUTION SIGNAL QUALITY – If there is a severe muscle interference or artifact on the ECG when you tap the top of the electrodes lightly or when the patient moves, it is possible that the electrodes are not attached properly. -
Page 48: Auto-Switch-Off
Preparing the Recording each time wireless communication takes place, if the cable status changes (e.g., cable attached or removed), or if the Event Button is pressed but no recording starts because of low battery or open lead (error sound). NOTE Once the recording has automatically started, it is not possible to ac- cess the recorder demographic and ECG data using an app until the... -
Page 49: After Completing The Recording
After Completing the Recording The recorder automatically switches off when the recording duration has been reached. CAUTION DATA LOSS – The recorder retains the data for at least one month af- ter the recording has finished. Make sure the data is transferred and erased before assigning the re- corder to another patient. -
Page 50: Removing The Electrodes
ECG data. Compatible Evaluation Software The data stored by the devices are compatible with the GETEMED evalua- tion software CardioDay 2.4 (and above) and the GE Healthcare MARS Ambulatory ECG System, V8.0 SP3 (and above). SEER™ 1000... -
Page 51: Applications (Apps) - General Information
Applications (Apps) – General Information There are two applications (apps), one which is available as an Apple iOS app running on an iPod touch, an iPhone, or an iPad, and one which is available as a standalone software app running on a personal computer under Microsoft Windows operating systems. -
Page 52: Functionality
Applications (Apps) – General Information NOTE It is not possible to read-out a recording from the recorder using these apps. Recordings are read-out using the MARS or CardioDay evaluation software packages. Functionality Both apps provide the following functionality: Initiate a secure wireless connection to a recorder. ... -
Page 53: Data Protection
Applications (Apps) – General Information Data Protection For data protection purposes, both apps employ access control using two levels of password protection. The first level is the administrator pas s- word; the second level is the ECG technician password. Setting these passwords is explained in the section “Changing the Administrator Pass- word”... -
Page 54: Basic Information On Wireless Bluetooth Connection
NO OPTIMUM PERFORMANCE – If you are using any NON-GE SUP- PLIED Bluetooth wireless equipment, optimum performance cannot be assured. Only use the Bluetooth wireless equipment supplied BY GE, as the Blue- tooth wireless technology has been tested and validated using this equipment. - Page 55 Applications (Apps) – General Information NOTICE The recorder consumes more power if Bluetooth wireless technology is used. If Bluetooth wireless technology is used extensively, a desired recording duration may not be possible. NOTICE Loss of range can occur if Bluetooth wireless technology and other RF devices (e.g., WLAN) are used close to each other.
-
Page 57: Using The Apple Ios App
(5th and 4th generation). Installing and Starting the App Touch the icon to call-up the App Store on your device. Search for SEER 1000 Mobile App. Touch Install. Touch the app icon to start the app. 2067634-077 Revision B... -
Page 58: Changing The Administrator Password
Using the Apple iOS App NOTE Verify that your iOS device has Bluetooth enabled. On your Apple de- vice, open Settings, select Bluetooth and verify that it is On. Changing the Administrator Password The app is password protected to avoid unintentional access to a re- corder. -
Page 59: Add Technician Or Reset Technician Password
Using the Apple iOS App Replace the default password by entering and confirming your new password. (Your new password must be at least eight char- acters long.) Touch Set New Administrator Password. The Technicians screen opens. Add Technician or Reset Technician Password Only the app administrator can create Technician IDs and reset pass- words to the default password. -
Page 60: Reset Application
Using the Apple iOS App To reset a technician password, the administrator has to perform the fol- lowing steps: Log in as administrator. Touch Administration in the upper right corner and enter the ad- ministrator password. Touch the blue arrow to the right of the technician entry. -
Page 61: Starting The App And Changing The Technician Password
Using the Apple iOS App Delete all technician IDs and passwords. Delete all patient information stored in the app. Erase recorder pairings. To reset the application: Touch Reset Application in the Administration screen. Enter the default Administrator Password: 14012013. Touch Continue. -
Page 62: Patient Hookup
Using the Apple iOS App Enter the default password: 20130114 Touch Login. Replace the default password by entering and confirming your new password. Your new password must be at least eight characters long. Patient Hookup If you have prepared the recording as explained in the “Preparing the Re- cording”... -
Page 63: Add Or Select A Patient
Using the Apple iOS App Add or Select a Patient To add a new patient, touch Add Patient. Enter the patient demographic data in the Add Patient window. You have to enter at least the Patient ID. Touch the Continue button. Find Device After selecting a patient, you will be taken to the Find Device screen. -
Page 64: Electrode Placement And Waveform Preview
Using the Apple iOS App The recorder identifier will now appear in the device list. Select the recorder to move to the overview screen. Refer to the “Electrode Placement and Waveform Preview” section on page 64 for next steps. NOTE If the recorder is in the process of recording or contains a re- cording, a warning is displayed. -
Page 65: Verify Or Change Settings
Using the Apple iOS App The two associated electrodes are displayed to the left of each waveform. If an electrode is loose, a red line will be shown around the respective electrode pair and a red indicator will be shown on the torso. The app will display waveforms for each channel. -
Page 66: Start The Recording
Using the Apple iOS App Select Recording Duration To select the recording duration, touch the duration button at the bottom of the screen and select the number of days. To set a custom duration, touch Custom and scroll to the desired time. Then touch Set. The Autodelete Option The Autodelete option is a setting of the recorder. -
Page 67: Patients Tab
Using the Apple iOS App Patients Tab In the Patients tab, you can view, edit, and delete patient entries. Also, you can add patients to the list for later recordings. Touch the Patients tab to view the patient list. ... -
Page 68: Devices Tab
Using the Apple iOS App Devices Tab In the Devices tab, you can connect to a recorder while it is recording or after having finished. NOTE If the recorder is already recording, you need to activate the re- corder’s Bluetooth module by pressing the Event Button of the re- corder for more than three seconds until a multi-beep sounds. -
Page 69: Using The Microsoft Windows App
Technician Password” on page 74. Installing and Setting up the App WARNING INTERFERENCES POSSIBLE – Safe and effective use of the SEER 1000 Mobile Application can only be performed with suited hardware. The personal computer (PC) used must comply with the most recent version of the international standard IEC 60950. -
Page 70: Using The Bluetooth Adapter
Using the Microsoft Windows App Component Description Display 1024 x 768 pixels Disk drive Required Port One free USB port needed for Bluetooth Adapter Keyboard Standard PS/2, USB, or wireless device Mouse Standard PS/2, USB, or wireless 2- or 3-button device Installation media One CD Using the Bluetooth Adapter... -
Page 71: Removing The Pc App
When the installation is complete, the PC app icon is placed on the desktop. Double-click the desktop icon to start the PC app. To display the version of the app, place the mouse cursor over the GE logo in the upper left corner of the app window. Removing the PC App The app can be removed by opening Control Panel on the PC and going to Add or Remove Programs or Programs and Features and removing SEER 1000. -
Page 72: Add Technician Or Reset Technician Password
Using the Microsoft Windows App This is a prerequisite for adding new technicians to the list or for resetting technician passwords. Enter the Default Administrator Password: 14012013 Replace the Default Administrator Password by entering and setting your new password. Your new password must be at least eight characters long. Add Technician or Reset Technician Password Click the I symbol to create a new technician ID. -
Page 73: Reset Application
Using the Microsoft Windows App Click Save to enter the Technician ID and close the dialog. Click Logout to return to the Technician Login screen. The first time the technician logs in, he/she will be required to set up a new password. -
Page 74: Starting The App And Changing The Technician Password
Using the Microsoft Windows App Delete all technician IDs and passwords. Delete all patient information stored in the app. Delete stored recorder information. To reset the application: Click Reset Application in the Administration screen. Enter the Default Administrator Password: 14012013 Click Login. - Page 75 Using the Microsoft Windows App Enter the ID that has been set up for you by your administrator. Enter the default password: 20130114 Click Login. Replace the default password by entering and setting your new password. Your new password must be at least eight characters long. 2067634-077 Revision B SEER™...
-
Page 76: Patient Hookup
Using the Microsoft Windows App Patient Hookup If you have prepared the recording as explained in the “Preparing the Re- cording” section on page 37, you can start the recording using the Hookup tab of the app. When logging in, the app opens in the Hookup tab. Add or Select a Patient, Connect to the Recorder Click the I symbol to add a new patient. - Page 77 Using the Microsoft Windows App If the patient has been previously entered into the app, double - click the patient name or click the patient entry and then the V symbol. Press the Event Button to switch on the recorder. Click the M symbol to start the device search.
-
Page 78: Electrode Placement And Waveform Preview
Using the Microsoft Windows App If the connection cannot be established, you will be asked to try again. NOTE If the recorder is in the process of recording or contains a recording, a warning is displayed. Electrode Placement and Waveform Preview WARNING WAVEFORM DIAGNOSTIC QUALITY –... -
Page 79: Verify Or Change Settings
Using the Microsoft Windows App The two associated electrodes are displayed to the left of each waveform. If an electrode is loose, a red line will be shown around the respective electrode pair and a red indicator will be shown on the torso. Double-click the waveform to zoom in or to zoom out again. -
Page 80: Start The Recording
Using the Microsoft Windows App The Autodelete Option The Autodelete option is a setting of the recorder. The default setting of the recorder is Autodelete On. If this is changed, the application detects it. To automatically delete recordings after they are read into the Holter analysis system, set Autodelete to On. -
Page 81: Devices Tab
Using the Microsoft Windows App To delete a patient, select the patient and click the ` symbol. To edit a patient, click the U symbol and enter and save your edits. You have to enter at least the Patient ID. ... - Page 82 Using the Microsoft Windows App Double-click the device or click the device entry and then the V symbol. If you select the recorder in the list, you can: view the Hookup screen while a recorder is recording, view patient data, recorder serial number, cable serial number, recorder time, battery level, stop and delete existing recordings or delete patient information stored on the recorder, and...
-
Page 83: Troubleshooting
Troubleshooting This section explains error signs and troubleshooting recommendations. Recorder Troubleshooting Trouble Indicators Cause Recommendation The Event Button LED Battery power is low. The battery is not fully charged flashes yellow once or the wrong battery type has every second. been inserted. - Page 84 Holter analysis sys- tem software or the SEER 1000 app. The Event Button LED The recording has stopped The recording may have been...
-
Page 85: Application Troubleshooting
Troubleshooting Application Troubleshooting Message Recommendation “A technician with the same identifier exists al- Enter a new technician identifier. ready.” “An error occurred while connecting. You Try again to connect to the recorder. should try again.” “Battery level too low to start a recording.” For the recording duration selected, the battery is not sufficiently charged or the wrong battery type has been inserted. - Page 86 Troubleshooting Message Recommendation “Password too short. A password must have at Enter a new password with at least eight least 8 characters.” characters. “Recorder “SN” is no longer paired with this PC. (Message from Microsoft Windows) Do you want to repeat the pairing procedure Select “Yes”.
- Page 87 Troubleshooting Message Recommendation “Setting patient data failed.” Try again as the wireless communication may have been interrupted. “Setting recorder protection key failed.” Try again as the wireless communication may have been interrupted. “Starting recording failed.” If the recording is running (Event But- ton LED flashes intermittently green), no recorder feedback has been reg- istered in the app and the patient...
- Page 88 “Unable to establish a connection.” Check if Bluetooth is enabled on the SEER 1000 recorder and try again. Check if Bluetooth is enabled on your Ap- ple iOS device. Ensure that your PC or Apple mobile de- vice is not already connected to another Bluetooth device.
-
Page 89: Bluetooth Troubleshooting
Troubleshooting Message Recommendation “Wrong password.” The password is wrong. Try a valid pass- word. “Wrong technician or password.” The technician ID does not exist or the password is wrong. Try a valid combina- tion of technician ID and password. Bluetooth Troubleshooting Trouble Indicators Cause Recommendation... -
Page 90: Bluetooth Messages From The Microsoft Windows System
Troubleshooting Bluetooth Messages from the Microsoft Windows System Certain problems when establishing Bluetooth connectivity between PC and recorder are reported by the operating system of the PC. The app tries to suggest a solution but cannot always determine the rea- son of the problem. -
Page 91: How To Notify Service If The Recorder Is Defective
A two-second pause follows. The green Event Button LED flashes. If any of these failures occur, contact GE Technical Support. By counting the number of flashes, service personnel can determine the cause of the defect. Refer to the following table for the defect identified by the number of LED flashes. - Page 92 Troubleshooting Failure number Failure (Count of LED flashes) The firmware CRC check fails. The board needs to be reprogrammed. The internal RAM is defective or has a soldering problem. One or more of the different internal clocks fails. The communication between the µC and the NAND-Flash fails. The NAND-Flash has too many bad blocks.
-
Page 93: Maintenance
Maintenance Perform the following maintenance procedures as described. Perform the visual inspection daily. If you notice any items that need re- pair, contact an authorized GE Healthcare service person to make repairs. Notices NOTICE DAMAGE TO THE EQUIPMENT – Some chemical substances can dam- age the plastic of the device casing and cables. -
Page 94: Cleaning And Disinfecting The Recorder
Maintenance Never use solutions or products that contain any type of Ammo- nium Chloride such as, but not limited to: Dimethyl Benzyl Ammonium Chloride Quaternary Ammonium Chloride solutions Abrasive cleaners or solvents of any kind Acetone ... -
Page 95: Cleaning The Carrying Pouch
Maintenance Cleaning the Carrying Pouch Clean the pouch by hand using a mild soap solution. Alternatively, you can machine wash the pouch at 60°C (140°F). Dry thoroughly before use. Do not spin dry. Cleaning, Disinfecting, and Storing ECG Cables In addition to keeping the system clean and in good repair, it is important to keep the cables and leadwires clean and disinfected. -
Page 96: Disinfecting Ecg Cables
Maintenance Disinfecting ECG Cables Use the following procedure to disinfect the cables and leadwires: Remove the cables and leadwires from the device before disin- fecting. Wipe them with a cloth lightly moistened with an appropriate dis- infectant. Use the following solutions, as recommended in APIC Guidelines for Selection and Use of Disinfectants (1996): Sodium hypochlorite (5.2% household bleach) minimum ... -
Page 97: Specifications
Specifications This section lists the specifications for the SEER 1000 recorders. General Component Description Recording channels 2 or 3 channels ECG, depending on the ECG cable type connected Pacemaker pulses Pacemaker detection All channels Recording time 24 hours, 48 hours, or 7 days, depending on model... -
Page 98: Electrical
Specifications Electrical Component Description Battery type 1 x LR03/AAA 1.5 V alkaline, or 1 x HR03/AAA 1.2 V NiMH rechargeable, 1000 mAh Frequency response 0.05 to 70 Hz Analog-to-digital converter 1024 Hz, 12 bit (2.93 µV) ECG data storage 256 Hz, 12 bit (2.93 µV) Input voltage range ECG ±... -
Page 99: Environmental
Specifications Environmental Component Description Operating temperature 5 to 45°C (41 to 113°F) Operating humidity 10 to 95% relative humidity, non-condensing Ambient pressure 106 to 50 kPa Storage temperature – 20 to 65°C (– 4 to 149°F) Storage humidity 5 to 95% relative humidity, non-condensing Bluetooth module Component Description... -
Page 100: Emc Specifications According To Iec 60601-1-2
Specifications EMC Specifications according to IEC 60601-1-2 General Specifications, Table 201 Guidance and manufacturer’s declaration – electromagnetic emissions The device is intended for use in the electromagnetic environment specified below. The customer or the user should ensure that the device is used in such an environment. Emissions test Compliance Electromagnetic environment –... -
Page 101: General Specifications, Table 202
Specifications General Specifications, Table 202 Guidance and manufacturer’s declaration – electromagnetic immunity The device is intended for use in the electromagnetic environment specified below. The customer or the user should ensure that the device is used in such an environment. Immunity IEC 60601 Compliance... -
Page 102: Non Life-Sustaining Systems, Table 204
Specifications NOTE: is the AC mains voltage prior to application of the test level. Non Life-Sustaining Systems, Table 204 Guida nce a nd m a nuf a ct ur er ’s decla r a t ion – elect r om a gnet ic im m unit y The device is intended for use in the electromagnetic environment specified below. -
Page 103: Recommended Separation Distances From Portable And Mobile Rf Communications Equipment, Table 206
Specifications Recommended Separation Distances from Portable and Mobile RF Communications Equipment, Table 206 Recommended separation distances between portable and mobile RF communications equip- ment and the device The device is intended for use in an electromagnetic environment in which radiated RF disturbances are controlled. -
Page 105: Index
Index accessories, 19 label locations, 25 product, 26 biocompatibility, 18 manual purpose, 28 certification, 17 classification, 16 contraindications, 10 notes, 30 document conventions, 28 package information, 19 prescription device statement, 10 product label, 26 electrode placement, 40 product information, 19 equipment identification, 26 product label, 26 illustration conventions, 29... - Page 106 Index responsibility signal reproduction, accuracy of, 17 of the manufacturer, 19 skin preparation, 39 supplies, 19 symbols, 19 safety conventions, 11 hazards, 11 typographical conventions, 28 information, 10 serial number format, 27 service information, 27 warranty information, 28 requirements, 27 SEER™...
- Page 108 Fax: +49 761 45 43 -233 Shanghai, People’s Republic of Fax: +1 414 355 3790 China 201203 Tel: +86 21 5257 4650 Fax: +86 21 5208 2008 GE Medical Systems Information Technologies, Inc., a General Electric Company, going to market as GE Healthcare. www.gehealthcare.com...
Need help?
Do you have a question about the SEER 1000 and is the answer not in the manual?
Questions and answers