Adaptive Recognition Vidar Installation Manual
Hide thumbs
Also See for Vidar:
- User manual (188 pages) ,
- Quick installation manual (38 pages) ,
- Install manual (22 pages)
Table of Contents
Advertisement
Quick Links
Advertisement
Table of Contents

Related Manuals for Adaptive Recognition Vidar


Summary of Contents for Adaptive Recognition Vidar
- Page 1 Vidar Installation Guide This guide contains an overview of the hardware and required components, suggested scenarios and step-by-step guide for installation, and safety and maintenance instructions. © Copyright Adaptive Recognition Inc. 14.03.2023. All rights reserved.
-
Page 2: Table Of Contents
Vidar Installation Guide VIDAR Install Guide Document version: 2023.03.14. Table of Contents Instructional video series......................3 Hardware Overview ........................4 Required components ....................... 5 Recommended installation......................6 Installation steps ........................12 5.1. Power Specifications......................12 5.2. Cable Layouts........................13 5.3. -
Page 3: Instructional Video Series
Z&index=2 2. VIDAR ANPR/LPR Camera: Setting the IP Address and Reaching the GUI: In this video, we guide you through connecting the VIDAR ANPR camera to a PC or laptop/centralized router/switch to set it up by covering the following: •... -
Page 4: Hardware Overview
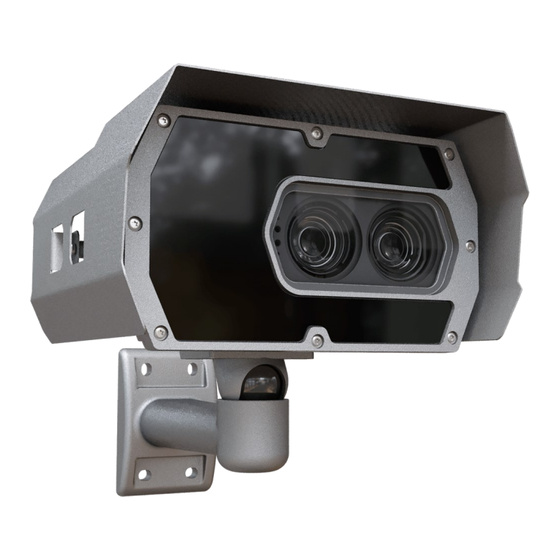
Vidar Installation Guide HARDWARE OVERVIEW Sunshield Wall bracket Camera with bracket Red status LED Light sensor Laser Green status LED Built-in- illuminator Camera optics Camera front Page 4/29 REQUESTINFO@ADAPTIVERECOGNITION.COM Adaptive Recognition America Adaptive Recognition Nordic Adaptive Recognition Hungary Adaptive Recognition Singapore... -
Page 5: Required Components
Vidar Installation Guide REQUIRED COMPONENTS The box contains: • Vidar camera • Bracket Optional parts: • GPIO cable • Junction Box • Synchronized External Illuminator Required for camera operation: These are not included in the box, you can purchase it directly from Adaptive Recognition. -
Page 6: Recommended Installation
Vidar Installation Guide RECOMMENDED INSTALLATION 1. Please make sure that the camera is installed centered and it does not roll neither to the left nor right. Roll must be 0°. You can check the ROLL on the camera GUI here: (Maintenance > Sensors) 2. - Page 7 Vidar Installation Guide 3. Make sure the connecting cable does not lead rainwater drops into the camera housing! 4. Water may enter into the camera inside through not properly sealed connectors. To maintain the camera’s watertightness please make sure that connected cables are tightened properly and the unused connectors are capped.
- Page 8 Vidar Installation Guide 11. Overhead installation - when camera placed above the lane • Vertical positioning (h): o typically 4-9 m above the lane o 2,5-4 m internal • Horizontal positioning: center of the lane • Vertical rotation - TILT (α): 20°-40°...
- Page 9 Vidar Installation Guide Here's an exact example of Overhead installation: Overhead installation geometrics with exact values 12. Transversal installation - when the device is installed on a pole near the road and it has to be: • Typical height (h): 4-8m •...
- Page 10 Vidar Installation Guide Here's an exact example of Transversal installation: Transversal installation geometrics with exact values 13. Access control - Typical for access control • Typical height (h): At least 1 meter above the headlights of the car • Distance from the side of the road (d): Maximum 1 or 2 meters •...
- Page 11 Vidar Installation Guide Here's an exact example of Access control: Access control with exact values Page 11/29 REQUESTINFO@ADAPTIVERECOGNITION.COM Adaptive Recognition America Adaptive Recognition Nordic Adaptive Recognition Hungary Adaptive Recognition Singapore WWW.ADAPTIVERECOGNITION.COM...
-
Page 12: Installation Steps
Vidar Installation Guide INSTALLATION STEPS 5.1. POWER SPECIFICATIONS The required input voltage is model dependent, please use the proper input according to your model! Please consider voltage drop if you use cables! Cam era with HD x s ens or... -
Page 13: Cable Layouts
Vidar Installation Guide 5.2. CABLE LAYOUTS Ethernet Power I/O (12 pin) Power 4 pos. M12 T coded, Male Input voltage should be connected to AC1 and AC2. Both signals are connected to two pins (a and b) to allow for larger effective cable diameter/two wires for each potential. AC1_a and AC1_b are connected in the device. -
Page 14: Hardware Installation
Vidar Installation Guide 5.3. HARDWARE INSTALLATION Camera fastening screws Bracket Details and Sizes To ensure proper mounting of the camera with bracket please use the largest possible fastener (e.g., fastening screw with DIA 8 mm). Page 14/29 REQUESTINFO@ADAPTIVERECOGNITION.COM Adaptive Recognition America... - Page 15 Vidar Installation Guide Adjust the bracket 1. Loosen the camera fastening screw on the bottom of the bracket. (Use size 5 Allen key). 2. Adjust the bracket into the desired position. Tighten the screw back. Do not overtighten the screws.
-
Page 16: Optional Wiring
Vidar Installation Guide 5.4. OPTIONAL WIRING I/O (12 pin) 12 pos. M12 A coded, Female Connector pinout and wire color coding. Colours refer to those in the supplied standard I/O cable. See Appendix for more details at section 10.2.3 Trigger specifications: •... -
Page 17: Software Requirements
Vidar Installation Guide SOFTWARE REQUIREMENTS The cameras are developed to operate without any kind of special software. Software requirements : • For network setup, administrator (root) privileges are necessary. • Web browser: Mozilla Firefox 52, Google Chrome 51.X.X.X or later editions. If it is possible, update your browser (Firefox or Chrome) to the newest available version. - Page 18 Vidar Installation Guide 4. Use the ping command to test the communication with the camera: Windows: C: \>ping -t 192.0.2.3 Linux: username@mylinux:~$ ping 192.0.2.3 5. Soon, the ping package returns: Reply from 192.0.2.3. If not: o first check the Ethernet LEDs at the PC or the switch side o check whether the IP address is set correctly;...
-
Page 19: Safety
Vidar Installation Guide SAFETY All screws should be hand- tightened! Do not overtighten the screws. Failures due to inappropriate installation void the warranty. The camera must only be installed on a stable surface! For cabling use quality, outdoor-certified cables! Improper cabling causes warranty to void! Water may enter into the camera inside through not properly sealed connectors. -
Page 20: Maintenance / Storage
Vidar Installation Guide MAINTENANCE / STORAGE The cameras are designed for 24/7/365 work for every weather condition and they do not need special maintenance. Please keep clean the camera front. During the cleaning process, avoid scratching the front cover. Do not use the camera without its sun-shield in hot environment, because it was specially designed to provide proper air-cooling. -
Page 21: Appendix
10. APPENDIX 10.1. RECOMMENDED POWER SUPPLY Two types of power supply are recommended, one is an AC230V/AC24V transformer, the other is an AC230V/36V DC power supply. Both are suitable for powering a Vidar camera under suitable environmental conditions. AC/DC power supply: Type: Stontronics SRS-75-36 Main features: 75W, Universal AC input 100-240Vac, 36V DC output. - Page 22 Vidar Installation Guide 10.2.2. Ethernet (8 pos. M12 X coded, Female) ..RJ45 10.2.3. I/O (12 pin) 12 pos. M12 A coded, Female Page 22/29 REQUESTINFO@ADAPTIVERECOGNITION.COM Adaptive Recognition America Adaptive Recognition Nordic Adaptive Recognition Hungary Adaptive Recognition Singapore WWW.ADAPTIVERECOGNITION.COM...
-
Page 23: Junction Box
A 12-pin user cable (M12 binder female connector at one end, and a stripped end on the other) is required to connect the camera to the Junction Box. This I/O cable is not included by default with the camera. However, you can purchase it directly from Adaptive Recognition (PART #: COMBUY- OTH0326) Page 23/29 REQUESTINFO@ADAPTIVERECOGNITION.COM... -
Page 24: Adding Alternate Ip Address
Vidar Installation Guide 10.4. ADDING ALTERNATE IP ADDRESS Windows Vista/Windows 7/Windows 10 1. Click Start and select Control Panel. 2. Open Network and Sharing Center . 3. Click Manage Network Connections on the left side of Network and Sharing Center. -
Page 25: Magnetic Reset
Remove the magnet • Enter the web interface at the 192.0.2.3 (default) IP Entering R ecovery mode to Vidar camera: Starting of the Recovery mode can be implemented by magnetization in the following way: By magnetization: 1. Power off the camera. -
Page 26: Position Of The Sticker
Vidar Installation Guide 10.6. POSITION OF THE STICKER Sticker is placed on the bottom of the device. The sticker, indicating the Name, IP address, MAC address and the Serial Number of the camera, can be found on a small metal placket at the bottom of the camera. -
Page 27: Compliances
This declaration represents the Company's best knowledge, which is partially based on information provided by third party suppliers. Laser safety compliance: All models of VIDAR ANPR camera which are equipped with a measuring laser module are Class 1 laser products according to the IEC 60825-1:2014 standard. Page 27/29 REQUESTINFO@ADAPTIVERECOGNITION.COM... - Page 28 FCC. Changes or modifications to product not expressly approved by Adaptive Recognition Hungary could void your right to use or operate your product by the FCC.
-
Page 29: Contact Information
Web: adaptiverecognition.com/support/ Adaptive Recognition Hungary Technical Support System (ATSS) is designed to provide you the fastest and most proficient assistance, so you can quickly get back to business. Information regarding your hardware, latest software updates and manuals are easily accessible for customers via our Documents Site (www.adaptiverecognition.com/doc...
Need help?
Do you have a question about the Vidar and is the answer not in the manual?
Questions and answers