Adaptive Recognition Vidar Install Manual
Anpr camera
Hide thumbs
Also See for Vidar:
- User manual (188 pages) ,
- Quick installation manual (38 pages) ,
- Installation manual (29 pages)
Table of Contents
Advertisement
Quick Links
Advertisement
Table of Contents

Related Manuals for Adaptive Recognition Vidar


Summary of Contents for Adaptive Recognition Vidar
-
Page 2: Table Of Contents
VIDAR Install Guide VIDAR INSTALL GUIDE Document version: 2021.07.23. Table of Contents THE FCC DECLARATION OF CONFORMITY ..................... 3 COMPLIANCES ............................... 4 Hardware Overview ........................... 5 1.1. Bracket Details and Sizes ........................ 6 Install the Hardware ..........................7 Mounting ................................7 Connect the Cables ........................... -
Page 3: The Fcc Declaration Of Conformity
FCC. Changes or modifications to product not expressly approved by Adaptive Recognition Hungary could void your right to use or operate your product by the FCC. -
Page 4: Compliances
VIDAR Install Guide Compliances CE Certificates: The AR FreewayCAM4 ANPR digital camera (VIDAR) family complies with the European CE requirements specified in the EMC Directive 2014/30/EU. The ANPR cameras conform to the following Product Specifications: Emission and Immunity: EN 55032:2015, EN 55024:2010+A1:2015 Declaration of RoHS Compliance for Electrical and Electronic Products: Adaptive Recognition Hungary ("the Company") hereby declares that the VIDAR ANPR camera family... -
Page 5: Hardware Overview
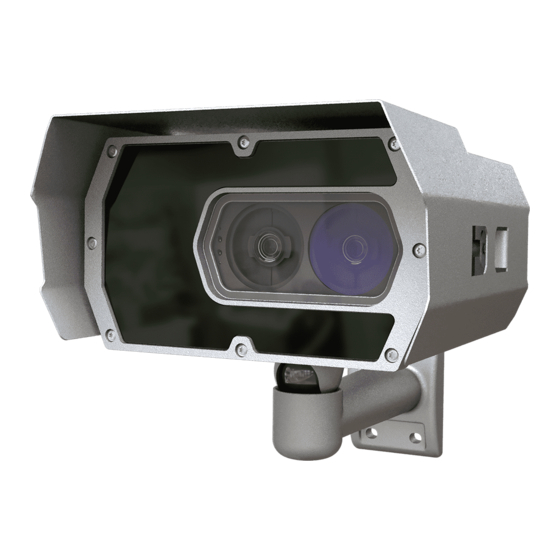
VIDAR Install Guide HARDWARE OVERVIEW Sunshield Wall bracket Camera with bracket Red status LED Light sensor Laser Green status LED Built-in- illuminator Camera optics Camera front Page 5/22 SENDINFO@ADAPTIVERECOGNITION.COM Adaptive Recognition America Adaptive Recognition Nordic Adaptive Recognition Singapore WWW.ADAPTIVERECOGNITION.COM Adaptive Recognition Hungary... -
Page 6: Bracket Details And Sizes
VIDAR Install Guide 1.1. BRACKET DETAILS AND SIZES Page 6/22 SENDINFO@ADAPTIVERECOGNITION.COM Adaptive Recognition America Adaptive Recognition Nordic Adaptive Recognition Singapore WWW.ADAPTIVERECOGNITION.COM Adaptive Recognition Hungary... -
Page 7: Install The Hardware
VIDAR Install Guide INSTALL THE HARDWARE Camera fastening screws Remove protective film from the protecting plate (on the camera front) before using the camera. Adjust the bracket 1. Loosen the camera fastening screw on the bottom of the bracket. (Use size 5 Allen key). -
Page 8: Connect The Cables
VIDAR Install Guide CONNECT THE CABLES Technical specifications are subject to change without prior notice. For cabling use quality, outdoor-certified cables! Improper cabling causes warranty • to void! Water may enter into the camera inside through loose cable ends. Use smooth circular cables only. -
Page 9: Cable Layouts
VIDAR Install Guide 3.1. CABLE LAYOUTS Ethernet I/O (12 pin) Power Page 9/22 SENDINFO@ADAPTIVERECOGNITION.COM Adaptive Recognition America Adaptive Recognition Nordic Adaptive Recognition Singapore WWW.ADAPTIVERECOGNITION.COM Adaptive Recognition Hungary... - Page 10 VIDAR Install Guide Ethernet (8 pos. M12 X coded, Female) ..RJ45 Wire colors and RJ45 positions refer to those in the supplied standard ETH cable. Use quality outdoor Cat6 cable. Power 4 pos. M12 T coded, Male Input voltage should be connected to AC1 and AC2. Both signals are connected to two pins (a and b) to allow for larger effective cable diameter/two wires for each potential.
- Page 11 VIDAR Install Guide IO (12 pin) 12 pos. M12 A coded, Female Connector pinout and wire color coding. Colors refer to those in the supplied standard I/O cable. ETH Connector 8 pos. X coded, Female Page 11/22 SENDINFO@ADAPTIVERECOGNITION.COM Adaptive Recognition America...
- Page 12 VIDAR Install Guide POWER SPECIFICATIONS: The required input voltage is model dependent, please use the proper input according to your model! Please consider voltage drop if you use cables! Camera with HDx sensor Camera with FullHD sensor AC Input isolated 24 - 28V AC (sinusoidal) Power (typical)* 10 –...
- Page 13 VIDAR Install Guide TRIGGER SPECIFICATIONS: • Input: min. 5V, max. 12V Logic Output: min. 5V, max. 12V, max. 10mA • Pulse width: min. 1 ms Be aware of the polarity. SCHEMATIC FOR TRIGGERING: SERIAL CONNECTION SPECIFICATION: The serial port of the camera complies with the RS 232/485 standard.
-
Page 14: Software Requirements
VIDAR Install Guide SOFTWARE REQUIREMENTS The cameras are developed to operate without any kind of special software. Software requirements: • For network setup, administrator (root) privileges are necessary. • Web browser: Mozilla Firefox 52, Microsoft Edge, Google Chrome 51.X.X.X or later editions. If it is possible, update your browser (Firefox or Chrome) to the newest available version. - Page 15 VIDAR Install Guide 4. Use the ping command to test the communication with the camera: Windows: C: \>ping -t 192.0.2.3 Linux: username@mylinux:~$ ping 192.0.2.3 5. Soon, the ping package returns: Reply from 192.0.2.3. If not: o first check the Ethernet LEDs at the PC or the switch side o check whether the IP address is set correctly;...
-
Page 16: Recommended Camera Position
VIDAR Install Guide RECOMMENDED CAMERA POSITION A good ANPR engine can read the plates from images taken in various conditions. However, if you want to achieve over 95% recognition rate with short recognition times, you have to calculate the position of the camera accurately. The best position is if the camera is installed on a gentry above the traffic lane (see below). - Page 17 VIDAR Install Guide A properly set camera should provide a similar image: A proper sample image Proper character sizes (in pixels) on the sample image Page 17/22 SENDINFO@ADAPTIVERECOGNITION.COM Adaptive Recognition America Adaptive Recognition Nordic Adaptive Recognition Singapore WWW.ADAPTIVERECOGNITION.COM Adaptive Recognition Hungary...
-
Page 18: Maintenance / Storage
VIDAR Install Guide MAINTENANCE / STORAGE The cameras are designed for 24/7/365 work for every weather condition and they do not need special maintenance. Please keep clean the camera front. During the cleaning process, avoid scratching the front cover. Do not use the camera without its sun-shield in hot environment, because it was specially designed to provide proper air-cooling. -
Page 19: Appendix
VIDAR Install Guide Appendix Adding Alternate IP Address Windows Vista/Windows 7/Windows 10 1. Click Start and select Control Panel. 2. Open Network and Sharing Center. 3. Click Manage Network Connections on the left side of Network and Sharing Center. 4. Click on the network connection you want to add an IP address for (to which the camera has been connected) and select Properties. - Page 20 Remove the magnet • Enter the web interface at the 192.0.2.3 (default) IP Entering Recovery mode to Vidar camera: Starting of the Recovery mode can be implemented by magnetization in the following way: By magnetization: 1. Power off the camera.
- Page 21 VIDAR Install Guide Position of the sticker Sticker is placed on the bottom of the device. The sticker, indicating the Name, IP address, MAC address and the Serial Number of the camera, can be found on a small metal placket at the bottom of the camera.
-
Page 22: Contact Information
Web: Adaptive Recognition Hungary Technical Support System (ATSS) is designed to provide you the fastest and most proficient assistance, so you can quickly get back to business. For further technical information about our products, please visit our official website.
Need help?
Do you have a question about the Vidar and is the answer not in the manual?
Questions and answers