Table of Contents
Advertisement
Quick Links
Advertisement
Table of Contents
Troubleshooting

Related Manuals for Compaq iPAQ CP-2E

Summary of Contents for Compaq iPAQ CP-2E
- Page 1 Compaq iPAQ Connection Point CP-2E User Guide 287449-001...
- Page 2 Compaq shall not be liable for technical or editorial errors or omissions contained herein. The information is provided “as is” without warranty of any kind and is subject to change without notice. The warranties for Compaq products are set forth in the express limited warranty statements accompanying such products. Nothing herein should be construed as constituting an additional warranty.
-
Page 4: Table Of Contents
Configuring Windows 98 and ME Clients....2–4 Setting Up Connection Point CP-2E ......2–7 Using the Installation Wizard . - Page 5 Adding a Reserved IP Address ..... 5–16 Excluded IP Addresses ......5–17 iPAQ Connection Point CP-2E User Guide...
- Page 6 For Windows 2000 PCs ........B–3 Accessing Security Configuration Options....B–3 G Glossary iPAQ Connection Point CP-2E User Guide...
-
Page 8: Introduction
Congratulations! As the owner of a new Compaq iPAQ Connection Point CP-2E, you are taking advantage of the most advanced network technology available to manage your home or small office network. The iPAQ Connection Point will be the focal point of your network, providing secure broadband Internet connectivity to all of your networked computers and devices. -
Page 9: Ethernet Networking
> Internal web-based management pages allow you to manage and configure the Connection Point CP-2E through a web browser for easy access and navigation > NTP allows CP-2E to track events based upon your time zone. What's in the Box? > Connection Point CP-2E >... - Page 10 Firmware Update Utility to update your Connection Point CP-2E with the latest firmware or repair the system in the case of failure Product Registration option walks you through the registration of your Connection Point CP-2E to help ensure that you get support information for this product...
-
Page 11: What Else Do I Need
More than four Ethernet PCs will require an additional hub or switch. — Ethernet cabling to connect each PC to the Connection Point CP-2E. Use Category 3 cabling or better for 10 Mbps, Category 5 cabling or better for 100 Mbps. 1–4 ®... -
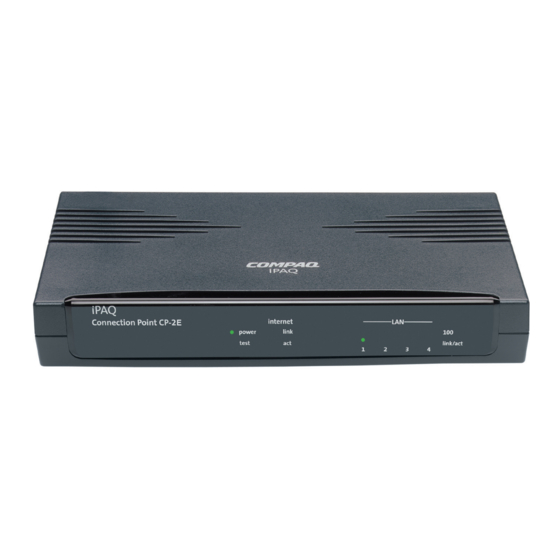
Page 12: What's In Front
What's in Front? Before you begin installation, familiarize yourself with your Connection Point CP-2E. Your Connection Point CP-2E has the following LED indicators: Item Description Power LED Test LED Internet link LED Internet act LED LAN 100 LED LAN link/act LED... -
Page 13: What's In Back
Introduction What's in Back? The Connection Point CP-2E has the following components on the back. Item Description Power input (DC12v 1.2A) RJ 45 (1-4) RJ 45 (Internet) Reset button 1–6 Function Power adapter connector Individual Ethernet LAN ports Ethernet port for broadband Internet... -
Page 14: Installation And Configuration
Installation and Configuration Installing and configuring the Connection Point CP-2E involves the following steps: > Installing the Connection Point CP-2E hardware > Configuring a PC client > Running the Installation Wizard Configure the Connection Point CP-2E Internet connection Establish a unique user name and password Note: If you forget your user name and password, you will be unable to modify the Connection Point setup. -
Page 15: Connecting To The Internet
2. Disconnect the existing Ethernet cable from PC. Leave the other end of the cable connected to your modem. 3. Connect the existing cable to the port labeled Internet on the back of the Connection Point CP-2E. Connecting to Your PC 2–2 iPAQ Connection Point CP-2E User Guide... -
Page 16: Powering Up
Connection Point CP-2E. The Power LED on the front panel should light up immediately. The Connection Point CP-2E runs a series of self-tests to verify that it is operating properly. The Test LED on the front panel remains lit while the self-tests are running. -
Page 17: Configuring Windows 98 And Me Clients
Configuring Windows 98 and ME Clients To configure other clients, refer to Chapter 3. 1. From the taskbar, select Start > Settings > Control Panel. The Control Panel window is displayed. 2–4 iPAQ Connection Point CP-2E User Guide... - Page 18 3. In the list of installed network components on the Configuration tab, double-click TCP/IP. If more than one TCP/IP entry is listed, select the entry for the network adapter you will use to connect to the Connection Point CP-2E. The TCP/IP Properties window is displayed. iPAQ Connection Point CP-2E User Guide Installation and Configuration 2–5...
- Page 19 6. Click OK. The Network window is displayed again. 7. Click OK. 8. Restart the PC to complete the process. Note: You must restart your PC before continuing, even if you are not prompted to reboot. 2–6 iPAQ Connection Point CP-2E User Guide...
-
Page 20: Setting Up Connection Point Cp-2E
Setting Up Connection Point CP-2E To set up your Connection Point CP-2E you will use a web browser such as Microsoft Internet Explorer or Netscape Communicator. Using the Installation Wizard 1. Open a web browser. 2. Type cp.home into the Address field and press Enter. You may also type in the base address, which is 192.168.1.1. -
Page 21: Dynamic Internet Ip
Internet Connection Method: > Dynamic Internet IP: This is the default setting for the Connection Point CP-2E. If your internet service provider (ISP) automatically assigns you a public IP address (common among cable providers) or if you are unsure of the other options, select this option. -
Page 22: Configuring Dynamic Internet Ip
Otherwise, leave these fields blank. 4. Click Next. The Reboot dialog box is displayed. The Connection Point CP-2E must be rebooted for applied changes to take effect. Static Internet IP This setting configures your Connection Point CP-2E to use a static (fixed) IP address to access the Internet. -
Page 23: Pppoe
6. Click Next. The Reboot dialog box is displayed. The Connection Point CP-2E must be rebooted for applied changes to take effect. PPPoE This setting configures your Connection Point CP-2E to connect to a DSL service using PPPoE. A PPPoE password is provided by your ISP. 2–10... -
Page 24: Configuring Pppoe
Server 1 field. If there is a second DNS server IP address, type it into the DNS server 2 field. 7. Click Next. The Reboot dialog box is displayed. The Connection Point CP-2E must be rebooted for applied changes to take effect. iPAQ Connection Point CP-2E User Guide Installation and Configuration... -
Page 25: Timezone Setup
2. Click the checkbox to activate Daylight Savings time compensation functionality. Enter appropriate Daylights Savings time start and end dates for your locale using the pulldown menus. 3. Click Next. 2–12 iPAQ Connection Point CP-2E User Guide... -
Page 26: Administrator Password Settings
Note: Do not use cut and paste operations in the Confirm Password field. 2. Click Next. 3. The Congratulations! You have completed the Quick Setup Wizard screen appears. Your Connection Point will reboot automatically. iPAQ Connection Point CP-2E User Guide Installation and Configuration 2–13... -
Page 27: Confirming Successful Setup
2. If Internet Connection Status reads Connected in green print, your setup has been successful. If Internet Connection Status does not read Connected in green letters, click the Refresh button on your web browser. If still not connected, proceed to Step 3. 2–14 iPAQ Connection Point CP-2E User Guide... -
Page 28: Installing The Firmware Update Utility
Please refer to Chapter 5 for a full discussion of MAC Spoofing. Installing the Firmware Update Utility The Connection Point CP-2E firmware update utility enables you to repair the system in case of failure. It is recommended that you install the utility during initial set-up. -
Page 29: Registering The Connection Point Cp-2E
2. Click Install Firmware Update Utility. 3. Follow the instructions presented by the Update Utility Wizard. Registering the Connection Point CP-2E You can register your new iPAQ Connection Point CP-2E at www.compaq.com/register. 2–16 iPAQ Connection Point CP-2E User Guide... -
Page 30: Adding Pcs To Your Network
Adding PCs To Your Network Once you have set up the Connection Point CP-2E, you can add more PCs to your Connection Point CP-2E network. PC client configuration for Windows XP, 2000 and NT 4.0 are included in this chapter. Refer to your operating system’s online help for instructions to set up file sharing. -
Page 31: Windows Xp Configuration
Adding PCs To Your Network Windows XP Configuration Windows XP automatically configures itself to connect to CP-2E. If you are having problems connecting to the network, verify the client setup by following the steps below. Configuring the Client 1. From the taskbar, select Start > Control Panel. The Control Panel window is displayed. - Page 32 The Network Connection Status window is displayed. 4. Click Properties. The Local Area Connection Properties window is displayed. 5. Select Internet Protocol (TCP/IP) from the list. Components checked are used by this connection. iPAQ Connection Point CP-2E User Guide Adding PCs To Your Network 3–3...
- Page 33 7. Click the Obtain an IP address automatically radio button. 8. Click the Obtain DNS server address automatically radio button. 9. Click OK. The Network Connection Properties window is displayed. 10. Click OK. 11. Restart the PC to complete the process. 3–4 iPAQ Connection Point CP-2E User Guide...
-
Page 34: Windows 2000 Configuration
1. From the taskbar, select Start > Settings > Control Panel. The Control Panel window is displayed. 2. Double-click the Network and Dial-Up Connections icon. The Network and Dial-Up Connections window is displayed. iPAQ Connection Point CP-2E User Guide Adding PCs To Your Network 3–5... - Page 35 3. Double-click the Local Area Connection icon. The Local Area Connection Status window is displayed. 4. Click Properties. The Local Area Connection Properties window is displayed. 5. Select Internet Protocol (TCP/IP) from the list. Components checked are used by this connection. 3–6 iPAQ Connection Point CP-2E User Guide...
- Page 36 9. Click OK. The Local Area Connection Properties window is displayed. 10. Click OK. The Local Area Connection Status window is displayed. 11. Click OK. 12. Restart the PC to complete the process. iPAQ Connection Point CP-2E User Guide Adding PCs To Your Network 3–7...
-
Page 37: Windows Nt4.0 Configuration
Windows NT4.0 Configuration Configuring the Client 1. From the taskbar, select Start > Settings > Control Panel. The Control Panel window is displayed. 2. Double-click the Network icon. The Network window is displayed. 3–8 iPAQ Connection Point CP-2E User Guide... - Page 38 4. Click the Obtain an IP address from a DHCP server radio button. 5. Click OK. The Network window is displayed again. 6. Click OK. 7. Restart your PC to put the change into effect. iPAQ Connection Point CP-2E User Guide 3–9...
-
Page 40: Home Page Information Bar
Connection Point CP-2E Home Page The Connection Point CP-2E home page is accessed using your computer Internet browser (Windows IE, Netscape Navigator, etc.). The Home Page is a centralized point to access all of your system information, manage network configuration settings and provide help and useful information whenever you need it. -
Page 41: Management Icons
The Management Icons are shortcuts to all of your configuration and connection settings. When using the icons, you are required to enter your Admin Login and Admin Password to change any settings of your CP-2E. Quick Setup Icon The Quick Setup Icon accesses the initial setup screens to configure Internet connection method, SSID, WEP encryption, timezone setup and Administrator Login and Password settings. -
Page 42: Lan Status
LAN Status LAN MAC Address: Displays the Ethernet MAC address of the LAN interface of the Connection Point CP-2E. A MAC address is expressed in six 2-digit hexadecimal number pairs. IP Address: Displays the IP address of the local LAN interface of the Connection Point CP-2E. -
Page 43: Internet Status
ISP to establish a connection to the Internet (especially for certain cable ISPs). IP Address: Displays the IP Address of the CP-2E as seen by devices outside your network (including your ISP and other devices on the Internet). -
Page 44: Network Information
This page displays the IP address of the internal DHCP server. It also lists the hostname, LAN IP address and MAC address for each PC on the LAN. > Click Refresh to update the list and display any changes that may have occurred. iPAQ Connection Point CP-2E User Guide 4–5... -
Page 45: Event Log
This screen displays a list of operating events and exceptions (in chronological order) that have occurred during the operation of the Connection Point CP-2E since last started. Each event is listed with a time stamp to indicate when the event or exception occurred. -
Page 46: Renew Internet Ip Icon
Firmware Update Icon The Firmware Update icon accesses the Update utility. Locate and download the latest firmware update from the www.compaq.com/athome/support website and save it in a temporary folder. 1. Click the Firmware Update icon. 2. Click the Update button. If you are updating from a CD or downloaded file, use the Browse button. -
Page 48: Advanced Setup Icons
The Advanced Setup icon allows you to perform configuration and maintenance tasks. Accessing Advanced Configuration Options 1. Click the Advanced Setup icon System Settings Password The default login name for the Connection Point CP-2E is admin, with the password field left blank. iPAQ Connection Point CP-2E User Guide 5–1... -
Page 49: Resetting To Factory Default
3. Click Apply. The Connection Point CP-2E must be rebooted for applied changes to take effect. 4. Click OK. You can reboot the Connection Point CP-2E at any time by clicking the Reboot button at the left. Resetting to Factory Default This procedure restores all factory defaults to the Connection Point CP-2E. - Page 50 3. Click OK. 4. Click the Reboot button at the left. A confirmation message is displayed. 5. Click OK. The system restarts, then resumes operation with the new configuration. iPAQ Connection Point CP-2E User Guide Advanced Setup Icons 5–3...
-
Page 51: Timezone Setup
LAN computers by the DHCP server. You can change the IP address of the LAN interface on the Connection Point CP-2E. You can also change the subnet mask, but if you do, you must ensure that the new subnet includes the addresses your DHCP server uses. -
Page 52: Changing The Subnet
4. Click Apply. The Connection Point CP-2E must be rebooted for applied changes to take effect. 5. Click OK. You can reboot the Connection Point CP-2E at any time by clicking the Reboot button at the left. iPAQ Connection Point CP-2E User Guide Advanced Setup Icons 5–5... -
Page 53: Mac Spoofing
Enter. You may also type in the base address, which is 192.168.1.1. 3. Click Advanced Setting icon. 4. Click MAC Spoofing on the left. 5. Click on Enable. 6. Click Network Computer List. 5–6 iPAQ Connection Point CP-2E User Guide... -
Page 54: Dmz
9. Click OK. The Connection Point CP-2E must be rebooted for applied changes to take effect. 10. Click OK. You can reboot the Connection Point CP-2E at any time by clicking the Reboot button at the left. 11. Click Reboot. Connection Point will reboot to the Home Page. -
Page 55: Virtual Server
Computer List field. 6. Click Apply. The Connection Point CP-2E must be rebooted for applied changes to take effect. 7. Click OK. You can reboot the Connection Point CP-2E at any time by clicking the Reboot button at the left. Virtual Server Virtual servers allow you to redirect incoming data on a specific port to a server on the local network. -
Page 56: Adding A Virtual Server
Adding a Virtual Server 1. Click the Virtual Server link at the left. The Virtual Server page is displayed. 2. Use the pulldown to select Enable in the Virtual Server field. iPAQ Connection Point CP-2E User Guide Advanced Setup Icons 5–9... -
Page 57: Packet Filtering
5. Click Apply. The Connection Point CP-2E must be rebooted for applied changes to take effect. 6. Click OK. You can reboot the Connection Point CP-2E at any time by clicking the Reboot button at the left. Packet Filtering Packet filtering allows you to block specific services, applications, and Internet locations by IP addresses and port numbers. -
Page 58: Enabling Packet Filtering
3. Click Apply. The Connection Point CP-2E must be rebooted for applied changes to take effect. 4. Click OK. You can reboot the Connection Point CP-2E at any time by clicking the Reboot button at the left. iPAQ Connection Point CP-2E User Guide Advanced Setup Icons 5–11... -
Page 59: Adding An Ip Rule
Advanced Setup Icons Adding an IP Rule 1. Click the IP Rules link. The IP Rules page is displayed. 2. Click Add. The Add IP Rules page is displayed. 5–12 iPAQ Connection Point CP-2E User Guide... -
Page 60: Adding Port Rules
4. Click Apply. The Connection Point CP-2E must be rebooted for applied changes to take effect. 5. Click OK. You can reboot the Connection Point CP-2E at any time by clicking the Reboot button at the left. Adding Port Rules 1. -
Page 61: Dhcp
5. Click Apply. The Connection Point CP-2E must be rebooted for applied changes to take effect. 6. Click OK. You can reboot the Connection Point CP-2E at any time by clicking the Reboot button at the left. DHCP... -
Page 62: Changing Dhcp Server Settings
4. Click Apply. The Connection Point CP-2E must be rebooted for applied changes to take effect. 5. Click OK. You can reboot the Connection Point CP-2E at any time by clicking the Reboot button at the left of the Advanced Setup tab. -
Page 63: Adding A Reserved Ip Address
Advanced Setup Icons Adding a Reserved IP Address 1. Click the Reserved IP Table link on the left. The Reserved IP Table page is displayed. 2. Click Add. The Add Reserved IP page is displayed. 5–16 iPAQ Connection Point CP-2E User Guide... -
Page 64: Excluded Ip Addresses
6. Click Apply. The Connection Point CP-2E must be rebooted for applied changes to take effect. 7. Click OK. You can reboot the Connection Point CP-2E at any time by clicking the Reboot button at the left. Excluded IP Addresses You can exclude a specific IP address within the DHCP server leasing pool from being leased out. -
Page 65: Adding An Excluded Ip Address
Advanced Setup Icons Adding an Excluded IP Address 1. Click Excluded IP Table on the left. The Excluded IP Table page is displayed. 2. Click Add. The Add Excluded IP Address page is displayed. 5–18 iPAQ Connection Point CP-2E User Guide... -
Page 66: Bootpip Table
4. If you wish, you can type a brief description into the Comment field. 5. Click Apply. The Connection Point CP-2E must be rebooted for applied changes to take effect. 6. Click OK. You can reboot the Connection Point CP-2E at any time by clicking the Reboot button at the left. BOOTPIP Table The BOOTP IP Table allows you to reserve IP addresses for devices that use the BOOTP protocol for TCP/IP network configuration. - Page 67 5. If you wish, you can type a brief description into the Comment field. 6. Click Apply. The Connection Point CP-2E must be rebooted for applied changes to take effect. 7. Click OK. You can reboot the Connection Point CP-2E at any time by clicking the Reboot button at the left. 5–20...
-
Page 68: Static Routing Table
These entries are based on the IP address of the destination computer. It may be necessary to define static routes when your Connection Point CP-2E is connected to more than one local network, or when a site on the Internet cannot be reached because too many hops are needed to route the IP packet dynamically. - Page 69 WAN. 7. Click Apply. The Connection Point CP-2E must be rebooted for applied changes to take effect. 8. Click OK. You can reboot the Connection Point CP-2E at any time by clicking the Reboot button at the left. 5–22...
-
Page 70: Smtp
5. Click Apply. The Connection Point CP-2E must be rebooted for applied changes to take effect. 6. Click OK. You can reboot the Connection Point CP-2E at any time by clicking the Reboot button at the left. iPAQ Connection Point CP-2E User Guide Advanced Setup Icons 5–23... - Page 71 Advanced Setup Icons 5–24 iPAQ Connection Point CP-2E User Guide...
-
Page 72: System Recovery
The Connection Point CP-2E Firmware Update Utility allows you to perform emergency recovery in case of critical system failure. Using the Firmware Update Utility To perform emergency recovery using the Firmware Update Utility, locate and download the latest firmware update from the www.compaq.com/athome/support website and save it to a temporary... -
Page 73: Restore Factory Defaults
Advanced Setup tab. Refer to Chapter 6 for more information. > Hold down the reset button on the back of the Connection Point CP-2E for ten seconds. Refer to Chapter 1 for the location of the reset button. Each of these procedures restores all factory defaults to the Connection Point CP-2E. -
Page 74: Troubleshooting
PC does not have IP address. Proxy settings enabled on browser. iPAQ Connection Point CP-2E User Guide Troubleshooting Reset factory defaults: Press the reset button for 10 seconds. If this does not fix the problem, use update/recovery utility to reinstall firmware. - Page 75 7–2 Verify that network cables are properly connected at both ends and that Connection Point CP-2E is plugged in. The Connection Point CP-2E act LEDs should be flickering on corresponding cable connections when PCs are on and connected. iPAQ Connection Point CP-2E User Guide...
- Page 76 ISP requires MAC address of device connected to Internet. iPAQ Connection Point CP-2E User Guide Turn on DSL or cable modem. Go to Connection Point CP-2E Home Page. Click Renew Internet IP Address icon. Then, Renew Internet IP. Verify that DSL or cable modem is on and working properly by checking the modem’s LEDs.
- Page 77 Windows 2000 PC. On PCs attempting to access Windows 2000 PC, log on using one of the user names that was added for resource access on the Windows 2000 PC. iPAQ Connection Point CP-2E User Guide...
-
Page 78: Regulatory Compliance
Modifications The FCC requires the user to be notified that any changes or modifications made to this device that are not expressly approved by Compaq Computer Corporation may void the user's authority to operate the equipment. Cables Connections to this device must be made with shielded cables with metallic RFI/EMI connector hoods in order to maintain compliance with FCC Rules and Regulations. -
Page 79: Declaration Of Conformity For Products Marked With The Fcc Logo - United States Only
Compaq Computer Corporation P. O. Box 692000, Mail Stop 510101 Houston, Texas 77269-2000 Or, call (281) 514-3333 To identify this product, refer to the part, series, or model number found on the product. 8–2 iPAQ Connection Point CP-2E User Guide... -
Page 80: A Appendix A: Specifications
Standard features Ports Environment Power Dimensions and weights iPAQ Connection Point CP-2E User Guide Appendix A: Specifications • NAT • NTP • SMTP • DHCP server (up to 253 IP addresses) • Supports dynamic IP, static IP and PPPoE Internet connections •... -
Page 82: B Appendix B: Mac Address Manual Identification
2. In the Run dialog box, enter CMD. Click OK. The DOS Window is displayed. 3. At the c: prompt, type ipconfig /all and press Enter. 4. Locate the network adapter connected to the Connection Point CP-2E in the list displayed. 5. Note the MAC address listed next to Physical Address. -
Page 83: For Windows 98 And Me Pcs
2. Type winipcfg into the Open field. 3. Click OK. The IP Configuration window is displayed. 4. Select the adapter that is connected to the Connection Point CP-2E from the pick list. 5. Make note of the address listed in the Adapter Address field. -
Page 84: For Windows 2000 Pcs
2. In the Run dialog box, enter CMD. Click OK. The DOS Window is displayed. 3. At the c: prompt, type ipconfig /all and press Enter. 4. Locate the network adapter connected to the Connection Point CP-2E in the list displayed. 5. Note the MAC address listed next to Physical Address. - Page 86 Web browser. Driver. Software that enables the operating system to recognize and operate devices installed in or attached to the computer, such as a printer. iPAQ Connection Point CP-2E User Guide G–1...
- Page 87 Intranet. A local network with internal Web servers that are accessible to computers in the office, but not accessible from outside the company. Many intranets are protected from exterior access by security devices such as firewalls. G–2 iPAQ Connection Point CP-2E User Guide...
- Page 88 Microsoft Windows®. A computer operating system by Microsoft Corporation, Modem (MOdulator/DEModulator). Equipment that converts digital signals to analog signals and vice versa. Modems are used to send data signals (digital) over the telephone network, which is usually analog. iPAQ Connection Point CP-2E User Guide G–3...
- Page 89 SPX (sequenced packet exchange). A transport layer protocol used in Novell Netware networks to provide connection-oriented services between two nodes on the network. Used primarily by client/server applications. G–4 iPAQ Connection Point CP-2E User Guide...
- Page 90 It is used extensively for local area networks and telephone connections. WLAN (wireless local area network). A type of local area network that uses high-frequency radio waves instead of wires to communicate. iPAQ Connection Point CP-2E User Guide G–5...
Need help?
Do you have a question about the iPAQ CP-2E and is the answer not in the manual?
Questions and answers