Corghi Artiglio 5000 Operator's Manual
Hide thumbs
Also See for Artiglio 5000:
- Manual (8 pages) ,
- Operator's manual (372 pages) ,
- Operator's manual (372 pages)

Subscribe to Our Youtube Channel
Related Manuals for Corghi Artiglio 5000


Summary of Contents for Corghi Artiglio 5000
- Page 1 Artiglio 5000 Codice 4-122510 - 07/2017 Italiano Manuale d’uso English Operator’s manual Français Manuel d’utilisation Deutsch Betriebsanleitung Español Manual de uso...
- Page 2 CORGHI Dear Customer Thank you for purchasing your Corghi Tyre Changer. Your Tyre Changer has been designed to provide years of safe and dependable service, as long as it is used and maintained in accordance with the instructions provided in this manual.
- Page 3 Wheel with reverse rim Bead lubrication for proper mounting WDK procedure Accessories Instructions for correct use of the accessories Inflatron user instructions (optional) Inflation Safety measures Lubrication and removal of the valve insert Tubeless tyre inflation Artiglio 5000 Operator Manual...
- Page 4 Individuals and Dates Trained _____________________________________________________________________ _____________________________________________________________________ _____________________________________________________________________ _____________________________________________________________________ _____________________________________________________________________ _____________________________________________________________________ _____________________________________________________________________ _____________________________________________________________________ _____________________________________________________________________ _____________________________________________________________________ Artiglio 5000 Operator Manual...
-
Page 5: Table Of Contents
2. TRANSPORT, STORAGE AND HANDLING ........... 95 3. ASSEMBLY/HANDLING ................96 3.1. HOISTING/HANDLING ................96 3.2. INSTALLATION ....................97 5. DESCRIPTION OF ARTIGLIO 5000 ............98 5.1. OPERATOR POSITION.................99 5.2. OVERALL DIMENSIONS ................99 5.3. EQUIPMENT COMPONENTS (MAIN WORKING OPERATING ELEMENTS OF THE MACHINE) ..................100 5.4. - Page 6 ABOUT TYRE LUBRICATING FLUID ..........131 12. RECOMMENDED FIRE EXTINGUISHING EQUIPMENT ....132 13. GLOSSARY ................... 133 TABLE FOR USING CENTRING AND CLAMPING ACCESSORIES ACCORDING TO RIM TYPE ........137 WIRING DIAGRAM ..................145 PNEUMATIC DIAGRAM ................146 Artiglio 5000 Operator Manual...
-
Page 7: Getting Started
Furthermore, ask the new owner to fill out the ownership transfer module attached to the previous page in the manual and send it to Corghi, so that Corghi will be able to provide the customer with all necessary safety information. Alternatively, the new owner can send an email to service@corghi.com. -
Page 8: General Warning And Instructions
This manual makes continuous reference to the possibility that accidents can occur. Any accident could cause serious or fatal injuries to the operator or people nearby, or cause material damage. Artiglio 5000 Operator Manual... - Page 9 7. Crushing Hazard. Moving Parts Present. Contact with moving parts could result in an accident. The machine may only be used by one operator at a time. and mounting process. operation. seizure. lever 8. Electric Shock Hazard. Artiglio 5000 Operator Manual...
- Page 10 21. Only suitably trained personnel can use, service and repair the machine. Repairs may only be performed by qualified personnel. Corghi technical personnel are the most qualified individuals. Employers must determine if an employee is qualified to carry out any machine repair safely if the operator has attempted to make the repair.
-
Page 11: Decal Placement
QUAL. SYS. CERTIFIED ANNO DI COSTRUZIONE / Code MANUFACTURED X-XXXXXXXX/XX - XX Serial N. bar7psi Port.max XXXXXXXXX 4-105844 INVERTER MOTOR 4-103881 CORGHI 4-122534 ARTIGLIO 5000 CORGHI TOUCHLESS TECH- 4-122231 NOLOGY ADHESIVE LABEL LIFTER UP-DOWN PED. (OP- 4-104346 TIONAL) Artiglio 5000 Operator Manual... - Page 12 PROHIBITION OF TWO OPERA- 461936 TORS WORKING SIMULTANE- OUSLY ADHESIVE SAFETY STRIP Y/B 346855 50X130 462081 RISK OF CRUSHING 461930 RISK OF CRUSHING 462080 NOISE PROTECTION LABEL 461931 INFLATION WARNING PLATE 462778 USA HAZARD PLATE 4-122775 WDK APPROVAL Artiglio 5000 Operator Manual...
- Page 13 Artiglio 5000 Operator Manual...
- Page 14 Artiglio 5000 Operator Manual...
-
Page 15: Electrical And Pneumatic Connections
- The operator must: QUAL. SYS. CERTIFIED ANNO DI COSTRUZIONE / Code MANUFACTURED X-XXXXXXXX/XX - XX Serial N. bar7psi connection - A, Fig. 2 - and fit a differential Port.max XXXXXXXXX safety circuit-breaker with 30 mA residual Artiglio 5000 Operator Manual... -
Page 16: D Technical Data
- Compatible tyre types: CONVENTIONAL – LOW PROFILE - RUN FLAT - BALOON - BSR - Wheel dimension range: .................... from 13” to 28” ................1200 mm (47”) .............15” (from wheel mating surface) - Turntable: ......................resting side: flanged ........................on cone ........................manual .................. 2-speed motor-inverter ......................1200 Nm Artiglio 5000 Operator Manual... -
Page 17: Air Pressure
The machine is equipped with an internal pressure limiting valve to minimize the risk of over inflating the tyre. DANGER EXPLOSION HAZARD Do not exceed the pressure recommended by the tyre manufacturer. Always match the tyre and rim dimensions. Avoid personal injury or death Artiglio 5000 Operator Manual... -
Page 18: Additional Rim/Tyre Information
Artiglio 5000 Operator Manual... -
Page 19: Preliminary Checks
If strange or unusual noises are heard, if a component or system is not operating correctly or if you observe anything unusual, immediately stop using the machine. Make sure that all other people are positioned at least 6 metres (20 feet) from the machine. To stop the machine in an emergency: Artiglio 5000 Operator Manual... -
Page 20: Transport, Storage And Handling
(pallet) (Fig.3). Before moving the machine, refer to the HOISTING/ HANDLING section. CAUTION! Keep the original packing in good conditions to be used if the equipment has to be shipped in the future. Artiglio 5000 Operator Manual... -
Page 21: Assembly/Handling
To lift the machine from the pallet, remove the screws from the fastener feet (H, Fig. 4) and secure it with the hoisting bracket (Fig. 5). This hoisting point must be used whenever you need to change the installation position Artiglio 5000 Operator Manual... -
Page 22: Installation
Install the tyre changer in the chosen work posi- tion, complying with the minimum clearances shown in fig.7 The support surface must have a load-bearing capacity of at least 1000 kg/m 1000 Artiglio 5000 Operator Manual... -
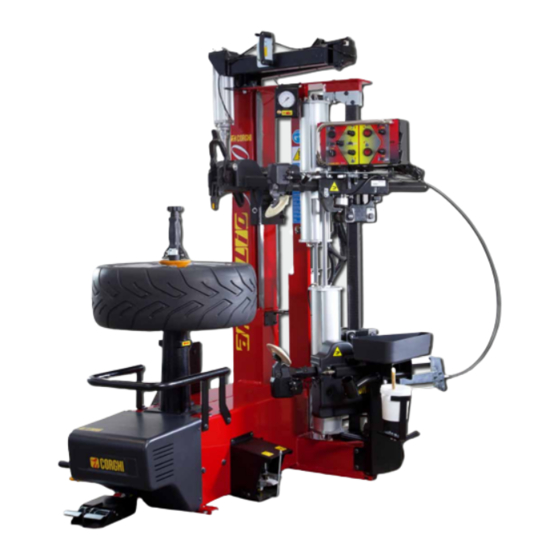
Page 23: Description Of Artiglio 5000
- Relative humidity 30% - 95% without condensation. - Temperature 0°C ÷ 50°C. 5. DESCRIPTION OF ARTIGLIO 5000 The Artiglio 5000 is an electropneumatic universal tyre changer for changing passenger car, off-road and light commercial vehicle tyres. The Artiglio 5000 is capable of bead break-... -
Page 24: Operator Position
B Demounting / mounting / inflating tyre CAUTION! In these conditions, the operator can move away, monitor and check every tyre change operations and take action in the case of any unforeseen events. 5.2. OVERALL DIMENSIONS ¡ ¢ Artiglio 5000 Operator Manual... -
Page 25: Equipment Components
Learn the functions and positions of all controls. Carefully check that all controls work correctly. To prevent the risk of accidents of damage, the machine must be installed and operated correctly, and maintenance must be performed regularly. Artiglio 5000 Operator Manual... - Page 26 Artiglio 5000 Operator Manual...
- Page 27 Artiglio 5000 Operator Manual...
-
Page 28: Controls
5.4. CONTROLS 5.4.a. CONTROL CONSOLE (FIG. 12) 1 - Control lever for simultaneous upper and lower bead breaker disc horizontal movement. 2 - Tool head horizontal movement control lever. 3 - Lower bead breaker disc penetration button Artiglio 5000 Operator Manual... -
Page 29: Pedal Unit (Fig. 13)
11 - Tool head horizontal movement unlock button. 5.4.b. PEDAL UNIT (FIG. 13) 1 - Inflation pedal. 2 - Turntable rotation pedal. The pedal has 4 different operating positions, each cor- responding to a rotation speed. Artiglio 5000 Operator Manual... -
Page 30: Wheel Lifter Pedal Unit (Optional) Fig. 14
1 - Pedal pressed (unstable position): hands-on wheel lifting 2 - Pedal pressed (unstable position): hands-on wheel lowering 5.4.d. PRESSURE GAUGE WITH DEFLATE BUTTON (FIG. 15) 1- Pressure gauge displaying air pressure, with pedal regulation 2- Deflation button Artiglio 5000 Operator Manual... -
Page 31: Basic Procedures - Use
Before using the machine: Disconnect the power supply Fig. 16; Isolate the compressed air line by disconnecting the delivery hose (quick-release connector) Fig. 17 CAUTION! Use only original spare parts to prevent the risk of damage or uncontrolled move- ments of the machine Artiglio 5000 Operator Manual... -
Page 32: Preliminary Checks
United States and Canada (these wheels cannot be sold in these markets). High performance wheels (asymmetric curvature) - Fig. 18C some European wheels have rims with a very pronounced curvature C, except in the area of the valve Artiglio 5000 Operator Manual... -
Page 33: Wheel Loading
Remove the old weights from the rim before starting work operations. 6.3. WHEEL LOADING CAUTION! Only use the lifter pedals when loading and unloading the wheel. Do not press these pedals during any other procedures! - Load the wheel onto the wheel lifter (Fig. 19). Artiglio 5000 Operator Manual... - Page 34 (Fig. 21). - When positioning the wheel on the turntable, also make sure that the movable pin, situated radially on the turntable, is centred correctly in one of the fastener bolt holes (Fig. 22). Artiglio 5000 Operator Manual...
-
Page 35: Clamping The Wheel On The Turntable
- Turn the handle to engage correctly with the turntable (Fig. 23a) - Manually move the centring cone into position against the wheel by moving the retainers “1” (Fig. 23b) - Tighten the clamping device by turning the handle clockwise (Fig. 23c) Artiglio 5000 Operator Manual... - Page 36 Dropped centre hole rim Reversed rim Pick-up rim Rim without central hole Open centre rim CAUTION! CRUSHING POINT - MOVING PARTS. Risk of injuries due to crushing. Keep hands away from the handle or cone during clamping Artiglio 5000 Operator Manual...
-
Page 37: Tyre Deflation
- First press the button (10, Fig. 12) and then use the lever to bring the disc towards the wheel. CAUTION! Both arms move simultaneously during this procedure. Before starting, check that the lower arm is in the rest position (completely lowered). Artiglio 5000 Operator Manual... - Page 38 (Fig. 29). - Perform at least one full turn to break the bead. - Raise the lever to automatically stop bead penetration and move the disc away from Artiglio 5000 Operator Manual...
- Page 39 4 – Breaking the lower bead. - Operate the lever to preload the bead breaker disc (fig. 32). A preload compressing the tyre by approximately 5 mm is recommended. - Press the lower bead breaker disc penetration button (Fig. 33) Artiglio 5000 Operator Manual...
-
Page 40: Demounting Procedure
(Fig. 37). - Hold the button to engage with the bead (Fig. 38). - Press the pedal (2, fig.13) to turn the turntable. If necessary, operate the control to lower the head Artiglio 5000 Operator Manual... - Page 41 - Turn the selector (Fig. 42). - To facilitate the demounting process, push and lift the tyre with the lower bead breaker disc as needed to take the load off the mobile hook. Artiglio 5000 Operator Manual...
- Page 42 (Fig. 46). - If necessary, use the control to raise the lower the bead breaker disc slightly and bring the bead completely out of the wheel. Artiglio 5000 Operator Manual...
-
Page 43: Mounting
first bead is completely seated (fig. 49). 7- Move the lever down to bring the mounting tool into the position shown in figure Artiglio 5000 Operator Manual... - Page 44 13- Return the bead breakers on the upper and lower sides to the rest positions. CAUTION! Avoid personal injury. Make sure the top bead is correctly inserted in the rim well, throughout the mounting stage. Artiglio 5000 Operator Manual...
- Page 45 - manually adjust the position of the tyre so that the upper shoulder of the wheel rim moves past the lower bead and enters the well. - keep the portion of tyre with the lower bead still Artiglio 5000 Operator Manual...
- Page 46 - return the demounting tool to the rest position. 6.9. APPROVED UHP and RUN FLAT TYRE DEMOUNTING AND MOUNTING PROCEDURE For this type of tyre please refer to the instructions in the manual prepared by WDK (German Tyre Industry Association). Artiglio 5000 Operator Manual...
- Page 47 4. Never bring your head or other body parts close to a tyre during inflation or bead insertion operations. This machine is not a safety device against the possible explosion risk of tyres, air chambers or rims. 5. Maintain a suitable distance from the tyre changer while inflating. Do not approach it. Artiglio 5000 Operator Manual...
- Page 48 3. Remove the valve core if it has not already been removed (Fig. 63). 4. Connect the air hose Doyfe inflator union to the valve stem (Fig. 64). 5. Press the pedal to inflate the tyre at short intervals. Frequently check the pressure on the Artiglio 5000 Operator Manual...
- Page 49 (quick bead insertion). Verify that both upper and lower tire beads and rim bead seat have been properly lubricated with an approved mounting paste. 1. Make sure that the rim is correctly clamped on the turntable (Fig. 67). Artiglio 5000 Operator Manual...
- Page 50 To increase the effectiveness of the air jets, manually lubricate and lift the lower bead before activating the nozzles CAUTION! To improve the operation of the tubeless tyre inflation system the line pressure must be between 8 and 10 bar. Artiglio 5000 Operator Manual...
- Page 51 6.11 UNCLAMPING THE WHEEL AND UNLOADING 6.11.a. WHEEL UNCLAMPING - Loosen the device by turning the handles anticlockwise (Fig. 73). - Press the retainers "1" and move the centring cone away from the rim by hand (Fig. 73A) Artiglio 5000 Operator Manual...
- Page 52 - Lower the lifter (DOWN pedal) (Fig. 74A). -Remove the wheel from the lifter 7. MAINTENANCE DANGER When the machine is disconnected from the air supply, the devices bearing the sign shown above may remain pressurised. Artiglio 5000 Operator Manual...
- Page 53 While cleaning, try as far as possible to prevent dust from forming or rising. CAUTION! CORGHI declines all liability for claims derived from the use of non-original spare parts or accessories. Scheduled maintenance: CAUTION! The machine will periodically prompt maintenance to carry out.
- Page 54 - Contact the service network to check the belts and rubber pads: Periodic check by the service network. To carry out every 7000 wheels - Clean the upper part of the turntable (Fig 79): Remove accumulated dirt with environmentally-friendly solvents. Artiglio 5000 Operator Manual...
- Page 55 With your help it is possible to reduce the amount of natural resources used to produce electrical and electronic equipment, to minimise the use of landfills for the disposal of the products and to improve the quality of life by preventing that potentially hazardous substances are released in the environment. Artiglio 5000 Operator Manual...
- Page 56 - Eyes: rinse with plenty of running water and seek medical attention as soon as possible. - Skin: wash with soap and water. 11. INFORMATION AND WARNINGS ABOUT TYRE LUBRICATING FLUID Disposing of spent fluid and consign it to an authorised disposal company. Artiglio 5000 Operator Manual...
- Page 57 WARNING The indications given in this table are of a general nature and should be used as a gen- eral guide. All the applications of each type of extinguisher must be obtained from the relevant manufacturer. Artiglio 5000 Operator Manual...
- Page 58 The tread and sidewall work with different, independent rigidities, so during roll- Artiglio 5000 Operator Manual...
- Page 59 The bead point (a) is the inner corner. The spur (b) is the inner part of the bead. The base (c) is the area resting against the rim. The groove (d) is the concave part against which the rim shoulder rests. Artiglio 5000 Operator Manual...
- Page 60 Tubeless Inflater. An inflation system which simpli- fies inflating tubeless tyres. Beading. Operation which takes place during infla- tion and ensures perfect centring between the bead and the rim edge. Bead pressing gripper. A tool intended for use when Artiglio 5000 Operator Manual...
- Page 61 It is generally used for mounting low profile tyres. Air delivery regulator. Union allowing regulation of the air flow. Bead breaking. Operation that allows the tyre bead to be detached from the rim edge. Artiglio 5000 Operator Manual...
- Page 62 TABLE FOR USING CENTRING AND CLAMPING ACCESSORIES ACCORDING TO RIM TYPE Standard rim Dropped centre hole rim Reversed rim Pick-up rim Rim without central hole Open centre rim Artiglio 5000 Operator Manual...
- Page 63 CLAMPING ACCESSORIES I - Accessori a richiesta GB - Accessories on request F - Accessoires sur demande D - Zubehör auf Anfrage E - Accessorios opcionales Artiglio 5000 Operator Manual...
- Page 64 STANDARD RIM Artiglio 5000 Operator Manual...
- Page 65 DROPPED CENTRE HOLE RIM Artiglio 5000 Operator Manual...
- Page 66 REVERSED RIM Artiglio 5000 Operator Manual...
- Page 67 PICK-UP RIM Artiglio 5000 Operator Manual...
- Page 68 RIMS WITHOUT CENTRAL HOLE Artiglio 5000 Operator Manual...
- Page 69 OPEN CENTRE RIM Artiglio 5000 Operator Manual...
- Page 70 WIRING DIAGRAM Single / two-speed motor circuit board Motor Two-speed micro-switch Micro-switch (ANTICLOCKWISE rotation) Micro-switch (ANTICLOCKWISE rotation) Connector Power supply plug Artiglio 5000 Operator Manual...
- Page 71 43 2/2 NO pneumatic control monostable valve 44 Double acting cylinder d. 40 mm F VERTICAL HEAD MOVEMENT 50 Silencer filter 51 5/3 NC valve 52 Head vertical movement cylinder H LIFTER (optional) 60 5/3 NC valve 61 Lifter cylinder Artiglio 5000 Operator Manual...
- Page 72 70 3/2 NC valve L BEAD DEPRESSOR 80 Silencer filter 81 5/3 NC valve 82 Bead pressing tool cylinder M INFLATION N MANUAL DEFLATION 90- Pressure gauge 91 Manual deflation valve 2/2 NC O DISTRIBUTOR 100 Distributor Artiglio 5000 Operator Manual...
- Page 73 Artiglio 5000 Operator Manual...
- Page 74 Artiglio 5000 Operator Manual...
- Page 75 Notes Artiglio 5000 Operator Manual...
Need help?
Do you have a question about the Artiglio 5000 and is the answer not in the manual?
Questions and answers