Table of Contents
Advertisement
Quick Links
Industrial Non-display Computers
Catalog Numbers 6177R-M4AXP, 6177R-M4PXP, 6177R-M4SXP, 6177R-R4PXP,
6177R-R4SXP, 6177R-R4LXP, 6177R-M4AS3RD, 6177R-R4AS3RD, 6177R-M3PXP,
6177R-M3PXPDC, 6177R-M3AS3
Topic
About This Publication
This publication provides pre-installation instructions and describes how to:
• machine/wall mount the 650R computer (6177R-M3xxxxx).
• machine/wall mount the 750R computer (6177R-M4xxxxx).
• rack mount the 1450R computer (6177R-R4xxxxx).
It also describes how to make peripheral, power, and network connections.
Installation Instructions
Page
2
3
4
4
4
5
7
9
11
12
14
14
15
16
16
17
20
20
21
22
Advertisement
Table of Contents

Related Manuals for Rockwell Automation 6177R-M4AXP


Summary of Contents for Rockwell Automation 6177R-M4AXP
-
Page 1: Table Of Contents
Installation Instructions Industrial Non-display Computers Catalog Numbers 6177R-M4AXP, 6177R-M4PXP, 6177R-M4SXP, 6177R-R4PXP, 6177R-R4SXP, 6177R-R4LXP, 6177R-M4AS3RD, 6177R-R4AS3RD, 6177R-M3PXP, 6177R-M3PXPDC, 6177R-M3AS3 Topic Page Important User Information European Union Directive Compliance Environment and Enclosure Information Operating Systems Multilingual User-interface CD Pack Before You Begin... -
Page 2: Important User Information
In no event will Rockwell Automation, Inc. be responsible or liable for indirect or consequential damages resulting from the use or application of this equipment. -
Page 3: European Union Directive Compliance
Industrial Non-display Computers European Union Directive Compliance This product meets the European Union Directive requirements when installed within the European Union or EEA regions and have the CE mark. A copy of the declaration of the conformity is available at http://ab.com. This product is intended to operate in an industrial or control room environment, which ATTENTION utilizes some form of power isolation from the public low-voltage mains. -
Page 4: Operating Systems
Industrial Non-display Computers Voltage Precaution The computers contain line voltages. Disconnect all power to the computer before you install or remove system components. Disconnect power from the computer before removing components. Failure to disconnect SHOCK HAZARD power could result in severe electrical shock or damage the computer. Operating Systems The computers are shipped with one of these Microsoft-licensed embedded operating systems:... -
Page 5: Before You Begin
Industrial Non-display Computers Before You Begin Before unpacking the product, inspect the shipping carton for damage. If damage is visible, immediately contact the shipper and request assistance. Otherwise, proceed with unpacking. Keep the original packing material in case you need to return the product for repair or transport it to another location. - Page 6 Industrial Non-display Computers Installation Guidelines Follow these guidelines to make sure your product provides safe and reliable service: • The installation site must have sufficient power. To maintain an electrically safe installation, the AC powered products must be plugged ATTENTION into a grounded outlet.
-
Page 7: Install The Computer
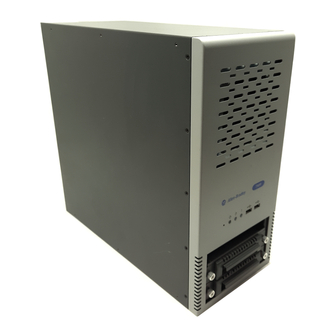
• Rack mount Mounting Hardware The table lists the hardware required for each type of installation. Description Used for Applies to Industrial Computer Cat. No. 6177R-M4AXP, 6177R-M4PXP, Mounting brackets (2) Machine or wall mounting 750R 6177R-M4SXP, 6177R-M4AS3RD 6177R-R4PXP, 6177R-R4SXP, Rack handles (2) - Page 8 Industrial Non-display Computers Product Dimensions Review the product dimensions to estimate the clearance necessary for computer installation. Dimensions are give in mm (in.). 650R Computers (catalog number 6177R-M3) 427 (16.8) 750R Computers (catalog number 6177R-M4) 381 (15.01) 170 (6.69) Publication 6177R-IN001E-EN-P - March 2009...
-
Page 9: Mount The 650R Non-Display Computer In A Panel
Industrial Non-display Computers 1450R Computers (catalog number 6177R-R4) 465 (18.31) 431 (16.97) 485 (19.11) Mount the 650R Non-display Computer in a Panel You can mount the non-display computer on a wall, panel, or 19-inch rack. The computer attaches to the panel by using the four screw slots in the front plate. Use M5 or #10 screws (or larger). - Page 10 Industrial Non-display Computers Bottom Mounting Dimensions 650R 243 (9.6) Mounting Bracket Dimensions (bottom side) Dimensions are in mm (in.). Side Mounting Dimensions 650R 279.4 (11.0) Dimensions are in mm (in.). Mounting Bracket Dimensions (side cover) Publication 6177R-IN001E-EN-P - March 2009...
-
Page 11: Mount The 750R Computer On A Machine
Industrial Non-display Computers Mount the 750R Computer on a Machine You can mount the 750R computer, catalog number 6177R-M4, on any flat surface, such as a shelf, inside a machine, or against a wall by using mounting brackets. Follow these steps to mount the 750R computer. 1. -
Page 12: Mount The 1450R Computer On A Rack
Industrial Non-display Computers 3. Fasten the computer assembly through the slotted holes in the brackets by using M6…M8 mounting screws. For ease of installation, make sure two or more people help to install the computer. Mount the 1450R Computer on a Rack You can install the 1450R (catalog number 6177R-R4) computer in a rack cabinet that conforms to EIA standards for equipment with 483 mm (19 in.) wide panels. - Page 13 Industrial Non-display Computers 4. Attach the rack slides to the computer. 5. Align the rack slides to the corresponding slides inside the cabinet. 6. Insert the computer in the rack cabinet from the front of the cabinet. For ease of installation, make sure two or more people help to install the computer.
-
Page 14: Connect Peripherals
Industrial Non-display Computers Connect Peripherals The illustration shows the I/O port panel of the computers. Peripheral components compatible to each port are marked inside the callout figures. DVI available for 650R only. Connect AC Power A standard IEC 320 power cable provides power to the computer. The power supply input accepts 120…240V AC. -
Page 15: Connect Dc Power
Industrial Non-display Computers Connect DC Power The 650R computer, catalog number 6177R-M3XPDC, is available with a DC power option using a three-screw terminal block (+24VDC, 24RTN, GND). The DC power option supports operation from either a safety extra-low voltage (SELV) or protective extra-low voltage (PELV) power source. A ground bus strip is provided to let you connect the DC common and functional ground terminals together. -
Page 16: Functional Ground Screw
Proper cable routing and power conditioning is required for reliable Ethernet communication in an industrial environment. Rockwell Automation recommends that you route all Ethernet cabling through dedicated metal conduits. Installing ferrite bead filters at the cable ends may also improve reliability. -
Page 17: Replace The Rtc Battery
Industrial Non-display Computers Replace the RTC Battery The computers use nonvolatile memory that require a battery to retain system information when power is removed. The 3V, 200 mAh lithium battery is on the system board. 650R 750R and 1450R Battery The battery life depends on the amount of time the computer is powered on. - Page 18 Industrial Non-display Computers To avoid voiding your product warranty, use only Rockwell Automation ATTENTION Allen-Bradley-approved replacement parts and accessories. Follow these steps to replace the RTC battery. 1. Perform this pre-configuration procedure. a. Turn off the computer and all of the peripherals connected to it.
- Page 19 Industrial Non-display Computers 6. Insert the new battery with the positive polarity (+ side) facing up, and make sure that it is seated completely. 7. Observe this post-configuration procedure. a. Make sure all components are installed according to the described step-by-step instructions.
-
Page 20: Load The System Defaults
Doing so may cause damage to the product. You must uninstall the product and place it in its original packing material before shipping. Rockwell Automation is not responsible for damage incurred to a product that is shipped or transported while installed in a machine, panel, or rack. -
Page 21: Specifications
Industrial Non-display Computers Specifications Industrial Non-display Computers - 6177R-M4, 6177R-R4, 6177R-M3 Attribute Value Electrical Input voltage, AC 90…264V AC, autoranging Line frequency, AC 47…63 Hz Input voltage, DC 18…32V DC Power consumption, AC 650R 144VA (1.4 A @ 100V rms, 0.6 A @ 240V rms) 750R, 1450R 265VA (2.7 A @ 100V rms, 1.1 A @ 240V rms) Power consumption, DC... -
Page 22: Additional Resources
For more information on the Industrial Non-display Computers, refer to the user manual, publication 6177R-UM001. You can view or download publications at http://literature.rockwellautomation.com. To order paper copies of technical documentation, contact your local Rockwell Automation distributor or sales representative. Publication 6177R-IN001E-EN-P - March 2009... - Page 23 Industrial Non-display Computers Notes: Publication 6177R-IN001E-EN-P - March 2009...
- Page 24 New Product Satisfaction Return Rockwell Automation tests all of its products to ensure that they are fully operational when shipped from the manufacturing facility. However, if your product is not functioning and needs to be returned, follow these procedures.
Need help?
Do you have a question about the 6177R-M4AXP and is the answer not in the manual?
Questions and answers