Nortel IP Phone 2001 User Manual
Hide thumbs
Also See for IP Phone 2001:
- User manual (112 pages) ,
- Installation and operation manual (432 pages) ,
- User manual (14 pages)
Table of Contents
Advertisement
Quick Links
Advertisement
Table of Contents

Related Manuals for Nortel IP Phone 2001


Summary of Contents for Nortel IP Phone 2001
- Page 1 Title page Nortel Communication Server 2000/2100 Nortel IP Phone 2001 User Guide...
- Page 3 Revision history Revision history July 2005 Standard 1.01. Up-issued with minor change to the menu map.The information contained in this user guide applies to the IP Phone 2001 when used in Communication Server 2100 and Communication Server 2000 networks.
- Page 4 Revision history...
-
Page 5: Table Of Contents
Contents About the IP Phone 2001 ......9 Basic features ........9 Telephone display . - Page 6 Terminate a call ........89 Use features on your IP Phone 2001 ....90 Feature activation examples .
- Page 7 Contents Use the IP Phone 2001 with the IP Softphone m6350 ..93 Terms you should know ......95...
- Page 8 Contents...
-
Page 9: About The Ip Phone 2001
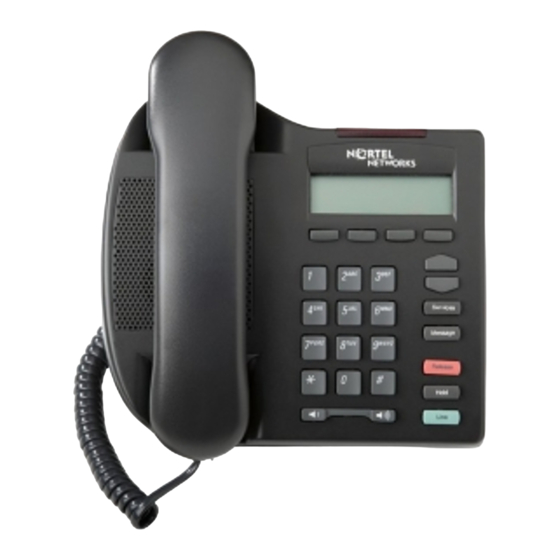
Note 1: Not all features are available on all telephones. Consult your system administrator to verify which features are available for your use. Note 2: The IP Phone 2001 does not have a mute key or a microphone for handsfree talking. - Page 10 About the IP Phone 2001 Figure 1 illustrates the IP Phone 2001. Figure 1 IP Phone 2001 Message Waiting Indicator/ Incoming Call Indicator Handset LCD screen Speaker Soft keys Up Navigation key Down Navigation key Dialpad Services key Inbox key...
-
Page 11: Telephone Display
About the IP Phone 2001 Telephone display Figure 2 shows the IP Phone 2001 display areas. Figure 2 IP Phone 2001 LCD screen Information area line 0/Date and time Soft keys/Information area line 1 Information area (area shared with date and time in gray) - Page 12 About the IP Phone 2001 • To select a numerically-indexed menu item, view the option and press “Ok”. Alternatively, enter the appropriate shortcut using the keypad which enables you to jump straight to the menu item without scrolling Note: Menu items above 9 do not have a shortcut.
-
Page 13: Connect The Ip Phone 2001 Components
Connect the IP Phone 2001 components Before you begin CAUTION Damage to equipment Do not plug the IP Phone 2001 into a regular telephone jack. This results in severe damage to the IP Phone 2001. Consult your system administrator to ensure that you plug your telephone into a 10/100BaseT Ethernet jack. - Page 14 Connect the IP Phone 2001 components Figure 3 IP Phone 2001 connections...
-
Page 15: Log Into Your Ip Phone 2001
Log into your IP Phone 2001 Log into your IP Phone 2001 This section describes the navigation screens that appear when you are logging into an IP Phone 2001. 1. The following screen appears only if a firmware upgrade is available:... - Page 16 Log into your IP Phone 2001 Press Ok, or start entering your username, if you want to use the London Gateway. Otherwise press the down navigation key to scroll to the following screen: Login 9 Oct 2:32pm Ottawa Press Ok, or start entering your username, if you want to use the Ottawa Gateway.
- Page 17 Log into your IP Phone 2001 Note: If you access the following screen by starting to enter your username, the digits you have entered will appear at the beginning of the username field. 3. When you press Ok, or start entering your username, the following...
- Page 18 Log into your IP Phone 2001 Enter your password (it will appears as asterisks – ****). 5. Press Ok to go to the menu options/idle screen view. If you make an error, you can press Clear to clear the field and re-enter your...
-
Page 19: Use The Display Menu On The Ip Phone 2001
Use the display menu on the IP Phone 2001 Use the display menu on the IP Phone 2001 Once you have successfully logged into your IP Phone 2001, the following Menu screen appears: Centrex 9 Oct 2:32pm Menu If you press the... - Page 20 Use the display menu on the IP Phone 2001 Figure 4 IP Phone 2001 display menu hierarchy Main Menu IP Phone 2001 1. Logoff 2. Settings 3. Inbox 4. Outbox 5. Directory Confirmation 1. Regional 1. Dial 1. Dial 1. Dial 2.
-
Page 21: Logoff Your Ip Phone 2001
Logoff your IP Phone 2001 1. Logoff is the first submenu that appears under the scrollable menu as follows: Menu 9 Oct 2:32pm 1. Logoff Cancel 2. Press Ok to logoff of the IP Phone 2001 or press Cancel to return to the Menu. -
Page 22: Configure Your Ip Phone 2001 Settings
Configure your IP Phone 2001 settings Configure your IP Phone 2001 settings Settings is the second menu item and appears as follows when you press the down navigation key from the Logoff screen: Menu 9 Oct 2:32pm 2. Settings Cancel Press Ok, to access the following four submenus: •... -
Page 23: Regional
Configure your IP Phone 2001 settings Regional 1. Scroll through the Settings menu until Regional is displayed which is the first item in the list. Settings 9 Oct 2:32pm 1. Regional Cancel 2. Press Cancel to return to the Settings menu or press Ok to access submenus in which you can configure the following: •... -
Page 24: Select A Language
Configure your IP Phone 2001 settings Select a language 1. Scroll through the Regional menu until Language is displayed which is the first item in the list. Regional 9 Oct 2:32pm 1. Language Cancel 2. With Language displayed, press Ok to display a list of available languages or press Cancel to return to the Regional menu. -
Page 25: Define Your Regional Time Zone
Configure your IP Phone 2001 settings Define your regional time zone 1. Scroll through the Regional menu until Time is displayed which is the second item in the list and press Ok. Regional 9 Oct 2:32pm 2. Time Cancel 2. From the Time menu scroll until Hours from GMT is displayed which is the first item in the list. - Page 26 Configure your IP Phone 2001 settings 9 Oct 2:32pm ✓ (00:00) GMT Clear The “✓” shows that you have Greenwich Mean Time selected. Press Clear and scroll to select a different time zone as shown in the following example or press Ok to return to the Time menu:...
-
Page 27: Enable Daylight Savings
Configure your IP Phone 2001 settings Enable Daylight Savings 1. Scroll through the Regional menu until Time is displayed which is the second item in the list and press Ok. Regional 9 Oct 2:32pm 2. Time Cancel 2. From the Time menu scroll until Daylight Saving is displayed which is the second item in the list. - Page 28 Configure your IP Phone 2001 settings 3. Press Ok to display the daylight savings options. Daylight 9 Oct 2:32pm Clear Press Ok to turn on Daylight Savings and return to the Time menu. 4. Press Clear (if there is a “✓” in front of On) to deselect On and scroll...
-
Page 29: Define A Your Time Format
Configure your IP Phone 2001 settings Define a your time format 1. Scroll through the Regional menu until Time is displayed which is the second item in the list and press Ok. Regional 9 Oct 2:32pm 2. Time Cancel 2. From the Time menu scroll until Time Format is displayed which is the third item in the list. - Page 30 Configure your IP Phone 2001 settings Time Format 9 Oct 2:32pm ✓ 12 Hour Clear The “✓” shows that you have 12-hour format selected. Press Clear to uncheck the 12-hour format and scroll to select the following additional formats or press Ok to return to the Time menu:...
-
Page 31: Define Your Date Format
Configure your IP Phone 2001 settings Define your date format 1. Scroll through the Regional menu until Time is displayed which is the second item in the list and press Ok. Regional 9 Oct 2:32pm 2. Time Cancel 2. From the Time menu scroll until Date Format is displayed which is the fourth item in the list. - Page 32 Configure your IP Phone 2001 settings 3. Press Ok to display the date format options. Date Format 9 Oct 2:32pm ✓ ddmmm Clear The “✓” shows that you have the ddmmm format selected (for example, 9 Oct). Press Clear to uncheck the ddmmm format and...
- Page 33 Configure your IP Phone 2001 settings Date Format 9 Oct 2:32pm mm/dd Clear Date Format 9 Oct 2:32pm dd/mm Clear...
-
Page 34: Reset Your Time Settings
Configure your IP Phone 2001 settings Reset your time settings 1. Scroll through the Regional menu until Time is displayed which is the second item in the list and press Ok. Regional 9 Oct 2:32pm 2. Time Cancel 2. From the Time menu scroll until Reset to Defaults is displayed which is the final item in the list. -
Page 35: User
Configure your IP Phone 2001 settings User 1. Scroll through the Settings menu until User is displayed which is the second item in the list. Settings 9 Oct 2:32pm 2. User Cancel 2. Press Cancel to return to the Settings menu or press Ok to access the following submenus: •... -
Page 36: Edit Your Username
Configure your IP Phone 2001 settings Edit your username 1. Scroll through the Settings menu until User is displayed which is the second item in the list and press Ok. Settings 9 Oct 2:32pm 2. User Cancel 2. From the User menu scroll until Username is displayed which is the first item in the list. - Page 37 Configure your IP Phone 2001 settings 3. Press Ok to access the following screen in which you can edit your username or press Cancel to return to the User menu: Username 9 Oct 2:32pm 000024 4. Use the keypad to change your username and press Ok.
-
Page 38: Define Your Login Type
Configure your IP Phone 2001 settings Define your login type 1. Scroll through the Settings menu until User is displayed which is the second item in the list and press Ok. Settings 9 Oct 2:32pm 2. User Cancel 2. From the User menu scroll until Login Type is displayed which is the third item in the list. - Page 39 3. If you press Ok the following screen appears. Login Type 9 Oct 2:32pm ✓ Unique 4. Press Ok if you will be using your IP Phone 2001 on its own or scroll down to have the following screen appear: Login Type 9 Oct 2:32pm Joint 5.
-
Page 40: Configure Your Auto Login Option
Configure your IP Phone 2001 settings Configure your Auto Login option Any maintenance activity requires a user to be logged out forcibly (for example, a firmware upgrade). If you have Auto Login enabled, you will automatically be logged back into the IP Client Manager once the terminal becomes available again. - Page 41 Configure your IP Phone 2001 settings a. If editing is enabled, press Ok to access the following screen in which you can edit your Auto Login capability as follow: Auto Login 9 Oct 2:32pm ✓ Enabled Cancel You can toggle between enabling the Auto Login functionality by pressing the down navigation key.
-
Page 42: Change Your Password
Configure your IP Phone 2001 settings Change your password 1. Scroll through the Settings menu until User is displayed which is the second item in the list and press Ok. Settings 9 Oct 2:32pm 2. User Cancel 2. From the User menu scroll until Password is displayed which is the final item in the list. - Page 43 Configure your IP Phone 2001 settings 3. Press Cancel to return to the User menu or press Ok to access the following screen: Password 9 Oct 2:32pm Old Password: **** Cancel 4. They system prompts you to enter your old password. Once entered, you can use the keypad to enter your new password in this screen.
-
Page 44: Terminal
Configure your IP Phone 2001 settings Terminal 1. Scroll through the Settings menu until Terminal is displayed which is the third item in the list. Settings 9 Oct 2:32pm 3. Terminal Cancel 2. Press Cancel to return to the Settings menu or press Ok to access the following submenus: •... -
Page 45: Configure Your Audio Profile
Configure your IP Phone 2001 settings Configure your audio profile 1. Scroll through the Settings menu until Terminal is displayed which is the third item in the list and press Ok. Settings 9 Oct 2:32pm 3. Terminal Cancel 2. From the Terminal menu scroll until Username is displayed which is the first item in the list. - Page 46 Configure your IP Phone 2001 settings a. If editing is enabled, press Ok to access the following screen in which you can edit your Audio Profile capability as follows: Profile 9 Oct 2:32pm ✓ Local Area Network Cancel You can scroll to select additional Audio Profiles by pressing the down navigation key.
- Page 47 Configure your IP Phone 2001 settings b. If editing is not enabled, press Ok to access the following screen in which you can view your Audio Profile configuration as follows: Profile 9 Oct 2:32pm Local Area Network Cancel You can view your Audio Profile configuration in this screen. Press...
-
Page 48: Adjust Your Display Contrast
Configure your IP Phone 2001 settings Adjust your display contrast 1. Scroll through the Settings menu until Terminal is displayed which is the third item in the list and press Ok. Settings 9 Oct 2:32pm 3. Terminal Cancel 2. From the Terminal menu scroll until Display is displayed which is the second item in the list. - Page 49 Configure your IP Phone 2001 settings 3. Press Ok to access the following Display Contrast screen or press Cancel to return to the Terminal menu. Contrast 9 Oct 2:32pm Cancel 4. Press the left-most bottom button to decrease the contrast of your display.
-
Page 50: Perform A Firmware Upgrade
Configure your IP Phone 2001 settings Perform a firmware upgrade Upgrades are only presented to you if your firmware is at a lower level than recommended by the IP Client Manager. When an upgrade is occurring, your phone will reboot and temporarily be unavailable. - Page 51 Configure your IP Phone 2001 settings 4. If you press Ok in the Upgrade screen, the following confirmation screen appears: Upgrade 9 Oct 2:32pm Are you sure? 5. Press Yes to confirm the upgrade or press No to return to the...
-
Page 52: Call
Configure your IP Phone 2001 settings Call 1. Scroll through the Settings menu until Call is displayed which is the final item in the list and press Ok. Settings 9 Oct 2:32pm 4. Call Cancel 2. Press Cancel to return to the Settings menu or press Ok to access the following submenus: •... -
Page 53: Use The Feature Menu
Important note: In SN08/SE08, changes to feature keys only apply when you log out of the IP Phone 2001 and log back in using an IP Phone 2002 or 2004, due to there being no physical feature keys on the IP Phone 2001. - Page 54 Configure your IP Phone 2001 settings 3. If you press Ok, the following is an example of the screen that appears. Feature 9 Oct 2:32pm 1. 8325431 Cancel 4. The first item is your DN which is followed by a list of features in the order that they are provisioned by your administrator against your line.
- Page 55 Configure your IP Phone 2001 settings Assign a feature The Assign menu contains the following items: • Key Type (see “Define the key type” on page • AutoScroll (see “Configure AutoScroll” on page • Inbox (see “Enable the Inbox feature” on page Define the key type 1.
- Page 56 Configure your IP Phone 2001 settings 3. Press Ok to access the following screen in which you can assign the key type or press Cancel to return to the Feature menu: Key Type 9 Oct 2:32pm ✓ Central Cancel 4. Press Ok to assign a feature from the core or press the down navigation button to have Local appear (the “✓”...
- Page 57 Configure your IP Phone 2001 settings For example, selecting “Memory 1: Person X” and pressing Ok will have Person X appear as a label beside Key 2 in the feature key format defined for Person X. Once configured, you can now press Key 2 to dial Person X directly.
- Page 58 Configure your IP Phone 2001 settings 2. Press Ok to access the following AutoScroll screen or press Cancel to return to the feature menu: AutoScroll 9 Oct 2:32pm ✓ Enabled Cancel 3. Press Ok to enable AutoScrolling or press Cancel to return to the Assign menu or press the down navigation button to have Disabled appear (the “✓”...
- Page 59 Configure your IP Phone 2001 settings 2. Press Ok to access the following Inbox screen or press Cancel to return to the Feature menu: Inbox 9 Oct 2:32pm ✓ Enabled Cancel 3. Press Ok to enable the Inbox feature that logs your calls to an inbox or press Cancel to return to the Assign menu (the “✓”...
- Page 60 Configure your IP Phone 2001 settings Label a feature You can assign a label to the feature keys on your IP phone 2001. 1. Scroll through the Feature menu using the navigation keys so that Label appears (the second item in the list).
- Page 61 Configure your IP Phone 2001 settings Use the Feature Options menu The Feature Options menu contains the following items: • Auto Hide (see “Configure Auto Hide” on page • Default Feature (see “Define your default feature” on page • Outbox (see “Enable the Outbox feature”...
- Page 62 Configure your IP Phone 2001 settings Options 9 Oct 2:32pm 1. Auto Hide Cancel 3. Press Ok to access the following Inbox screen or press Cancel to return to the feature menu: Auto Hide 9 Oct 2:32pm ✓ Enabled Cancel 4.
- Page 63 Configure your IP Phone 2001 settings Define your default feature 1. Scroll through the Options menu using the navigation keys so that Default Feature appears (the second item in the list) and press Ok or press Cancel to return to the Feature menu.
- Page 64 Configure your IP Phone 2001 settings Enable the Outbox feature 1. Scroll through the Options menu using the navigation keys so that Outbox appears (the final item in the list) and press Ok or press Cancel to return to the Feature menu.
- Page 65 Configure your IP Phone 2001 settings Reset your feature keys to defaults 1. Scroll through the Assign menu using the navigation keys so that Reset appears (the final item in the list). Assign 9 Oct 2:32pm 4. Reset Cancel 2. Press Ok to access the following Reset screen or press Cancel to return to the Feature menu.
-
Page 66: Use Call History
Configure your IP Phone 2001 settings Use Call History 1. Scroll through the Settings menu until Call is displayed which is the final item in the list and press Ok. Settings 9 Oct 2:32pm 4. Call Settings Cancel 2. Scroll until History is displayed which is the final item in the list. - Page 67 Configure your IP Phone 2001 settings 3. Press Ok to access the following screen or press Cancel to return to the Call menu: Call 9 Oct 2:32pm 1. Reset Inbox Cancel 4. Press Ok to reset your inbox, press the down navigation key to access your outbox screen or press Cancel to return to the Call screen.
-
Page 68: Use Your Inbox
Once you assign a DN key as an inbox, the IP Phone 2001 logs all incoming calls to that DN. The system logs the incoming key number, time and date, as well as the display shown on the IP Phone 2001 at the time of the incoming call. - Page 69 Use your inbox 1. When you select a call in your inbox and press Ok, the following screen appears: Inbox 9 Oct 2:32pm 1. Dial Cancel 2. Press Ok to dial the number, press Cancel to return to your Inbox menu or press the down navigation key to access the following screen: Inbox...
-
Page 70: Inbox Example Display
Use your inbox 3. Press Ok to display additional information about the number, press Cancel to return to your Inbox menu or press the down navigation key to access the following screen: Inbox 9 Oct 2:32pm 3. Store Cancel Press Ok to store the number in your directory or press Cancel to return to your Inbox menu. - Page 71 Use your inbox Pressing the down navigation key displays the following: Display 9 Oct 2:32pm 1418506601 Pressing the down navigation key again displays the following: Display 9 Oct 2:32pm 24/03 - 6:03 Key 1...
-
Page 72: Use Your Outbox
Once you assign a DN key as an outbox, the IP Phone 2001 logs all outgoing calls to that DN. The system logs the outgoing key number, time and date, as well as the display shown on the IP Phone 2001 at the time of the outgoing call. - Page 73 Use your outbox 2. Press Ok to dial the number, press Cancel to return to your Outbox menu or press the down navigation key to access the following screen: Outbox 9 Oct 2:32pm 2. Display Cancel 3. Press Ok to display additional information about the number, press Cancel to return to your Outbox menu or press the down navigation key to access the following screen: Outbox...
-
Page 74: Use Your Directory
Use your directory Use your directory Enter text using the dialpad You can use the dialpad to enter text when you use features. For example, if you want to use the letter “A”, press the number 2 key once. If you want the letter “C”, press the number 2 key three times. No letters are associated with the number 1 or the 0 keys. -
Page 75: Directory Menu
Use your directory Pressing the Symbol key shows the following: Surname 9 Oct 2:32pm AÀÁÂÃÄÅÆBCÇaàáâãäåæbcç2 Cancel Bkspc Cancel You can then use the up and down navigation keys to scroll through the row to select the special character with which you want to replace the “A”. Pressing OK saves the character and enables you to continue entering text. - Page 76 Use your directory With an existing entry displayed press Ok to edit the directory or press Cancel to exit from the directory. 2. Press the down navigation key to view other directory entries. The final entry in the directory is as follows: Directory 9 Oct 2:32pm [New Entry]...
-
Page 77: Add An Entry To The Directory
Use your directory Add an entry to the directory 1. Scroll through the Directory menu using the navigation keys so that [New Entry] appears and press Ok. The following screen appears: Directory 9 Oct 2:32pm 1. Number Cancel 2. Enter the number and press Ok. The following screen appears: Directory 9 Oct 2:32pm 2. - Page 78 Use your directory 3. Enter the surname and press Ok. The following screen appears: Directory 9 Oct 2:32pm 3. First Name Cancel 4. Enter the first name and press Ok. The following screen appears: Directory 9 Oct 2:32pm 4. Feature Key Format Cancel...
- Page 79 Use your directory 5. Enter the feature key on which you want the entry to appear and press Ok (if you do not want the entry to appear on a feature key, press Ok without making an entry). The following screen appears: Directory 9 Oct 2:32pm 5.
-
Page 80: Edit An Entry In The Directory
Use your directory Edit an entry in the directory 1. Scroll through the Directory menu using the navigation keys so that the entry you wish to edit appears and press Ok. The following screen appears: Directory 9 Oct 2:32pm 1. Dial Cancel 2. - Page 81 Use your directory 3. Press Ok and the following screen will appear: Directory 9 Oct 2:32pm 1. Edit Number Cancel 4. Edit the number, if required, and press Ok. The following screen appears: Directory 9 Oct 2:32pm 2. Edit Surname Cancel...
- Page 82 Use your directory 5. Edit the surname, if required, and press Ok. The following screen appears: Directory 9 Oct 2:32pm 3. Edit First Name Cancel 6. Edit the first name, if required, and press Ok. The following screen appears: Directory 9 Oct 2:32pm 4.
- Page 83 Use your directory 7. Edit the feature key on which you want the entry to appear, if required, and press Ok (if you do not want the entry to appear on a feature key, press Ok without making an entry). The following screen appears: Directory 9 Oct 2:32pm...
-
Page 84: Delete An Entry In The Directory
Use your directory Delete an entry in the directory 1. Scroll through the Directory menu using the navigation keys so that the entry you wish to delete appears and press Ok. The following prompt appears: Directory 9 Oct 2:32pm 1. Dial Cancel 2. -
Page 85: Make A Call Using The Directory
Use your directory 3. Press Ok to delete the entry or press Cancel to return to the Directory menu. If you press Ok, the following confirmation screen appears. Delete 9 Oct 2:32pm Are you sure? Press Yes to confirm the removal of the entry from your directory. Make a call using the directory 1. -
Page 86: Make A Call
Make a call Make a call There are several ways to make a call from an IP Phone 2001. Use Off-hook dialing This procedure shows you how to use off-hook dialing to make a call. 1. Pick up the handset. -
Page 87: Use Predial
Make a call 4. When the called party answers, lift the handset. Use Predial Use the Predial feature to enter, preview, and edit numbers before dialing. To use Predial: 1. Without selecting the Line (DN) key, enter the number to be dialed. 2. - Page 88 Make a call 2. Choose one of the following: — To change numbers one-at-a-time, press the Delete soft key to delete characters after the cursor or press the Bkspc key to delete characters before the cursor. Bkspc Re-enter a new number. 3.
-
Page 89: Answer Or Terminate A Call
Answer or terminate a call Answer or terminate a call Answer a call Each incoming call causes the telephone to ring and the Message Indicator lamp to flash. To answer a call: • Lift the handset. Note: Do not use the Line (DN) key to answer a call but you will only be able to... -
Page 90: Use Features On Your Ip Phone 2001
Use features on your IP Phone 2001 Use features on your IP Phone 2001 The IP Phone 2001 has no dedicated feature keys. You activate features through the use of the Services Key and access codes. To use the services key as a flashhook, you need to ensure that Three- Way Calling/Call Transfer (3WC/CXR) is assigned to any of the 14 keys on the core and the IP Client Manager. -
Page 91: While Not Active On Call
Use features on your IP Phone 2001 • Dial the feature Access Code (for example, for Call Transfer dial: * + the Call Transfer Access Code) • When prompted, enter the number to which you want to transfer the call. -
Page 92: Access Code Summary
Contact you system administrator for a list of features available on your set and their corresponding Access Codes. Use Table 1 to keep track of the feature Access Codes on your IP Phone 2001. Table 1 Your feature access codes... - Page 93 IP Client Manager in a joint session with a IP Softphone m6350. In this configuration, the IP Softphone m6350 provides all the feature keys, while the IP Phone 2001 is used for the voice path.
- Page 94 Use the IP Phone 2001 with the IP Softphone m6350...
- Page 95 Terms you should know Terms you should know Auto Hide Auto Hide enables features to appear on your display only when they are available for use depending on the state of your phone and administrator settings. Auto Login Any maintenance activity requires a user to be logged out forcibly (for example, a firmware upgrade).
- Page 96 A one-line by 24-character area which displays date and time or application information. Key Caps Your IP Phone comes with a choice of English or icon-based Key Caps. Message (Inbox) A fixed key on the IP Phone 2001 that connects to your voice messaging system when the key is pressed.
- Page 97 Terms you should know Message waiting indicator/Incoming call indicator An LCD or an LED that indicates the status of a feature by the flash, wink, steady on, or off. Navigation keys Keys used to scroll through menus and lists appearing on the LCD display screen.
- Page 98 Terms you should know...
- Page 99 Index Index Display contrast 48 Display menu 19 About the IP Phone 2001 9 Display menu hierarchy 20 Answer a call 89 DN 96 Assign a feature 55 Audio profile 45 Auto Hide 61, 95 Auto Login 40, 95 Enter text using the dialpad 74...
- Page 100 Label a feature 60 Services Key 90 Language selection 24 Services key 97 Local 56 Settings 19 Log into your IP Phone 2001 15 Soft keys 97 Login type 38 Symbol key 74 Logoff 19 Logoff your IP Phone 2001 21...
- Page 102 User Guide Copyright © 2005 Nortel All Rights Reserved Information is subject to change without notice. Nortel reserves the right to make changes in design or components as progress in engineering and manufacturing may warrant. SL-100 and Meridian SL-100 and are trademarks of Nortel.
Need help?
Do you have a question about the IP Phone 2001 and is the answer not in the manual?
Questions and answers