Table of Contents
Advertisement
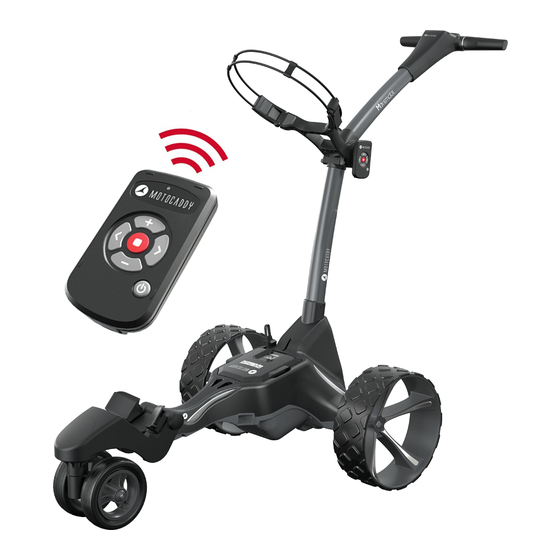
M7 GPS Electric Trolley
Distance Measurement Device (DMD) features are legal to use when local USGA and R&A
rule 4.3 is in effect. Always check local and competition rules prior to commencing play
Visit www.motocaddy.com/instructions for other Motocaddy instructions including translations
ORIGINAL VERSION
Instruction Manual
EN
REGISTERONLINE
www.motocaddy.com/warranty
IMPORTANT: Scan the QR code to ensure
that your M7 GPS software remains up to
date and performance is always optimised
Advertisement
Table of Contents

Subscribe to Our Youtube Channel
Related Manuals for Motocaddy M7 GPS


Summary of Contents for Motocaddy M7 GPS
- Page 1 REGISTERONLINE www.motocaddy.com/warranty IMPORTANT: Scan the QR code to ensure that your M7 GPS software remains up to date and performance is always optimised Distance Measurement Device (DMD) features are legal to use when local USGA and R&A rule 4.3 is in effect. Always check local and competition rules prior to commencing play...
- Page 2 Advanced statistic tracking Performance analysis Automatic course updates Notification of software updates All M7 GPS owners receive a no-obligation 12-month FREE trial. Follow the on-screen prompts to get started. LEARN MORE: Scan the QR code or visit www.motocaddy.com/performance-plan Page 2...
- Page 3 IMPORTANT - Software Updates The M7 GPS has been developed to include WiFi powered, Over-the-Air course and system updates. It is recommended that you always use the latest firmware to take advantage of new features, bug fixes and system improvements.
-
Page 4: Equipment Overview
Equipment Overview LCD Touchscreen Display (see page 24) Manual Speed Controller & On/Off Button USB Charging Port (under handle) Remote Control Handset & Cradle Upper Release Latch Upper Bag Support Battery Battery Connector EASILOCK™ Lower Bag Support 10. Front Wheels 11. -
Page 5: Remote Control Handset
Remote Control Handset Remote Control Handset Indicator LED Plus (+) Button Stop Button Left (<) Button Right (>) Button Minus (-) Button On/Off & Lock Button Charging Port The remote handset contains a rechargeable Lithium battery. The handset can be recharged using a mini USB cable (supplied), the charging port is located under the rubber flap at the base of the handset. - Page 6 Safe use of your Trolley The first time you use the M7 GPS, we would advise using it on an open area of grass. The trolley speeds and steering characteristics will vary depending on the surface. The M7 GPS will turn much quicker on hard, smooth surfaces and will behave differently on grass.
-
Page 7: Safety Cut-Out
Safety cut-out This Motocaddy trolley is fitted with safety cut off features. Whilst operating the trolley via the remote control, if no command is sent to the trolley (any buttons pressed) for longer than 120 seconds, the trolley will stop. Whilst moving, if the trolley travels out of range of the remote control, the trolley will also cut power to the motors. - Page 8 WARNING: For the purposes of recharging the battery, only use the detachable supply unit provided with this trolley; • If the supply cord is damaged, it must be replaced by Motocaddy, authorised Service Agents or similarly qualified persons to avoid a hazard;...
- Page 9 IMPORTANT - As with any electrical device, it is not recommended to leave batteries charging overnight or for prolonged periods without supervision. Motocaddy Lithium batteries can be fully-charged from empty in less than 5 hours, so wait for the charger light to turn green, switch off at the wall and unplug the battery ready for your next round.
-
Page 10: Charging Your Lithium Battery
Always unplug the battery prior to folding the trolley or charging the battery. Plug the Motocaddy 28V Lithium battery charger into an earthed mains power socket The charger light will be GREEN when not attached to a battery to indicate that it is ready to charge... - Page 11 BMS may switch-off the battery. A full battery charge will rectify this problem. Motocaddy golf trolleys are designed to work with the BMS system installed in the Lithium batteries and the battery meter is also synchronised to work in conjunction with the battery. If for any reason the voltage on the battery falls below the low battery warning on the trolley, then the BMS may disable the battery to protect it.
- Page 12 Attaching the Wheels / Inverting the Wheels Attaching the Wheels This trolley does not have a specific left and right wheel. To attach the rear wheels, follow these simple steps: Push and hold the quick release button in towards the centre of the wheel Slide the wheel onto the trolley axle as far as it will go (onto the inner groove) Once in position, release the button and pull the wheel outwards slightly to lock An audible ‘click’...
- Page 13 Attaching the Anti-Tip Wheel Attaching the Anti-Tip Wheel The Anti-Tip wheel is designed to prevent the trolley from tipping backwards on steeper inclines and it is recommended that the wheel is ALWAYS fitted when navigating using the remote control handset. To attach the wheel, simply pull the grey button on the right-hand side out and slide the wheel attachment into the housing.
- Page 14 Setting the trolley to run straight Adjusting the Front Wheel Alignment If your trolley is not running in a straight line, there are a couple of adjustments that can be made. The problem can be caused by a number of factors including a slightly loose bag support or unevenly packed bag. The first thing to alter is the front wheel alignment: Place the trolley on a flat level surface.
- Page 15 Setting the trolley to run straight B A C K M O T O R T R I M M I N G I F T H E T R O L L E Y I S N O T R U N N I N G S T R A I G H T I N M A N U A L M O D E Motor Trimming A D J U S T T H E F R O N T W H E E L...
-
Page 16: Unfolding Your Trolley
Unfolding your Trolley Unfolding your Trolley We recommend unfolding your trolley once the wheels have been un-inverted and re-attached (see page 12). Lift the upper bag support slightly and release the upper latch (fig. 1) Unfold the handle and re-secure the latch (fig. 2) Release the lower latch (fig. -
Page 17: Folding Your Trolley
Folding your Trolley Folding your Trolley Release the lower latch (fig. 1). The auto-open stand will also be activated Fold the frame forward until fully extended (fig. 2). The front wheel will automatically fold underneath Release the upper latch and fold the handle back until the trolley is fully folded (fig. 3) Re-secure both latches. - Page 18 Lower Bag Supports Lower Bag Support with EASILOCK™ Bag All Motocaddy trolleys are fitted with the EASILOCK™ bag attachment system. This securely attaches the bag, reduces twisting and removes the need to use a lower bag strap. If using an EASILOCK™ compatible bag, please ensure that the supplied pins are fitted to the bag base (fig. 1) If attached, remove the two lower bag support elastic straps by pressing and holding the back of the clip before pulling outwards (fig.
- Page 19 Upper Bag Supports / Adjusting the Bag Supports Upper Bag Supports The upper bag support straps are secured in the same way as the lower straps using the following steps: Stretch the elasticated strap around the bag & loop the rounded bar underneath the hook (fig. 1) Position the two placement straps centrally on your golf bag (fig.
- Page 20 Pairing the Remote Control / Handset Lock function Pairing the Remote Control In the event that the remote is not responding or you have a new handset, it will need to be paired to the trolley. Press/hold the 'On/Off' button (fig. 1a) on the remote handset until a red LED is illuminated (fig. 1b) and release the button once the red LED is no longer visible From the trolley Home screen select “Settings”, “Reset Remote Control”...
- Page 21 Operating the Trolley - Remote Mode When the battery is initially connected, a Motocaddy logo graphic will be displayed, followed by a blank screen for around 25 seconds to allow the processor to boot up. Please do not attempt to restart the trolley during the booting procedure.
- Page 22 Operating the Trolley - Manual Mode Switching the trolley to Manual mode The M7 GPS can also be used in manual mode, allowing it to be controlled from the handle without the remote handset. While the trolley is stationary, turn the dial to select the desired speed and press the On/Off button to start the trolley.
-
Page 23: Battery Meter
Battery Meter / USB Charging Battery Meter The M7 GPS includes an on-screen battery meter in the top right corner (fig. 1) which provides an indication of remaining trolley battery capacity. The battery bar is green when fully-charged. The bar will gradually reduce while turning amber and then red as battery capacity decreases. - Page 24 GPS Mode Overview GPS Mode Overview Hole Number Par / Stroke Index AED Locator (selected regions) Clock Round Timer Battery Indicator Back Distance Middle Distance / Dynamic Pin Distance Front Distance 10. Previous Hole 11. Green Map with Dynamic Pin 12.
- Page 25 Introduction to GPS Mode / Using GPS Mode Introduction to GPS Mode The M7 GPS is pre-loaded with over 40,000 courses and includes front, middle and back of green distances, along with hole information, hazards, score tracking, shot measurement and round timer.
-
Page 26: Clock Settings
Clock Settings The M7 GPS includes a clock which is visible on the Home (fig. 1) and GPS Mode (fig. 2) screens. The clock will set automatically each time the trolley is turned on and either has a strong enough GPS signal or connects to a WiFi network. - Page 27 Dynamic Pin Location The M7 GPS allows you to move the location of the pin to provide a more accurate distance measurement. Touch the point on the green that you want to move the pin to and the centre distance will update (fig. 1).
- Page 28 Units of Measure Fig 2 - GPS Mode - Shot Distance The M7 GPS can display and measure distances in either Yards or Metres. To select preferred units: From the Home screen select “Settings” and then “Units” Select “Yards” or “Metres” (fig. 3) Select "Close"...
-
Page 29: Hazard Information
Hazard Information Hazard Information The M7 GPS also includes a list of on-course hazards. You can view the hazards for the hole you are currently playing by selecting “Hazards” at the bottom of the GPS mode screen (fig. 1). Once selected, the screen will provide distances to the closest four hazards (fig. -
Page 30: Score Tracking
Score Tracking You can use your M7 GPS to keep track of your score and access a score summary at any point during the round. To enter a score, select the scorecard logo (fig. 1) at the bottom right corner of the GPS screen. - Page 31 Fig 1 - GPS Mode - AED Icon If the course you are playing has an on-course defibrillator and has registered details on the Motocaddy AED database, the main GPS screen will display an AED Icon at the top of the screen (fig. 1).
- Page 32 Android Devices Once installed, select the Motocaddy GPS app and it will load the registration screen. When using the app for the first time, you will be prompted to allow the app to access your location and it is important that this is enabled to use standalone GPS features within the app.
-
Page 33: Enabling Bluetooth
Fig 1 - Home Settings Menu Pairing your Phone To pair your M7 GPS to a compatible smartphone, you must first ensure Bluetooth is enabled on both devices (see above) and then follow the below steps: Open the Motocaddy app on your phone and select "Pair Device" button (fig. 2) Select the correct trolley model from the list and select “Next”... -
Page 34: Notification Settings
It is possible to pre-set which smartphone notification types are displayed on the trolley screen (fig. 1 & fig. 2) using the device ‘Settings’ menu within the Motocaddy app. There are also other app specific notification settings within your phone that need to be enabled for the notifications to be displayed on your trolley. - Page 35 Connecting to WiFi / Firmware Updates The M7 GPS is able to install course and firmware updates via WiFi powered Over-the-Air (OTA) updates. Connecting to a WiFi Network Before attempting an OTA update, the trolley will need to be connected to a WiFi network.
- Page 36 Course Updates Course Updates (OTA) The M7 GPS is pre-loaded with over 40,000 worldwide courses. To check for an updated course map, the trolley will need to be connected to a WiFi network (see page 35): Fig 1 - Course Search From the Home screen select “Settings”...
-
Page 37: Language Settings
Language Settings / Competition Mode Language Settings The M7 GPS can be used in a number of different languages: From the Home screen select “Settings” and then “Languages” Select preferred language and then "Close" to confirm (fig. 1) Competition Mode It is possible to temporarily disable GPS using the competition mode should competition rules dictate. - Page 38 Factory Reset / Demo Mode Factory Reset Should you experience a problem with your M7 GPS, it is possible to reset the trolley back to its original factory default settings: From the Home screen select “Settings” and then "Reset all Settings”...
-
Page 39: Fcc Statement
FCC Statement FCC Statement This device complies with Part 15 of the FCC Rules. Operation is subject to the following two conditions: (1) This device may not cause harmful interference, and (2) This device must accept any interference received, including interference that may cause undesired operation. Changes or modifications not expressly approved by the party responsible for compliance could void the user’s authority to operate the equipment. - Page 40 Android and Google Play are trademarks of Google Inc. The Bluetooth word mark and logos are registered trademarks owned by the Bluetooth SIG, Inc. and any use of such marks by ® Motocaddy is under license. Other trademarks and trade names are those of their respective owners.
Need help?
Do you have a question about the M7 GPS and is the answer not in the manual?
Questions and answers
Motocaddy M7 GPS Remote Control Electric Golf Trolley 2025 HOW DO I REGISTER MY TROLLEY
Motocaddy M7 GPS Remote Control Electric Golf Trolley 2025