Table of Contents
Advertisement
Advertisement
Table of Contents

Subscribe to Our Youtube Channel
Related Manuals for Motocaddy S1 Pro DHC


Summary of Contents for Motocaddy S1 Pro DHC
- Page 1 Downhill Control Models Instruction Manual...
-
Page 2: Contents Page
Page 1 : Locating your Serial Number Page 12 : S1 PRO DHC Equipment Overview Battery Care Page 13 : Using your S1 PRO DHC / Power & Battery Level Page 2 : Battery Care and Charging Instructions Page 14 : Using the Adjustable Distance Control... -
Page 3: Locating Your Serial Number
Locating your Serial Number The serial number for your Motocaddy trolley is located on the underside of the battery tray. This number is required when returning your warranty card and should be kept handy for future use. -
Page 4: Battery Care And Charging Instructions
All batteries must be charged as soon as possible after each use. Leaving batteries discharged for long periods of time may affect the battery life. Please ensure that only batteries supplied by Motocaddy are charged with Motocaddy chargers. Cyclic battery chargers are designed specifically in accordance with the battery manufacturer’s requirements. The Lithium battery charger MUST NOT be used to charge any other battery and is designed for use with Motocaddy Lithium batteries only. -
Page 5: Lead Acid Battery Charging Procedure
Lead Acid Battery Charging Procedure Disconnect and remove the battery from the trolley Plug the charger into your mains supply Attach the battery cable to the charger matching the red and black connections Follow the charger LED indicator stages shown below: Powered Charging 90% Charged... -
Page 6: Lithium Battery Charging Procedure
Lithium Battery Charging Procedure Unplug your lithium battery from your trolley. This should always be done before folding the trolley to avoid damage to the battery and/or trolley. Plug the charger into your mains supply. Attach the battery cable to the charger matching the black and blue connections. When the charging led indicator has turned green, the battery is fully charged and ready to be used. -
Page 7: Caring For Your Lithium Battery
BMS may switch-off the battery. A full battery charge will rectify this problem. Motocaddy golf trolleys are designed to work with the BMS system installed in the Lithium batteries and the voltage meter is also synchronised to work in conjunction with the battery. If for any reason the voltage on the battery reaches that below the low battery warning on the trolley, then the BMS may disable the battery to protect it. -
Page 8: Attaching The Wheels
The outer groove can be used as a “free-wheel” option if you run out of battery power during a round of golf. IMPORTANT: Motocaddy PRO DHC trolleys are not designed to be freewheeled whilst the wheels are engaged. If you need to push your trolley, please use the ‘free-wheel groove’... - Page 9 Getting Started - Folding and Unfolding your Trolley Unfolding your Trolley Pull the clip to release the locking system (fig. 1) Raise the wishbone to the vertical position (fig. 2) Hook the lower part of the frame into the clip (fig. 3) Simply unfold the upper part of the frame then pull the clip again to lock the upper frame in place (fig.
- Page 10 Getting Started - Using the Upper and Lower Bag Supports Using the Upper and Lower Bag Supports The upper and lower bag supports on your Motocaddy trolley are designed to hold your bag Fig 1 securely whilst allowing simple adjustment to incorporate differing bag sizes. To secure your...
- Page 11 Getting Started - Adjusting the Bag Supports Adjusting the Bag Supports Fig 1 The bag support straps are manufactured from elasticated material to allow your golf bag to be held tightly in place. The strap should be adjusted to be reasonably tight around the golf bag. The following steps detail how to alter the length of the straps: Unclip the elasticated straps from the housing by pulling the straps outwards in the direction shown by the arrows (fig.
-
Page 12: Safety Cut-Out
Safety Cut-out Your Motocaddy trolley is fitted with a safety cut out feature which will help prevent damage to your trolley in the event of it being inadvertently switched on and in a position where it is not able to move for 30 seconds. -
Page 13: Safe Use Of Your Trolley
Always use the carry strap when moving and transporting lead acid batteries. Caring for your trolley Although your Motocaddy Trolley has been weatherproofed, please follow these simple guidelines to help protect your trolley: • Do not store your trolley outside. -
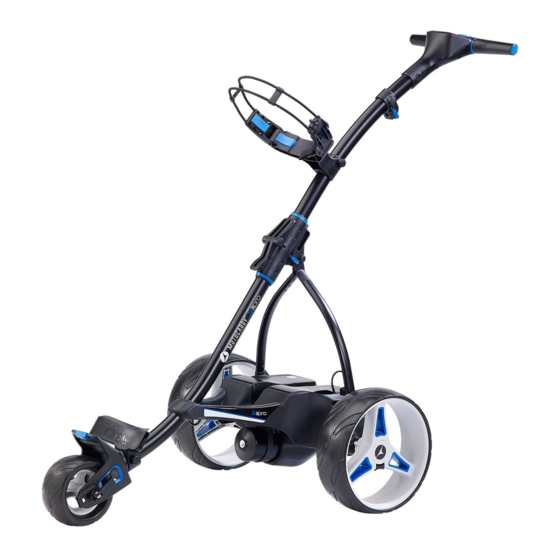
Page 14: S1 Pro Dhc Equipment Overview
S1 PRO DHC Equipment Overview S1 PRO DHC Equipment Overview Digital Control Panel Upper Bag Support Central Folding System Folding Release Clip Rear Wheels Rear Wheel quick release button Lower Bag Support Battery Battery Tray 10. Motors (located under Battery Tray) 11. -
Page 15: Using Your S1 Pro Dhc / Power & Battery Level
Using your S1 PRO DHC / Power and Battery Level Using your S1 PRO DHC The S1 PRO DHC is extremely simple to control. There is one main button that is used to turn the trolley on and off, whilst also controlling the speed of the trolley. -
Page 16: Using The Adjustable Distance Control
S1 PRO DHC - Using the Adjustable Distance Control Using the Adjustable Distance Control The S1 PRO DHC features a basic, easy to use adjustable distance control which will allow you to send you trolley ahead of you from 15-45 meters. -
Page 17: Using The Usb Charging Port
S1 PRO DHC - Using the USB charging port Using the USB charging port Simply remove the covering cap and plug a USB cable into the charging port located on the underside of the handle. The device will continue charging for the duration of time that the cable is attached and the battery is connected. -
Page 18: S3 Pro Dhc Equipment Overview
S3 PRO DHC Equipment Overview S3 PRO DHC Equipment Overview Digital Control Panel Upper Bag Support Central Folding System Folding Release Clip Rear Wheels Rear Wheel quick release button Lower Bag Support Battery Battery Tray 10. Motors (located under Battery Tray) 11. -
Page 19: The Advanced Digital Control Panel
The Advanced Digital Control Panel / Operating the Digital Functions The Advanced Digital Control Panel Speed Setting Clock Round /Lost Ball Timer Battery Meter Battery Setting Distance Reading Scroll Button USB Charging Port Speed Controller & On/Off Set Button Operating the Digital Functions To activate the control panel you need to connect the battery to the trolley. -
Page 20: Battery Meter
S3 PRO DHC - Operating the Digital Functions Battery Meter The battery meter on the digital display is set to measure capacity of the standard battery as default. To enable accurate measurement of lithium battery capacity, please follow the procedure below: Hold down the “Scroll”... -
Page 21: Setting The Time
S3 PRO DHC - Operating the Digital Functions Setting the Time Press and hold the “Set” button for three seconds until the “minutes” start flashing. Set the minutes by pressing the “Scroll” button, each press will increase the time by one minute. To toggle to the hour press the “Set”... - Page 22 S3 PRO DHC - Operating the Digital Functions Using the Adjustable Distance Control Whilst stationary, select the speed that you wish to set your trolley off at. Hold down the central ‘on/off’ button for a couple of seconds. The Distance display will change to indicate ‘05’ (5 yards or metres) and the word ‘ADC’ will appear. Turn the button clockwise to increase the distance and anti-clockwise to decrease accordingly.
- Page 23 S3 PRO DHC - Operating the Digital Functions Distance Readouts There are three different distance readouts – “Distance 1”, “Distance 2” and “Total Distance”. You can toggle through them at any time by pressing the “Scroll” button. We recommend using “Distance 1” to measure your drives or particular shots during your round.
- Page 24 S3 PRO DHC - Operating the Digital Functions Using the Lost Ball Timer To use the lost ball timer you must first toggle through the distance readings using the “Scroll” button until the display shows “Distance 1” and the timer is flashing (Fig. 1). To start the timer, press the “Set”...
- Page 25 It is possible to temporarily disable the distance measuring functions using the competition mode should competition rules dictate. It is recommended that you always check competition rules before using your Motocaddy S3 PRO DHC with distance readings enabled. To enable competition mode follow the steps below: Whilst stationary, hold down the “Scroll”...
- Page 26 S3 PRO DHC - Operating the Digital Functions Setting the security pin code The S3 PRO DHC also comes with the option of enabling a security feature to make the trolley unusable for potential thieves. There is no pin-code set when the trolley is manufactured but this can be set using the steps below: Press and hold the “Scroll”...
-
Page 27: Changing The Pin Code
S3 PRO DHC - Operating the Digital Functions Changing the pin code You can change your pin number at any time using the following steps: Press and hold the “Scroll” button whilst connecting the battery to the trolley, release the button once the screen has lit up. - Page 28 S3 PRO DHC - Operating the Digital Functions Using the USB charging port Simply remove the covering cap and plug a USB cable into the charging port located on the underside of the handle. The device will continue charging for the duration of time that the cable is attached and the battery is connected. It is important to note that the speed of charge will be lower than that of a mains AC charger and similar to plugging the device into a PC.
-
Page 29: Wheel Alignment
Wheel Alignment Adjusting the front wheel alignment if your trolley is veering In the unlikely event that your trolley is not tracking in a straight line, the alignment of the front wheel can be adjusted to rectify the fault. This problem can be caused by a number of factors Fig 1 including a slightly loose bag support or an unevenly packed golf bag. -
Page 30: Frequently Asked Questions
Frequently asked questions If I only play 9 holes, do I still have to recharge the battery before the next game? Yes. Regardless of the number of holes played the battery must be charged after every use. Should I fully discharge my battery from time to time? Definitely not. -
Page 31: Declaration Of Conformity
Declaration Of Conformity Page 29... - Page 32 We are dedicated to protecting the environment and encourage the recycling of Motocaddy products through a free collection and disposal service. To find out more or to locate your nearest Motocaddy recycling point, please contact us through our website or by calling 0845 058 9818.
Need help?
Do you have a question about the S1 Pro DHC and is the answer not in the manual?
Questions and answers