Motocaddy M1 Instruction Manual

Motocaddy M1 Instruction Manual

M-series electric trolley
Hide thumbs Also See for M1:

Advertisement

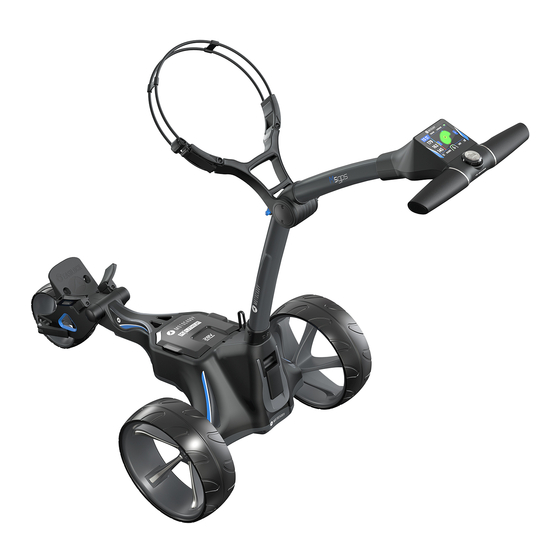
M-Series Electric Trolley
Instruction Manual
EN
REGISTERONLINE
www.motocaddy.com/warranty
Distance Measurement Device (DMD) features are legal to use when local USGA and R&A
rule 14-3 is in effect. Always check local and competition rules prior to commencing play
Visit www.motocaddy.com/instructions for other Motocaddy instructions including translations

Advertisement

Table of Contents
loading

Summary of Contents for Motocaddy M1

  • Page 1 Instruction Manual REGISTERONLINE www.motocaddy.com/warranty Distance Measurement Device (DMD) features are legal to use when local USGA and R&A rule 14-3 is in effect. Always check local and competition rules prior to commencing play Visit www.motocaddy.com/instructions for other Motocaddy instructions including translations...
  • Page 2: Table Of Contents

    M5 CONNECT - Using Adjustable Distance Control ..28 M1 - Equipment Overview ..........14 M5 CONNECT - Smart Features Overview ......29 M1 - Using your trolley / Power and Battery Level .....15 Downhill Control and Parking Brake (DHC models) ...30 M3 PRO - Equipment Overview .........16 Declaration of Conformity ..........31...
  • Page 3: Locating Your Serial Number / Information About Dhc

    Locating your Serial Number / Information about DHC Locating your Serial Number The serial number for your M-Series trolley is located on the trolley underside next to the motor (fig. 1). This number is required when registering your warranty online and should be kept handy for future use. The same number should also be on the box received with your trolley.
  • Page 4: Safe Use Of Your Trolley / Caring For Your Trolley

    Safety Cut-out This Motocaddy M-Series trolley is fitted with a timed safety cut-out feature. Once started the trolley will automatically cut power to the motor after ten minutes to prevent any possible damage to the trolley. Pressing the on/off button will restart the trolley.
  • Page 5: Caring For Your Trolley / Battery Care And Advice

    Caring for your Trolley / Battery Care and Advice This Motocaddy trolley is designed to require very little maintenance. We do however recommend giving your trolley regular checks to ensure: • There is no build up of excess mud and dirt •...
  • Page 6: Charging Instructions / Caring For Your Lithium Battery

    Charging your Lithium Battery / Caring for your Lithium Battery Charging your Lithium Battery Unplug the Lithium battery from the trolley. This should always be performed before folding the trolley to avoid damage to the battery and/or trolley Plug the charger into your mains supply Attach the battery cable to the charger matching the black and grey connections When the charging LED indicator has turned green, the battery is fully charged and ready to be used RED - Battery charging...
  • Page 7: Caring For Your Lithium Battery

    BMS may switch-off the battery. A full battery charge will rectify this problem. Motocaddy golf trolleys are designed to work with the BMS system installed in the Lithium batteries and the voltage meter is also synchronised to work in conjunction with the battery. If for any reason the voltage on the battery falls below the low battery warning on the trolley, then the BMS may disable the battery to protect it.
  • Page 8: Attaching The Wheels

    Attaching the Wheels Attaching the Wheels There is a left and a right wheel and it is important that you put them on the correct side, otherwise the trolley will not move. There is an “L” and “R” on the inside of the wheel on the central hub.
  • Page 9: Adjusting The Front Wheel Alignment

    Adjusting the Front Wheel Alignment Adjusting the Front Wheel Alignment In the unlikely event that your trolley is not tracking in a straight line, the alignment of the front wheel can be adjusted to rectify the fault. This problem can be caused by a number of factors including a slightly loose bag support or an unevenly packed golf bag.
  • Page 10: Unfolding Your Trolley

    Unfolding your Trolley Unfolding your Trolley We recommend unfolding your trolley once the wheels have been un-inverted and reattached (see pg 8). Lift the upper bag support slightly and release the upper latch (fig. 1) Unfold the handle and re-secure the latch (fig. 2) Release the lower latch (fig.
  • Page 11: Folding Your Trolley

    Folding your Trolley Folding your Trolley Release the lower latch (fig. 1). The auto-open stand will also be activated Fold the frame forward until fully extended (fig. 2). The front wheel will automatically fold underneath Release the upper latch and fold the handle back until the trolley is fully folded (fig. 3) Re-secure both latches.
  • Page 12: Using The Upper And Lower Bag Supports

    Fig 1 Using the Lower Bag Supports This Motocaddy trolley is fitted with the EASILOCK™ bag attachment system. If you are using an EASILOCK™ compatible golf bag please follow these simple instructions: Remove the two pre-fitted lower bag straps by depressing the rear button and sliding (fig. 3) Match up the indicating line on the golf bag with the line on the lower bag support Lower the bag until the pins lock in position.
  • Page 13: Adjusting The Bag Supports

    Adjusting the Bag Supports Adjusting the Bag Supports Fig 1 The bag support straps are manufactured from elasticated material to allow your golf bag to be held tightly in place. The strap should be adjusted to be reasonably tight around the golf bag: Unclip the elasticated straps from the housing by pulling outwards in the direction shown (fig.
  • Page 14: M1 - Equipment Overview

    M1 - Equipment Overview M1 - Equipment Overview LCD Digital Display Speed Setting (see pg 15) Advanced Battery Meter (see pg 15) Speed Controller & On/Off Button (see pg 15) Upper Bag Support Upper Release Latch Rear Wheels Rear Wheel Release Button EASILOCK™...
  • Page 15: M1 - Using Your Trolley / Power And Battery Level

    Using your M1 / Power and Battery Level Using your M1 The M1 is very simple to control. There is one main button that is used to start and stop the trolley, whilst also controlling the speed, which can be adjusted while the trolley is stationary or in motion.
  • Page 16: M3 Pro - Equipment Overview

    M3 PRO - Equipment Overview M3 PRO - Equipment Overview LCD Advanced Digital Control Panel Upper Bag Support Upper Release Latch Rear Wheels Rear Wheel Release Button EASILOCK™ Lower Bag Support Battery Battery Tray Motor (under Battery Tray) 10. Front Wheel 11.
  • Page 17: M3 Pro - Digital Control Panel / Digital Functions

    M3 PRO - The Advanced Digital Control Panel / Operating the Digital Functions The Advanced Digital Control Panel Speed Setting Clock Round Timer Battery Meter Distance Readings Left Button Speed Controller & On/Off Right Button USB Charging Port (under handle) Operating the Digital Functions To activate the control panel simply connect the battery to the trolley.
  • Page 18: M3 Pro - Starting, Stopping & Speed / Usb Charging

    M3 PRO - Starting, Stopping & Changing Speed / Using the USB Charging Port Starting, Stopping and Changing the Speed of your Trolley The speed can be adjusted while the trolley is stationary or in motion. Rotate the central button clockwise to increase the speed setting and anti-clockwise to decrease.
  • Page 19: M3 Pro - Setting The Time / Using The Round Timer

    M3 PRO - Setting the Time / Using the Round Timer Setting the Time Press and hold the right button for three seconds until the minutes start flashing Set the minutes by pressing the left button, each press will increase the time by one minute To toggle to the hour press the right button again Set the hour in the same way as the minutes Once the time is correct, press and hold the right button for three seconds to confirm...
  • Page 20: M3 Pro - Using Adjustable Distance Control

    M3 PRO - Adjustable Distance Control Using the Adjustable Distance Control Whilst stationary, select the speed at which you wish the trolley to start Hold down the central ‘on/off’ button for 2 seconds The Distance Display will change to indicate ‘05’ (5 yards or metres) and the letters ‘ADC’ will appear under the speed setting Rotate the button clockwise to increase the distance and anti-clockwise to decrease (fig.
  • Page 21: M3 Pro - Distance Readouts

    M3 PRO - Distance Readouts Distance Readouts There are three different distance readouts – “Drive”, “Round” and “Lifetime”. You can toggle through them at any time by pressing the left button. To reset the reading, press the right button (this must be done whilst the display shows “Drive” or “Round”).
  • Page 22: M3 Pro - Using The Competition Mode

    M3 PRO - Using the Competition Mode Using the Competition Mode It is possible to temporarily disable the distance measuring functions using the competition mode should competition rules dictate. It is recommended that you always check competition rules before using your trolley with distance readings enabled. To enable the competition mode the trolley must be stationary.
  • Page 23: M3 Pro - Setting The Security Pin Code

    You may wish to keep a record of this number. If you are unable to enter the correct pin code the trolley will need to be returned to Motocaddy to be reset (this will incur a charge).
  • Page 24: M3 Pro - Changing / Disabling The Security Pin Code

    M3 PRO - Changing / Disabling the Pin Code Changing the Pin Code You can change your pin code at any time using the following steps: Press and hold the left button whilst connecting the battery to the trolley, release the button once the screen has illuminated Enter your current pin code on the left side of the screen (fig.
  • Page 25: M5 Connect - Equipment Overview

    10. Front Wheel 11. Front Wheel Alignment Adjusters 12. Battery Connector 13. USB Charging Port (under handle) 14. Auto-Open Stand 15. Lower Release Latch NB : See accompanying ‘Motocaddy CONNECT Smart Display’ instruction manual for M5 CONNECT smart features Page 25...
  • Page 26: M5 Connect - Digital Control Panel / Digital Functions

    M5 CONNECT - The Advanced Digital Control Panel / Operating the Digital Functions M5 CONNECT - Handle Overview Smart Display (see separate instruction manual) Power Indicator LED Speed Indicator Battery Indicator LED Speed Controller & Stop/Start button USB Charging Port (under handle) Using your M5 CONNECT The M5 CONNECT is extremely simple to control.
  • Page 27: M5 Connect - Power & Battery Level / Usb Charging

    M5 CONNECT - Power and Battery Level / Using the USB Charging Port Power and Battery Level There are two indicating LEDs beside the speed display. The right hand LED displays the battery capacity (green & red) and will illuminate as soon as the battery is plugged in. The left hand LED will illuminate when the power is on. The trolley is designed to protect your battery from being fully discharged, should your battery capacity drop too low the trolley will cut the power to the motor.
  • Page 28: M5 Connect - Using Adjustable Distance Control

    M5 CONNECT - Using the Adjustable Distance Control Using the Adjustable Distance Control The M5 CONNECT features a basic, easy to use adjustable distance control which will allow you to send your trolley ahead of you from 15 - 45 metres. While stationary select the speed that you wish your trolley to set off at Fig 1 Hold down the on/off button for 2 seconds, you will see the outer digits of the LED display rotate...
  • Page 29: M5 Connect - Smart Features Overview

    You will need to install the Motocaddy GPS app and pair your M5 CONNECT with a compatible smartphone to utilise the wide range of game enhancing smart features. To install the app, search for “Motocaddy” on either the Apple App Store or on Google Play.
  • Page 30: Downhill Control And Parking Brake (Dhc Models)

    Whenever you are looking to move the trolley, even if just to reposition it ready to use, always put it on a low speed setting to make it easier to steer. Fig 1 - M1 DHC Using the DHC Parking Brake DHC models are fitted with an electronic parking brake.
  • Page 31: Declaration Of Conformity

    Declaration of Conformity Model: S1/S1 DHC/S3 PRO/S3 PRO DHC/ S5 CONNECT/S5 CONNECT DHC/ S7 REMOTE/M1/M1 DHC/M3 PRO/ M5 CONNECT/M5 CONNECT DHC/C-TECH Sunday, January 01, 2018 Page 31...
  • Page 32 +44 (0)1279 712 370 e: info@motocaddy.com w: www.motocaddy.com We are dedicated to protecting the environment and encourage the recycling of Motocaddy products through a free collection and disposal service. To find out more or to locate your nearest Motocaddy recycling point, please contact us through our website.

This manual is also suitable for:

M5 connectM3 pro

Table of Contents