
Related Manuals for Electrolux Professional thermaline Pro Thermetic PFET-G Series


Summary of Contents for Electrolux Professional thermaline Pro Thermetic PFET-G Series
- Page 1 Operating and installation instructions (Translation of the original operating instructions) DOC no. 87.8041.01 - EN Edition 4 (01-2020) Pro Thermetic PFET RECTANGULAR TILTING FRYING PAN Gas powered │ PFET-G...
-
Page 2: Table Of Contents
Operating and installation instructions │ Pro Thermetic │ Tilting frying pan PFET-G CONTENT OVERVIEW CONTENT OVERVIEW ................... 2 FOREWORD ......................4 1. GENERAL INFORMATION ..................5 INTRODUCTION ..................5 IDENTIFYING YOUR COOKING APPLIANCE ..........5 1.2.1 Cooking appliance identification plate ............5 1.2.2 Meaning of the identification plate fields ............ - Page 3 Operating and installation instructions │ Pro Thermetic │ Tilting frying pan PFET-G CONTENT OVERVIEW 4.6.2 Wall installation: wall-mounted ..............23 ASSEMBLING APPLIANCE GROUPS ............24 GAS CONNECTION ................... 25 4.8.1 General information and important instructions .......... 25 4.8.2 Appliances mounted on the floor and against a wall ........26 4.8.3 Wall mounted appliances ................
-
Page 4: Foreword
Should you have any doubts or uncertainties concerning the use of the machine or cooking appliance after reading the operating and installation instructions, please contact Electrolux Professional or your closest customer service centre who will gladly assist you to optimise the performance of the appliance. -
Page 5: General Information
IPX ......(Q) Water protection class CE ......(R) CE mark Xxx ......(S) Country specification Cat......(T) Gas category P mbar ..... (U) Gas pressure ELX ......(V) Manufacturer: Electrolux Professional AG Allmendstrasse 28 CH-6210 Sursee (Switzerland) EN │ 01-2020 87.8041.01... -
Page 6: Liability
Electrolux Professional shall bear no responsibility for any inaccuracies in the operating instructions and installation instructions that are due to printing or translation errors. -
Page 7: Operator's Obligations
The correct operation of safety-related components must be tested at least once each calendar year by Electrolux Professional authorised specialist engineers and replaced if necessary. The appliance operator is responsible for complying fully with the national regulations relating to operational safety. -
Page 8: Handling Industrial Cooking Appliances
Operating and installation instructions │ Pro Thermetic │ Tilting frying pan PFET-G If the temperature control is not functioning 100%, switch the appliance off immediately. Remove the appliance’s main fuse. Do not use the appliance if damaged in any way. ... -
Page 9: Customer Services, Service, Repair And Maintenance Work
1.4.7 Customer services, service, repair and maintenance work Service, repair and maintenance work must only be carried out by Electrolux Professional or Electrolux partner dealers. Country-specific and local regulations apply. This applies in particular to safety and regulatory installations entering a service contract. -
Page 10: Disposal
Operating and installation instructions │ Pro Thermetic │ Tilting frying pan PFET-G 1.5.2 Disposal The WEEE symbol on the appliance means that this appliance must not be disposed of with the normal household waste but must be disposed of in accordance with the conditions in force so that no danger to the environment or the health of people can occur. -
Page 11: Transport, Handling And Storage
Operating and installation instructions │ Pro Thermetic │ Tilting frying pan PFET-G TRANSPORT, HANDLING AND STORAGE 1.7.1 Introduction Appliances must be transported (i.e. moved from one place to another) and handled (i.e. moved within the company premises) using lifting devices with a suitable load-bearing capacity. The appliance can be transported by truck, train, ship or aircraft. -
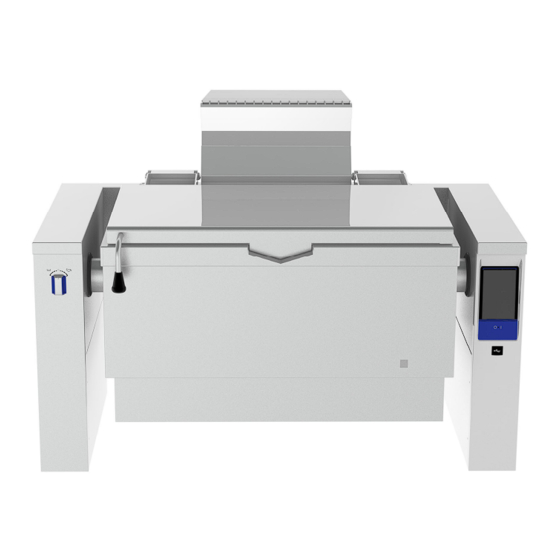
Page 12: Appliance Functions And Equipment
Operating and installation instructions │ Pro Thermetic │ Tilting frying pan PFET-G APPLIANCE FUNCTIONS AND EQUIPMENT OVERVIEW Panel TOUCH control unit controls USB connection Tilt function handle Flue for combustion gases APPLIANCE FUNCTION The tilting frying pan is a multi-functional cooking appliance which is used to sear, fry, stew, grill, make sauces, saute, poach, steam, simmer, braise and boil foods of all kinds. -
Page 13: Brief Description Of The Most Important Working Parts
Operating and installation instructions │ Pro Thermetic │ Tilting frying pan PFET-G 2.3.1 Brief description of the most important working parts The electronic TOUCH control is used to operate the cooking appliance. Safety thermostats are used to guard against overheating. Food and floor sensors are used for precise temperature control of the required cooking process. -
Page 14: Technical Specifications
Operating and installation instructions │ Pro Thermetic │ Tilting frying pan PFET-G SPECIFICATIONS VALIDITY AND IDENTIFICATION This document deals with the following appliance model types in the Pro Thermetic product range with the following names (can be found on the identification plate, →for this see Section 1 "General information"): Gas powered (compound steel) PFET06G PFET09G... -
Page 15: Standard Appliances (Mild Steel)
Operating and installation instructions │ Pro Thermetic │ Tilting frying pan PFET-G STANDARD APPLIANCES (mild steel) Appliance Width Depth Height Base Gas (El.) feet power weight size Voltage Frequency Amperage Type 586169 PFET06NCCx 586170 PFET06NGCx 16 (0.2) 586171 PFET06NVCx 1200 586175 PFET09NCCx 586176... -
Page 16: Installation And Assembly
Operating and installation instructions │ Pro Thermetic │ Tilting frying pan PFET-G INSTALLATION & ASSEMBLY DIMENSION DRAWINGS FOR FLOOR AND WALL INSTALLATION 4.1.1 Appliances installed on the floor and against a wall EN │ 01-2020 87.8041.01... -
Page 17: Wall Mounted Appliances
Operating and installation instructions │ Pro Thermetic │ Tilting frying pan PFET-G 4.1.2 Wall mounted appliances EN │ 01-2020 87.8041.01... -
Page 18: Installation Diagrams And Connections
Operating and installation instructions │ Pro Thermetic │ Tilting frying pan PFET-G INSTALLATION DIAGRAMS AND CONNECTIONS 4.2.1 Appliances installed on the floor and against a wall Electrical connection Gas connection (Customer's supply pipe: Natural gas/ town gas = 1" DN25 / Liquid gas = 3/4"... -
Page 19: Wall Mounted Appliances
Operating and installation instructions │ Pro Thermetic │ Tilting frying pan PFET-G 4.2.2 Wall mounted appliances Electrical connection Gas connection (Customer's supply pipe: Natural gas/ town gas = 1" DN25 / Liquid gas = 3/4" DN20) Hot water connection (G 1/2", NW15) Cold water connection (G 1/2", NW15) Wall attachment points EN │... -
Page 20: Floor Outlet And Gutters
Operating and installation instructions │ Pro Thermetic │ Tilting frying pan PFET-G FLOOR OUTLET AND GUTTERS Tilting models are fitted with a loose grate and floor outlet in the base tray near the water outlet. These help drain away the water when the appliance is cleaned. The base trays can be designed for a single appliance or for a whole group of appliances. -
Page 21: Access To The Inside Of The Appliance
Operating and installation instructions │ Pro Thermetic │ Tilting frying pan PFET-G ACCESS TO THE INSIDE OF THE APPLIANCE 4.5.1 Removing the panel front (F): Remove the screws (S1) on the bottom of the panel front (F). Pull on the underside to remove the control panel (F) and pull it downwards and out of the track. 4.5.2 Removing the panel cover (A/B): Remove each of the two M5 nuts (M1) [located on the inside of the panel] for each panel cover (A/B). -
Page 22: Assembly And Set Up
Operating and installation instructions │ Pro Thermetic │ Tilting frying pan PFET-G ASSEMBLY AND SET UP 4.6.1 Floor installation: free-standing or standing against a wall Transport the appliance on its pallet to directly in front of the desired point of installation. The installation connections that are sticking out of the floor should be as close as possible to the side of the transport pallet. -
Page 23: Wall Installation: Wall-Mounted
Operating and installation instructions │ Pro Thermetic │ Tilting frying pan PFET-G Adjust the height of the foot (FU) by rotating the bottom to the preferred appliance height. Determine and align the horizontal position with a spirit level. The foot can be adjusted from 150 to 200 mm. -
Page 24: Assembling Appliance Groups
Operating and installation instructions │ Pro Thermetic │ Tilting frying pan PFET-G According to the installation plans (see →4.2.2 Wall-mounted appliances) the wall anchoring holes must be marked on the wall in advance. Drill boreholes into the wall with a diameter of ø 18 mm and a minimum depth of 145 mm. Then wall anchors provided are to be affixed using threaded bolts (W). -
Page 25: Gas Connection
Operating and installation instructions │ Pro Thermetic │ Tilting frying pan PFET-G GAS CONNECTION 4.8.1 General information and important notes Connecting the gas and laying any gas pipes at the customer's must only be done by an authorised specialist complying with the relevant local and national regulations. The following relevant regulations must be obeyed when installing, testing and adjusting the equipment: •... -
Page 26: Appliances Mounted On The Floor And Against A Wall
Operating and installation instructions │ Pro Thermetic │ Tilting frying pan PFET-G IMPORTANT! The gas supply line must guarantee the necessary gas flow for the flawless operation of all appliances connected to the network. An insufficient gas supply will have a significant detrimental effect on the operation and safety of the connected appliances. -
Page 27: Sealing The Gas Pipes
Operating and installation instructions │ Pro Thermetic │ Tilting frying pan PFET-G 4.8.4 Sealing the gas pipes The screws on the gas lines must be sealed with suitable sealing material. Sealing material for gas supplying parts: • We recommend: Chesterton 800 GoldEnd sealing tape: for gas threaded screws or •... -
Page 28: Adjusting The Gas Flow Speed On Ignition
Operating and installation instructions │ Pro Thermetic │ Tilting frying pan PFET-G Permissible tolerances for gas pressure in mbars: Normal Minimum Maximum Type of gas pressure pressure pressure Natural gas (H) Natural gas L 28-30 Liquid gas Propane 42.5 57.5 Butane 4.8.8 Adjusting the gas flow speed on ignition... -
Page 29: Electrical Connection
Operating and installation instructions │ Pro Thermetic │ Tilting frying pan PFET-G ELECTRICAL CONNECTION Each appliance comes with an appliance-specific wiring diagram. The technical specifications (electrical rating, voltage, amperage etc.) are documented here. Check and ensure that the electrical voltage corresponds to the voltage specified on the identification plate. -
Page 30: Connecting To A Potential Equalisation System
Operating and installation instructions │ Pro Thermetic │ Tilting frying pan PFET-G The mains supply is connected via a cable installed during assembly, which protrudes 1.5m out of the floor or wall. The appliance’s terminal clamps are under the cover. The front panel (A) must be removed to connect the appliance. (→see 4.5 "ACCESS TO THE INSIDE OF THE APPLIANCE"). -
Page 31: Mixer Tap
Operating and installation instructions │ Pro Thermetic │ Tilting frying pan PFET-G 4.10 MIXER TAP (optional extra) The mixer tap is supplied loose and must be installed on the left-hand appliance panel. Thread the mixer tap pipes (9) and the stand pipe (4) through the pre-drilled hole on the left side of the panel cover(8). -
Page 32: Commissioning
Operating and installation instructions │ Pro Thermetic │ Tilting frying pan PFET-G 5. COMMISSIONING PREPARATION All appliances are ready for use when they are delivered. - Carry out commissioning as per (→see 6. CHECK LIST: COMMISSIONING). Before first use the pan must be thoroughly cleaned with hot water containing a mild cleaning agent (→for this also see 1.6 CLEANING). -
Page 33: Check List: Commissioning
Operating and installation instructions │ Pro Thermetic │ Tilting frying pan PFET-G CHECK LIST: COMMISSIONING Inspection Checked Inspection Checked √ √ Check all water, gas and electrical connections and voltages. (→4.2 INSTALLATION PLANS) Set the time. (→8.2.2 Default settings). Check appliance functions for the electrical controls. -
Page 34: Check List: Maintenance
Operating and installation instructions │ Pro Thermetic │ Tilting frying pan PFET-G CHECK LIST: MAINTENANCE Troubleshooting Remedy Inspection Earth conductor connections Potential equalisation connections If contacts are loose Check all electrical connections and contacts to terminals, coils, tighten connections. switches and connections to ensure that they are fully tightened. - Page 35 Note: This list is only a brief description. A detailed description can be found in the (→Service Manual). If an increased failure rate of safety-related parts is detected during a service please inform Electrolux Professional - Customer Services immediately. EN │ 01-2020...
-
Page 36: Operating The Touch Control
Operating and installation instructions │ Pro Thermetic │ Tilting frying pan PFET-G OPERATING THE TOUCH CONTROL DESCRIPTION OF THE CONTROL PANEL Touch screen (touch-sensitive screen): All your cooking appliance's operating functions can be performed just by touching the relevant symbols and selecting the functions directly. -
Page 37: Manual
Operating and installation instructions │ Pro Thermetic │ Tilting frying pan PFET-G 8.2.3 Manual 8.2.4 Phase (→Select Manual from the main selection menu) (→Select Phase from the submenu) Manual: Define cooking processes. Number of programmed Programme and define multiple cooking phases/ cycles cooking phases. -
Page 38: Selecting Cooking Time (Entering Time And Continuous Cooking)
Operating and installation instructions │ Pro Thermetic │ Tilting frying pan PFET-G 8.2.7 Selecting cooking time (entering time and continuous cooking) Cooking by setting a time or continuous cooking. Target cooking time value Select hours/ minutes. Select target value for cooking time. -
Page 39: Saving Programmes
Operating and installation instructions │ Pro Thermetic │ Tilting frying pan PFET-G 8.2.10 Additional settings: Saving programmes Programme name Select the name using the keyboard Pop-up menu Select [Active field position right at the bottom, picture on left]. Save programmes Confirm/ cancel programme saving. -
Page 40: Cooking With Target Value Power Levels And Cooking Time
Operating and installation instructions │ Pro Thermetic │ Tilting frying pan PFET-G 8.3.2 Cooking with target value power levels and cooking time By default the cooking appliance heats up to 95° Celsius at full heating power and then follows the required power level for the pre-selected cooking time. -
Page 41: Operating The Sub-Systems
Operating and installation instructions │ Pro Thermetic │ Tilting frying pan PFET-G OPERATING THE SUB-SYSTEMS APPLIANCE TILTING The tilting feature may only be used if the mixer tap swivel arm is in the correct position (facing the front), the lid is fully open and if there is nobody or any object in the tilting area under the appliance. -
Page 42: Drain Tap
Operating and installation instructions │ Pro Thermetic │ Tilting frying pan PFET-G DRAIN TAP (optional extra) The tilting boiling pan does not normally need a drain tap. The drain tap is only available as an option (only when ordered with the appliance, cannot be retrofitted) . The drain tap (EH) is used to meter the liquid to be drained from the vessel. 9.2.1 Draining the liquid / the food The drain tap (EH) is closed when the knob (H) is in the far left position. -
Page 43: Accessories
The automatic water filling device fills the pan with a preselected amount of water. Only available when ordered with the appliance. It cannot be retrofitted. ©2012 Electrolux Professional AG | Tech.Docu Services | CH - 6210 Sursee | Schweiz EN │ 01-2020...
Need help?
Do you have a question about the thermaline Pro Thermetic PFET-G Series and is the answer not in the manual?
Questions and answers