Advertisement
- 1 Pulse Oximeter
- 2 Important Safety Instructions
- 3 General Description
- 4 Measurement Principles
- 5 Directions for Use
- 6 Inserting the batteries
- 7 Adjusting Display Mode and Brightness
- 8 Using the Lanyard
- 9 Malfunctions and Actions to take
- 10 Cleaning and Disinfecting
- 11 Technical Specifications
- 12 Videos
- 13 Documents / Resources
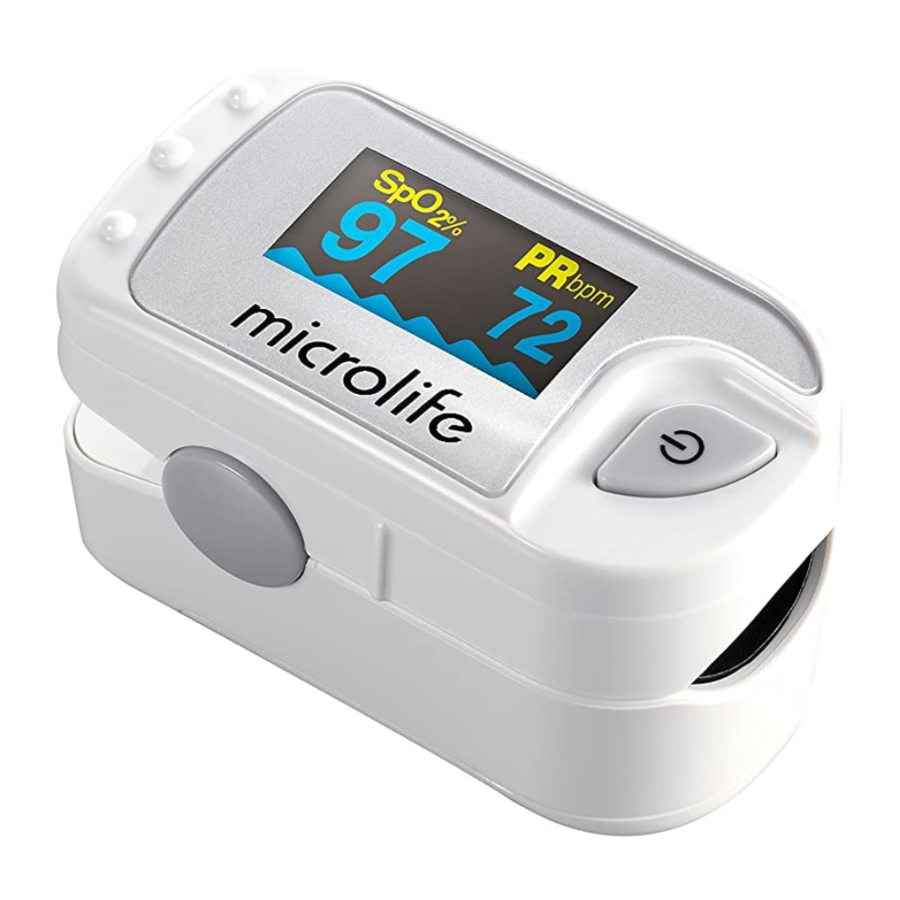
Pulse Oximeter

- ON/OFF button
- Oxygen saturation (value as percentage)
- Pulse rate (value in beats per minute)
- Pulse wave (plethysmographic wave)
- Pulse bar
- Low battery indicator
- Inserting the batteries
- Attaching the lanyard
- Display modes
- Operation principle
Explanation of symbols

Batteries and electronic devices must be disposed of in accordance with the locally applicable regulations, not with domestic waste.

Read the instructions carefully before using this device.

Type BF applied part

Keep dry

Manufacturer

Date of manufacture

No SpO 2 alarm

Low battery indicator

Serial number

Protected against dripping water

Authorized representative in the European community

Oxygen saturation (value as percentage)


Operating conditions: 5 - 40°C / 41 - 104°F

Storage conditions: -20 - +55°C / -4 - +131°F

CE Marking of Conformity
Important Safety Instructions
- This device may only be used for the purposes described in these instructions. The manufacturer cannot be held liable for damage caused by incorrect application.
- Never immerse this device in water or other liquids. For cleaning please follow the instructions in the «Cleaning and Disinfecting» section.
- Do not use this device if you think it is damaged or notice anything unusual.
- Never open this device.
- This device comprises sensitive components and must be treated with caution. Observe the storage and operating conditions described in the «Technical Specifications» section.
- Protect it from:
- water and moisture
- extreme temperatures
- impact and dropping
- contamination and dust
- direct sunlight
- heat and cold
- The function of this device may be compromised when used close to strong electromagnetic fields such as mobile phones or radio installations and we recommend a distance of at least 1 m (according to 60601-1-2 table 5). In cases where you suspect this to be unavoidable, please verify if the device is working properly before use. • Do not use the device in an MRI or CT environment.
- This device is not intended for continuous monitoring. • This device does not have an alarm function and is therefore not suitable for evaluating medical results. Do not use this device in situations where alarms are required.
- Do not sterilize this device using autoclaving or ethylene oxide sterilizing. This device is not intended for sterilization.
- If the device is not going to be used for a prolonged period the batteries should be removed.

Ensure that children do not use this device unsupervised; some parts are small enough to be swallowed. Be aware of the risk of strangulation in case this device is supplied with cables or tubes.
 Use of this device is not intended as a substitute for a consultation with your doctor.
General Description
Oxygen saturation indicates the percentage of hemoglobin in arterial blood that is loaded with oxygen. This is a very important parameter for the respiratory circulation system. Many respiratory diseases can result in lower oxygen saturation within human blood.
Following factors can reduce oxygen saturation:Automatic regulation of organ dysfunction caused by anesthesia, intensive postoperative trauma, injuries caused by some medical examinations. These situations may result in light-headedness, asthenia and vomiting. Therefore, it is very important to know the oxygen saturation of a patient so that doctors can detect problems in a timely manner.
Measurement Principles
Principle of this fingertip pulse oximeter: A mathematical formula is established making use of Lambert Beer Law according to spectrum absorption characteristics of deoxygenated hemoglobin (Hb) and oxyhemoglobin (HbO2) in red and near-infrared zones.
Operation principle of this device:Photoelectric oxyhemoglobin inspection technology is adopted in accordance with capacity pulse scanning and recording technology, so that two beams of different wavelength of lights (660 nm red and 905 nm near infrared light) can be focused onto a human nail tip through a clamping fingertype sensor. A measured signal obtained by a photosensitive element, will be shown on the display through process in electronic circuits and microprocessor.
Diagram of Operation Principle :
- Red and infrared-ray emission tube.
- Red and infrared-ray receipt tube.
Directions for Use
- Insert the batteries as described in the «Inserting the batteries» section.
- Insert one finger (nail side up; index or middle finger is recommended) into the finger opening of the device. Be sure to fully insert the finger so that the sensors are completely covered by the finger.
- Release the device allowing it to clamp down on the finger.
- Press the ON/OFF button to turn the device on.
- Do not shake your finger during the test. It is recommended that you do not move your body whilst taking a reading.
- Your measurement values will appear on the screen after a few seconds.
- Remove your finger from the device. The display will indicate «Finger Out».
- The device will automatically switch off after approx. 8 seconds after the finger is removed from the device.
- The height of the bar graph 5 is an indication of the pulse and signal strength. The bar should be greater than 30% for a proper reading.
- The device must be able to measure the pulse 2 properly to obtain an accurate SpO measurement. Verify that nothing is hindering the pulse measurement before relying on the SpO2measurement.
- The maximum application time at a single site should be less than 30 minutes, in order to ensure correct sensor alignment and skin integrity.
Inaccurate measurements may occur if:
- The patient suffers from significant levels of dysfunctional hemoglobin (such as carboxyhemoglobin or methemoglobin).
- Intravascular dyes such as indocyanine green or methylene blue have been injected into the patient.
- Used in the presence of high ambient light (e.g. direct sunlight). Shield the sensor area with a surgical towel if necessary.
- There is excessive patient movement.
- The patient experiences venous pulsations.
- The patient has hypotension, severe vasoconstriction, severe anemia, or hypothermia.
- The patient is in cardiac arrest or is in shock.
- Fingernail polish or false fingernails are applied.
Inserting the batteries
After you have unpacked your device, first insert the batteries. The battery compartment is on the bottom of the device. Remove the battery cover by sliding it in the direction shown. Insert the batteries (2 x 1.5 V, size AAA), thereby observing the indicated polarity.
- Replace the batteries when the low power indicator 6 appears on the display.
Always replace both batteries at the same time.
Adjusting Display Mode and Brightness
Display Mode
When the device is switched on, shortly press the ON/OFF button to switch to another display mode to select your desired display mode. There are 6 different display modes. The default setting is mode 1.
Brightness
Press and hold the ON/OFF button for longer than one second to adjust the brightness of the device. The display will show «Br 1-10». There are 10 levels of brightness. The default setting is level 4.
Using the Lanyard
- Thread the thinner end of the lanyard through the hanging hole at the rear end of the device.
- Thread the thicker end of the lanyard through the threaded end before pulling it tightly.
Malfunctions and Actions to take
| Description | Symptom/Possible causes | Solutions |
| SpO2 or pulse rate do not display normally. |
|
|
| SpO2 or pulse rate is shown unstable. |
|
|
| The device cannot be powered on. |
|
|
| The display suddenly switches off. |
|
|
| «Error 3» | The red emission LED is damaged. | Check the red emission LED. |
| «Error 4» | The infrared emission LED is damaged. | Check the infrared emission LED. |
| «Error 6» | The screen has failed. | Contact your local Microlife-Customer Service. |
| «Error 7» | The emission LED or reception diode is damaged. | Contact your local Microlife-Customer Service. |
Cleaning and Disinfecting
Use an alcohol swab or cotton tissue moistened with alcohol (70% Isopropyl) to clean the silicone that touches the finger inside of the device. Also clean the finger being tested using alcohol before and after each test. Allow the device to dry thoroughly before use.
Never use abrasive cleaning agents, thinners or benzene for cleaning and never immerse the device in water or other cleaning liquids.
Technical Specifications
Type: Fingertip Pulse Oximeter OXY 300
Display: OLED display
SpO2:
Measurement range: 70 ~ 100 %
Accuracy: 70 ~ 100%: ±2 %
Resolution: 1 %
Pulse rate:
Measurement range: 30 ~ 250 bpm
Accuracy: 30 ~ 99 bpm: ±2 bpm; 100 ~ 250 bpm: ±2 %
Resolution: 1 bpm
Operating conditions: 5 - 40°C / 41 - 104°F, ≤ 80% relative maximum humidity
Storage conditions: -20 - +55°C / -4 - +131°F, ≤ 93% relative maximum humidity
Automatic switch-off: Automatically shut down in 8 seconds, when no or low signal is detected.
Battery: 2 x 1.5 V alkaline batteries; size AAA
Battery lifetime: approx. 30 hours (using new batteries)
Weight: 56 g (including batteries)
Dimensions: 58 x 32 x 34 mm
IP Class: IPX1
Reference to standards: EN ISO10993-1/-5/-10; IEC 60601-1; EN 60601-1-2; EN ISO9919; EN 62304; EN 60601-1-6; CE0123
Expected service life: 5 years (when used 15 times/day; 20 minutes for each measurement)
Technical alterations reserved.

Beijing Choice Electronic Technology Co., Ltd.
Room 4104, No. A12, Yuquan Road, Haidian District,
100143 Beijing, People's Republic of China
Europe / Middle-East / Africa
Microlife AG
Espenstrasse 139
Tel. +41 / 71 727 70 30 Fax +41 / 71 727 70 39
Email admin@microlife.ch
www.microlife.com

VideosFingertip Pulse Oximeter microlife OXY 300 Review Video
Documents / Resources
References
Download manual
Here you can download full pdf version of manual, it may contain additional safety instructions, warranty information, FCC rules, etc.
Advertisement


Need help?
Do you have a question about the OXY 300 and is the answer not in the manual?
Questions and answers