Advertisement
Quick Links
471688
jl.avfgroup.com
rev00
JML8651
Please read these instructions thoroughly
before installation.
55kg
120lb
If you have any questions or need
spare parts don't worry, we're happy to help.
0333 320 0463
CUSTOMER SERVICES HELPLINE NUMBER:
AVF Group Ltd. Hortonwood 30, Telford, Shropshire, TF1 7YE, England
Advertisement

Related Manuals for AVF JML8651


Summary of Contents for AVF JML8651
- Page 1 Please read these instructions thoroughly before installation. 55kg 120lb If you have any questions or need spare parts don’t worry, we’re happy to help. 0333 320 0463 CUSTOMER SERVICES HELPLINE NUMBER: AVF Group Ltd. Hortonwood 30, Telford, Shropshire, TF1 7YE, England...
-
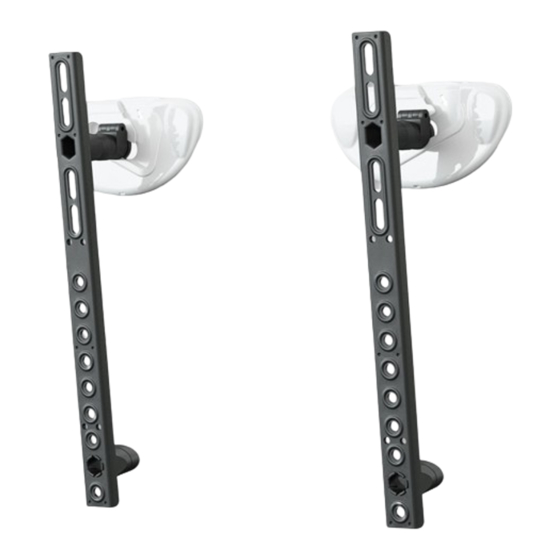
Page 2: Assembly Overview
TV in the future. Fitting the Wall Brackets The JML8651 is suitable for attaching to plasterboard, wood and metal stud, brick, dot and dab, concrete, or any combination of these wall types. Establish which wall type you are mounting to and follow the corresponding steps. - Page 3 It is the responsibility of the installer to ensure that the mounting wall is of a suitable standard and void of any services (eg gas, electricity, water etc). AVF accept no responsibility for any damage or loss caused by installing this product in a substandard wall.
- Page 4 You Will Need Ø5.5mm (7/32”) Masonry Ø10mm (25/64”) Masonry Ø3.5mm (9/64”) Metal Stud Finder Ø3mm (1/8”) Wood Boxed Parts...
- Page 6 TV Screws, Reducers and Spacers M4’s M6’s M8’s 55mm 40mm 20mm...
- Page 7 Measure the TV fixing holes Width and Height 200mm to infinity 100mm to infinity If width is less than 200mm or height less than 100mm STOP installation now and contact the customer helpline. Determine which diameter TV Screws fit your TV and put them to one side. M4, M6 or M8 We will select the correct length later.
- Page 8 Prepare Tilt Brackets - Skip this step if mounting Flat to Wall You can choose between two different fixed tilt positions, either 8° or 4°. 8° Tilt Ensure a flush fit between tilt bracket W and spacer X by lining up the notch and pip correctly. Notch Use your fingertip to hold nut V...
- Page 9 4° Tilt Use your fingertip to hold nut V steady while you tighten screw V Make sure Screen Hangers and C are fully closed after assembly is complete. Check to see if your TV will clash with the wall. If a clash occurs it will be necessary to add E spacers to prevent this.
- Page 10 Fit Screen Hangers to TV - Flat to Wall Option Select the correct length TV screw. If required You may need to use Spacers E1 or E2 if the screws are too long or the back of your TV is not flat. You can also use longer screws and the spacers to help avoid cabling or plug sockets on your wall.
- Page 11 Fit Tilt Brackets to TV - 4° or 8° Fixed Tilt Option Select the correct length TV screw. If required You may need to use Spacers E1 or E2 if the screws are too long or the back of your TV is not flat. You can also use longer screws and the spacers to help avoid cabling or plug sockets on your wall.
- Page 12 Marking Wall for Drill Points Assemble the Positioning Template. Determine Bracket Holes Centres. Lay the template on the back of the TV and follow the instructions below. Place the top row of holes on template U1 over hangers C. Mark off the top fixing centres. The centre line of the template U2 represents the centre of your TV.
- Page 13 Marking the Wall. Before marking the wall, determine the wall type that you have (i.e. Solid Wall/ Dot & Dab/Plasterboard/Wood Stud/Metal Stud). Ensure the drilling area is free from mains services (Gas/Electric/Water). Represents the top of your TV. Use your template to mark two points on the wall that correspond with the top Represents the...
-
Page 14: Fitting The Wall Brackets
Fitting the Wall Brackets Remove the Wall Bracket Covers. Wall Bracket Covers A and B are removed in the same way. Take care... -
Page 15: Solid Wall
This product is designed to be fitted to many different types of wall. Identify your wall type and follow the relevant instruction. Make sure you use the correct fixings for your wall. Solid Wall 10mm (25/64") 75mm (3") 5.5mm (7/32") 40mm (1 ") 9/16... - Page 16 Dot and Dab 10mm (25/64") 108mm (4 ") Remove Dust from Holes. 40mm (1 ") 9/16 MAX gap. If gap is above 40mm (1 ") use 9/16 plasterboard fixing method. If you have trouble fitting P you can drill a 3mm pilot hole. Self drilling Lubricate screw thread with soap.
- Page 17 Plasterboard 18mm (3/4") Remove Dust from Holes. 40mm (1 ") 9/16 MAX gap. If you have trouble fitting P you can drill a 3mm pilot hole. Self drilling Lubricate screw thread with soap. DO NOT overtighten screws. Tighten screws by hand only...
- Page 18 Wood Stud 18mm (3/4") (1/8") 75mm (3") Ensure hole is in the middle of the wood stud. Use Plasterboard fixing H Only one fixing will be in the wood stud. The other fixings will be in plasterboard (see Plasterboard installation instruction).
- Page 19 Metal Stud 18mm (3/4") 3.5mm (9/64") Use Plasterboard fixing H Only one fixing will be in the metal stud. The other fixings will be in plasterboard (see Plasterboard installation instruction). If you have trouble fitting P Self drilling you can drill a 3mm pilot hole. DO NOT overtighten screws.
- Page 20 Replace the Wall Bracket Covers. On the Wall Bracket Covers A and B there are three retaining tabs. These locate onto three retaining lips on the Wall Brackets A and B and lock the Wall Bracket Covers in position. Retaining lip Retaining lip Retaining tab Retaining tab...
- Page 21 Hanging the TV The procedure for hanging the TV is exactly the same for Flat to Wall or either Tilt option. Make sure Screen Hangers and C are fully closed before hanging the TV. Line must be horizontal before attempting to hang the TV.
- Page 22 Present Hangers C and C (on the back of the TV) to the opening on Brackets A and B. Slide down and across into place. Ensure both Hangers are fully engaged. If cables from the TV prevent the TV resting against the wall then an alternative Hanger configuration will be required (see Section 3).
- Page 23 View “through” TV from the front. DO NOT release TV until it is secure and level. Removing the TV To remove the TV reverse the movements as shown above.
-
Page 24: Cable Access
Removing the Wall Bracket Covers Should you want to remove the Wall Bracket Covers please follow the steps below. Keep screwdriver level as you pull downwards Take care Cable Access For easy cable access, gently pull the bottom of the TV away from the wall using two hands. Hold the TV in position while accessing cables.
Need help?
Do you have a question about the JML8651 and is the answer not in the manual?
Questions and answers