Oki LP-1040 Installation Manual
Wide format printer
Hide thumbs
Also See for LP-1040:
- User manual (290 pages) ,
- Quick reference manual (32 pages) ,
- Maintenance manual (746 pages)

Subscribe to Our Youtube Channel
Related Manuals for Oki LP-1040


Summary of Contents for Oki LP-1040
- Page 1 OKI Data Infotech Corporation CONFIDENTIAL LP-1040/LP1040-MF Wide Format Printer Installation Manual U10000141200...
- Page 2 OKI Data Infotech Corporation CONFIDENTIAL U10000141200 August, 2016 Initial publication Copyright© 2016 OKI Data Infotech Corporation. All rights reserved. The contents of this manual may be changed without prior notice.
- Page 3 Preface This LP-1040/LP-1040-MF Wide Format Printer Installation Manual (hereinafter referred to as this manual) applies to the LP-1040 (hereinafter referred to as Basic Printer Model) and LP-1040-MF (hereinafter referred to as Multifunction Printer Model) Wide Format Printers. The LP-1040 printer model may not be sold in some countries or regions.
- Page 4 OKI Data Infotech Corporation CONFIDENTIAL Preface Safety precautions Warning Do not touch areas labeled HIGH TEMPERATURE inside the printer (such as the fuser unit). Burn injuries may result. Do not disassemble the Printer further than stipulated in this manual.
- Page 5 OKI Data Infotech Corporation CONFIDENTIAL Preface Warning labels Warning labels are affixed to the Printer in the locations shown in the figure below. Before performing inspections or maintenance, carefully read and understand the contents of warning labels. HIGH TEMPERATURE warning label A...
- Page 6 OKI Data Infotech Corporation CONFIDENTIAL Preface (1) High Temperature Warning Label This label warns against touching heated parts. The fuser unit can become very hot. Be careful not to touch this area when removing a paper jam or performing any other work in this area.
- Page 7 OKI Data Infotech Corporation CONFIDENTIAL Preface Hardware installation precautions Observe the following points when performing hardware installation. 1. Sudden changes in temperature cause condensation inside the Printer and damage it. When there is a large difference between the temperature of the installation location and the outdoor temperature, such as in the winter, do not immediately open the packaging.
-
Page 8: Table Of Contents
OKI Data Infotech Corporation CONFIDENTIAL Table of contents Chapter 1 Installation procedure overview Procedure and required personnel ............... 1-1 Tools ......................1-2 Printer appearance and part names ............. 1-3 Chapter 2 Site preparation check Installation environment ................2-1 Installation surface ..................2-3 Installation space .................. - Page 9 OKI Data Infotech Corporation CONFIDENTIAL Table of contents 3.4.10 Attach the original output guide (Multifunction Printer Model only) ........3-26 3.4.11 Connect the power cord ....................3-26 3.4.12 Power on the Printer / Supply the toner................3-27 Chapter 4 Prepare the Printer...
- Page 10 OKI Data Infotech Corporation CONFIDENTIAL Table of contents Appendix A List of functions Functions ..................... A-1 Appendix B Factory default settings Factory default settings ................B-1 Appendix C Frequently asked questions (FAQ) Table of contents-3...
-
Page 11: Installation Procedure Overview
OKI Data Infotech Corporation CONFIDENTIAL Chapter 1 Installation procedure overview Procedure and required personnel Table 1-1 shows the procedures and number of persons/people/workers required to install the Printer. Table 1-1 Installation procedure overview Procedure Description Personnel Reference Transfer to the unpacking Transfer the packed box to the Section 3.1... -
Page 12: Tools
OKI Data Infotech Corporation CONFIDENTIAL Chapter 1 Installation procedure overview Tools Table 1-2 is a list of tools required for hardware installation. Table 1-2 Required tools Name Notes Phillips screwdriver JIS B 4633 (No.2) Flat head screwdriver JIS B 4609 (45x50) -
Page 13: Printer Appearance And Part Names
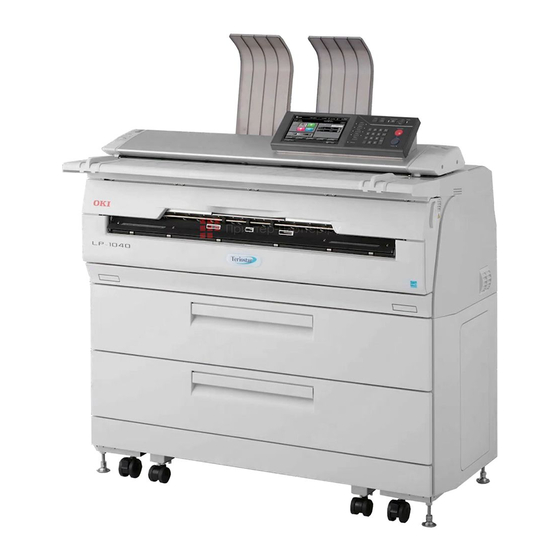
OKI Data Infotech Corporation CONFIDENTIAL Chapter 1 Installation procedure overview Printer appearance and part names Figure 1.1 and 1.2 show the Printer appearance and part names. (1) Operation panel (8) Drawer for roll 1 (2) Scanner cover (9) Outlet slot... - Page 14 OKI Data Infotech Corporation CONFIDENTIAL Chapter 1 Installation procedure overview (1) Toner door (2) Heater switch (3) Main power switch (4) Power cord (5) Rear door (6) Original output guide (7) Top cover Figure 1.2 Printer appearance and part names (rear)
-
Page 15: Chapter 2 Site Preparation Check
OKI Data Infotech Corporation CONFIDENTIAL Chapter 2 Site preparation check Before the installation, be sure to confirm the environmental conditions of the installation location of the Printer. Accordingly, before the Printer is delivered to the customer’s site, you are recommended to inspect the proposed installation location preliminarily based on the points listed below. - Page 16 OKI Data Infotech Corporation CONFIDENTIAL Chapter 2 Site preparation check Figure 2.1 Temperature and humidity range during operation (2) Avoid continuous mechanical vibration. (3) Keep the air clean. In particular, avoid dusty areas. (4) Avoid direct sunlight. Note that the sunlight direction may change depending on the time of the day.
-
Page 17: Installation Surface
OKI Data Infotech Corporation CONFIDENTIAL Chapter 2 Site preparation check Installation surface The conditions for the installation surface are listed below. (1) Install on a flat surface. A flat surface is required to: - Maintain equal load on casters; and - Keep the Printer level. -
Page 18: Installation Space
OKI Data Infotech Corporation CONFIDENTIAL Chapter 2 Site preparation check Installation space Before installing the Printer, secure the space required for: - Regular operation; and - Maintenance and inspection. Figure 2.3 shows the installation/maintenance space. Figure 2.3 Installation and maintenance space... -
Page 19: Electrical Configuration
OKI Data Infotech Corporation CONFIDENTIAL Chapter 2 Site preparation check Electrical configuration The electrical configuration to connect the Printer's power cord is shown below. (1) Power specifications The power specifications of the printer are shown below. Confirm that the primary-side power also satisfy these specifications. - Page 20 OKI Data Infotech Corporation CONFIDENTIAL Chapter 2 Site preparation check (2) AC outlet The AC outlet must be within 3 m of the rear of the Printer, as the length of the power cable is 3 Figure 2.4 shows the shape and polarity of the AC outlet.
-
Page 21: Receive The Shipment And Set Up The Printer In The Final Position
OKI Data Infotech Corporation CONFIDENTIAL Chapter 3 Receive the shipment and set up the Printer in the final position Install the Printer delivered from the factory following the procedure below. (1) Move the Printer to the unpacking location (2) Remove the crate packaging... -
Page 22: Move To The Unpacking Location
OKI Data Infotech Corporation CONFIDENTIAL Chapter 4 Prepare the Printer Move to the unpacking location 3.1.1 Select the unpacking location Select the unpacking location based on the requirements below. (1) To shorten the moving distance after unpacking, choose a unpacking location that is as close as possible to the final position. -
Page 23: Move The Printer
OKI Data Infotech Corporation CONFIDENTIAL Chapter 3 Receive the shipment and set up the Printer in the final position 3.1.2 Move the Printer (1) Inspect the transfer route Inspect the transfer route ahead of time and confirm that no obstacles are found on the route. -
Page 24: Unpack
OKI Data Infotech Corporation CONFIDENTIAL Chapter 4 Prepare the Printer Unpack After unloading and moving, remove the Printer from the box and check the contents. 3.2.1 Unpacking procedure Remove the packing list on the left side of the Printer box. - Page 25 OKI Data Infotech Corporation CONFIDENTIAL Chapter 3 Receive the shipment and set up the Printer in the final position Raise and remove the top panel and sleeve. With a cutter, cut the tape at the four positions on the corners of the pallet.
- Page 26 OKI Data Infotech Corporation CONFIDENTIAL Chapter 4 Prepare the Printer Remove the Printer wrapping bag. Front side of the Printer Remove the four brackets with four screws each. Rear side of the Printer Bracket for the rear of the Printer...
- Page 27 OKI Data Infotech Corporation CONFIDENTIAL Chapter 3 Receive the shipment and set up the Printer in the final position Remove the three pedestals. Raise the adjustable leveling feet. Set ramps as the left photo shows. Then slowly move the Printer over the ramps.
-
Page 28: Unpacking Post-Check
OKI Data Infotech Corporation CONFIDENTIAL Chapter 4 Prepare the Printer 3.2.2 Unpacking post-check After unpacking and cleaning up the unneeded packing and waste material, check the following. (1) Check packaged items With the packing list, check the items removed during unpacking, and ensure that no item is missing. -
Page 29: Move To The Final Position
OKI Data Infotech Corporation CONFIDENTIAL Chapter 3 Receive the shipment and set up the Printer in the final position Move to the final position After unpacking, when you move the Printer to another position, use a dolly or the Printer's casters. -
Page 30: Hardware Installation
OKI Data Infotech Corporation CONFIDENTIAL Chapter 4 Prepare the Printer Hardware installation After moving the Printer to the final position specified by the user, perform the following procedure to install the Printer. Before starting work, refer to the sections required to meet the specifications of the user site. -
Page 31: Adjusting Leveling Feet
OKI Data Infotech Corporation CONFIDENTIAL Chapter 3 Receive the shipment and set up the Printer in the final position 3.4.2 Adjusting leveling feet Adjust the height of the four leveling feet with the procedure below. Turn the nuts to lower the four adjustable leveling feet until the four casters are about 1 mm off the floor. -
Page 32: Remove Any Shock Absorption Materials And Stabilizers
OKI Data Infotech Corporation CONFIDENTIAL Chapter 4 Prepare the Printer 3.4.3 Remove any shock absorption materials and stabilizers Remove the packing tape. Remove the flanges below. Drawer for rolls 1: Two flanges Drawer for rolls 2: Two flanges 3-12... - Page 33 OKI Data Infotech Corporation CONFIDENTIAL Chapter 3 Receive the shipment and set up the Printer in the final position Open the fuser unit drawer. Then install the bearings and pins on the fuser unit roller's right and left. The bearings and pins are supplied in the drawer for rolls 1.
- Page 34 OKI Data Infotech Corporation CONFIDENTIAL Chapter 4 Prepare the Printer Remove the right and left L-shaped metal plates with one screw and one knob for each. Remove the orange tapes fixing the levers to position the transfer/detack corotron. Note that the levers are fixed with the tape at the right and left part in the Printer.
-
Page 35: Remove The Panel Protective Sheet
OKI Data Infotech Corporation CONFIDENTIAL Chapter 3 Receive the shipment and set up the Printer in the final position 3.4.4 Remove the panel protective sheet Remove the protective sheet attached to the surface of the panel. 3-15... -
Page 36: Release The Led Head And Developer Unit
OKI Data Infotech Corporation CONFIDENTIAL Chapter 4 Prepare the Printer 3.4.5 Release the LED head and developer unit Open the toner cover and remove the dummy toner cartridge. Remove the top cover with four screws. Caution Before removing the top cover, slightly raise its rear. - Page 37 OKI Data Infotech Corporation CONFIDENTIAL Chapter 3 Receive the shipment and set up the Printer in the final position Loosen the two screws for each of the right and left fixing metal plates. Then slide them outward. Fixing metal plates Tighten the two screws loosened above for each metal plates.
-
Page 38: Attach The Transfer/Detach Corotron
OKI Data Infotech Corporation CONFIDENTIAL Chapter 4 Prepare the Printer 3.4.6 Attach the transfer/detach corotron Remove the transfer/detach corotron from the box, and remove the metal plates with two screws each attached to the transfer/detach corotron's right and left. Install the transfer/detach corotron to the Printer so that the two below match. - Page 39 OKI Data Infotech Corporation CONFIDENTIAL Chapter 3 Receive the shipment and set up the Printer in the final position Tighten the right and left knobs. Attach the arms to the bearings. Pull the arms a little to the side and attach them from the outside.
-
Page 40: Attach The Process Cartridge
OKI Data Infotech Corporation CONFIDENTIAL Chapter 4 Prepare the Printer 3.4.7 Attach the process cartridge Attach the process cartridge. For more details, see step 6 and later in 8.7 Replacing the process cartridge. 3.4.8 Attach the electrical box access cover Open the fuser unit drawer. -
Page 41: Attach The Document Table (Multifunction Printer Model Only)
OKI Data Infotech Corporation CONFIDENTIAL Chapter 3 Receive the shipment and set up the Printer in the final position 3.4.9 Attach the document table (Multifunction Printer Model only) Required tools Phillips screwdriver (#2) x1 - Between 150 mm (5.91 inches) and 210 mm (8.27 inches) in length... - Page 42 OKI Data Infotech Corporation CONFIDENTIAL Chapter 4 Prepare the Printer Prevent the screws from falling To prevent the screws from falling inside the Printer, place a sheet of paper or cloth under the document table installation part, as shown in the figure below.
- Page 43 OKI Data Infotech Corporation CONFIDENTIAL Chapter 3 Receive the shipment and set up the Printer in the final position Attach the document table Hook the U-shaped grooves of the document table to the screws attached previously. Tilt the document table a little toward you to hook them easily.
- Page 44 OKI Data Infotech Corporation CONFIDENTIAL Chapter 4 Prepare the Printer Align the screw holes in the middle and secure with a screw (Hexagon plus socket head TP machine screw). As above, loosen the screw one turn. Align the screw holes in the second position...
- Page 45 OKI Data Infotech Corporation CONFIDENTIAL Chapter 3 Receive the shipment and set up the Printer in the final position Align the screw holes in the third position from the left and secure with a screw (Hexagon plus socket head TP machine screw).
-
Page 46: Attach The Original Output Guide (Multifunction Printer Model Only)
OKI Data Infotech Corporation CONFIDENTIAL Chapter 4 Prepare the Printer 3.4.10 Attach the original output guide (Multifunction Printer Model only) Attach the two original output guides. 3.4.11 Connect the power cord Connect the power cord at the rear of the Printer to the AC outlet. -
Page 47: Power On The Printer / Supply The Toner
OKI Data Infotech Corporation CONFIDENTIAL Chapter 3 Receive the shipment and set up the Printer in the final position 3.4.12 Power on the Printer / Supply the toner The Printer has two power switches. The main power switch is on the bottom left when viewed from behind the Printer, and the POWER button is on the operation panel. - Page 48 OKI Data Infotech Corporation CONFIDENTIAL Chapter 4 Prepare the Printer Turn on the main power switch on the bottom left when viewed from behind the Printer. After ensuring that the main power switch is on, press POWER on the Printer's operation panel.
- Page 49 OKI Data Infotech Corporation CONFIDENTIAL Chapter 3 Receive the shipment and set up the Printer in the final position Enter the date and time. Press Next. Enter the IP address and the subnet mask. Press Restart. Caution It takes a few seconds for the restart to to be initiated.
-
Page 50: Chapter 4 Prepare The Printer
OKI Data Infotech Corporation CONFIDENTIAL Chapter 4 Prepare the Printer After installing the Printer, installing options, and supplying consumables, set up the Printer's parameters to meet the user's operating conditions. Change the original parameter settings, that is the factory default settings, only at the user's request. - Page 51 OKI Data Infotech Corporation CONFIDENTIAL Chapter 4 Prepare the Printer To enable the parameter setting operation, press MENU on the operation panel. To set the menu for the maintenance personnel, enter the password, as the menu is not opened to the users.
- Page 52 OKI Data Infotech Corporation CONFIDENTIAL Chapter 3 Receive the shipment and set up the Printer in the final position The following operations are the same as the operations on the user menu. After completing the settings, press Enter to return to the standby condition. Maintenance mode is automatically exited.
-
Page 53: Confirm The Printer Operation Without Connecting To A Computer
OKI Data Infotech Corporation CONFIDENTIAL Chapter 5 Confirm the Printer operation without connecting to a computer After completing set up and putting the Printer in the printable state, check the Printer operation without connecting to a computer. - Print System Settings... -
Page 54: Chapter 6 Connecting The Interface Cables
OKI Data Infotech Corporation CONFIDENTIAL Chapter 6 Connecting the interface cables After confirming operation by setting up the Printer and by printing the setup list offline, connect the interface cables. Cautions Before connecting or removing the interface cables, always turn off the power of the Printer and... -
Page 55: Configuration
OKI Data Infotech Corporation CONFIDENTIAL Chapter 6 Connecting the interface cables Configuration Figure 6.1 shows the configuration of the system connection available with the Printer. Port 10 Port 9 The Ethernet interface has 10 logical ports and can simultaneously communicate with up to 10 computers. -
Page 56: Interface Cables
OKI Data Infotech Corporation CONFIDENTIAL Chapter 6 Connecting the interface cables Interface cables The following interface cable may be necessary depending on the usage conditions of the Printer interface. - Ethernet interface: Ethernet cable (category 5e or higher) The user must acquire a cable that meets the specifications of the connecting computer. -
Page 57: Connection Method
OKI Data Infotech Corporation CONFIDENTIAL Chapter 6 Connecting the interface cables Connection method Cautions Before connecting or removing the interface cables, always turn off the power of the Printer and connected devices. Using an interface cable, connect the interface connectors at the lower right of the rear side of the Printer and the corresponding connector on the connecting computer. -
Page 58: Chapter 7 Confirm System-Wide Operation And Complete The Hardware Installation
OKI Data Infotech Corporation CONFIDENTIAL Chapter 7 Confirm system-wide operation and complete the hardware installation After connecting the Printer and computer with an interface cable, check the entire system operation and ensure the Printer's installation conditions. -
Page 59: Confirm System-Wide Operation
OKI Data Infotech Corporation CONFIDENTIAL Chapter 7 Confirm system-wide operation and complete the hardware installation Confirm system-wide operation Check the entire system operation following the procedure below. (1) Turn on the power of the Printer. The panel displays the standby screen. -
Page 60: Ensure The Printer's Installation Conditions
OKI Data Infotech Corporation CONFIDENTIAL Chapter 7 Confirm system-wide operation and complete the hardware installation Ensure the Printer's installation conditions After confirming normal operation of the Printer, recheck the Printer's installation conditions below to complete the hardware installation. (1) Check that the cables are connected securely and placed out of the way. -
Page 61: Chapter 8 Handover
OKI Data Infotech Corporation CONFIDENTIAL Chapter 8 Handover After hardware installation is complete, perform the contents of this chapter while describing it to the user. See Appendix C, which contains a list of frequently asked questions (FAQ). Using this chapter The following icons used in this chapter indicate the description method to the user. -
Page 62: Turning The Power On And Off
OKI Data Infotech Corporation CONFIDENTIAL Chapter 8 Handover Turning the power on and off The warm-up time is approximately 240 seconds. Turning On the power (1) Set the main power switch to on. The switch is located at the bottom right when viewing the printer from the rear. -
Page 63: Mode Buttons
OKI Data Infotech Corporation CONFIDENTIAL Chapter 8 Handover Mode buttons The mode buttons correspond to each mode operations. ● COPY button Switches to copy mode and the green lamp to the left of the button lights up. For more details, see User’s Manual for... -
Page 64: Replace Paper
OKI Data Infotech Corporation CONFIDENTIAL Chapter 8 Handover Replace paper To prevent the flanges from breaking, carefully place the flanges on the ground. To prevent the flanges from splitting, avoid tightening the flanges too strongly. Open the drawers for rolls 1 and 2. - Page 65 OKI Data Infotech Corporation CONFIDENTIAL Chapter 8 Handover Insert the ends of the paper flange into the roll paper tube fully, and then turn the knobs to CLOSE to secure them. Move the flange guides. Move the flange guides to meet the size of the roll paper.
- Page 66 OKI Data Infotech Corporation CONFIDENTIAL Chapter 8 Handover Insert the end of the roll paper inside the paper inlet. Turn the paper feed knob and feed the roll paper so that its top protrude from the Printer by approximately 60 cm.
- Page 67 OKI Data Infotech Corporation CONFIDENTIAL Chapter 8 Handover Close the roll paper drawer.
-
Page 68: Supply Toner
OKI Data Infotech Corporation CONFIDENTIAL Chapter 8 Handover Supply toner Show the icon that indicates that the toner has run out before supplying the toner. Open the toner door. Remove the empty toner cartridge. - Page 69 OKI Data Infotech Corporation CONFIDENTIAL Chapter 8 Handover Remove the new toner cartridge from its packaging. Shake the new toner cartridge to mix the toner inside. Shake it up, down, right, and left ten times each. Set the toner cartridge in the Printer.
- Page 70 OKI Data Infotech Corporation CONFIDENTIAL Chapter 8 Handover Pull off the green tape. The toner will spill if the tape is removed before step 7. Also tell the user that there may be some toner on the tape that has been removed.
-
Page 71: Replace The Waste Toner Bottle
OKI Data Infotech Corporation CONFIDENTIAL Chapter 8 Handover Replace the waste toner bottle The waste toner bottle is set on the right side of the Printer. Push and open the waste toner door. Tap the duct 10 times to drop the toner inside the duct. - Page 72 OKI Data Infotech Corporation CONFIDENTIAL Chapter 8 Handover Remove the waste toner bottle from the Printer. Remove the new waste toner bottle from its packaging. Attach the cap of the new waste toner bottle on to the waste toner bottle containing the waste toner.
- Page 73 OKI Data Infotech Corporation CONFIDENTIAL Chapter 8 Handover Close the waste toner door. 8-13...
-
Page 74: Replace The Process Cartridge
OKI Data Infotech Corporation CONFIDENTIAL Chapter 8 Handover Replace the process cartridge Replace the process cartridge when the printouts become dirty. Press the POWER button on the operation panel for more than 1 second to turn off the power. Put the document table in the vertical position. - Page 75 OKI Data Infotech Corporation CONFIDENTIAL Chapter 8 Handover Three knobs are classified into two: - Outer-side knobs to secure the process cartridge drawer; and - Inner-side knob to secure the cleaner blade. Grab the green portion and pull out parallel to the ground.
- Page 76 OKI Data Infotech Corporation CONFIDENTIAL Chapter 8 Handover Remove the new process cartridge with the protective case attached from its packaging. Attach the new process cartridge. With the protective case still attached, install the cartridge so that its green label matches the Printer's green label.
- Page 77 OKI Data Infotech Corporation CONFIDENTIAL Chapter 8 Handover With rotating the knob at the center to remove it, release the fixed cleaner blade. Close the process cartridge drawer. Turn the outer-side knobs to secure the process cartridge. Replace the filters.
- Page 78 OKI Data Infotech Corporation CONFIDENTIAL Chapter 8 Handover Replace the small filters installed at both ends of the fuser unit drawer. (1) Turn the knob to remove the cover. (2) Replace the small filter inside. (3) Attach the cover. (4) Replace the small filter on the other side following the same procedure.
- Page 79 OKI Data Infotech Corporation CONFIDENTIAL Chapter 8 Handover Return the document table to its original position. Replace the large filter. (1) Pull forward and remove the filter cover on the left side of the Printer. (2) Replace the large filter inside.
-
Page 80: Remove Paper Jams
OKI Data Infotech Corporation CONFIDENTIAL Chapter 8 Handover Remove paper jams The location of the paper jam is displayed on the operation panel. A paper is jammed at the roll paper drawer. Open and close the appropriate door. A paper is jammed at the front door. - Page 81 OKI Data Infotech Corporation CONFIDENTIAL Chapter 8 Handover A paper is jammed at the fuser unit. Open and close the appropriate door. A paper is jammed at the rear door and roll paper drawer. Open and close the appropriate doors.
-
Page 82: Copy
OKI Data Infotech Corporation CONFIDENTIAL Chapter 8 Handover The original is jammed. Open and close the scanner cover. Copy Press the COPY button on the operation panel. Load the original. With the copy side down, load the original in the center. -
Page 83: Scan
OKI Data Infotech Corporation CONFIDENTIAL Chapter 8 Handover 8.10 Scan Double-click TerioStation. Click the Scan tab. Click Save folder. Select the destination folder to save the scan data. Click OK. 8-23... - Page 84 OKI Data Infotech Corporation CONFIDENTIAL Chapter 8 Handover Click Scan. Click Preferences. Input the Printer IP address in the Assign host name/IP address field. Click OK. 8-24...
- Page 85 OKI Data Infotech Corporation CONFIDENTIAL Chapter 8 Handover Set the scan conditions, and then click Scan. Load the original. 8-25...
-
Page 86: Web Operations
OKI Data Infotech Corporation CONFIDENTIAL Chapter 8 Handover 8.11 Web operations Start the web browser. Enter the IP address specified in the Printer in the address field as follows, http://(IP address set for the printer) and press the enter button on the computer. -
Page 87: Appendix A List Of Functions
Prints all the system settings, PDL settings, copy settings, and submission settings. Print for Fax Transmission Prints the maintenance information (total number of printed pages, etc.) so that the customer can send it to OKI Data Infotech by fax. Print Error Log Prints the error log information. -
Page 88: Appendix B Factory Default Settings
OKI Data Infotech Corporation CONFIDENTIAL Appendix B Factory default settings Factory default settings The factory default settings are listed in the message tree in the User's Manual for Basic Printer Operation. -
Page 89: Appendix C Frequently Asked Questions (Faq
OKI Data Infotech Corporation CONFIDENTIAL Appendix C Frequently asked questions (FAQ) Printer How long is the warm-up time? Within 240 seconds. How can I shorten the warm-up time? This is not possible. How do I stop the output of large amounts of Use the web functions. - Page 90 OKI Data Infotech Corporation CONFIDENTIAL Appendix C Frequently asked questions (FAQ) Toner What is the content of the toner cartridge? 450 g (15.87oz) With one toner bottle at the print rate of 6%, For A0, approximately 330. how many sheets can be printed? * The consumption of toner depends on the printout size.
- Page 91 OKI Data Infotech Corporation CONFIDENTIAL Appendix C Frequently asked questions (FAQ) Scanner What are the limits for paper thickness, width, Thickness: 0.05 to 0.2 mm (0.002 to 0.008 length, and flexibility for scanned originals? inches) Width: 182 to 914 mm (7.17 to 36 inches) Length: 210 to 10000 mm (8.27 to 393.70 inches)
Need help?
Do you have a question about the LP-1040 and is the answer not in the manual?
Questions and answers