
Related Manuals for Kleenmaid cooking CCTB6020


Summary of Contents for Kleenmaid cooking CCTB6020
- Page 1 cooking collection Instructions for use and warranty details To register your warranty or make a warranty claim, scan this QR code: Ceramic Cooktop Model No.: CCTB6020...
- Page 2 Once installation is complete, please read this instruction manual carefully and get to know the controls and the features of your new Kleenmaid appliance. These simple instructions will enable you to achieve excellent results from the very first time you use it.
-
Page 3: Table Of Contents
Content Safety Warnings ......................... 4 Installation ........................4 Electrical Shock Hazard ................4 Cut Hazard ....................4 Important safety instructions ............... 4 Operation and maintenance ..................5 Electrical Shock Hazard ................5 Health Hazard ....................5 Hot Surface Hazard .................. 5 Cut Hazard .................... -
Page 4: Safety Warnings
NOTE: Before making preparations for or commencing installation, the installer should refer to the current online version of the User Manual, which is available on the Kleenmaid website (see back cover for details). Installation Warnings Electrical Shock Hazard •... -
Page 5: Operation And Maintenance
isolating switch providing full disconnection from the power supply. • Failure to install the appliance correctly could invalidate any warranty or liability claims. Operation and Maintenance Warnings Electrical Shock Hazard • Do not cook on a broken or cracked cooktop. If the cooktop surface should break or crack, switch the appliance off immediately at the mains power supply (wall switch) and contact a qualified technician. -
Page 6: Important Safety Instructions
Important safety instructions • Never leave the appliance unattended when in use. Pots left to boil over cause smoking and greasy spillovers that may ignite. • Never use your appliance as a work or storage surface. • Never leave any objects or utensils on the appliance. •... - Page 7 •CAUTION: The cooking process has to be supervised. A short term cooking process has to be supervised continuously. •This appliance is intended to be used in household and similar applications such as: -staff kitchen areas in shops, offices and other working environments; -farm houses;...
-
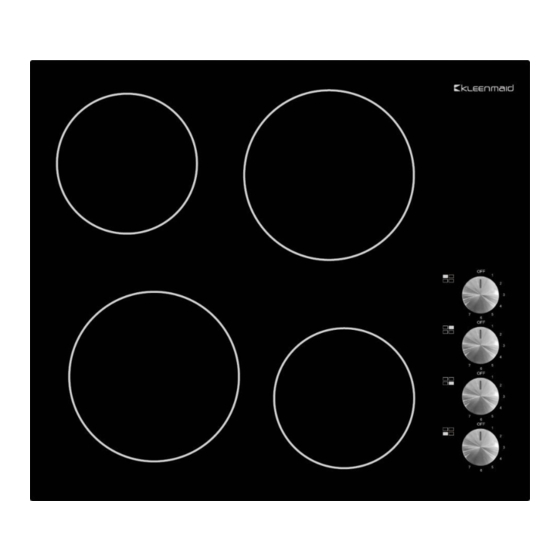
Page 8: Product Overview
Product Overview Top View 1. max. 200mm 1800 W zone 2. max. 165mm 1200 W zone 3. max. 200mm 1800 W zone 4. max. 165mm 1200 W zone 5. Glass plate 6. Control panel Control Panel 1. Cooking zone indicator Power level display 3. -
Page 9: Before Using Your New Ceramic Cooktop
Before using your New Ceramic Cooktop • When unpacking the cooktop please ensure that all contents of the carton are removed prior to disposing of the packaging. These articles should be retained for the installer. Contents include: - 1 x Ceramic Cooktop - 1 x User Manual - 4 x Brackets - 4 x Screws... -
Page 10: Choosing The Right Cookware
Choosing the right Cookware A ceramic cooktop doesn't require specific cookware to activate it. You can use metal or glass pots or pans, such as copper pots, woks, stainless steel cookware, glass pots and casserole and ceramic pots. Do not use cookware with jagged edges or a curved base. Make sure that the base of your pan is smooth, sits flat against the glass, and is the same size as the cooking zone. -
Page 11: Using Your Ceramic Cooktop
Using your Ceramic Cooktop Setting the Cooking Zone Temperature Place the pan on the selected Cooking Zone. Now turn the associated power regulating control knob clockwise to the required heat level. Power settings range from '1' lowest to '7' highest setting and the selected level will be shown on the power level display. -
Page 12: Over-Temperature Protection
Over-Temperature Protection An inbuilt temperature sensor monitors the temperature inside the cooktop. When an excessive temperature is detected, the cooktop will stop operation automatically. Residual Heat Warning When the cooktop has been operating for some time, there will be residual heat. The letter “... -
Page 13: Searing Steak
Searing steak To cook juicy flavoursome steaks: 1. Stand the meat at room temperature for about 20 minutes before cooking. 2. Heat up a heavy-based frying pan. 3. Brush both sides of the steak with oil. Drizzle a small amount of oil into the hot pan and then lower the meat onto the hot pan. -
Page 14: Care And Cleaning
• pancakes • sautéing • cooking pasta • stir-frying • searing • bringing soup to the boil • boiling water Care and Cleaning What? How? Important! Everyday soiling on 1. Switch the power to the • When the power to the cooktop is glass (fingerprints, cooktop off. -
Page 15: Hints And Tips
1. Switch the power to the • Make sure you wipe the control Spillovers on the controls cooktop off. area dry before turning the cooktop 2. Soak up the spill back on. 3. Wipe the control area with a clean damp sponge or cloth. 4. -
Page 16: Technical Specification
NOTE: Before making preparations for or commencing installation, the installer should refer to the current online version of the User Manual, which is available on the Kleenmaid website (see back cover for details). Selection of installation equipment Cut out the work surface according to the sizes shown in the drawing (Fig. 1). -
Page 17: Before Locating The Fixing Brackets
Model L(mm) W(mm) H(mm) D(mm) A(mm) B(mm) X(mm) CCTB6020 50 min Under all circumstances, make sure the ceramic cooktop is well ventilated and the air inlet and outlet are not blocked. Ensure the ceramic cooktop is positioned correctly, as shown below (see Fig. 3 and Fig. 4). Fig. -
Page 18: Cautions
Adjusting the bracket position Fix the cooktop onto the work surface by screwing the 4 brackets on the bottom case of the cooktop after checking placement within the cutout (see picture). (Screws and brackets supplied.) Adjust the bracket position to suit the thickness of the work surface. -
Page 19: Connecting The Cooktop To The Mains Power Supply
Connecting the cooktop to mains power supply The power supply should be connected in compliance with the relevant standard, or a single-pole circuit breaker. The method of connection is shown below. 1.If the supply cord is damaged, it must be replaced by the manufacturer, its service agent or similarly qualified person in order to avoid a hazard. - Page 20 This appliance is labeled in compliance with European directive 2012/19/EU for Waste Electrical and Electronic Equipment (WEEE). By ensuring that this appliance is disposed of correctly, you will help prevent any possible damage to the environment and to human health, which might otherwise be caused if it were disposed of in the wrong way.
- Page 21 Kleenmaid Warranty, however, if repair is needed because of Product failure during normal Domestic Use, Kleenmaid has the option to repair or replace the defective Product or part of the Product with a product or part of like kind and quality.
- Page 22 Service under this warranty may be limited by the area in which you live. Service to remote and regional areas may incur additional travel costs which will be payable by you. You will be advised of this at the time you make a claim and Kleenmaid arranges to attend your premises.
- Page 23 This page deliberately left blank.
- Page 24 Other products available in the Kleenmaid range of appliances Washing machines Clothes dryers Dishwashers Ovens Cooktops Steam ovens Microwave ovens Built in espresso coffee machines Rangehoods Freestanding ovens Refrigerators & Freezers Beverage Serving Cabinets Water Dispensers Vacuum Cleaners Compass Capital Services Pty Limited...
Need help?
Do you have a question about the cooking CCTB6020 and is the answer not in the manual?
Questions and answers