Advertisement
- 1 Purpose
- 2 Functioning
- 3 Operating modes and functions
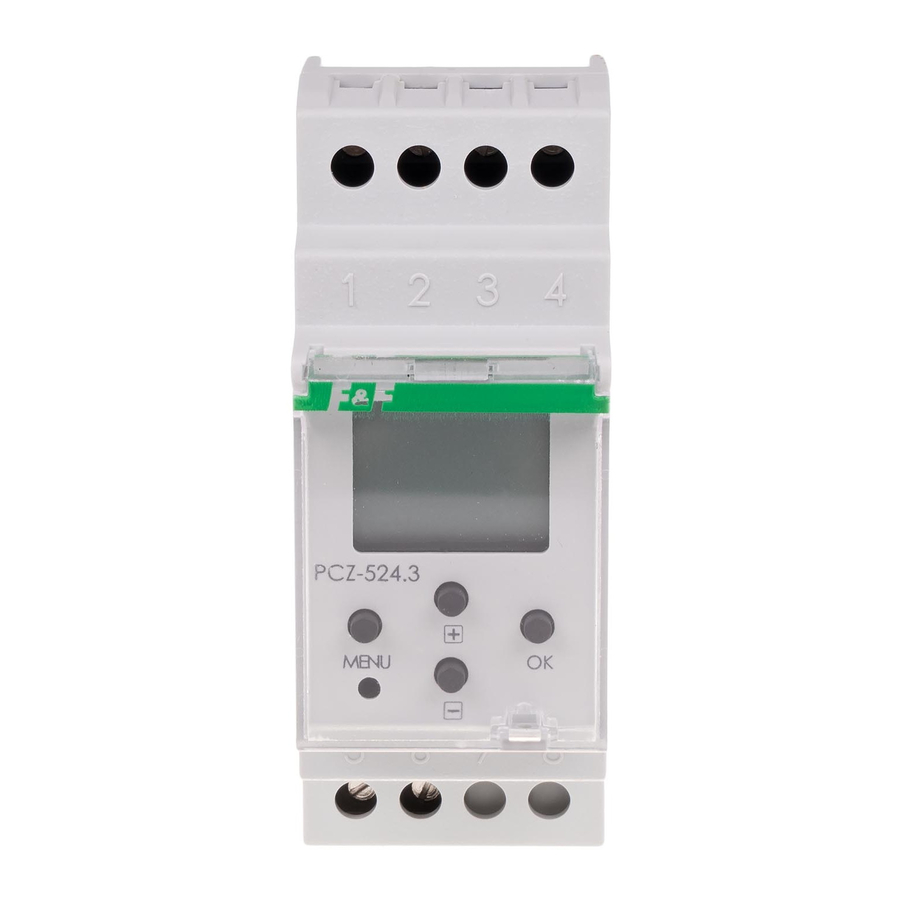
- 4 Display and control panel description
- 5 Function keys description
- 6 Programming
- 7 Preview of settings and the scheduled points of switch on/off
- 8 Low battery
- 9 Technical data
- 10 Installation
- 11 Connection scheme
- 12 Table of location codes
- 13 CE declaration
- 14 PCZ Configurator app
- 15 Programming scheme
- 16 WARRANTY
- 17 Documents / Resources
Purpose
Astronomical timer is used for switching on and off the lightning or other electrical receivers in accordance to sunset and sunrise.
Functioning
On the basis of information about the current date and the geographical coordinates of its location, the astronomical timer automatically sets daily, scheduled points of lightning switching. The exact time of switch on and off is determined on the basis of the calculation of the position of the sun relative to the horizon and allows you to select one of the three control options (the moment the lights go on and off is set independently):
- Astronomical sunset and sunrise
- Civil twilight/dawn
- Correction – individual correction of program switch on and off points by the user: angular or time
Operating modes and functions
- AUTOMATIC MODE – automatic operation by programmatic points of contact switching [highlighted
![]() icon on the left side of the display].
icon on the left side of the display]. - SEMI-AUTOMATIC MODE – the ability to manually close and open contact during automatic operation. The change will be effective until the switch on/off resulting from the automatic mode [flashing symbol
![]() on the display on the left side].
on the display on the left side].
![warning]() In semi-automatic mode the contact position is opposite to that which results from the program cycle (which means that the contact is opened at night and closed during the day). Semi-automatic operation works only until the end of the current cycle of automatic operation, for example entering semi-automatic mode during the day will turn on the lights until the time of the scheduled switch resulting from the astronomic cycle. Then, the clock returns to automatic operation (and the light is still switched on until dawn). Mode switching is done using the +/– buttons on the main level.
In semi-automatic mode the contact position is opposite to that which results from the program cycle (which means that the contact is opened at night and closed during the day). Semi-automatic operation works only until the end of the current cycle of automatic operation, for example entering semi-automatic mode during the day will turn on the lights until the time of the scheduled switch resulting from the astronomic cycle. Then, the clock returns to automatic operation (and the light is still switched on until dawn). Mode switching is done using the +/– buttons on the main level. - MANUAL MODE – [ON] permanently closed contact (position 1-5) or [OFF] permanently open contact (position 1-6) when the AUTOMATIC MODE is off [no
![]() icon on the left side of the display].
icon on the left side of the display]. - ASTRONOMICAL SUNRISE AND SUNSET – moments when the center of the solar disk touches the horizon (parameter h= -0.583°). Due to the simplification of calculations, the deviation of a few minutes in relation to data designated by "HM Nautical Almanac Office" is acceptable.
![warning]() The advantage of setting the point of switch on/off as a function of the position of the sun disk is that this feature is immune to change of the duration of the dusk/dawn for the different seasons of the year, so that the switch on/off occurs always for the same level of brightness.
The advantage of setting the point of switch on/off as a function of the position of the sun disk is that this feature is immune to change of the duration of the dusk/dawn for the different seasons of the year, so that the switch on/off occurs always for the same level of brightness. - CIVIL TWILIGHT AND DAWN (including the calendar) – the phase of the sunset, in which the center of the solar disk will be no more than 6 angular degrees below the horizon (solar disk viewed from Earth has a diameter of approximately half a degree). During this time brightest stars and planets ("Evening star", "first star" on Christmas Eve) appear in the sky (with good air clarity). Due to the scattering of light in the atmosphere there is still generally sufficient sunlight for normal operation in the open space without artificial light sources.
- CIVIL DAWN (and calendar) – the time before sunrise, when the center of the solar disk is already higher than 6° below the horizon line.
- SCHEDULED POINT OF SWITCH ON/OFF – times of contact switching on (position 1-5) and off (position 1-6) determined based on the selected control op on: astronomical sunrise/sunset or civil twilight/dusk and location.
- NIGHT BREAK – user-settable temporary switching between the program points of switching on and off.
- CONFIGURATION – designation of the LOCATION and setting the SCHEDULED POINTS OF SWITCH ON/OFF.
- LOCATION – the geographical coordinates and time zone of a place relatively close to the place of the timer installation. Locations and time zones of approx. 1500 cities from 51 countries of the world are defined in the memory of the device. You can enter your personal settings as geographical location and time zone (UTC).
- COORDINATE CODE – geographical coordinates assigned for specified cities to help provide the location (cities and their associated codes are shown in the table).
- CORRECTION – acceleration or deceleration of the switch on/off times in relation to astronomical time points of sunrise and sunset:
- ± 15° – angular correction for the point of switching relative to the position of the center the sun disk to the horizon;
- ± 180 min. – time correction for the point of switching as a shift of time relative to sunrise/sunset.
- DST (Daylight Saving Time) – international name of summer time (free translation: the sunlight acquisition time). Disables automatic time changes.
- AUTOMATIC TIME CHANGE – change from winter to summer time. It can be set to work with or without automatic change. The controller is equipped with a function to select the time zone so that the switching time is consistent with the local time.
- DATE PREVIEW – preview of the set date (OK).
- PREVIEW OF THE SCHEDULED POINT OF SWITCH ON/OFF and LOCATION – the ability to view the current time of switch the contact open and close and the set locations (geographic coordinates are displayed) and the UTC time zone (subsequent pressing of the +/– buttons in the date preview mode).
- NFC WIRELESS COMMUNICATION – wirelessly read and write timer configuration from an Android phone equipped with the NFC module.
- PCZ CONFIGURATOR APP – free application for Android mobile phones and tablets equipped with the NFC module for wireless communication.
Features:- timer configuration in offline mode (without the connection with the timer);
- coordinates settings by selecting the preset location (code coordinates), a direct indication of the location on a map on your phone or copying the current position recorded by the GPS in your phone;
- read and write the configuration of the controller;
- quick programming of multiple controllers using a single configuration;
- read and write the configuration from and to a file;
- sharing the configuration via e-mail, Bluetooth, network drives;
- identification of the connected timer and the ability to name individual devices;
- automatic backups of the configuration. Along with a unique identifier for each timer, user can easily restore previous configuration;
- set the time and date according to the clock in mobile phone.
![warning]() The app is available on Google Play!
The app is available on Google Play!
- CLOCK TIME CORRECTION – set monthly adjustment of the seconds of the system clock.
- BATTERY INDICATOR – the controller comes with built-in control system of the backup timer battery used in case of main power supply failure. If the battery is low, user will receive information that the battery needs to be replaced.
- LCD BRIGHTNESS ADJUSTMENT – change the contrast of the display to get a clear LCD read-out from different viewing angles.
- RELAY STATE MEMORY – set relay state in manual mode is remembered and restored when the power returns.
 icon on the left side of the display].
Display and control panel description

Mo – Monday; Tu – Tuesday; We – Wednesday; Th – Thursday; Fr – Friday; Sa – Saturday; Su – Sunday.
Function keys description
- MENU
- enter the program menu
- return to the previous position (back)
- OK
- move to the next setting
- accept setting
- preview of the date and the scheduled points of switch on/off and the location
- "+" [plus]
- change the setting by one position up (+1) for the selected programming op on (holding down the button continuously changes the setting by one position up in a loop)
- in MANUAL MODE: permanent ON and OFF contact switching
- "−" [minus]
- change in the setting by one position down for the selected programming op on (holding down the button continuously changes the setting by one position down in a loop)
- in MANUAL MODE: permanent ON and OFF contact switching
Programming
START
Connect the power supply.
The timer will start at the root level and the display will show selected hour.

In the absence of any program entries, timer will automatically run in manual mode. If the previous entries are present, timer will execute the program. Set individual timer program with internal configuration menu or by using the PCZ KONFIGURATOR app for mobile devices.
DATA
Press MENU. The timer will enter program menu.
Using the +/– buttons select the date setting mode DATE.

Confirm with OK. Timer will show settings for the next parameters: year, month, and day. Use the +/– keys to set the parameters; move to the next parameter with the OK button. Go back to the previous item by pressing MENU.

Press OK to accept date setting. The timer will automatically exit from the date setting mode and go to the program menu.
The date setting is tantamount to time determination: winter or summer. In Poland, the time change from winter to summer is done automatically at night, on the last Sunday of March at 2.00 AM (by adding one hour to the current time). Time change from summer to winter is done automatically at night, on the last Sunday of October at 3.00 AM (by subtracting one hour from the current time).
 The automatic time change can be turned off.
HOUR
Press MENU. The timer will enter the program menu.
Using the +/– buttons select the mode for time setting HOUR.

Timer will show settings for the next parameters: hour and minutes. Set the parameters with the +/– buttons. Move to the next parameter with the OK button. Go back to the previous item by pressing MENU.

Press OK to accept time entry. The timer will automatically exit from the date setting mode and go to the program menu.
OPERATION MODE
Press MENU. The timer will enter program menu.
Using the +/– buttons select the mode for time setting MODE.

Press OK to accept. The timer will enter auto operation mode (AUTO/HAND). Select operation mode using the +/– buttons:

AUTO – automatic mode
HAND – manual mode
Press OK to accept. The timer will automatically exit from the date setting mode and go to the program menu. Pressing MENU again will bring you to the root level.
Changes to the contact position in MANUAL OPERATION mode are done using the +/– buttons at the root level.
LOCATION
Press MENU. The timer will enter program menu.
Using the +/– buttons select the mode for time setting LOCATE.

Press OK to accept. The timer will enter to the location settings menu (LIST/ USER). Select mode using the +/– buttons:

- LIST – select location from the list of coordinate codes;
- USER – manual setting of the user geographical position.
Press OK to accept.
COORDINATE CODES
Check the table of coordinate codes located at the diagram of programming. Find the country and the city closest to your location and the corresponding code.
The timer will enter country selection menu. Using the +/– buttons select the country. Accept by pressing OK. The timer will enter the coordinate code selection. Using the +/– buttons select desired code from the list. Press OK.

The timer will automatically go to the location settings menu. Pressing the MENU button will move you to a higher level.
After selecting a location from the list of locations, there is no need to write common geographical ordinates. The full list of locations (written in timer memory) you find from the product subpage on www.fif.com.pl. Scan QR code below:

THE GEOGRAPHICAL COORDINATES OF THE USER
The timer will enter the geographical coordinates and time zone setting mode. The timer will automatically set latitude marking:
- N – North
- S – South
Set the degrees using the +/– buttons. Accept by pressing OK. Then select the minutes. Accept by pressing OK.

The timer will enter the longitude setting mode.
Longitude marking:
- E – East
- W – West
- length in degrees and arc minutes
Set the degrees using the +/– buttons. Accept by pressing OK. Then select the minutes. Accept by pressing OK.

SCHEDULED POINTS OF SWITCH ON/OFF
SWITCH [ON] – SUNSET
Press MENU. The timer will enter program menu.
Using the +/– buttons select the mode for time setting ON.

Press OK to accept. The timer will enter to the switch option selection (SUNSET/TLIGHT/USER).
Use the +/– buttons to select the correct moment of activation:

- SUNSET – astronomical sunset
- TLIGHT – civil twilight
- USER (time correction setting) – accelerating or delaying the switching time in relation to the time point of astronomical sunset:
- ± 15° – for the point of switching relative to the position of the center of the sun disk to the horizon. PLUS value speeds up the switching, MINUS value delays switching.
- ± 180 min. – time correction for the point of switching as a shift of time relative to sunrise/sunset. PLUS value speeds up the switching, MINUS value delays switching.
Select the switching op on using +/– buttons. Accept by pressing OK.
If you select TIME feature, set the hour and minutes in accordance with paragraph 3 (HOUR).
If you select USER feature, set the adjustment in accordance with the paragraph 6.3.
SWITCH [OFF] – SUNRISE
Press MENU. The timer will enter program menu.
Using the +/– buttons select the mode for time setting OFF.

Press OK to accept. The timer will enter to the switch option selection (SUNRISE/DAWN/TIME/USER).
Select mode using the +/– buttons:

- SUNRIS – astronomical sunrise
- DAWN – civil twilight
- USER ( me correction setting) – accelerating or delaying the switching time in relation to the time point of astronomical sunrise:
- ± 15° – for the point of switching relative to the position of the center of the sun disk to the horizon. PLUS value speeds up the switching, MINUS value delays switching.
- ± 180 min. – time correction for the point of switching as a shift of time relative to sunrise/sunset. PLUS value speeds up the switching, MINUS value delays switching.
Select the switching op on using +/– buttons. Accept by pressing OK.
If you select USER, set compensation in accordance with section 6.3.
SETTING THE TOME CORRECTION
The setting for the USER switching.
Select USER. Accept by pressing OK.
The timer will enter the angular or time off set selection mode (° – ti).

Select op on using +/– buttons:
- ti – time off set
- ° – angular off set
Accept by pressing OK. The timer will enter the correction value setting mode. Set the value using +/– buttons:
- ± 15° – for the point of switching relative to the position of the center of the sun disk to the horizon. PLUS value speeds up the switching, MINUS value delays switching.
- ± 180 min. – time correction for the point of switching as a shift of time relative to sunrise/sunset. PLUS value speeds up the switching, MINUS value delays switching.

Confirm by pressing OK. The timer automatically exits the correction setting function and enters the program menu. Pressing MENU will bring you to the main level.
SYSTEM SETTINGS
Press MENU. The timer will enter the program menu. Using the +/– keys select system settings SYST.

Confirm by pressing OK. The timer will enter the system settings submenu (DST/UTC/BATT/CAL/LCD/CLEAR/INFO).
Select the parameter with the +/– keys and Confirm with OK.
Pressing MENU will take you to the upper level.
AUTOMATIC TIME CHANGE (DST)

DST (DAYLIGHT SAVING TIME) – international name of summer time.
Confirm by pressing OK. The timer will enter the menu with the op on to disable automatic time change (AUTO/OFF).
With +/– keys select desired mode:

- AUTO – with automatic time change
- OFF – without automatic time change
Confirm selected op on by pressing OK.
To exit the parameter without saving the changes, press the MENU button.
BATTERY CHARGE INDICATOR (BATT)
The PCZ-524.3 clock includes checking the battery charge status.
To check the battery level, enter the SYST menu (p.7), then use the +/– buttons to go to BATT and Confirm by pressing OK.

The clock will display information about battery charge level:

- HIGH – fully charged, new battery
- GOOD – in good condition, provides long-term operation
- LOW – low battery level, recommended replacement
- EMPTY – discharged, it must be replaced immediately
SYSTEM CLOCK TIME ADJUSTMENT (CAL)
If you notice that the time is measured incorrectly by the timer, you can correct it yourself. To do this, you first need to estimate the error of time measurement in seconds on a monthly scale.
Next press MENU button and go to SYST (p. 7).
Using +/– select CAL parameter and Confirm OK.

Using +/– select desired correction value.
For example:
If the clock is fast 4 seconds per month, set the parameter value -4.

Confirm by pressing OK, to exit edit mode without making any changes – MENU button.
The operation of the timer is based on a quartz resonator, the natural feature of which is aging causing a change in the resonance frequency and thus reducing the accuracy of time measurement.
DISPLAY CONTRAST (LCD)
Setting the display contrast.
Range: -3 (lowest)... + 3 (highest).

Confirm by pressing OK. The timer will display the current contrast parameter. Using +/– select contrast parameter. Confirm OK.

Confirm by pressing OK, to exit edit mode without making any changes – MENU button.
SYSTEM INFORMATION (INFO)
Information about the device type and software version are available in the INFO menu. To display them, enter the SYST menu, use the +/– buttons to select INFO. Confirm by pressing OK.

Using +/– select required parameter:

Confirm by pressing OK. The timer will display information menu. Use the +/– keys to browse the information:
- timer type
- software version
To exit the parameter, press the MENU button.
Preview of settings and the scheduled points of switch on/off
At the root level of the timer (showing the current time), press OK button. Current date (day-month-year) will be displayed. Subsequent pressings of the + button show the scheduled switch on time, scheduled switch off time, set latitude, set longitude and set time zone.

For some locations, information about the polar day and night may be displayed instead of switching on and off times.

- P DAY (polar day) – switched off 24 hours a day
- P NIGHT (polar night) – switched on 24 hours a day
Information about polar day and polar night may be displayed instead of the times of switch on and off for some locations.
Low battery

The LOW BATT message indicates that the battery backup clock is too low after a power outage. In this case, battery replacement is recommended. The user can replace the battery by himself with a new, type 2032 lithium coin cell battery.
A film demonstrating how to replace the battery is shown below the product code (scan the QR code):

The low battery level is no obstacle during normal clock operation. However, if the clock is not powered, it may result in loss of date and time settings.
All settings, except for time and date, are saved in non-volatile memory and are not lost in the event of a power outage and low battery.
Under proper operating conditions, a new, charged battery is sufficient for approx. 6 years of operation. Low temperatures or long periods of operation without AC power can shorten this period.
Technical data
| power supply | 24÷264 V AC/DC |
| maximum load current (AC-1) | 16 A |
| contact | separated 1×NO/NC |
| backup time clock operation | 6 years* |
| battery type | 2032 (lithium) |
| backup time display operation | none |
| accuracy of the clock | 1 s |
| error time | ±1 s/ 24 h |
| power consumption | 1.5 W |
| terminal | 2.5 mm² screw terminals (cord) 4.0 mm² screw terminals (wire) |
| tightening torque | 0.5 Nm |
| working temperature | -20÷50°C |
| dimensions | 2 modules (35 mm) |
| mounting | on TH-35 rail |
| protection level | IP20 |
* battery life addicted to weather conditions and frequency of mains failure
Installation
- Turn off the power.
- Mount the timer on the TH-rail in the distribution box.
- Connect wires according to the diagram.
- Connect receivers according to the diagram.
- Set the correct date (see sec on 2) and time (see sec on 3).
- Set individual switch-on time programs for receivers.
Connection scheme

1 COM contact input
3-4 timer power supply
5 NO contact output ("standard open" position)
6 NC contact output ("standard closed" position)
Table of location codes
- Albania
- Armenia
- Austria
- Azerbaijan
- Belgium
- Bulgaria
- Bosnia and Hercegovina
- Belarus
- Kazakhstan
- Kyrgyzstan
- Switzerland
- Cyprus
- Czech Republic
- Denmark
- Germany
- Spain
- Estonia
- Finland
- France
- Great Britain
- Georgia
- Greece
- Croatia
- Hungary
- Ireland
- Iceland
- Italy
- Lichtenstein
- Lithuania
- Luxembourg
- Latvia
- Macedonia
- Monaco
- Moldova
- Malta
- Mongolia
- Holland
- Norway
- Poland
- Portugal
- Romania
- Russia
- San Marino
- Serbia
- Slovakia
- Slovenia
- –
- Sweden
- Tajikistan
- Turkmenistan
- Ukraine
- Uzbekistan
CE declaration
A copy of the CE declaration is available for download from the website: www.fif.com.pl from the product subpage.
PCZ Configurator app
Main window

- New configuration – opens window creation configuration.
- Open configuration – opens window for loading the program configuration stored as a file in the phone memory.
- My device – gives access and support for all backup copies of configurations assigned to specific devices.
- Information – application user guide.
New configuration

- New – creates new, empty configuration file (without any programs).
- Load from PC – new configuration is created based on a program saved in the PCZ controller. Select this option and bring the phone closer to the timer to load the program phone.
- Load from file – new configuration is created based on a files saved by the user. Opens a window with a list of files previously saved by the user.
- Restore – a new configuration is created based on a backup copy of one of the previous configuration. Tapping this icon opens window with a list of backups split into controllers in which they were written.
Select a new configuration option opens another window.
The function window allows to edit program as well as to load and save configuration to a PCZ controller. It appears automatically when we bring the phone closer to the controller, or when we create a new configuration. In the upper part of the screen the application displays a frame with following information:
- Dev – supported controller type.
- ID – unique identifier of connected controller (appears only when the application is connected with the controller. In the Offline mode that field remains empty). Icon of a pencil on the right-hand side allows you to enter your own name for the controller.
- Operating mode – displays the current operating mode for the controller (manual or automatic). Applies only to operating in Online Out mode – Output relay status (enabled or disabled).
Applies only in online mode.
Keys:
- Read the timer configuration.
- Save the current configuration to the timer.
- Load configuration from file.
- Save the current configuration to file.
- Restore configuration from backup copies.
- Edit the current configuration.
Edit

Editing window allows you to edit current configuration (new, loaded from fi le or from PCZ)
Editing window consists of three tabs:
- List – a list of all programs (in the order in which they are stored in the memory).
- Filter – a list of programs that will be executed on the selected day (in chronological order by program execution).
- Settings – system settings configuration
Configuration
Setting the scheduled points of lightning on and off switching:
- Civil twilight and sunset
- User settings – correction for astronomical sunrise and sunset: acceleration or delay of the on/off switching times in relation to astronomical points.
The three icons at the bo om of the screen allow you to:
- Save to file – saves the current configuration to a file
- Save to PCZ – saves the configuration to a timer
- Back – return to a function window
In case of a going back to the function window the current configuration is constantly stored in the application memory.
Settings

Info tab. Displays data from the timer:
- Software version
- Date of manufacture
- Channel status (on/off)
Timer system settings: operation modes for each channel (auto/manual), contrast, time correction, current date.
Location: city list

Selecting a city relatively close to the place of installation of the timer. Locations and time zones of approx. 1500 cities from 51 countries of the world are defined in the memory.
Location: GPS

Entering custom settings as a geographical location and time zone (UTC) using the GPS location of the user's phone.
Application available on:


Programming scheme
The programming scheme for the timer is available for download on the product's subpage. Website address: www.fif.com.pl.
WARRANTY
The F&F products are covered by a warranty of the 24 months from the date of purchase. Effective only with proof of purchase.
Contact your dealer or directly with us.

Do not dispose of the device to a garbage bin with other unsorted waste! In accordance with the Waste Electrical and Electronic Equipment Act any household electro-waste can be turned in free of charge and in any quantity to a collection point established for this purpose, as well as to the store in the event of purchasing new equipment (as per the old for new rule, regardless of brand). Electro-waste thrown in the garbage bin or abandoned in the bosom of nature pose a threat to the environment and human health.
F&F Filipowski sp. j.
ul. Konstantynowska 79/81 95-200 Pabianice
phone: (+48 42) 215 23 83; 227 09 71 POLAND
https://www.fif.com.pl e-mail: biuro@fif.com.pl

Documents / Resources
References
Automatyka przemysłowa i domowa - producent F&F
![play.google.com]() Google Play
Google PlayAutomatyka przemysłowa i domowa - producent F&F
Download manual
Here you can download full pdf version of manual, it may contain additional safety instructions, warranty information, FCC rules, etc.
Download F&F PCZ-524.3 - Astronomical Programmable Control Timer Manual
Advertisement


Need help?
Do you have a question about the PCZ-524.3 and is the answer not in the manual?
Questions and answers