WE-EF FLB141 Installation And Maintenance Instructions Manual
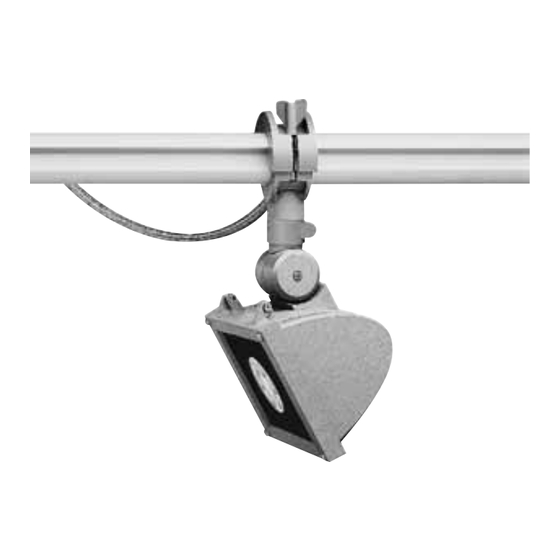
Floodlight with clamp
Hide thumbs
Also See for FLB141:
- Installation and maintenance instructions manual (17 pages) ,
- Installation and maintenance instruction (7 pages) ,
- Installation and maintenance instructions manual (12 pages)
Advertisement
Quick Links
Do not open during installation
This product is factory-sealed.
Refer to the instructions contained
in this document for details.
Surge Protection
This product features built-in surge protection circuitry in compliance
with applicable standards.
For comprehensive protection of a luminaire installation against lightning
and electrical surges, it is essential to cover mains supply and data input
lines at the distribution board level, by using respective primary (Type 1)
and secondary (Type 2) surge arrestors in compliance with EN61643-11/
IEC61643-1.
Warning
Ensure that all required surge protection measures are in place and acti-
vated prior to luminaire installation. Also, disconnect luminaires
before operating high-power devices such as, for example, electrical arc
welders.
WE-EF LIGHTING
Installation and Maintenance
Instructions
Floodlight with clamp
FLB141 #6 LED
FLB141 #7 LED
Advertisement

Related Manuals for WE-EF FLB141


Summary of Contents for WE-EF FLB141
- Page 1 WE-EF LIGHTING Installation and Maintenance Instructions Floodlight with clamp FLB141 #6 LED FLB141 #7 LED Surge Protection Do not open during installation This product is factory-sealed. This product features built-in surge protection circuitry in compliance Refer to the instructions contained with applicable standards.
- Page 2 Floodlight with clamp FLB141 #6 RAIL66 version FLB141 #7 Space frame version IP66, IK08, Class I, ta = 40°C Weight for FLB141 #6 LED for FLB141 #7 LED 10.1 Windage area ft² for FLB141 #6 LED 0.431 for FLB141 #7 LED 0.484...
-
Page 3: Maintenance
Light Source Maintenance Apart from cleaning the product’s exterior surfaces, no special maintenance work is required. Do not use high-pressure cleaners. In case of component failure due to abnormal circumstances or at end of life, replacement must be carried Warning: Do not open luminaire while mains supply is switched on. -
Page 4: Installation
Installation The product must be installed and maintained by a building/construction and/or electrical regulations and relevant legislation. Warning: Notice: no longer be valid and shall become the full responsibility of the modifying person/organisation. Claims based on defects attributable to improper installation and/or application, and the consequences thereof, are excluded. -
Page 5: Installation Procedure
Prior to installing the luminaire, mount and connect the selected RAIL66 mounting system in accordance with relevant installation instructions 2) Check that rating shown on luminaire label conforms with mains electrical supply. 07/18 IP66 FLB141-LED 120-277V 60Hz 161-XXXX SOE XXXXXXX LED 3000K 18W item no. XXX... - Page 6 5) Remove protective cover Z from mains outlet 6) Loosen screws H and I slightly. Aim luminaire Y. Insert in-line connector G and tighten. in desired direction, retighten screws H and I. Attention: On any mains outlet Y’ that is not used, protective cover Z’...
- Page 7 Installation – Space frame version Suitable for space frame diameter 1.89-2.36 in. 2) Check that rating shown on luminaire label conforms with mains electrical supply. 07/18 IP66 FLB141-LED 120-277V 60Hz 161-XXXX SOE XXXXXXX LED 3000K 18W item no. XXX (example) 3) Determine desired position of luminaire A 4) Detach gear box cover D by loosening screws S.
- Page 8 5) Feed mains supply cable E through cable 6) Connect mains supply cable E leads to gland G (Fig. I). respective terminals in terminal connector K: a) ON/OFF (L = Phase, N = Neutral, = Earthing) b) 0-10 V (L = Phase, N = Neutral, = Earthing, D–/D+ = 0-10 V control line).
- Page 9 WE-EF LIGHTING United States of America Tel +1 724 742 0030 Fax +1 724 742 0035 info.usa@we-ef.com TO9248W0422 © WE-EF 2022 Technical specifications are subject to change.
- Page 10 WE-EF LIGHTING Installation and Maintenance Instructions RAIL66 Projector and Floodlight Mounting System...
- Page 11 Projector and Floodlight Mounting System RAIL66 Versatile mounting system, developed in conjunction with and engineered for a dedicated range of RAIL66/UNIVERSAL 310-9200 310-9202 310-9210 310-9212 310-9220 310-9222...
- Page 12 RAIL66/CANTILEVER RAIL66/CANTILEVER 310-9230 310-9232 310-9240 310-9242 310-9250 310-9252 Installation appropriate to prevailing site conditions, including structural and wind loads etc. Luminaire Installation Refer to separate, dedicated installation instructions.
- Page 13 Installation Procedure - RAIL66/UNIVERSAL 2) Remove covers A reposition covers A. Tighten screws B in a conforms with mains electrical supply. D and insert nylon plugs E. installation instructions. Warning tightness of protective covers Z’ on mains holes. outlets Y’. Remove cover(s) only when installing X in position.
- Page 14 Optional Mounting Accessories for RAIL66/UNIVERSAL Fig. I Fig. II Flat Surface Fitters (pair) Column Fitters (pair) 310-9290 310-9294...
- Page 15 Installation Procedure - RAIL66/CANTILEVER 2) Remove covers A Pay particular attention to tension-free alignment of terminal connector J. Tighten screws D conforms with mains electrical supply. compression, evenly. Warning: In the process, do not apply any load to F and insert nylon plugs G. Warning: holes.
- Page 16 WE-EF LIGHTING info.usa@we-ef.com Technical specifications are...
Need help?
Do you have a question about the FLB141 and is the answer not in the manual?
Questions and answers