Advertisement
Quick Links
O FF-G R ID DR AW ER
SYST E M
IN S TAL L ATION INS T RU C TIO NS
Please read the mounting instructions below carefully before attempting to install.
Check out the install video on the product page for more detailed information.
Thank you for purchasing from Victory 4x4! Checkout our website, victory4x4.com for other great off-road
products. Be sure to rate and review our product online. If you have any questions or are missing parts, please
don't hesitate to call us at 269-459-8447!
Advertisement

Related Manuals for Victory 4x4 OFF-GRID DRAWER SYSTEM


Summary of Contents for Victory 4x4 OFF-GRID DRAWER SYSTEM
- Page 1 Check out the install video on the product page for more detailed information. Thank you for purchasing from Victory 4x4! Checkout our website, victory4x4.com for other great off-road products. Be sure to rate and review our product online. If you have any questions or are missing parts, please...
-
Page 2: I Nclu D E D Hardware
I NCLU D E D HARDWARE 1/4"-20 X 1/2" 1/4"-20 X 3/8" Button Head Button Head 1/4” ID Black 1/4"-20 Washer Serr. Flange Nut Loctite Packet 1/4" Flat Nuts... -
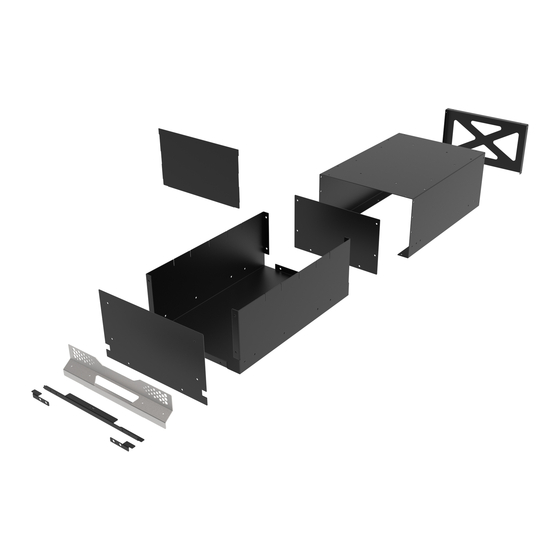
Page 3: Included Parts
I N CLU DE D PA RTS 1L/1R 1L/1R... - Page 4 ASSEMBLY Start by taking the (2) provided slides and bolt one to each side of the inside of the slide assembly with the red handles pointing out, as shown in the orientation below. Making sure to use (4) each per side of the provided shorter 1/4”...
- Page 5 ASSE M BLY Next, take the back piece of the cabinet assembly with the “X” cutout and bolt that piece to the main U shaped slide piece using (6) each of the provided longer 1/4” button heads, washers and flange nuts as shown in the orientation below.
- Page 6 ASSE M BLY Next, mount the (2) provided L shaped brackets in the upper inside corners of the slide assembly with the provided 1/4” button heads, washers and flange nuts as shown in the orientation below. Make sure to do this on each side.
- Page 7 ASSE M BLY You are now ready to assemble the drawer, start with the flat rectangle piece and mount it to the back side of “U” shaped drawer. Look for the arrow pointing forward to identify which direction the drawer should be facing.
- Page 8 AS SE M BLY Once the back piece to the drawer is attatched, you can now slide in the provided divider piece from the top into whichever slot in the drawer to your liking, as shown below.
- Page 9 AS SE M B LY You can now start to fasten the front drawer piece onto the drawer assembly. To do so use (2) of the provided 1/4” button heads, washers and flange nuts, as shown below. Edge trim will be provided to be cut and trimmed to nest inside the cutouts of this panel.
- Page 10 A SSE MBLY With the front piece in place, you now need to attatch the drawer assembly to your slide system using (4) of the provided shorter 1/4” button heads, washers and flat nuts per side, as shown in the orientation below. Be sure that the button heads are installed from the inside of the drawer facing out.
- Page 11 AS SE M B LY With your drawer attached to your slides, you can now assemble the handle system around the red latches on the slides. To do so, use (4) of the provided button heads and secure them through the “PRESS” bracket into the pem nut bracket and sandwhich them around the red grab handles so they are grabbing them, as shown in the orientation below.
- Page 12 ASSEMBLY The final step is to secure the handle cover bracket to the front of the drawer to complete your install. Take (4) of the provided 1/4” button heads, washers and flange nuts and use them to secure the bracket to the panel, as shown in the orientation below.
- Page 13 A SSEM BLY You are now finished with the install, enjoy your new drawer system! For placement and specific instruction of your new drawer, refer to your vehicle floor product page on our website for more detail. This installation guide shows how to assemble one Off-Grid Drawer assembly, but the possibilities are endless! Check out the product page for inspiration on how to maximize your space by using a combination of Off- Grid Drawers and our Off-Grid Fridge Slide!
Need help?
Do you have a question about the OFF-GRID DRAWER SYSTEM and is the answer not in the manual?
Questions and answers