Table of Contents
Advertisement
Advertisement
Table of Contents

Related Manuals for Amada WELTOUCH CT-110D


Summary of Contents for Amada WELTOUCH CT-110D
- Page 1 WELTOUCH ® CT-110D OPERATION MANUAL AA04OM1188289-04...
- Page 2 CT-110D Preface Thank you for purchasing our WELTOUCH CT-110D. This operation manual describes the proper method of operation for the CT-110D, as well as precautions for its use. If you have any questions concerning operation of the controller, read this operation manual.
-
Page 3: Table Of Contents
CT-110D Contents 1. Special Notes .......................... 1-1 (1) Safety Precautions ..............................1-1 (2) Precautions for Handling ............................1-4 (3) On Disposal ................................1-4 2. Features ........................... 2-1 3. Name and Function of Each Section ..................3-1 (1) Front Panel ................................3-1 (2) Rear Panel ................................ -
Page 4: Special Notes
CT-110D 1. Special Notes (1) Safety Precautions Prior to use, read these “Safety CAUTION Precautions” carefully to gain a full understanding of the proper method of use. Indicates a risk of physical injury or damage to product if precautions are not correctly ... - Page 5 CT-110D WARNING Do not insert your fingers or hands between the electrodes. When welding, keep your fingers and hands away from the electrodes. Do not touch any welded part or electrode during welding or just after completion of welding. The welded parts of a workpiece, electrodes, and the arm are very hot. Do not touch them;...
- Page 6 CT-110D CAUTION Always use a terminal cover. Touching the terminal block directly may result in electric shock. Be sure to fit the block with a cover. Use proper tools (wire strippers, pressure wire connectors, etc.) for terminal treatment of the connecting cables. Do not cut the wire conductor;...
-
Page 7: Precautions For Handling
CT-110D (2) Precautions for Handling Install the Controller securely on a firm and level surface, to ensure that it will not fall. Do not install the Controller in the following locations: Damp areas (where the humidity is above 90%), areas where chemicals are handled, dusty areas, areas near a high noise source, areas where water may condense, areas exposed to large amounts of vibration or shock, and areas where temperatures are above 45C or below 0C Clean the exterior of the Controller using a soft, dry cloth or one slightly dampened with water. -
Page 8: Features
CT-110D 2. Features The WELTOUCH CT-110D is a constant/alternating-current resistance weld control with a 15-schedule setting function. It is controlled by a microcomputer, allowing it to be applied to all types of welding. Due to the plating-layer treatment by the pre-stage current, heat treatment by the post-stage current, etc., splashing is prevented, the welding tip is protected from... -
Page 9: Name And Function Of Each Section
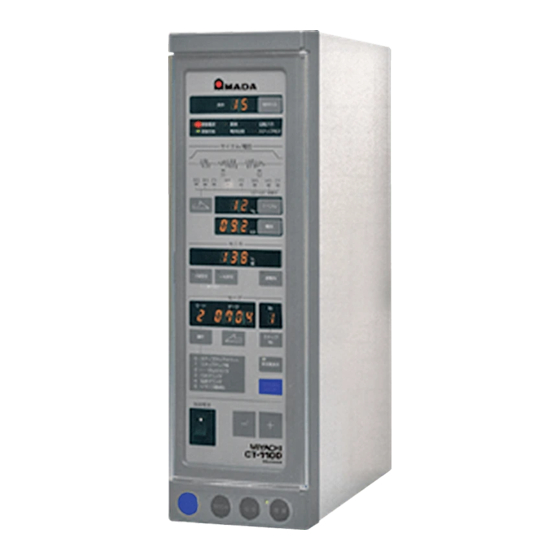
CT-110D 3. Name and Function of Each Section (1) Front Panel ① Schedule No. setter/indicator [SCHEDULE] Calls a No. to input a schedule and indicates the schedule No. ① Schedule No. ② State indicator SCHEDULE NUMBER setter/indicator Indicates the current state of the CT-110D for confirmation. -
Page 10: Rear Panel
CT-110D ⑨ Weld-force key [SQUEEZE] Each time this key is pressed, the LED at its upper left comes on and goes off alternately. While the LED is lit up, the weld-force mode is selected and the weld force is applied while the start signal [START1,2,4,8] is turned on; however, the weld current does not flow. -
Page 11: Internal Block Diagram
CT-110D (3) Internal Block Diagram Welding transformer Welding head Welding power Thyristor Toroidal coil (For detection of the secondary constant current) (For detection of primary constant current) Turn-on pulse Transformer for generation synchronization Waveform Waveform amplification reproduction Turn-on angle command Primary Secondary Source-voltage... -
Page 12: Connection
CT-110D 4. Connection (1) Basic Configuration 1) The general system configuration of the CT-110D is as follows: Example) Installation to stationary welder ① CT-110D The body of the constant-current resistance welding control. Connect Control power to it. ① ② Toroidal coil (Option) Installed to the stationary welding electrode arm. -
Page 13: Connection Of Power Source
CT-110D (2) Connection of Power Source 1) Connect the power source to the power-supply terminal block mounted on the rear panel. ① Connect the thyristor contactor to the power-supply terminal block on the rear panel of CT-110D, as shown below. ②... -
Page 14: Installation Method For The Current-Detecting Coil
CT-110D (3) Installation Method for the Current-Detecting Coil 1) Installation Method for a Toroidal Coil ① Install the toroidal coil to the secondary side of the welding transformer. If only one welding head is used, install the toroidal coil as shown below: Primary side Welding transformer Toroidal coil... - Page 15 CT-110D When two or more welding heads weld at a time The current of only one circuit is kept constant in this case. Primary side Welding transformer Toroidal coil Welding head Fig.3 Connector method for toroidal coil (3) ② Set dip switch DSW1-(2) to the OFF position (see page 4-7). ③...
- Page 16 CT-110D ④ Checking for breakage and short-circuiting of the toroidal coil Breakage of and shorts in the toroidal coil can be checked using a tester, as the toroidal coil has the internal resistance shown in Fig. 5. (Keep in mind that the internal resistance changes depending on the type of toroidal coil.) Toroidal coil Internal resistance MB-400L...
-
Page 17: Selecting Of Functions
CT-110D (4) Selecting of Functions Functions are set using dip switches on the printed-circuit board. [DANGER! High Voltage] When removing the cover and setting the dip switches on the board, confirm that the welding power and control power are turned off to ensure safety. (1) Initial setting of dip switches Dip switches Factory default setting of dip switches... - Page 18 CT-110D (3) Explanation of the functions of dip switches ① DSW1-(1): Selects the constant-current control or source-voltage fluctuation compensation control. OFF: Constant-current control Source-voltage fluctuation compensation control ② DWS1-(2): Selects the primary current or secondary current to be detected in the constant-current control mode. If a coil is connected for full-wave detection in the source-voltage fluctuation compensation control mode, set this dip switch properly.
- Page 19 CT-110D ⑦ DSW1-(7): Selects the length of time for which the holding finish signal is to be output. OFF: Output of the holding-finish-signal level Output of the holding-finish-signal pulse If this dip switch is set to OFF, the holding finish signal [HOLD END] is output for approximately 0.2 seconds, or while the start signal is being input.
- Page 20 CT-110D ⑫ DSW2-(4): Selects start in 4-schedule start mode or 15-schedule start mode upon reception of an external start signal. OFF: 15-schedule start mode 4-schedule start mode If this dip switch is set to OFF, 15 schedules made by combining start signals [START 1, 2, 4, and/or 8] are selected.
-
Page 21: Input Method For Start Signals
CT-110D (5) Input Method for Start Signals 1) When the operation is started in the 15-schedule start mode and the parity check of the start signal is not performed (when DSW-1(4) is set to OFF). Select up to 15 schedules by inputting the four signals of Start 1, Start 2, Start 4, and Start 8 in Binary Format. - Page 22 CT-110D 2) When the operation is started in the 15-schedule start mode and the parity check of the start signal is performed (when DSW-1(4) is set to ON). Select up to 15 schedules by inputting the four signals of Start 1, Start 2, Start 4, and Start 8 in Binary Format and Start P (Parity).
-
Page 23: Interface
CT-110D 5. Interface (1) External Input and Output Signals Connect the toroidal coil CT-110D (secondary constant-current control) or CT (primary constant-current control). (Terminals 33 and 34 are short-circuited.) +24 V DC IN +24 V DC OUT (100 mA Max) INTERLOCK/ COUNT UP STEP END ERROR... - Page 24 CT-110D VALVE 2 VALVE 1 VALVE COM The voltages for this Control equipment are indicated next 24-V DC-rated valve power to the terminal block; check the voltage and perform connection properly. BODY GROUNDING Ground the E terminal (grounding) of CT-110D in common with the (480V AC) grounding of the contactor.
- Page 25 CT-110D Pin No. Name Description STEP RESET input terminal. If this is turned on, the step completion STEP RESET output is turned off and the system returns to the first step No. WELD ON/OFF input terminals. If these are ON, welding is enabled; 15,16 WELD ON/OFF if they are OFF, welding is disabled.
-
Page 26: Timing Chart
CT-110D (2) Timing Chart 1) Timing chart of basic operation START 1,2,4,8 Start input VALVE 1,2 Weld force output Welding current WELD ON Power on output HOLD END Holding-finish output (When a caution concerning (When an error is detected) the current is output) ERROR Error output (When the last step is completed) - Page 27 CT-110D 2) Timing chart of repeating function operation (when DSW2-(1) is set to ON) START 1,2,4,8 Start input VALVE 1,2 Weld force output Welding current HOLD END Holding-finish About 200ms About 200ms output OF: Off T1: Time from when the start signal [START1,2,4,8] is turned on (rising edge of the first input signal) until the valve signal [VALVE1,2] is turned on (60 ms max.) T2: Time from the Hold is finished until the holding finish signal [HOLD END] is...
- Page 28 CT-110D 3) Timing chart of interlock function operation (when DSW2-(2) is set to OFF) When the welding is performed at the same timing, the voltage of the welding power supply decreases and the welding current fluctuates. In such a case, this function keeps the welding from being performed while the interlock input signal [INTERLOCK/COUNT RESET] is turned on.
- Page 29 CT-110D 4) Timing chart of re-power-on function operation (when DSW1-(6) is set to ON) START 1,2,4,8 Start input VALVE 1,2 Weld force output Welding current cycles (When the re-power-on current is less than the lower limit setting) ERROR Error output HOLD END Holding-finish output T1: Time from when the start signal [START1,2,4,8] is turned on (rising edge of...
-
Page 30: Operation Method
CT-110D 6. Operation Method (1) Basic Operation 1) Turn on the control power switch. If the control power switch [POWER] on the front is turned on, control power is supplied to the machine. When it is turned on, all LEDs light up for 2-3 seconds while self-diagnosis is performed. - Page 31 CT-110D 4) Press the [WELD] key to start welding. ON/OFF If the weld ON/OFF key [WELD] at the lower right is pressed to start welding, WELD the green LED to the upper left of the key lights up. The green [READY] LED lights up (when the weld ON/OFF signal [WELD ON/OFF] is turned on).
- Page 32 CT-110D 6) Upon completion of welding, the measured value is indicated. ① The green [MONITOR DISPLAY] LED lights up, and the measured value that is the welding result is indicated. MONITOR DISPLAY The measured value of the item, the green LED of which is lit, is shown on the indicator CURRENT MONITOR...
-
Page 33: Setting Of Schedule Data
CT-110D (2) Setting of Schedule Data 1) Setting of schedule No. Press the SCHEDULE [NUMBER] key SCHEDULE NUMBER and select a schedule No. Schedule No. key 2) Setting of timer CYCLES/ CURRENT ① Press the -> key to select an item to be set. - Page 34 CT-110D 3) Setting of the maximum current ① Press the [HIGH] and [LOW] MONITOR keys at the same time, then input the maximum welding current (maximum secondary current) DEG. using the [+] / [-] keys. COND. HIGH Setting range of max. current: ANGLE 5 - 80 kA CURR.
-
Page 35: Setting Of The Monitor
CT-110D b. When the source-voltage fluctuation compensation control is used When the current is set to 99.9%, such a current as flows in a reference 50° welding machine having a 50° power factor angle at a 50° thyristor firing angle will flow;... - Page 36 CT-110D 2) Setting of the current monitor (Effective only in constant-current control mode) ① Press the [HIGH] key to enter the MONITOR setting mode. ② Set the upper limit of the current DEG. monitor using the [+] / [-] keys (setting range: 0 - 49%).
- Page 37 CT-110D 4) Indication of the conduction angle and monitored current MONITOR Upon completion of the weld cycle, the monitor indicates the conduction angle and DEG. monitored current. COND. HIGH ANGLE CURR. (WELD 1) Indication of the conduction angle of Weld 1 ①...
-
Page 38: Setting By Mode No
CT-110D (4) Setting by Mode No. The setter/indicator of the data/counter are explained below. MODE ① Press the [SELECT] key, and select the mode MODE DATA (0 - 7) using the [+] / [-] keys. Note: If DSW2- (7) is set to ON, select the mode from 0 to 9. - Page 39 CT-110D ② Operation If the number of weld counts for each step No. reaches the set value, the step No. is increased by 1 and the current is increased by the set stepper-up rate. Upon completion of the last step, the red [STEP END] LED lights up and the step-end signal [STEP END] is turned on.
- Page 40 CT-110D (3) Mode 3: Weld counter [3: WELD COUNT] (1 schedule) ① Setting method for preset value Set the mode No. to 3. (Setting of the weld counter) Set the preset value of the weld counter in the data setter. ②...
- Page 41 CT-110D ③ Reset method 1) Reset of the work count. When the interlock function is turned on (DSW2-(2): ON) a. Press the [SELECT] key and set the mode to "4" using the [+] / [-] keys. b. Press the [COUNT RESET] key; the Work counter is reset. 2) Reset of the work count.
- Page 42 CT-110D Examples of the turn ratio of the transformer When only one secondary output is provided: Welding transformer Primary input voltage Primary Secondary = 44 Turn ratio = Secondary output voltage When two secondary outputs are connected in parallel: Welding transformer Secondary Primary input voltage...
- Page 43 CT-110D (6) Mode 6: Setting of: ±% WINDOW ON/OFF [6: ±% WINDOW ON/OFF] Determine whether the upper and lower limits of the current monitor for Current I, Current II, and Current III should be judged. Set the mode No. to 6. (Setting of ±% WINDOW ON/OFF) (0: OFF;...
-
Page 44: Setting Of The Maximum Current
CT-110D (8) Mode 8: Setting of the constant-current correction value for Interval G1 (only when DSW2-(7) is set to ON) Adjust the constant-current correction value when the control is connected to a welder of the single-phase rectifier type and the welding current rises abnormally and overshoots or does not rise quickly enough. -
Page 45: Current Calibration Method
CT-110D (6) Current Calibration Method Though the CT-110D is properly factory-adjusted, the control current may vary over time. The control-current value may also change due to a current sensor and its installation. In such a case, the difference between controls used and the control current values can be adjusted using the properly calibrated Weld Checker, according to the following procedures. -
Page 46: Maintenance
CT-110D 7. Maintenance (1) Replacement of Battery The life of the lithium battery installed in the control is five years. Accordingly, replace it five years after the purchase of this machine. Model Lithium battery CR 2450 [ Warning ] ① When replacing the lithium battery, be sure to turn off the main power so as to prevent electrical shock. -
Page 47: Replacement Of Fuses
CT-110D (2) Replacement of Fuses The printed circuit board in this device has two fuses to protect the device. If one is blown, check for the cause, and replace it in accordance with the following procedures. Model Fuse (φ6.4 1A) FGB0 250V 1A PbF Fuse (φ10.3 1A) 250V A TLLC1... -
Page 48: Specifications
CT-110D 8. Specifications (1) Standard Specifications (1) Welding power source: The voltage depends on the specification. See (2) Specification Chart. 220V/230V/240V/380V AC -25% +10%, 50/60 Hz 400V/415V/440V/460V/480V AC -25% +10%, 50/60 Hz (Voltage set at time of shipment) (2) Control power source: The voltage depends on the specification. - Page 49 CT-110D ⑤ Weld II (W2) time: 00 - 99 cycles, 15 schedules ⑥ Cool II (C2) time: 00 - 99 cycles, 15 schedules ⑦ Weld III (W3) time: 00 - 99 cycles, 15 schedules ⑧ Slope II (S2) time (Downslope included in time of Weld 3): 00 - 99 cycles, 15 schedules ⑨...
- Page 50 CT-110D (14) Setting range of the transformer turn ratio: 1.0 to 199.9 (15) Current stepper-up ① Preset Step No.: 1 - 9 Step count: 0 - 9999, 1 schedule Stepper-up rate: 50 - 200%, 1 schedule ② Operation If the number of weld counts for each step No. reaches the set value, the step No.
- Page 51 CT-110D 8.Specifications...
- Page 52 CT-110D (20) External input signals ① PROGRAM.LOCK: If a closed-contact signal is input, programming is locked. ② START 1,2,4,8,P: Five types of start signals - START 1, 2, 4, 8, and P (parity) - are available. A 4-bit input terminal is installed. Fifteen schedules can be selected using binary signals.
-
Page 53: Specification Chart
CT-110D 355 mm (H) x 110 mm (W) x 250 mm (D) (excluding fittings), 4.5 kg (26) Accessories ① Fuse (spare): φ6.4, 1 A, φ10.3, 1 A: 1 pc. each ② Operation manual: 1 copy ③ Fittings: 1 set (2) Specification Chart Control Model No. -
Page 54: Data Out Function (Option)
CT-110D (3) Data Out Function (Option) Data out function (option) is for outputting the monitor data via RS-485. As to whether the function is equipped on your device or not, see (2) Specification Chart. (1) Data out Data is output when dip switch DSW2-(5) on the control is ON and DSW2-(1) is OFF (Pulsation). - Page 55 CT-110D Starts with the character "M". Space code "20H" between each piece of data. Ends with CR code "0DH". ①: Start No. ②: Monitor the current value of WELD 1. ③: Monitor the conduction angle of WELD 1. ④: Deviation of the WELD 1 current. If the current is larger than the current setting, “+”...
-
Page 56: Outline Drawing
CT-110D (4) Outline Drawing 1) CT-110D (Unit: mm) Fittings set M5 Rubber cushion: 4 pcs. M5 Sems, 5 x 12: 4 pcs. M5 Washer: 8 pcs. M5 Nut: 8 pcs. M5 Spring: 8 pcs. Fittings (Upper and lower): 2 pcs. 8.Specifications... - Page 57 CT-110D 2) Detail Drawing of Fitting 8.Specifications 8-10...
-
Page 58: Schedule Data Table
CT-110D 9. Schedule Data Table 9.Schedule Data Table... - Page 59 CT-110D 9.Schedule Data Table...
-
Page 60: Error Indication And Countermeasures
CT-110D 10. Error Indication and Countermeasures MODE DATA Each error code blinks in the "DATA" area on the panel. Error Code Contents Countermeasures Self-diagnosis error As the backup battery is dead, the program data is lost. Replace the battery and input the schedules again. Start input error A parity check error of the start input was detected.
Need help?
Do you have a question about the WELTOUCH CT-110D and is the answer not in the manual?
Questions and answers