Table of Contents

Related Manuals for Redexim RINK DS1600


Summary of Contents for Redexim RINK DS1600
- Page 1 Operating Manual and List of Parts RINK Model DS1600 2127 English 933.160.000 Translation of the original operating manual Kwekerijweg 8 | 3709JA | Zeist | The Netherlands | T: +31 (0)306 933 227 redexim@redexim.com www.redexim.com...
- Page 2 - 2 - DS1600...
-
Page 3: Table Of Contents
TABLE OF CONTENT SAFETY REGULATIONS ..................4 SAFETY REGULATIONS ..................5 SHORT DESCRIPTION....................6 TECHNICAL DATA ....................6 FIRST START-UP ...................... 7 OPERATION ......................8 Attachment and detachment ........................ 8 Before every drive ..........................9 Loading ..............................9 SPREADING ......................10 Operating elements .......................... -
Page 4: Safety Regulations
SAFETY REGULATIONS ➢ The RINK Disk Spreader DS1600 is designed exclusively for spreading fine-grained, loose grit such as sand, gravel, granulate or similar. ➢ Any use beyond this is considered improper use. The manufacturer is not liable for any damage resulting from this; the risk is borne solely by the user. ➢... -
Page 5: Safety Regulations
SAFETY REGULATIONS ➢ The permissible support load of the tractor must be observed. ➢ Before departure, check the immediate vicinity and ensure sufficient visibility. ➢ During operation, no one should be in the danger zone of the spreader, as there is a risk of injury from rotating parts and flying foreign objects. -
Page 6: Short Description
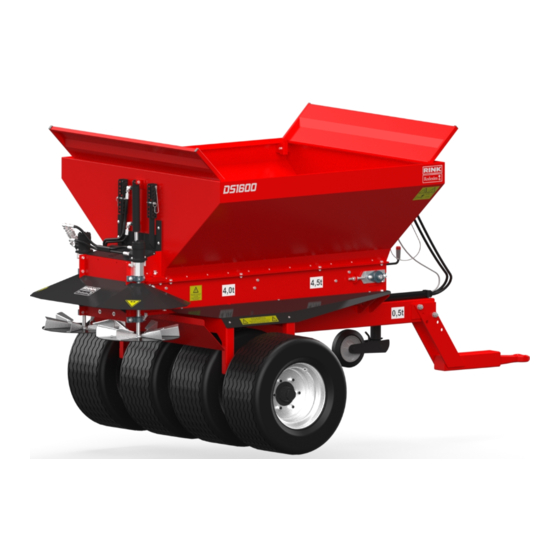
SHORT DESCRIPTION The RINK Disc Spreader DS1600 is used for spreading fine-grained, loose grit such as sand, gravel or similar. The spreading device of the disc spreader is driven by a gearbox with a hydraulic motor for the conveyor belt and one hydraulic motor each for the spreading discs. The speed of the hydraulic motors for the conveyor belt and the spreading discs is fully adjustable via a flow regulator. -
Page 7: First Start-Up
FIRST START-UP Tighten wheel nuts. Check wheel hub play and adjust if necessary. Check tyre pressure. If the RINK Disc Spreader DS1600 is to be used on public roads, the registration plate must be attached to the rear left-hand side on the mounting plate provided for this purpose (only possible with permission to use and after registration has been completed). -
Page 8: Operation
OPERATION Attachment and detachment Adjust the hitch (1) to the tractor. To do this, loosen the bolts of the hitch (1), adjust to the correct height and retighten the bolts (see page 9 - Fig. 1). Hitch RINK Disc Spreader DS1600 to tractor. Connect hydraulic lines (3) and (4) to tractor as a closed oil circuit is required (see page 10 - Fig. -
Page 9: Before Every Drive
Fig. 1: Support wheel Before every drive Check RINK Disc Spreader DS1600 for externally visible damage, and repair the damage. Check tyre pressure. Check the belt track, and readjust if necessary, as the belt must not rub against the side (see pages 16 and 17). -
Page 10: Spreading
SPREADING When the hydraulics are switched on, the spreading unit is automatically activated. The conveyor belt and the slider (6) are activated by actuating the valve (5), whereby the slider (6) is activated first and then, with a small delay, the conveyor belt. Before starting work, preselect slider position A-G (see page 11). -
Page 11: Electro-Hydraulic Control (10551)
electro-hydraulic control (10551) Fig. 3: - electro-hydraulic control Operating panel for electrohydraulic control Fig. 4: Operating panel for electrohydraulic control DS1600 - 11 -... -
Page 12: Adjusting The Spreading Density
Adjusting the spreading density The spreading density depends on: the speed of the tractor the speed of the conveyor belt - controller (1) (see page 10 Fig. 2) the speed of the spreading discs - controller (2) (see page 10 Fig. 2) the opening (A-G) of the automatic slider (6) Spreading chart Spreading... -
Page 13: Spread Of Different Grit Materials
Spread of different grit materials Different grit materials require different settings. The RINK Disc Spreader DS1600 can be adapted to all grit materials through the following options. Rotation of the distributor vanes (Fig. 5) Adjusting the conveyor belt speed with the controller (1) (see page 10 - Fig. 2) Regulating the spreading disc speed with the controller (2) (see page 10 - fig. -
Page 14: Care And Maintenance
CARE and MAINTENANCE Lubricate bearing with multi-purpose grease (every 50 operating hours) (1) Bearings on both sides of the spreading discs (2) Bearings on both sides of the rear transport shaft (3) Bearings on both sides of the front transport shaft (4) Bearings on both running axles Bearings without grease nipples are maintenance-free. -
Page 15: Changing The Oil On The Conveyor Belt Gear (Every 100 Operating Hours)
Changing the oil on the conveyor belt gear (every 100 operating hours) Unscrew the filler plug (11). Loosen the drain plug (12) on the inside at the bottom and drain the oil. Screw the drain plug (12) back in with a new seal. Fill with 0.6 l Oil SAE85-W140. -
Page 16: Axle Maintenance (Every 100 Operating Hours)
Axle maintenance (every 100 operating hours) Maintenance work on the axle may only be carried out by authorised specialist personnel. - Tighten wheel nuts. - Check wheel hub play and adjust if necessary. Tighten conveyor belt (in case of slipping) - Loosen lock nut (13) on both sides. -
Page 17: Removing And Installing The Conveyor Belt
Removing and installing the conveyor belt Disconnect the hydraulic plug connections and remove the spreading unit (1) by loosening the screws (2). Remove wheel cover (3) on both sides. Remove splash guard (4) and rubber cover (5) on the right in the direction of travel. Remove the chassis (6) by loosening the screws (14). -
Page 18: External Oil Supply (17331)
External oil supply (17331) Change the oil on the slip-on pump (every 100 operating hours)) Unscrew the bleed screw (7). Loosen the drain plug (8) at the bottom and drain the oil. Screw the filler plug (7) back in with a new seal Order no.: 10779. Turn the slip-on pump by 180 degrees. -
Page 19: Lighting System (17396)
Waste oil endangers the environment; please dispose in an environmentally friendly manner. Lighting system (17396) The lighting system must be connected to the tractor with the seven-pin plug. Cable Short designation Function colour Indicator left yellow (Tractor battery +) - - - Mass white Indicator right... -
Page 20: Troubleshooting
Troubleshooting Problem Cause Solution Slider does not Throttle valve set is too weak Adjust the throttle valve (9) until the open slider opens (see page 15) Spreading range Spreading discs rotate too slowly Increase spreading disc speed with is too narrow controller (2) (see pages 10 to 12) Spreading density Too little material is supplied...
Need help?
Do you have a question about the RINK DS1600 and is the answer not in the manual?
Questions and answers