Table of Contents
Advertisement
Quick Links
Advertisement
Table of Contents

Subscribe to Our Youtube Channel
Related Manuals for Gigaset SL800 H PRO


Summary of Contents for Gigaset SL800 H PRO
- Page 1 SL800 H PRO Up-to-date information on your product: wiki.gigasetpro.com...
-
Page 2: Table Of Contents
Contents Contents Overview ................3 Safety precautions . -
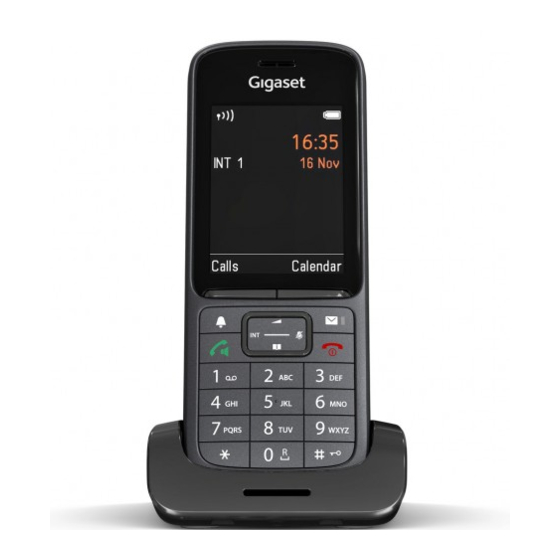
Page 3: Overview
Overview 5 End call key / On/off key End call; cancel function; Go back one menu level Press briefly Return to idle status Press and hold Switch the handset on/off Press and (in idle status) hold 6 Hash key / Lock key Lock/unlock the keypad Press and (in idle status) - Page 4 Illustration in the user guide Illustration in the user guide Warnings, which if not heeded, can result in injury to persons or damage to devices. Important information regarding function and appropriate handling or functions that could generate costs. Prerequisite for being able to carry out the following action. Additional helpful information.
-
Page 5: Safety Precautions
Read the safety precautions and the user guide before use. Comprehensive user guides for all telephones and telephone systems as well as for accessories can be found online at gigaset.com/pro in the Support category. We thereby help to save paper while providing fast access to the complete up-to-date documentation at any time. - Page 6 (e.g. a pacemaker), please contact the device manufacturer. They will be able to advise you regarding the susceptibility of the device to external sources of high frequency energy (for the specifications of your Gigaset product see "Technical data").
-
Page 7: Getting Started
Getting started Getting started Contents of the package • One handset • One battery cover (rear cover for the handset) • One battery • One charging cradle incl. power adapter • One belt clip • One user guide The charging cradle is designed for use in closed, dry rooms within a temperature range of +5°C to +45°C. - Page 8 Getting started Setting up the handset for use The display is protected by a plastic film. Please remove the protective film! Inserting the battery Only use a rechargeable battery, as this could otherwise result in significant health risks and personal injury. For example, the outer casing of the battery could be destroyed or the battery could explode.
- Page 9 Registration must be initiated on the base station and on the handset. Both must be carried out within 60 secs. On the base / On the router Gigaset base: Press and hold the Registration/Paging key on the base station (approx. 3 sec.).
- Page 10 If the product is connected to the Internet via an IP base station or router, it will automatically connect to the Gigaset support server sending regular product specific information. This information will for example be used for firmware updates or to provide internet services.
- Page 11 Getting started Setting the date and time Set the date/time so that the correct date and time can be assigned to incoming calls and to enable the alarm to be used. Date and time are set using the base. The date and time can also be set on an IP-compatible base via a time server on the network.
- Page 12 Getting started Connecting the headset Connect the headset with 3.5 mm jack to the left side of the handset Connect headset via Bluetooth ( p. 45) Setting the headset volume: p. 53 Connecting the USB data cable For data exchange between the handset and PC: Connect the USB data cable with micro-USB plug into the USB socket at the bottom of the handset Connect the handset directly to the PC, not via a...
-
Page 13: Using The Telephone
Getting to know your telephone Using the telephone Getting to know your telephone Switch the handset on/off Switch on: When the handset is switched off, press and hold the End call key Switch off: When the handset is in idle status, press and hold the End call key Lock/unlock the keypad The keypad lock prevents any accidental use of the telephone. - Page 14 Getting to know your telephone In submenus, selection and entry fields Confirm a function Navigate a line up/down Select an option, move the cursor to the left/right During a call Open the directory Open the list of available online directories (such as the directory of a Press and hold provider in the Internet or a central directory on a CAT-iq base) Mute the microphone...
- Page 15 Getting to know your telephone Menu guidance The functions of your telephone are displayed in a menu that consists of several levels. The menu guidance depends on the base. Depending on the number and type of available functions, these may be provided in different menus, e.g. at top level or in a submenu.
- Page 16 Getting to know your telephone Submenus The functions in the submenus are displayed as lists. Example To access a function: select a function Settings Return to the previous menu level: Date/Time Press the display key Back Audio Settings Display + Keypad Press the End call key briefly Language...
-
Page 17: Making Calls
Cancel dialling: Press the End call key On an IP-capable Gigaset base The connection is selected via the send connection (line) set for the handset. To use another line: press and hold the Talk key select the line Dial enter the number . - Page 18 Making calls Managing entries in the redial list Briefly press the Talk key . . . the redial list opens . . . use to select an entry Options . . . possible options: Copy an entry to the directory: Copy to Directory Copy the number to the display: Display Number...
- Page 19 Making calls Setting up Call Divert When call divert is enabled, incoming calls are forwarded to another connection. Select Services select a connection Call Divert select when call divert is to apply (All Calls/ When Busy / No Answer) enter the phone number Save Entry During a conversation Handsfree mode...
- Page 20 Making calls Adjust the microphone sensitivity Adjust the microphone sensitivity for the receiver or wired headset during a call. press and hold set the required sensitivity Save Changing without saving means the change only applies for the current call. Permanent setting of the microphone sensitivity when the phone is idle: press and hold select Earpiece / Corded headset set the sensitivity...
-
Page 21: Call Lists
Call lists Call lists The telephone saves different types of calls (missed, accepted and outgoing calls) in lists. The base/router to which the handset is registered provides information on call numbers. Detailed information can be found at wiki.gigasetpro.com List entry The following information is displayed in the list entries:: Example •... -
Page 22: Message Lists
As soon as a new message arrives, an advisory tone will sound. The Message key also flashes (if activated). Activation from the handset is only possible on Gigaset bases. use the web interface as required for CAT-iq routers. Information user guide of the base/router. - Page 23 Message lists Display messages: Example Press the Message key . . . Messages lists that contain Messages & Calls messages are displayed, Mailbox: is always displayed An entry is marked in bold: new messages are available. The Missed Appts: number of new messages is shown in brackets. Missed Calls: An entry is not marked in bold: no new messages.
-
Page 24: Directories
Local handset directory Directories Local handset directory The local directory is unique to the handset. However, it is possible to send entries to other handsets. Information about online directories on IP-capable bases and central directories on CAT-iq bases user guide of the base. Opening the directory Briefly press in idle status... - Page 25 Local handset directory Creating an entry <New Entry> switch between the Example entry fields New Entry Name: First Name: enter the first and/or last name Robert Numbers: Surname: Tel.1 - Type select a number type (Home, Office or Mobile) enter a number Tel.1 - Type: Enter more numbers: toggle between the entry fields...
- Page 26 Local handset directory Setting the order of the directory entries Directory entries can be sorted by first name or surname. Options Sort by Surname / Sort by First Name If no name was entered, the default telephone number is shown in the surname field. These entries appear at the beginning of the list, regardless of how the entries are sorted.
- Page 27 Local handset directory Copying an entry/directory The sending and receiving handset must both be registered to the same base station. The other handset and the base station are able to send and receive directory entries. An external call interrupts the transfer. Caller pictures and sounds are not transferred.
- Page 28 Synchronising the phonebook with the PC address book (Gigaset QuickSync) The Gigaset QuickSync programme has been installed on the computer. The handset is connected via Bluetooth or via a USB data cable to the computer. Free download and further information at gigaset.com/quicksync...
- Page 29 Local handset directory Dial a phone number: Select the entry Press the Talk key Options Display Number Select the number if required Transfer a contact: Select an entry Options Copy entry Select the phone number as required Transfer another contact: End a transfer: Transfer all contacts: Options...
-
Page 30: Base Directory
Base directory Base directory (depending on the base) If the DECT base (on a CAT-iq router for example) provides a separate directory, it can also be displayed and edited on the handset. Contacts Base Directory OK . . . The first entry in the phone directory is displayed Press and hold the Control button For information on the base directory:... -
Page 31: Answer Machine
Local answering machine Answer machine Local answering machine Some Gigaset bases make available a local answering machine, that you can use from the handset menu. Below is an introduction to the basic functions. For further information refer to the user guide for the base. -
Page 32: Network Mailbox
Network mailbox Network mailbox Each network mailbox accepts incoming calls made via the corresponding line. To record all calls, a network mailbox must be set up for all handset connections. The network mailbox has been requested from the network provider. A network mailbox might need to be set up on the phone system or in the base configuration. -
Page 33: Set Fast Access For The Answer Machine
Set fast access for the answer machine Playing back messages Press and hold Key 1 has been assigned to the network mailbox. Press the Message key select network mailbox (Net AM: Fixed Line / Mailbox: IP1) Voice Mail Play Messages select network mailbox (Net AM: Fixed Line / Mailbox: IP1) Listen to announcement out loud:... -
Page 34: Additional Functions
Additional information Regarding the telephone system, if the handset is connected to a Gigaset base: User guide for your Gigaset telephone Regarding the telephone system, if the handset is connected to another base/router:... -
Page 35: Sound Profiles
Sound profiles Sound profiles The telephone has sound profiles for adapting the handset to the environmental conditions: Profile Loud, Profile Silent, Profile Personal. You can use the Do not disturb profile to prevent the handset signalling an incoming call. Press the Profile key . -
Page 36: Calendar
Calendar Activate alert tone for an incoming call for Profile Silent: after switching to Profile Silent press the display key Beep . . . the icon appears in the status bar The set profile remains set when switching the phone off and back on. Changes to the settings listed in the table: •... - Page 37 Calendar Notification of appointments/anniversaries Anniversaries are transferred from the directory and displayed as an appointment. An appointment/anniversary is displayed in idle status and the selected ringtone plays for 60 seconds as a notification. Acknowledge and stop the reminder: Press the display key Off Respond with SMS: Press the display key SMS .
-
Page 38: Timer
Timer Timer Setting the timer (countdown) Organizer Timer OK . . . then Enable/disable: Activation: select On or Off Set the duration: Duration to enter the hours and minutes for the timer Min.: 00:01 (one minute); Max.: 23:59 (23 hours, 59 minutes) Save the timer: Save The timer starts the countdown. -
Page 39: Eco Dect
ECO DECT Alarm An alarm is shown on the display and indicated by the selected ringtone melody. The alarm sounds for 60 seconds. If no key is pressed, the alarm is repeated after 5 minutes. After the second repetition, the alarm call is deactivated for 24 hours. During a call, the alarm is only indicated by a short tone. -
Page 40: Protection Against Unwanted Calls
Protection against unwanted calls Deactivating radiation in idle status Settings ECO DECT No Radiation Change ( = activated) To benefit from the advantages of the setting No Radiation, all registered handsets must support this feature. If the setting No Radiation is activated and a handset is registered to the base that does not support this feature, No Radiation is automatically deactivated. - Page 41 Audio Settings Ringtones (H/Set) Anon. Calls Silent Edit ( = activated) . . . the call is only signalled on the display For all handsets (only on some Gigaset bases) Settings Telephony Anonymous Calls Edit = activated) Protection Mode: No Protection Anonymous calls are indicated in the same way as identified numbers.
- Page 42 Protection against unwanted calls Displaying/editing the black list Settings Telephony Blocklist Edit Blocked Numbers OK . . . the list of blocked numbers is displayed . . . possible options: Create an entry: New: use to enter a number Save Delete an entry: select an entry Delete .
-
Page 43: Resource Directory
Sounds for ringtones and images that can be used as caller pictures (CLIP pictures) or as a screensaver are saved in the handset's resource directory. A range of monophonic and polyphonic sounds and pictures have been pre-set but further images and sounds can be downloaded using a PC ( Gigaset QuickSync). Media types Type Format... -
Page 44: Bluetooth
Bluetooth Check memory Display the available memory for screensavers and CLIP-pictures. Additional Features Resource Directory Capacity OK . . . the percentage of available memory is displayed Bluetooth The handset is able to use Bluetooth™ to communicate wirelessly with other devices that also use this technology, e.g. - Page 45 Bluetooth Making a device visible/invisible When Bluetooth is enabled, the handset is visible to Bluetooth devices in range for 5 minutes. It is then invisible after this time. Making a device visible again: Settings Bluetooth Visibility Change ( = enabled) icon in the status bar flashes whilst the handset is visible.
- Page 46 Save Usage as a Bluetooth beacon The Gigaset SL800H can be used as a Bluetooth beacon. It can therefore be used in systems in which BLE (Bluetooth Low Energy) is used for communication, such as for localising the device, asset tracking, use in an alarm system, . . .
-
Page 47: Additional Functions Using The Pc Interface
Additional functions using the PC interface Additional functions using the PC interface The Gigaset QuickSync program has been installed on the computer. Free to download at www.gigaset.com/quicksync QuickSync functions: • Synchronise the contact details of the handset with Microsoft® Outlook® or a Google™... - Page 48 Additional functions using the PC interface Saving and restoring settings Saving settings: Save settings select which data to save (images, melodies / settings / contacts, call lists) = selected) Save settings select a storage location in the file system OK . . . the data selected is saved (file name extension: .hsdat) Restore settings: Save settings...
- Page 49 Procedure in the event of an error If the update procedure fails or the telephone no longer functions properly after the update, repeat the update procedure: End the Gigaset QuickSync program on the PC Remove the USB data cable from the telephone...
-
Page 50: Setting The Handset
Setting the handset Setting the handset Setting the date and time manually (depending on the base) To ensure you have the correct time for incoming calls and to use the alarm clock and calendar, for example, the date and time must be set. The address of a time server in the Internet is stored in the phone/router. - Page 51 Press the End call key briefly . . . the display changes to idle status Notes on displaying Info Services (only on an IP-capable Gigaset base) Info Services are activated via the web configurator. The telephone is connected to the Internet.
- Page 52 Setting the handset Large font Show text and icons in call lists and in the directory in a larger size in order to improve legibility. Only one entry is shown in the display and names are abbreviated if necessary. Settings Display + Keypad Large Font Change...
- Page 53 Setting the handset Tones and signals Call volume You can set the volume of the earpiece, handsfree function and headset on 5 levels inde- pendently of each other. Changes are only saved permanently in Profile Personal. During a conversation Handset Volume select volume Save .
- Page 54 Setting the handset Microphone sensitivity Adjust the sensitivity of the microphone for the receiver or wired headset. This gives you improved acoustics in loud environments and when there are echoes. Audio Settings Mic Sensitivity select what the setting applies for (Earpiece / Corded headset) adjust the sensitivity Save Earpiece and handsfree profile...
- Page 55 Setting the handset Switching the ringtone on/off Switching the ringtone off permanently Use the key to set the Profile Silent . . . The following icon appears in the status bar: or: Enable “Do not disturb” Audio Settings Do Not Disturb Change ( = enabled) Switching the ringtone on permanently...
- Page 56 Setting the handset Auto answer When Auto answer is enabled, the handset accepts an incoming call as soon as it is removed from the charging cradle. Settings Telephony Auto Answer Change = activated) Regardless of the Auto Answer setting, the connection ends as soon as you place the handset back in the charging cradle.
- Page 57 Setting the handset Permit/prevent multiple calls (only on a CAT-iq router) If the function is activated, multiple calls can be made in parallel. Settings Telephony Connections select connection Multiple Calls Change ( = activated) Permit/prevent internal listening in (only on a CAT-iq router) If the function is enabled, an internal party can listen in to an external call and take part in the conversation (conference).
- Page 58 Setting the handset Show status messages in idle display Settings Telephony Example Diagnostic Notifications System / Line Select On or Off Save 10:45 If a status display is enabled, relevant messages are shown in the idle INT 1 3rd Aug display.
- Page 59 Setting the handset Assigning display keys / Changing assignments The left and right display keys have a function preset by default when in idle mode. The key can be re-assigned. Press and hold the left or right display key in idle status . . . the list of possible key assign- ments is opened select the function OK .
- Page 60 If your base/router does not support this function, you can also update the firmware via a USB cable and Gigaset Quick Sync. The phone checks whether new firmware is available for the handset. If it is, a message is displayed.
- Page 61 Setting the handset Resetting a handset Reset any individual settings and changes that you have made. Settings System Handset Reset Yes . . . the handset's settings are reset The following settings are not affected by a reset • Registration of the handset to the base station •...
-
Page 62: Appendix
Data protection We at Gigaset take the protection of our customers’ data very seriously. It is precisely for this reason that we are ensuring all our products feature "Privacy by Design" as standard. All information we collect is used to make our products as good as possible. - Page 63 Manufacturer’s advice Environment Environmental management system Gigaset Communications GmbH is certified pursuant to the international standards ISO 14001 and ISO 9001. ISO 14001 (Environment): Certified since September 2007 by TÜV SÜD Management Service GmbH. ISO 9001 (Quality): Certified since 17/02/1994 by TÜV SÜD Management Service GmbH.
-
Page 64: Technical Data
3.7 V Capacity: 750 mAh Handset operating times/charging times The operating time of your Gigaset depends on the capacity of the battery, its age and the way it is used. (All times are maximum possible times.) Standby time (hours) 300/170 * Talktime (hours) Operating time with 1.5 hours of calls per day (hours) - Page 65 Technical data Power adapter Manufacturer Salom Electric (Xiamen) Co. Ltd. Commercial registration number: 91350200612003878C 31 Building, Huli Industrial District, Xiamen, Fujian 361006, P.R. China Salcomp (Shenzen) Co. Ltd. Commercial registration number: 91440300618932635P Salcomp Road, Furond Industrial Area, Xinqiao, Shajing, Baoan District, Shenzen 518125 China Model identifier C733 / C734 Input voltage...
-
Page 66: Display Icons
Display icons Display icons The following icons are displayed depending on the settings and the operating status of your telephone. Icons in the status bar Icon Meaning Icon Meaning Signal strength (No Radiation off ) Bluetooth enabled 1% -100% Headset / hearing aid connected via white, if Maximum Range on;... - Page 67 Display icons Display icons to indicate . . . Icon Meaning Icon Meaning External call Reminder for appointment Internal call Reminder for anniversary Establishing a call (outgoing call) Alarm call Connection established Countdown timer No connection established/ Answer machine is recording (only for connection terminated a system with a local answer machine) Other display icons...
-
Page 68: Index
Index Index ........42 Call block ....... . . 19 Call divert . - Page 69 ..... . .28, 47 Gigaset QuickSync ......25 saving an entry .
- Page 70 Index ......57 Internal listening in ......32 Network mailbox .
- Page 71 Index ........54 ......43 Ringtone Sounds for ringtones .
-
Page 72: Open Source Software
Open Source Software General Your Gigaset device includes Open Source software that is subject to various license conditions. With regard to Open Source software, the granting of usage rights that go beyond the operation of the device in the form supplied by Gigaset Communications GmbH is governed by the relevant license conditions of the Open Source software. - Page 73 Issued by Gigaset Communications GmbH Frankenstraße 2, D-46395 Bocholt © Gigaset Communications GmbH 2022 Subject to availability. All rights reserved. Rights of modification reserved. gigaset.com/pro...
Need help?
Do you have a question about the SL800 H PRO and is the answer not in the manual?
Questions and answers