Table of Contents
Advertisement
Quick Links
Quick Start Guide
SL930
A
Congratulations
By purchasing a Gigaset, you have chosen a brand that is fully
committed to sustainability.
This product's packaging is eco-friendly!
To learn more, visit www.gigaset.com.
GIGASET HELPLINE: 08450 318190
Connect the base to the telephone network and the mains power supply in the
order shown below:
3a
5
1
2
3
3
4
u
The power adapter must always be connected, as the phone will not operate without a
power supply.
u
Use only the supplied power adapter and phone cord. The pin connections on telephone
cables may vary.
Connect the charging cradle
¤
To remove, press the release button
nect the plug
.
4
4
2
1
3
Set up the handset for use
To be able to use the full range of phone functions, we recommend operating the handset
together with a Gigaset SL930A base.
You can also register the Gigaset SL930H base to another base. You can find more
information about the handset functions in connection with the individual Gigaset base at:
www.gigaset.com/compatibility.
The handset display and keys are protected by a film. Please remove the protective
film!
Please do not use a touchscreen pen to operate the handset!
Do not use any other manufacturers' protective case / film.
They may restrict the operability of your handset.
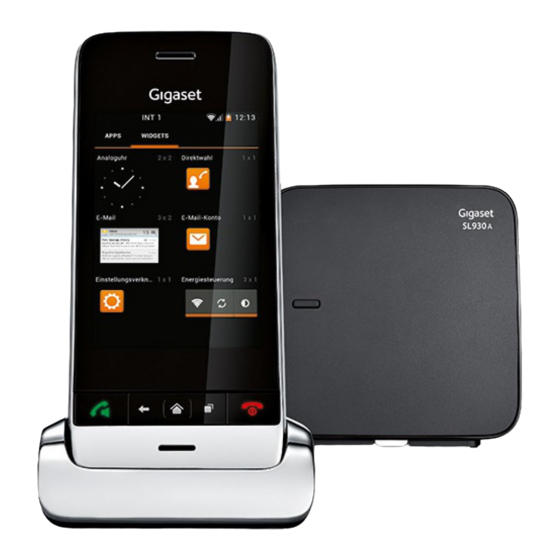
Overview
Message LED
Proximity sensor
Touchscreen/Display
Icons display the phone's operating state and its
current settings.
Status Screen: Touch status bar and drag down.
Application area
Depending on the selected app (application)
Start screens: Individually configurable).
Keys
Talk key
¤
Dial displayed number, accept call, switch between
handset and hands-free mode, open call list
(Press briefly).
¤
Set volume (press and hold).
Back key
¤
Back to the previous screen:
¤
Close keypad, dialog box, menu or notification
window.
End call/End key
¤
End call/paging call, reject internal call, turn off
ringtone for external call, switch off display (Press
briefly).
¤
Switch handset on/off (press and hold);
Last key / Menu key
¤
Display apps last opened (Press briefly).
¤
Open app-specific menu (Press and hold).
Start screen key
¤
Display start screen.
If you have problems setting up or operating this product please call
GIGASET UK HELPLINE 08450 318190
GIGASET IRL HELPLINE 0818 2000 33
To download the latest full Gigaset SL930A and other user guides, visit our website:
www.gigaset.com/uk
Insert SD card (not included)
In order to store personal data, images, videos or music, you can insert a microSD card into your handset.
¤
¤
Insert fingernail into the slit
Flip card slot upwards
¤
on the card slot and pull card
Insert card
.
2
slot forwards.
Insert the battery and close the battery cover
Use only the rechargeable battery recommended by Gigaset Communications GmbH, as this
could otherwise result in significant health risks and personal injury. For example, the outer
casing of the battery could be destroyed or the battery could explode. The phone could also
malfunction or be damaged.
1
2
3
and discon-
¤
¤
First insert battery with
First orientate the battery
the contact side pointing
cover with the side lugs
down
1
.
fitting into the slots on
¤
the inside of the housing.
Then insert battery
¤
downwards into the bat-
Then press the cover until
tery compartment
.
it clicks into place.
2
Charge the battery
The battery is supplied partly charged. Please charge it completely before
use.
¤
Charge the handset in the charging cradle for 4 hours.
The handset automatically switches on when you place it into the charging
cradle.
u
The handset may only be placed in the designated charging
cradle.
u
The battery may heat up during charging. This is not danger-
ous.
u
After a time, the charge capacity of the battery will decrease
for technical reasons.
Message LED
The message LED is situated on the left next to the
earpiece. It indicates, for example:
u
Missed calls
u
New messages on the answer machine
u
Missed appointments
For an event, which is indicated using the message LED, you are given additional information on the
status screen.
Connections
Base
User guide
Online: As soon as your phone is connected to the WLAN and is able to establish an Internet
connection, you can use the online help on the handset.
¤
Open the application menu
To enable you to quickly find the desired information, a table of contents
search function
are available. The online help provides comprehensive information about its
navigation options on the first page.
Basic settings
Before you use your phone, make the following settings:
u
Change the language.
2
u
Set the country and area code
u
3
Register the handset. To do this you need the system PIN for the base.
u
4
Connect the phone to the WLAN. To do this, you will need the access data to your WLAN (network
1
name and password). To use Internet services on your phone, you will need a router with WLAN
functionality and an Internet connection.
¤
If the phone has not yet been switched on:
1
.
Flip card slot downwards
You configure all the settings using the Settings menu.
3
and push backwards
Open the Settings menu:
Open the application menu
until it clicks into place
4
.
u
Information on operating the touchscreen.
u
Information on entering text.
u
Information on the Application menu.
Change the language
¤
Menu
Settings
A list of available languages is displayed.
¤
Select desired language. Where applicable, scroll through the list to the desired language.
If the language is spoken in several countries, select the entry for the country.
Your language selection is immediately activated.
Set the country and area code
If you have to re-open the
The country selection is the basis for the automatic setting of time zone and country code. Your phone
battery cover:
needs a country and area code to correctly dial telephone numbers, which may be saved in different
¤
formats on your handset, and to load country-specific applications.
Insert a fingernail into the
slot at the bottom of the
If you skip this setting, it may be the case that numbers in your phonebook, although they
battery cover and pull the
formally look correct, cannot be dialled.
battery cover upwards.
¤
Press on start screen key
.
¤
Country:
Select country from the list.
The country code is automatically set to fit the selected country. If your country is not in the list,
select Other country (at the very bottom of the list) and enter the country code yourself.
4 h
¤
Country (dial code):
Enter country code.
¤
Area (dial code):
Enter area code.
The code consists of a prefix and the number. The country-specific prefix is placed before the area
code number if the country code is not also dialled.
Install the base and charging cradle
The base and charging cradle are designed for use in closed, dry rooms within a temperature range of
+5°C to +45°C.
¤
Position the base on a level, non-slip surface at a central point in the building or house, or mount the
base onto the wall.
Charging contacts
Micro-USB socket
Connect handset to PC.
3.5 mm jack
Connect headset, stereo mode and
microphone function possible.
Registration/paging key
Start paging (press briefly)
Set base to registration mode
(Press and hold)
and tap on Help
.
, an index
and a
Issued by
Gigaset Communications GmbH
Frankenstr. 2a
D-46395 Bocholt
Google, Google Play, Android and other marks are trademarks of Google Inc.
Register the handset
Handsets contained in the package have already been registered to the base. If however a handset has
not been registered, register it now.
On the base:
(min. 5 secs).
On the handset within a minute:
¤
Menu
¤
Enter the system PIN if required (factory setting:
0000).
Press and hold the End call key
.
The connection to the base is established; this may take some time.
Following a successful registration the message Handset registered
.
Tap on Settings
.
is displayed.
¤
Confirm message by pressing OK.
Connect the handset to WLAN
¤
Menu
¤
Switch on WLAN with the sliding switch.
A list of WLANs in range of your phone is displayed.
¤
Tap on the desired WLAN. If necessary, tap on SCAN to update the list.
Language & input
Language.
The signal strength of the selected WLAN and the security protocol
used are displayed.
¤
Enter Password (network key).
¤
Tap on Connect.
If the desired network is not displayed:
¤
Tap on ADD A NETWORK.
desired WLAN.
(network key).
If the handset is able to establish an Internet connection, the date and time are automatically set.
Your phone is now ready for use.
Switch the handset on/off
Tap on
. Open context menu
.
Tap on Settings.
Switch on:
Or:
Switch off:
Confirm by pressing OK.
Confirm by pressing OK.
Getting started
To use Internet services on your phone, you need an operational router with WLAN func-
tionality and an Internet connection to which you register your handset as a WLAN client.
u
Range for telephone mode:
Pay attention to the DECT range of the base. This is up to 50 m inside buildings and up to
300 m in unobstructed outdoor areas. The range is reduced when Maximum range is
deactivated.
¤
Menu
Settings
DECT.
u
Range for data connections:
The WLAN range of the router is normally lower than the range of the base. Refer to the
user guide for your router to determine this.
u
Never expose the phone to heat sources, direct sunlight or other electrical devices.
u
Protect your phone from moisture, dust, corrosive liquids and vapours.
*A31008-M2311-L121-1-7643*
A31008-M2311-L121-1-7643
© Gigaset Communications GmbH 2013
Subject to availability. All rights reserved.
Rights of modification reserved.
www.gigaset.com
Press and hold the Registration/paging key
System PIN
Settings
Handsets & base
Register.
Cancel
OK
Confirm PIN by pressing OK.
Settings
Wi-Fi.
Wi-Fi
WiFi 1
Secured with WPA2
WiFi 2
Secured with WPA/WPA2 PSK
WiFi 3
Secured with 802.1x EAP
Enter the Network SSID for the
Select security procedure.
Enter password
Tap on Connect.
¤
Press the End call key
. The device switches on after a few seconds.
¤
Place the handset into the charging cradle. It switches on after about 35 seconds.
¤
Press and hold the End call key
.
Power off
OK.
If a screen lock has been set up:
Unlock the screen.
Done
ON
Advertisement
Table of Contents

Related Manuals for Gigaset sl930 a


Summary of Contents for Gigaset sl930 a
- Page 1 Gigaset SL930A base. cradle. You can also register the Gigaset SL930H base to another base. You can find more The battery may heat up during charging. This is not danger- information about the handset functions in connection with the individual Gigaset base at: www.gigaset.com/compatibility.
- Page 2 Copy app to start screen Getting to know and operating your phone Swipe Application menu (example) ¤ ¤ Swipe up/down or right/left over the display to scroll Select menu APPS or WIDGETS. In addition to calling functions, your phone has many other ¤...
Need help?
Do you have a question about the sl930 a and is the answer not in the manual?
Questions and answers