Table of Contents
Advertisement
Quick Links
Advertisement
Table of Contents
Troubleshooting

Related Manuals for Marport M6 PRO


Summary of Contents for Marport M6 PRO
-
Page 2: Table Of Contents
Contents Powering the Mx computer Legal Configuring Mac Mini Network History Installing Hydrophones Copyright List of Marport Hydrophones Disclaimer Connecting the Hydrophone to the Receiver Adding Temperature Data from the Hydrophones to the System Introduction and Understanding Receiver LEDs Presentation... - Page 3 Contents | iii Appendix Frequency Plan Index...
-
Page 4: Legal
• Added list of supported Apple operating systems for Scala and Mosa2 in Compatibility with Apple Oper 01/06/22 ating Systems (on page 14). • Now documents Scala2 version 02.10.x and Mosa2 08/04/22 version 02.11.x. M6 PRO | V6 | Legal... -
Page 5: Copyright
Marport. “Marport”, the Marport logo and Software Defined Sonar are registered trademarks of Marport. All other brands, products and company names mentioned are the trademark and property of its respective owners only. Marport is a division of Airmar Technology Corporation. -
Page 7: Introduction And Presentation
Read this section to get a basic knowledge of your M6 system. Introduction The M6 Pro system works with an Apple Mac mini, an Mx computer and two Mx receivers. The Mx computer processes the signal and displays the data on a screen connected to the Mac. -
Page 8: Safety Guidelines
Install and use this product in accordance with this user manual. Incorrect use of the product may cause damage to the components or void the warranty. Only qualified Marport dealers can do installation and maintenance interventions. M6 PRO | V6 | Introduction and Presentation... -
Page 9: Description
11 Junction boxes (x2) (ref. 46-055-01) Scala2 software dongle 12 Thru-hull penetration (ref. TH-1-XX) Mx computer (ref. SDS-0-01/SDS-0-02) 13 Hydrophones (ref. NC-1-XX) Ethernet switch, connected with USB to Ether net adapter Internet M6 PRO | V6 | Introduction and Presentation... - Page 10 Monitors, 3 per mac mini: Ethernet switch (not provided by Marport) • Monitor #1: HDMI • Monitor #2: HDMI/DVI/VGA • Monitor #3: HDMI/DVI/VGA Mac mini 2018 (x 2) (ref. MAC-0-01) Mx computer (ref. SDS-0-01) M6 PRO | V6 | Introduction and Presentation...
-
Page 11: Equipment List
• 2 Mx receivers • 4 Mx hydrophone junction boxes (ref. 46-055-01) • 2 CAT5e network cables • 2 Ethernet connector kits • 2 Mx hardware kit (mounting screws and ground straps) M6 PRO | V6 | Introduction and Presentation... - Page 12 • 1 NMEA multiplexer to receive NMEA data and display them in Scala2: ShipModul MiniPlex-3E-N2K if using NMEA2000 and NMEA0183 or Miniplex-3E if using only NMEA0183. • If using Mosa2 on a tablet computer: refer to Marport sales offices to know the recommended model. Software...
-
Page 13: Technical Specifications
ScalaReplay2 Marport software application replaying data recorded in Scala2. Mosa2 Marport software application used to configure sensors. Can be used on desktop or tablet computers. Mozilla Firefox Web browser. Allows to display the system web page (access to Mx re... -
Page 14: Systems
Scala2 Scala OS name OS release Scala 1.x Scala 2.0.x Scala 2.2.x Scala 2.4.x Scala 2.6.x 2.10.x Monterey mac OS 12.4 Big Sur mac OS 11.0 Catalina macOS 10.15 Mojave macOS 10.14 M6 PRO | V6 | Introduction and Presentation... - Page 15 OS 12.4 Big Sur mac OS 11.0 Catalina macOS 10.15 Mojave macOS 10.14 High Sierra macOS 10.13 Sierra macOS 10.12 El Capitan OS X 10.11 Yosemite OS X 10.10 Mavericks OS X 10.9 M6 PRO | V6 | Introduction and Presentation...
- Page 16 *Mosa 2.11 compatibility with Monterey: A1 sensors cannot connect by short range wireless signal. You must use a Configuration Cable. M6 PRO | V6 | Introduction and Presentation...
-
Page 18: Computer Configuration
1. From the top left corner of the screen, click Apple Menu > System Preferences > Keyboard. 2. macOS Big Sur or later: Click the tab Input Sources and select Show Input menu in menu bar. M6 PRO | V6 | Computer Configuration... - Page 19 3. macOS Catalina or earlier: Select Show Keyboard, Emoji, & Symbol Viewers in menu bar. 4. Close the window. 5. From the top right corner of the screen, click the flag corresponding to the keyboard language preferences, then select Show Keyboard Viewer. M6 PRO | V6 | Computer Configuration...
- Page 20 A virtual keyboard is displayed on the screen. You can change its size by dragging its corners. M6 PRO | V6 | Computer Configuration...
-
Page 22: Installation
Marport technicians or dealers need to connect the different components of the system. Note: The system is installed by Marport or by a dealer. If there is a problem, you can read these installation steps to check the system installation. - Page 23 Refer to Hydrophone installation manual for detailed guidelines. 12. When adding sensors to the system, refer to the Frequency Plan (on page 44) to help you allocating frequencies. M6 PRO | V6 | Installation...
-
Page 24: System Cabling
System Cabling Connect the components of the system according to the following cabling. Power cable, connected to 100-240V AC power supply* Up to 3 screens (HDMI or thunderbolt cable) Loudspeakers (if applicable) M6 PRO | V6 | Installation... -
Page 25: Powering The Mx Computer
Powering the Mx computer Important: Only use recommended power supply MEAN WELL HEP-150-24 A. Marport cannot not be held responsible for dysfunction of the system if recommended equipment is not used. 1. Connect the power cable to the Mx computer. -
Page 26: Configuring Mac Mini Network
Ethernet. If it is not at the top of the list, click the tooth wheel icon at the bottom of the list and select Set Service Order. 3. In the network list, click Ethernet, then: M6 PRO | V6 | Installation... -
Page 27: Installing Hydrophones
Note: For more information about Marport hydrophones, please refer to Hydrophone Installation Manual. List of Marport Hydrophones These are technical specifications for hydrophones currently sold by Marport. For information about obsolete hydrophones, please contact Marport support. M6 PRO | V6 | Installation... - Page 28 • Use at great depths (> 500 m). • Gain configurable (Low or High) • Filters configurable (38 and/or 50kHz). • Low noise environ ment between pas sive hydrophone and wideband pre amplifier box M6 PRO | V6 | Installation...
- Page 29 (inte level of noise (below grated preamplifi -100 dBV). • Large number of sensors.† • Use at great depths (> 500 m). • Gain configurable (Low or High) • Filters configurable (38 and/or 50kHz) M6 PRO | V6 | Installation...
-
Page 30: Receiver
‡ Add as NC-1-07 in the system web page. Connecting the Hydrophone to the Receiver You need to connect the hydrophone to the receiver to be able to display sensor data received by the hydrophones. M6 PRO | V6 | Installation... -
Page 31: Adding Temperature Data From The
Note: H3 hydrophone input allows to receive water temperature from an NMEA connection (Scanmar hydrophone or NMEA converter junction box). If you connect a Marport hydrophone to H3 without NMEA converter, you will not have temperature data from the hydrophone. - Page 32 In Hydrophone Location, select the number of the receiver's port on which the hydrophone is connected. d. Click Add Sensor. The water temperature is displayed in Scala2, in the control panels, under Mx. M6 PRO | V6 | Installation...
-
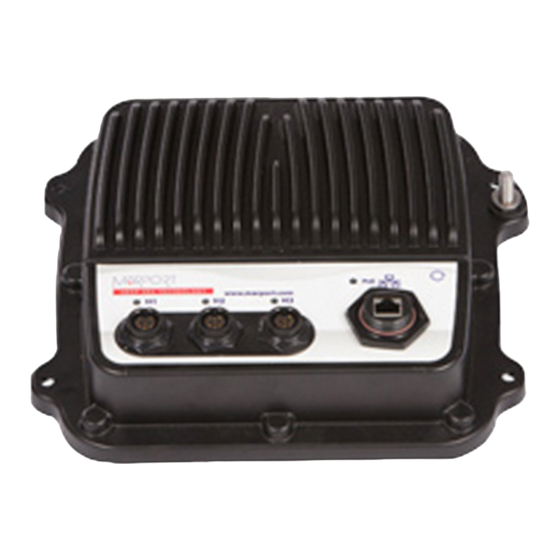
Page 33: Understanding Receiver Leds
• Blinking blue: the receiver is connected to a power source but it is disconnected from the computer. Check that the computer is connected to the Mx computer. • Blinking red: Ethernet is resetting. M6 PRO | V6 | Installation... - Page 34 Hydrophone LEDs The LEDs on the hydrophone inputs identify the type of hydrophone that is connected to the receiver. • Blue: passive hydrophone • Red: active hydrophone • No light: no configured hydrophone M6 PRO | V6 | Installation...
-
Page 36: Maintenance And Troubleshooting
3. Open the control panels and go to the Mx panel. 4. Go to Hydrophone data, then drag and drop Spectrum data to a page. These data appear only when the spectrum has been started. M6 PRO | V6 | Maintenance and Troubleshooting... - Page 37 ◦ RealTime: the latest highest level of noise (dBV) record ed and its frequency. ◦ Max: the highest level of noise recorded since the begin ning of the spectrum and its frequency. M6 PRO | V6 | Maintenance and Troubleshooting...
-
Page 38: Troubleshooting
13. Right-click the spectrum analyzer and click Hide FFT to hide the FFT plot. 14. Right-click the IP address of the receiver in the status bar and click Stop Spectrum. Troubleshooting Learn how to solve common problems. M6 PRO | V6 | Maintenance and Troubleshooting... -
Page 39: The Mx Receiver Does Not Appear On Mosa2
3. See or , according to the model of the Mx computer. No Internet Access You cannot connect to the internet or see the system control panel page on Firefox web browser. The order of the computer networks is wrong. M6 PRO | V6 | Maintenance and Troubleshooting... - Page 40 2. Make sure that the network called Ethernet 2 is at the top of the list, then is followed by the network called Ethernet 1. 3. If not, to change the order click the tooth wheel icon at the bottom of the list and select Set Service Order. M6 PRO | V6 | Maintenance and Troubleshooting...
-
Page 41: Antifouling System Causes Interferences
If you have an issue with the system, you may need to give remote access to the computer to the support team with TeamViewer application. You need to have access to a good internet connection. M6 PRO | V6 | Maintenance and Troubleshooting... -
Page 42: Recording Audio Files
Record Wave file. 3. When the recording is finished, click OK to download it. The audio file is saved in: 4. Send the recording to Marport support service for a diagnosis. M6 PRO | V6 | Maintenance and Troubleshooting... -
Page 43: Support Contact
Support Contact You can contact your local dealer if you need maintenance on your Marport products. You can also ask us at the following contact details: FRANCE ICELAND Marport France SAS Marport EHF 8, rue Maurice Le Léon Tónahvarf 7... - Page 44 BC/CH Frequency FID (Scanmar) C-1/CH1 42833 C-1/CH2 41548 C-1/CH3 41852 C-1/CH4 40810 C-1/CH5 42500 C-1/CH6 43200 C-2/CH1 42631 C-2/CH2 41417 C-2/CH3 41690 C-2/CH4 40886 C-2/CH5 42300 C-2/CH6 43100 C-3/CH1 42429 C-3/CH2 41285 C-3/CH3 41548 M6 PRO | V6 | Appendix...
- Page 45 C-5/CH1 42024 C-5/CH2 41690 C-5/CH3 41285 C-5/CH4 41060 C-5/CH5 42900 C-5/CH6 43400 C-6/CH1 39062 C-6/CH2 39375 C-6/CH3 39688 C-6/CH4 40000 C-6/CH5 40312 C-6/CH6 40625 C-7/CH1 38906 C-7/CH2 39219 C-7/CH3 39531 C-7/CH4 39844 C-7/CH5 40156 M6 PRO | V6 | Appendix...
- Page 46 C-7/CH6 40469 Frequencies and intervals The diagrams below show the bandwidth of the different types of Marport sensors and intervals you must respect when adding other sensors. Figure 1. PRP sensors (e.g. Catch sensor, Trawl Speed, Spread sensor...) Example: If the frequency of the sensor is 40kHz, there should be no sensors between 39.9-40kHz and 40-40.1kHz.
- Page 47 Figure 2. Marport Pro sensors (e.g. Trident, Door Explorer, Trawl Navigator, Speed Navigator) Example: If the frequency of the sensor is 40kHz, there should be no sensors between 39.8-40kHz and 40-50.2kHz. Figure 3. NBTE sensors (e.g. Speed Explorer, Trawl Explorer, Catch Explorer, Catch Navigator, Door Sounder) Example: If the frequency of the sensor is 40kHz, there should be no sensors between 39.8-40kHz and 40-40.6kHz.
- Page 48 • We recommend to allocate frequencies between 34 and 56 kHz for wideband hydrophones and between 41 kHz and 44 kHz for narrowband hydrophones. • Echosounders are usually placed around 38 kHz, make sure to allow enough distance with them. M6 PRO | V6 | Appendix...
- Page 49 Example of a system with Spread, Catch, Trawl Speed sensors and Speed Explorer, Catch Explorer, HDTE and Door Sounder. Example of a system with Spread sensors with positioning, Catch sensors, Trawl Explorer and Catch Explorer. M6 PRO | V6 | Appendix...
- Page 50 Example of a system for purse seining, with a Seine Explorer and depth Seine sensors. Bandwidth Mandatory distance with other sensors Avoid allocating frequencies between 37 and 39 kHz because this range is generally used by echosounders. M6 PRO | V6 | Appendix...
- Page 51 Index Internet No access 39 Boat code 44 IP address 26 Troubleshooting 39 Channel code 44 Keyboard Virtual 18 Data recording Audio recording 42 Mac pro Installation 22 Frequency plan 44 Network Mac Pro 26 NMEA converter junction box 30 Hydrophone Types 27 Power off Interference Checking 36...
- Page 52 Troubleshooting 41 Receiver Connecting to 30 H# LEDs 33 Installation 22 Lights 33 PoE LED 33 Restart Troubleshooting 41 Sonihull Interference 41 Spectrum 36 TeamViewer 41 Technical specifications 13...
Need help?
Do you have a question about the M6 PRO and is the answer not in the manual?
Questions and answers