
Related Manuals for Bodyworx ASB700


Summary of Contents for Bodyworx ASB700
- Page 1 LIGHT COMMERCIAL INDOOR CYCLE Model No: ASB700 Retain this owner’s manual for future reference. Read and follow all instructions in this owner’s manual.
- Page 2 GPI Sport & Fitness Warranty Registration Form Congratulations on purchasing your product, we at GPI believe that our product range is of the highest quality and represents great value for money. We back our product range up with our industry leading warranty. Please see below for the step by step instructions on how to register your product warranty on- line.
-
Page 3: Exercise Instructions
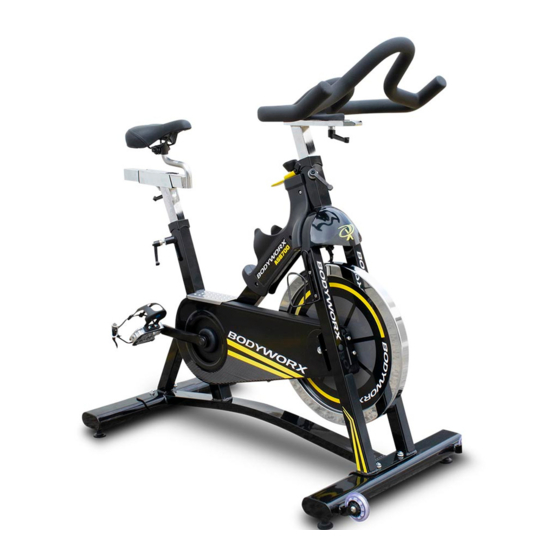
CONTENT PAGE WARRANTY REGISTRATION FORM IMPORTANT SAFETY INSTRUCTIONS SAFETY GUIDELINES FEATURES HARDWARE PARTS LIST ASSEMBLY INSTRUCTION 8-10 EXPLODED DIAGRAM PARTS LIST FLYWHEEL LUBRICATION PEDALS & CRANKS WARNING EXERCISE INSTRUCTIONS 15-16... - Page 6 Saddle Emergency Brake Seat Slider Seat Post Sweat Guard Quick Release Heavy Flywheel Belt Driven Transportation Wheel...
-
Page 7: Specification
DESCRIPTION Q'TY SPECIFICATION Handlebar Chrome & PVC dipping Handlebar Stem Chrome & PVC dipping Washer Quick Release Black Pedal (L) Left threaded Pedal (R) Right threaded Washer Front Stabilizer With 2 transportation wheels Cap Nut Carriage Bolt M8*60 Rear Stabilizer Without weels Multi-Wrench... - Page 8 ASSEMBLY STEP A Attach the Front Stabilizer (#63) to the Frame using two Cap Nuts (#64), two Washers (#61) and two Carriage Bolts (#65), then secure firmly using the Multi-Wrench (#70) ASSEMBLY STEP B Attach the Rear Stabilizer (#67) to the frame using two Cap Nuts (#64), two Washers (#61) and two Carriage Bolts (#65), then secure firmly using the Multi-Wrench (#70).
- Page 9 ASSEMBLY STEP C C1: Thread the left pedal (#46L) that has “L” on spindle of the left side arm of the bike using the Multi-Wrench (#70). Please note that the “L” pedal is left-hand threaded which must be turned counter-clockwise to tighten. C2: Thread the right pedal (#46R) that has “R”...
- Page 10 ASSEMBLY STEP E Install the Handlebar Assembly into the frame receptor and secure with the Quick Release (#7). Congratulations, you have done the assembly!
- Page 12 DESCRIPTION Q'TY/BIKE DESCRIPTION Q'TY/BIKE Handlebar Small Pulley Handlebar Stem Hub Set Washer 37-1 Flange Nut Quick Release 37-2 Washer Saddle Flywheel Seat Slider Locked Ring End Cap Hub Cover Sleeve Outer Chain Guard Seat Post Spring Washer Quick Release Bottom Bracket Water Bottle 43-1 Phillip Screw...
- Page 14 WARNING PEDALS & CRANKS (A117BB, ASB500, ASB700 & ASB800) Given the design and usage of Indoor Cycles it is very important to ensure correct assembly and ongoing maintenance for optimum performance and your safety. Supplied with the bike is a pedal wrench for your initial assembly.
- Page 17 LIGHT COMMERCIAL INDOOR CYCLEE Model No: ASB700 To register your warranty, please go to www.gpisports.com.au DISTRIBUTED EXCLUSIVELY BY 275 Wellington Road Mulgrave, VIC, 3170 Australia...
Need help?
Do you have a question about the ASB700 and is the answer not in the manual?
Questions and answers