Table of Contents
Advertisement
Quick Links
I
P
X
-
1
0
0
I
P
X
-
1
0
0
I
P
X
-
1
0
0
I
n
t
e
r
n
e
I
n
t
e
r
n
e
I
n
t
e
r
n
e
i
n
s
t
a
l
l
a
t
i
n
s
t
a
l
l
a
t
i
n
s
t
a
l
l
a
t
ARISTA SYSTEMS CORPORATION
5th Floor, No.82-8, Guang-Fu Road, Sec.1, San Chung Area, New-Taipei City 241, Taiwan
Tel: +886 2 8512 3000
Website:
www.aristel.com.tw
t
S
I
P
t
e
l
t
S
I
P
t
e
l
t
S
I
P
t
e
l
i
o
n
m
a
n
i
o
n
m
a
n
i
o
n
m
a
n
FAX: +886 2 8512 2555
e
p
h
o
n
e
e
p
h
o
n
e
e
p
h
o
n
e
a
u
l
a
u
l
a
u
l
s
y
s
t
e
m
s
y
s
t
e
m
s
y
s
t
e
m
Advertisement
Table of Contents

Related Manuals for Aristel IPX-100


Summary of Contents for Aristel IPX-100
- Page 1 ARISTA SYSTEMS CORPORATION 5th Floor, No.82-8, Guang-Fu Road, Sec.1, San Chung Area, New-Taipei City 241, Taiwan Tel: +886 2 8512 3000 FAX: +886 2 8512 2555 Website: www.aristel.com.tw...
-
Page 2: Table Of Contents
IPX-100 system installation & configuration TELECOMMUNICATIONS PRODUCT INTRODUCTION ........................... 8 SPECIFICATION ..............................9 ................................. 10 YSTEM FEATURE :............................... 11 UDIO AND VIDEO CODE : ..............................11 ETWORK STANDARD SYSTEM INSTALLATION REQUIRMENTS ......................12 PREPARATION OF SYSTEM INSTALLATION ......................12 SYSTEM STRUCTURE DISCRIPTION ........................13 SYSTEM INSTALLATION ............................ - Page 3 IPX-100 system installation & configuration TELECOMMUNICATIONS 2-2-5 SMTP Settings..............................25 2-2-6 Time Zone Settings ............................25 2-2-6-1 Time Server Settings ..........................25 2-2-6-2 Manual Set Date & Time .........................25 Firewall ..............................26 2-3-1 A Allow Traffic To/From Specific IP........................26 2-3-2 Attack Blockade Service ............................26 Hardware Settings ..........................
- Page 4 IPX-100 system installation & configuration TELECOMMUNICATIONS 3-10 Jitter Buffer............................48 3-11 Codec ..............................48 PBX SETTINGS ..............................49 Hardware Ports............................. 49 4-1-1 Solt ..................................49 4-1-1-1 FXO Port ..............................50 General ...............................50 Technology ..............................50 Other Options..............................51 Incoming Options ............................51 4-1-1-2 FXS Port..............................51 General ...............................51...
- Page 5 IPX-100 system installation & configuration TELECOMMUNICATIONS 5-1-2 Delete the System Recordings ...........................64 Follow Me/Forward ..........................65 5-2-1 Modify the Follow Me............................65 5-2-1-1 Follow Me Settings ..........................66 General ...............................66 Extension List ..............................66 Destination If No Answer/Busy........................67 5-2-1-2 System Forwarding Settings ........................68 5-2-2 Disable the Follow Me ............................68...
- Page 6 IPX-100 system installation & configuration TELECOMMUNICATIONS 5-7-1-1 General ..............................82 5-7-1-2 Conference Options ..........................82 5-7-2 Delete the Conference Room ..........................83 Time Conditions ............................ 83 5-8-1 Add/Modify the Time Condition........................83 5-8-1-1 General ..............................84 General ...............................84 Time To Match ............................84 5-8-1-2 Destination .............................84 Destination If Time Matches ........................84...
- Page 7 IPX-100 system installation & configuration TELECOMMUNICATIONS 5-13 System Alarm............................97 MAINTENANCE .............................. 98 System File Management ........................99 6-1-1 System Firmware Upgrade ..........................99 6-1-2 Factory Default ............................... 100 6-1-3 Restore System Configuration File ........................100 6-1-3-1 The system did not detect the backup file ..................... 100 6-1-3-2 The system detects that there is a backup file stored in the FLASH memory.
-
Page 8: Product Introduction
TELECOMMUNICATIONS 1 Product introduction Aristel IPX-100 is a whole new generation of telephone PBX systems, combined by traditional digital key phone PBX system and IP internet technology. Telephone recording, voice mail, one-button broadcasting, auto-hold, auto-transfer of internal and external calls, free settings of individual extension ringing tone, conference call, single-line phone function interface of power failure, intelligent function one-button setting, etc., each of Aristel telecommunication products design has incorporated your habits. -
Page 9: Specification
2 Specification System capacity: Maximum system hardware port: 24 ports Feature phone: 0-24 ports (RJ-11connector) Regular phone: 0-24 ports (RJ-11connector) Trunk line: 0-24 port (RJ-11connector) SIP trunk channel: Max 24 channels SIP extension: basic 20ports (Max registration: 200 seats) Free expansion slot: 3 expansion slots RS232port: DB9 male connector (system maintainance) -
Page 10: System Feature
IPX-100 system installation & configuration TELECOMMUNICATIONS System feature 1. abbreviation dail code (Speed dial – 900 sets(system) ,personal(100sets) 2. DISA (IVR) auto attendant 3. Voice mail 4. One touch online recording 5. Voice mail message send to Email 6. Incoming call aggsignment 7. -
Page 11: Audio And Video Code
IPX-100 system installation & configuration TELECOMMUNICATIONS Audio and video code: G.711 (A-law and mμ-law) G.726 (16/24/32/40 kbps) G.729 A G.723.1 (6.3 kbps,5.3 kbps) Dynamic payload support Adjustable audio frame per packet DTMF: in-band & out-of-band (RFC 2833) (SIP INFO) Call progress tone generation... -
Page 12: System Installation Requirments
IPX-100 system installation & configuration TELECOMMUNICATIONS 3 System installation requirments The system must be placed in a dry, dust-free place, 10 cm above the ground to avoid vibration。 Choose a well-ventilated place and avoid direct sunlight to avoid excessive system temperature. -
Page 13: System Structure Discription
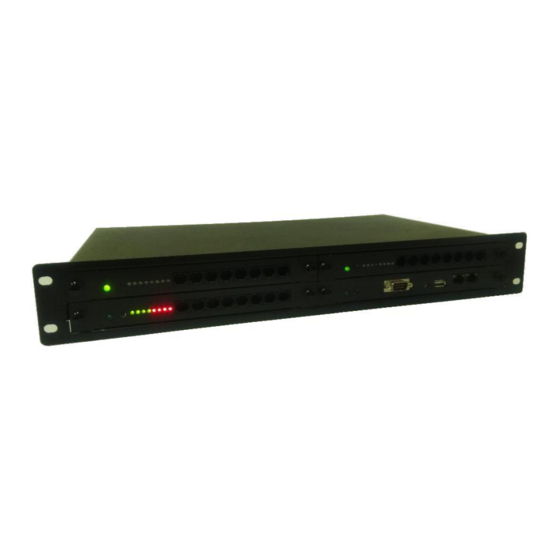
IPX-100 system installation & configuration TELECOMMUNICATIONS 5 System structure discription Front side Rear side Expansion and port description Page-13... - Page 14 ALU. 8 ports of Aristel feature phone interface. 8 ports of status indicator,green light means Aristel feature phone is connected, no light means non connection, blinking means in use. Rst. button,individulally restart this expansion card.
-
Page 15: System Installation
LAN port: take an RJ-45 cable to connect to the network router. Note: if the connected network provides DHCP server function, please disable DHCP function of the IPX-100 LAN port to avoid IP conflicts against the network devices of the domain. RS-232 port: 9 PIN series com port female connector. -
Page 16: System Initial Configuration
IPX-100 system installation & configuration TELECOMMUNICATIONS 7 System Initial configuration Log in Take a PC browser to loggin into the system as figure below. From WAN port, the default IP address is: http://192.168.1.100:8080 From LAN port, the default IP address is: http://10.19.10.1:8080... -
Page 17: Setup Wizard
IPX-100 system installation & configuration TELECOMMUNICATIONS 1 Setup wizard 1. Click “PBX Settings” icon on the main page toolbar. 2. Click “hardware ports” icon on the drop-down toolbar. 3. Click “Set wizard” on the Setup wizard” toolbar. 4. To set the port of the equipped card. - Page 18 IPX-100 system installation & configuration TELECOMMUNICATIONS After completing the “setup wizard” setting, the system will automatically pre-set the incoming /outgoing call route and operator extensions as according to the PSTN line ports, regular corded phone ports and key phone ports. The scenario are below 3 steps 1.
-
Page 19: System Setting
IPX-100 system installation & configuration TELECOMMUNICATIONS 8 System setting There are 8 click icons on the toolbar of the main page, 1. STATUS 2. GENERAL SETTING 3.SIP SETTINGS 4.PBX SETTINGS 5.PBX FEATURE FEATURES 6. MAINTENANCE 7. LANGUAGE 8. LOGOUT, the explanation of... -
Page 20: System
IPX-100 system installation & configuration TELECOMMUNICATIONS 1-2 System 1-2-1 Process Session At this page, it shows the operating program status of the system. Some programs can only be released the error status by restarting the system when an error occurs, and rest others can be restarted by the webpage. -
Page 21: General Settings
IPX-100 system installation & configuration TELECOMMUNICATIONS 2 GENERAL SETTINGS Click the GENERAL SETTINGS icon, with the dropdown toolbar. There are 8 click icons: 1. Network 2. Firewall, 3. Hardware Port, 4. Key Phone DSS Group, 5.DSS Console DSS Group, 6. Call Timer, 7. Dial Options, 8. Voice Mail, the explanation of functions as:... -
Page 22: Network
IPX-100 system installation & configuration TELECOMMUNICATIONS 2-2 Network Set the basic parameters of the network 2-2-1 WAN Configuration Set network connection mode, connection speed, network parameters, etc. of WAN port Wan Port Mode 3 options: static IP / Dynamic IP / PPPoE... -
Page 23: Lan Configuration
Enable Disable Note: By the connected domain server has enabled DHCP server function, then please must disable DHCP server function of IPX-100 to avoid device IP conflicts. IP Pool Start IP address range starting value assigned by DHCP Server IP Pool End... - Page 24 IPX-100 can be connected by setting a static route in the following setting. Condition 3 When a device of a specific domain needs to be sent via a specific device of the specified network, a static route can be set to connect the IPX-100 in the following setting.
-
Page 25: Access Control
Set access control to disallow remote access (Web, SSH, Ping) initiated from the WAN network to reduce the chance of being attacked by hackers. It also includes NAT and IPX-100 for remote access through dynamic IP for the problem of device call, click Submit to submit. -
Page 26: Firewall
IPX-100 system installation & configuration TELECOMMUNICATIONS 2-3 Firewall Allowing and blocked IP settings 2-3-1 A Allow Traffic To/From Specific IP Maximum 5 IP addresses to set per/time, click submit button to submit the IP addresses and set next 5 IP addresses. -
Page 27: Fxo(Trunk) Port Settings
IPX-100 system installation & configuration TELECOMMUNICATIONS 2-4-2 FXO(trunk) Port Settings Ring On Time To set the maximum of ring on signal recognized time. Ring Off Time To set the maximum of ring off (interval silence) recognized time. Caller ID Waiting Time To set the caller ID signal waiting time from central office (PSTN). -
Page 28: Keyphone Port Settings
IPX-100 system installation & configuration TELECOMMUNICATIONS 2-4-4 KeyPhone Port Settings Set the basic parameters such as the message, volume, DSS group, ring type, and extension group of the key phone. Client Name To set to display the client name on the creen of display key phone set (Max. -
Page 29: Key Phone Dss Key Group
IPX-100 system installation & configuration TELECOMMUNICATIONS 2-5 Key Phone DSS Key Group Set the DSS key function of the DSS key group of key phone. The DSS function/ group description as follows: Select DSS key group Total 10 DSS key groups, Select the DSS key group from 1 to 10 and to set the function of DSS key for each DSS key group. -
Page 30: Dss Key Group Of Dss64 Console Station
IPX-100 system installation & configuration TELECOMMUNICATIONS 2-6 DSS key Group of DSS64 console station To set DSS key function and DSS key group DSS64 key function/group description are as follows: DSS key group Total 5 groups. each group has a total of 60 keys... -
Page 31: Call Timer
IPX-100 system installation & configuration TELECOMMUNICATIONS 2-7 Call Timer Set the time parameters related to the call in the basic parameters of the PBX. 2-7-1 Call Timer Service Call Limitation Limit the total number of hours of talk time allowed on the external line per day, 0 is to turn off this feature. -
Page 32: Call Park Options Settings
IPX-100 system installation & configuration TELECOMMUNICATIONS 2-7-3 Call Park Options Settings Set the basic parameters of the Call Park call park, which are described as follows: Parking Maximum Time Call Back After Parking Timeout Whether to operate callback after the call parking time exceeds the set time. -
Page 33: Dial Options
IPX-100 system installation & configuration TELECOMMUNICATIONS 2-8 Dial Options Set the dialing parameters for internal and external calls. The fields are as follows:: External Call Dial Options Dial the dialing parameters of the external line (the system default is TtKkr). -
Page 34: Sip Settings
IPX-100 system installation & configuration TELECOMMUNICATIONS 3 SIP SETTINGS Agent account options : “General”, “NAT”, “Options”, “Timing”, “Domain Settings”, “TOS/COS”, “Auth & SIP Packet”, “T.38 FAX”, “Video”, “Jitter Buffer”, “Codec”. User account options: “General”, “NAT”, “Domain Settings”, “T.38 FAX”, “Video”, “Codec”. -
Page 35: Ip Address To Bind Udp Listen Socket
IPX-100 system installation & configuration TELECOMMUNICATIONS 3-1-1 IP Address to Bind UDP Listen Socket This column is used to set the way the system monitors and sends and receives SIP packets.: IP Address to Bind UDP Listen Socket Set the system to monitor the IP address of the UTP format SIP packet, set to "0.0.0.0"... -
Page 36: Outbound Proxy Settings
At this page is used to set the relevant parameters for NAT firewall penetration when the system processes SIP packets.: Select the processing mode for the IPX-100 is connected to the device on the external network through the NAT device. - Page 37 NAT. IPX-100 located on the intranet. Externally Visible Host Name The "external visible" domain name (and port) to be used when communicating with devices outside the NAT, the IPX-100 will look for the corresponding network IP address once at a fixed interval (change the refresh interval time setting).
-
Page 38: Options
IPX-100 system installation & configuration TELECOMMUNICATIONS 3-3 Options 3-3-1 General Options At this page to set the basic operational parameters of the PBX core to resolve SIP call request packages.: Preference for which MOH class this channel should listen When the channel of the call does not specify the music sort of MOH, the MOH sort setting is preset. -
Page 39: Core Options
IPX-100 system installation & configuration TELECOMMUNICATIONS 3-3-2 Core Options At this page to set the basic operational parameters of the PBX core to resolve SIP call request packets.: Allow Guest Calls Whether to allow unknown caller's call request, the options are as follows:... -
Page 40: Mwi Options
IPX-100 system installation & configuration TELECOMMUNICATIONS 3-3-3 MWI Options At this page to set the basic operating parameters for the PBX program to process MWI as below: Maximum allowed time of incoming subscriptions Maximum allowed time for incoming subscriptions (seconds). -
Page 41: Rtp Options
IPX-100 system installation & configuration TELECOMMUNICATIONS 3-3-4 RTP Options At this page to set the basic operating parameters of the PBX program to process RTP packet transmission: Timeout of NO RTP When the call does not enter the HOLD state, if there is no... -
Page 42: Timing
IPX-100 system installation & configuration TELECOMMUNICATIONS 3-4 Timing 3-4-1 Outbound SIP Registration Timing At this page to set the relevant time parameter for the PBX program to send the SIP external registration packet as below: Maximum allowed time of incoming registrations... -
Page 43: Sip Qualification
IPX-100 system installation & configuration TELECOMMUNICATIONS 3-4-4 SIP Qualification At this page to set the authentication operation parameters of the SIP core for the PBX core as below: Qualification Check if the host is still connected. Disable (system default). Enable, no response for more than 2 seconds is considered to have been lost. -
Page 44: Tos/Cos
IPX-100 system installation & configuration TELECOMMUNICATIONS 3-6 TOS/COS At this page to set the basic operating parameters of packet traffic when the system transmits packets as below: ToS for SIP packets Set the ToS setting value of the SIP packet (default is cs3). - Page 45 IPX-100 system installation & configuration TELECOMMUNICATIONS Authenticate OPTIONS Requests Whether to authenicate the OPTIONS request. Not authenticate required (system default). Verify as INVITE request. Reject All MESSAGE Requests Outside of a Call Whether to reject the MESSAGE request outside of the call, if allowed, the MESSAGE request will be transfered to Dialplan.
- Page 46 IPX-100 system installation & configuration TELECOMMUNICATIONS Remote-Party-ID should be Trusted Whether there is unconditional trust if there is a Remote-Party-ID setting. No (system default). Remote-Party-ID should be Sent If there is a Remote-Party-ID setting, do you want to send it out? No (system default).
-
Page 47: Fax
IPX-100 system installation & configuration TELECOMMUNICATIONS 3-8 T.38 FAX At this page to set the basic operating parameters for the PBX core program to process FAX as follows: support T.38 FAX (UDPTL) Set whether to enable T.38 fax (UDPTL) in SIP call. -
Page 48: Jitter Buffer
IPX-100 system installation & configuration TELECOMMUNICATIONS 3-10 Jitter Buffer At this page to set the basic operating parameters used by the PBX core to use the voice jitter buffer during SIP channel calls as below: Enables Jitterbuffer Enabled using the jitter buffer feature. The PBX... -
Page 49: Pbx Settings
Options: “Hardware Ports”, “SIP Extensions”, “SIP Trunks”. 4-1 Hardware Ports Each IPX-100 card slot has 3 groups, the sequence is as shown in the following figure; each card has 8 clamps, and the clamp order is also shown in the figure below:... -
Page 50: Fxo Port
IPX-100 system installation & configuration TELECOMMUNICATIONS 4-1-1-1 FXO Port General The general setting column is used to set the basic operating parameters of this FXO port as below.: Trunk ID Set the trunk line number to which this FXO port is located. The options are CO01~CO99, but only all trunk line numbers that are not used by other FXO port and SIP trunk lines are displayed. -
Page 51: Other Options
IPX-100 system installation & configuration TELECOMMUNICATIONS Other Options The other options column is to set the working parameters of this FXO port in the PBX as below.: Toll Layer Outbound dialing toll settings as below: Allow Layer 1 Allow PSTN to dial in and allow the extension of level 1 to dial out. -
Page 52: Technology
IPX-100 system installation & configuration TELECOMMUNICATIONS Technology The technical column sets the hardware operation parameters for this FXS port, which are described as below: Active Service Yes Enabled, users can answer or make calls using the phone connected to this port. -
Page 53: Other Options
IPX-100 system installation & configuration TELECOMMUNICATIONS Other Options The other options column is to set the working parameters of this FXS in the PBX, as below.: Call Group The sub-group to which the extension belongs, the options are Group1~Group30, a total of 30 groups. -
Page 54: Technology
IPX-100 system installation & configuration TELECOMMUNICATIONS Technology The technical column sets the hardware operation parameters of this key phone phone, as below: Active Service Enabled, users can answer or make calls using the phone connected to this port. Disabled this port. -
Page 55: Quick Settings
4-1-2-1 Card Solt The card slot will display the card card installed in each slot of the IPX-100 and the current settings of each slot. The user can first set the basic settings of all the cards in the section (external line number, extension number, etc.). -
Page 56: Relay Feature
Relay Feature Set how to operate the Relay on the ALU card. This function setting is valid only when the IPX-100 has an ALU card installed. Relay X whether to enable the Relay function, X means the relay of the place of ALU card by the card slot position. -
Page 57: Add/Modify The Sip Extension
IPX-100 system installation & configuration TELECOMMUNICATIONS 4-2-1 Add/Modify the SIP Extension The page shows the detailed setting field of the extension account. The user sets it according to the planning and requirements. After completing, click “Submit” to submit, or click “Cancel” to return to the extension list page. -
Page 58: Technology
IPX-100 system installation & configuration TELECOMMUNICATIONS 4-2-1-3 Technology At this page to set parameters for the communication protocol of this SIP phone as below: Active Service Enabled, users can answer or make calls using the phone connected to this port. -
Page 59: Other Options
IPX-100 system installation & configuration TELECOMMUNICATIONS 4-2-1-4 Other Options At this page to set the working parameters of the SIP extension in the PBX as below: Call Group The pick up group of the extension, the options are Group1~Group30. Pickup Group... -
Page 60: Add/Modify The Sip Trunk
IPX-100 system installation & configuration TELECOMMUNICATIONS 4-3-1 Add/Modify the SIP Trunk This page shows the detailed setting field of the SIP external line account. The user will set it according to the planning and requirements. After completing, click “Submit” to submit, or click “Cancel”... -
Page 61: Technology
IPX-100 system installation & configuration TELECOMMUNICATIONS 4-3-1-2 Technology At this page to set parameters for the communication protocol of this SIP trunk line as below: Active Service Enabled, users can answer or make calls using the phone connected to this port. -
Page 62: Other Options
IPX-100 system installation & configuration TELECOMMUNICATIONS 4-3-1-4 Other Options The other option page sets the working parameters of this SIP trunk line in the PBX as below.: Toll Layer Outbound dialing toll settings, options are as follows: Allow Layer 1 Outbound dialing toll level 1. -
Page 63: Pbx Features
IPX-100 system installation & configuration TELECOMMUNICATIONS 5 PBX FEATURES The options: “Greeting Recordings”, “Follow Me/Forward”, “Ring Groups”, “Paging Groups”, “IVR”、“Call Queues”, “Conference Rooms”, “Time Conditions”, “Incoming Routes”, “Outgoing Routes” , “Feature Codes” , “Speed Dialing”, “System Alarm”. 5-1 Greeting Recordings The operation of this page to manage the prompts of functions such as IVR, Queue..., etc.,... -
Page 64: Delete The System Recordings
IPX-100 system installation & configuration TELECOMMUNICATIONS 5-1-2 Delete the System Recordings After opening this section, all the current prompt recording files of the system will be displayed, and the file can be downloaded or deleted. Click the “Delete ALL” button at the bottom of the page, the system will clear all the recording files in the temporary file directory. -
Page 65: Follow Me/Forward
IPX-100 system installation & configuration TELECOMMUNICATIONS 5-2 Follow Me/Forward Set the follow-me and forward settings of the extension. The page displays the current setting status of all extensions in tabs. The user clicks the “Edit” button of the extension in the list to enter the setting page or disables the follow-up function of the extension on this page. -
Page 66: Follow Me Settings
IPX-100 system installation & configuration TELECOMMUNICATIONS 5-2-1-1 Follow Me Settings General The general setting section is used to set whether to start following, and the basic operating parameters when starting to follow as below: Extension Number (read only). Function Status follow me status, option as:... -
Page 67: Destination If No Answer/Busy
IPX-100 system installation & configuration TELECOMMUNICATIONS Destination If No Answer/Busy. At this page sets the system should perform subsequent processing when the selected extension is busy or unanswered after ringing. The main items selected in the destination field are Hangup, Voicemail, Extension, and Forward To. -
Page 68: System Forwarding Settings
IPX-100 system installation & configuration TELECOMMUNICATIONS 5-2-1-2 System Forwarding Settings The user can set or cancel the forward settings of the extension in this page, or use the phone to directly operate the function code to operate the settings or cancel the forward settings. -
Page 69: Ring Groups
IPX-100 system installation & configuration TELECOMMUNICATIONS 5-3 Ring Groups The page shows all the ring groups in a page, with 20 data per page. Click the “ADD” button to add a ring group. Click the “Edit” button in the group list to edit the ring group. -
Page 70: Extension List
IPX-100 system installation & configuration TELECOMMUNICATIONS 5-3-1-2 Extension List This page sets the ringing extension, maximum 15 extensions. None : non selected extension. 5-3-1-3 Destination If No Answer/Busy At this page defines the system to handle the call if the called extension is no answer or busy. -
Page 71: Paging Groups
IPX-100 system installation & configuration TELECOMMUNICATIONS 5-4 Paging Groups Thispage shows all the paging groups in a page, showing 20 data per page. Click the “ADD” button to add a paging group. Click the “Edit” button in the extension list to edit the paging group. -
Page 72: Extension List
IPX-100 system installation & configuration TELECOMMUNICATIONS 5-4-1-2 Extension List At this page sets the extension to be paged by the group. Up to 6 extensions can be set. The page descriptions as below None non selected extension. Paging All KeyPhone & External Speaker. -
Page 73: Add/Modify The Ivr
IPX-100 system installation & configuration TELECOMMUNICATIONS 5-5-1 Add/Modify the IVR The page shows the detailed setting section of the auto voice prompt. The user will set according to the planning and requirements. After completing, click “Submit” to submit, or click “Cancel”... -
Page 74: After Maximum Repeat Time
IPX-100 system installation & configuration TELECOMMUNICATIONS After Maximum Repeat Time After the number of repetitions is used to set how to handle the call when the repeating greeting exceeds the set number of times. The options of Destination section: Hangup、Voicemail、Extension、Forward To. The option for the user: IVR、Ring Group、Queue、Time Condition、Conference Room. -
Page 75: Announcement
IPX-100 system installation & configuration TELECOMMUNICATIONS 5-5-1-2 Announcement The announcement page is used to set the system recording prompt used by each announcement. After the new voice prompt is completed, the system will save these prompts to the working directory. The user can directly dial the recording code to modify the content. -
Page 76: Digit Maps
IPX-100 system installation & configuration TELECOMMUNICATIONS 5-5-1-3 Digit Maps The Digit Maps page sets the short code function of the voice prompt. When entering the setting page, the set short code and three sets of blank short code setting fields will be displayed, as explained below.:... -
Page 77: Delete The Ivr
IPX-100 system installation & configuration TELECOMMUNICATIONS 5-5-2 Delete the IVR At this page selects the checkbox in front of the automatic voice in the list and click the “Delete” button to delete the IVR. If you select the checkbox in the header field, all IVR will be deleted. -
Page 78: General
IPX-100 system installation & configuration TELECOMMUNICATIONS 5-6-1-1 General General The general setting section is used to set the basic operating parameters of the incoming call queue, which are described as follows: Queue Name Tne name of incoming call on queue. -
Page 79: Static Agents List
IPX-100 system installation & configuration TELECOMMUNICATIONS 5-6-1-2 Static Agents List This page stes the static agent extension. click the “Right” button from the available extension to move to the selected extension list to be the fixed agent extension, and then press the “Left” button to move to the list of available extensions to cancel the agent and press “Up/Down”. -
Page 80: Caller Announcements
IPX-100 system installation & configuration TELECOMMUNICATIONS Leave When Empty To select whether to force all incoming calls to end when the agents are all offline, the options are as follows: No still stay on call. Yes force end the call. -
Page 81: Delete The Call Queue
IPX-100 system installation & configuration TELECOMMUNICATIONS 5-6-2 Delete the Call Queue Select the checkbox in front of the caller list in the list and click the “Delete” button to delete the caller. If you select the checkbox in the header field, all caller stores will be deleted. -
Page 82: General
IPX-100 system installation & configuration TELECOMMUNICATIONS 5-7-1-1 General The general setting stes the basic operating parameters of the conference room. Leader: Dial *# + conference room number. Participants: dial ** + conference room number. After connecting, enter the password according to the voice prompt. -
Page 83: Delete The Conference Room
IPX-100 system installation & configuration TELECOMMUNICATIONS 5-7-2 Delete the Conference Room Select the checkbox in front of the conference room in the list and click the “Delete” button to delete the conference room. If you select the checkbox in the header field, all meeting rooms will be deleted. -
Page 84: General
IPX-100 system installation & configuration TELECOMMUNICATIONS 5-8-1-1 General General The general setting page sets the basic operating parameters of the time condition. Time To Match The judgment time page sets the time range of the time condition. Start Month (1~12). -
Page 85: Destination If Time Does Not Match
IPX-100 system installation & configuration TELECOMMUNICATIONS Forward to IVR. Ring Group Forward to ring group. Extension Forward to extension. Queue Forward on queue. Time Condition Set processing according to time conditions. Conference Room Forward to tele-conference room. Forward To Forward to trunk line (set trunk line code + outgoimg phone number). -
Page 86: Incoming Routes
IPX-100 system installation & configuration TELECOMMUNICATIONS 5-9 Incoming Routes The page shows all incoming routes by page, with 20 records per page. Click the “ADD” button to add a new incoming call route. Click the “Edit” button in the list to edit the incoming route. Click the number of pages above the list to shift the display of the other pages. -
Page 87: Options
IPX-100 system installation & configuration TELECOMMUNICATIONS 5-9-1-2 Options At this page sets the working parameters of the incoming route, description as below : Strip No Strip the number of the prefix code of the incoming call number (for example, set to 2, the incoming line number 0285123000, and the number after deletion is 85123000). -
Page 88: Delete The Incoming Route
IPX-100 system installation & configuration TELECOMMUNICATIONS 5-9-2 Delete the Incoming Route Select the incoming route in the list from the front check box, click the "Delete" button to delete the incoming route. If you select the checkbox in the header field, all incoming routes will be deleted. -
Page 89: General
IPX-100 system installation & configuration TELECOMMUNICATIONS 5-10-1-1 General General The general setting page sets the basic operating parameters of the outgoing route and described as follows: Name outgoing route name. Outbound Code Outbound code, as the basis for outbound dialing judgment 0~9 Must match the number. -
Page 90: Allow/Disallow Extensions
IPX-100 system installation & configuration TELECOMMUNICATIONS 5-10-1-2 Allow/Disallow Extensions At this page sets allow/disallow extension. Select whether the extension applies to this rule. The operation modes and options are described as follows: Allow/Disallow Allow ALL All extensions can use this outgoing route. -
Page 91: Toll Unrestricted Number
IPX-100 system installation & configuration TELECOMMUNICATIONS 5-10-1-4 Toll Unrestricted Number At this page sets the number that is allowed to be dialed out by this outgoing route. 5-10-2 Delete the Outgoing Route Select the checkbox in front of the outgoing route in the list and click the “Delete” button to delete the outgoing route. -
Page 92: Main Features
IPX-100 system installation & configuration TELECOMMUNICATIONS 5-11-1. Main Features 5-11-1-1. Main Functions Hunting CO Line Auto seized trunk line Operator Dial the operator, ringing the ringing group RGP_default extension Assign CO Line Sieze the specified trunk line, the trunk line code is 01~99 (example: set to #4, if you want to directly sieze the 1st trunk line, the dial code is #401). -
Page 93: Spd/Setup Functions
IPX-100 system installation & configuration TELECOMMUNICATIONS 5-11-1-3. SPD/Setup Functions Set Speed Dialing Memory Set the number of trunk line and outbound call to used by the speed dial group. The setting method is: Function code + location code + trunk line code + outgoing number. -
Page 94: Forward Features
IPX-100 system installation & configuration TELECOMMUNICATIONS 5-11-2. Forward Features Call Forward All Activate/Deactive Set the extension's incoming calls all to the specified extension (example: function code is set to #71, to call forward to extension 168, dial #71168) To cancel the cal forward function, dial the function code + its own extension number (example: the function code is set to #71, the machine is 123, then dial #71123). -
Page 95: Mailbox/Info Features
IPX-100 system installation & configuration TELECOMMUNICATIONS 5-11-3. Mailbox/Info Features 5-11-3-1. Voicemail Service Enter Voicemail Centor Enter voicemail, listen to messages, manage, and set up voicemail. My Voicemail Enter my voicemail. 5-11-3-2. Info Service Say Your Ext. Number Report the extension number dialing this feature code. -
Page 96: Call Feature
IPX-100 system installation & configuration TELECOMMUNICATIONS 5-11-4-2. Call Feature Blind transfer Transfer, dial this function code during the call, enter the extension number after hearing the prompt, the system will immediately forward the call to the extension. Call Park Incoming call park, dial this function code during the call, the system immediately transfers the call to the available call parking location, and reports the location of the call where it parked. -
Page 97: System Alarm
IPX-100 system installation & configuration TELECOMMUNICATIONS 5-13 System Alarm At this page sets the system warning, set the alarm initiation time and duration. When the time is set, the system will automatically play the external MOH source as a warning on the key phone, and automatically end after the set duration. -
Page 98: Maintenance
IPX-100 system installation & configuration TELECOMMUNICATIONS 6 MAINTENANCE Click MAINTENANCE icon of the tool bar, to drop-down the option bar as: For log-in Administator account: “System File Management”, “CDR Viewer”, “Call Recording Viewer”, “LOG Service”, “System Certificate”, “Core Manager”, “PBX LOGs”, “PBX CLI”, “File Editor”, “Reboot. -
Page 99: System File Management
6-1-1 System Firmware Upgrade Select the firmware file to be installed, click the “Upload” button, upload the file to IPX-100 to install the firmware. After the file upload is completed, the file size will be displayed. After confirming the error, click the “Upgrade”... -
Page 100: Factory Default
The system did not detect the backup file Select another backup file, click the “Upload” button, upload the file to IPX-100 for restore operation. When the file upload is completed, the file size will be displayed. After confirming the error, click the “Restore”... -
Page 101: The System Detects That There Is A Backup File Stored In The Flash Memory
1. Click the “Restore” button to use this backup file to restore settings. 2. Select another backup file, click the “Upload” button, upload the file to IPX-100 to restore the setting action. 6-1-4... -
Page 102: The System Detected That There Is A Backup File Stored In The Flash Memory
IPX-100 system installation & configuration TELECOMMUNICATIONS 6-1-4-2 The system detected that there is a backup file stored in the FLASH memory. When the system deteceds that there is a backup file in the FLASH memory (the system only retains the backup setting file of the last operation backup), the user can perform the following operations: 1. -
Page 103: Log Service
IPX-100 system installation & configuration TELECOMMUNICATIONS 6-3 Call Recording Viewer This page shows the list of all call recordings. The viewer can listen to the recording file on the web page or download/delete the recording file. 6-3-1 Select recording time range To select to display recording time in range of year/month/day/hour, otherwise, will display all of recording message history. -
Page 104: Log Service
IPX-100 system installation & configuration TELECOMMUNICATIONS 6-3-1 LOG Service The LOG service section is used to set the IP address to which the system uploads the LOG message. The device must run the LOG collection program to receive and display the LOG message sent by the system. -
Page 105: Core Manager
IPX-100 system installation & configuration TELECOMMUNICATIONS 6-5 Core Manager This page is used to remotely execute the Linux system commands on the system and display the execution results to help the administrator to obtain a more complete means to obtain the current operating status of the system when the system is debugged. -
Page 106: Pbx Cli
IPX-100 system installation & configuration TELECOMMUNICATIONS 6-7 PBX CLI This page is used to remotely execute the PBX internal commands on the system and display the execution results to help the administrator to obtain a more complete means of obtaining the current operation information of the PBX program when monitoring the system. -
Page 107: Reboot
IPX-100 system installation & configuration TELECOMMUNICATIONS 6-9 Reboot Click the Reboot button and the system will restart immediately and take about 2 minutes. Nnote: When the system monitor (web_proc) stops executing, this function will be invalid, and the progress bar will not work. -
Page 108: Language
IPX-100 system installation & configuration TELECOMMUNICATIONS 7 LANGUAGE The options are "English" and "Traditional Chinese". When you click the language option, the webpage will change the display of English or Chinese pages according to the selected language. 8 LOGOUT Click this icon and the page will be logged out immediately and the login page will be displayed. - Page 109 IPX-100 system installation & configuration TELECOMMUNICATIONS Annex 1, list of characters reserved for SIP registration password (not available) ASCII code ^@ ~ ^_ & HEX# 00~1F Page-109...
- Page 110 IPX-100 system installation & configuration TELECOMMUNICATIONS Annex 2, Aristel key telephone DSS key diagram DKP50 series DKP60 series DKP80 series DKP90 series DSS60 console phone Page-110...
- Page 111 IPX-100 system installation & configuration TELECOMMUNICATIONS Annex 3, DSS button function code description code Function Description code Finction Description Leave message Pickup all conference/DND Own group pickup save 46~69 reserved reserved calculator Call park Incoming call log 07~27 reserved Outgoing call log...
- Page 112 IPX-100 system installation & configuration TELECOMMUNICATIONS Annex 4, List of available Linux commands Query directory file list Display file content Show tasks currently being executed free Display RAM memory status Display ROM memory usage reboot Restart the system Page-112...
- Page 113 IPX-100 system installation & configuration TELECOMMUNICATIONS Annex 5, PBX CLI Command List sip show peers Display all SIP peers account message tables sip show registry Display SIP Trunk registration status sip reload Reload SIP settings sip show settings Display the current basic settings of SIP...
- Page 114 IPX-100 system installation & configuration TELECOMMUNICATIONS Annex 6, ToS Codepoint Decimal equivalent table Codepoint name Decimal control value af11 af12 af13 af21 af22 af23 af31 af32 af33 af41 af42 af43 Page-114...
Need help?
Do you have a question about the IPX-100 and is the answer not in the manual?
Questions and answers