Table of Contents
Advertisement
Quick Links
Advertisement
Table of Contents

Subscribe to Our Youtube Channel
Related Manuals for Cole Parmer EW-04725-60


Summary of Contents for Cole Parmer EW-04725-60
- Page 1 Operations Manual Item EW-04725-60 & EW-04724-01...
- Page 2 Safety Warnings and Guidelines Do not attempt to operate this instrument before reading the Manual. 1. Important: The operation, maintenance and repair of the Instrument should comply with the basic guidelines and warnings listed below. Failure to comply can result in damage to the instrument or personal injury.
-
Page 3: Table Of Contents
2. The maintenance of Instrument The platform and clamp should be cleaned regularly with a soft dipped in alcohol. Contents Chapter 1: Introduction -------------------------------------------------------------------------- 1 Chapter 2: Specifications ----------------------------------------------------------------------- 2 1. Operating conditions ------------------------------------------------------------- 2 2. Technical Data----------------------------------------------------------------------- 2 Chapter 3: Initial Setup -------------------------------------------------------------------------- 3 1. -
Page 4: Chapter 1 Introduction
High-Capacity Vortex Mixers Chapter 1 Introduction The Multi-Tube Vortexer is designed for mechanical and chemical cell lysis, mixing suspensions, and general sample agitation. This vortex mixer gives a distinctly different motion than shaking a sample. With vortexing, greater shearing forces are placed on materials in the bottom of a tube, thus promoting either disruption or solubility. -
Page 5: Chapter 2: Specifications
High-Capacity Vortex Mixers Chapter 2: Specifications 1. Operating conditions: Ambient temperature: 4C to 45C ≤70% Relative humidity: Electrical : AC100-240V 1.5A 2. Technical Data: EW-04725-60 Model Parameter Speed 500 to2500rpm Orbit 3 mm Time setting 1min ~ 99h59min Max. load 4.5kg... -
Page 6: Chapter 3: Initial Setup
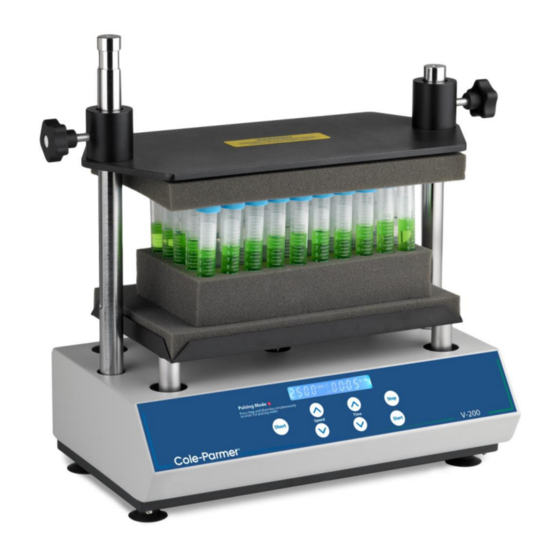
High-Capacity Vortex Mixers Chapter 3: Initial Setup This chapter introduces the Multi-Tube Vortexer and the necessary preparations prior to the first use. Please read this chapter carefully before operating the mixer. 1. Structure Description Support plate Support knobs Foam tube rack Control Panel Power inlet Power switch... -
Page 7: Control Panel
High-Capacity Vortex Mixers Control Panel Short: The short key activates the mixer for the length of time in Short which it is pressed. It is mainly used for short mixing cycles. Start: Press to begin operation. Start Stop: Press to stop a mixing Stop Up: Press to increase speed or time Down: Press to decrease speed or time... -
Page 8: Power On
High-Capacity Vortex Mixers 3. Power On: Place the Instrument on a level bench or table. Plug one end of the cord into the inlet at the rear side of the machine, and the other end into an outlet providing 100-240V. AC100-240V~ 4. - Page 9 High-Capacity Vortex Mixers BV10-10-500 50ml 245X132X45 Replacement tray BV1010-00 305X178.5X25 pad set ─ ─...
-
Page 10: Chapter 4: Operation Guide
Chapter 4: Operation Guide 1. Shaking speed and timing setting 8888 88:88 a) When the instrument powers on, display screen will show “ ” across each digit. b) After about 2 seconds, the time display window shows 9:30 as the default set time. The speed 2000 09:30 display window shows 2000 as the default set... -
Page 11: Speed And Time Setting
2. Additional Control Panel Settings: a) Adjusting the Time mode: Press time’s “” key 2400 02:00 and “” key simultaneously to switch time unit from h/m to m/s, the display flashes three times, then saves automatically. (Repeat above to 2400 02:00 swicth back to h/m ). -
Page 12: Chapter 5: Failure Analysis And Trouble-Shooting
Chapter 5: Failure analysis and trouble-shooting No. Problem Cause Remedy No power Check the connection of power Switch Failure Exchange the switch No display Others Contact your distributor Place the mixing samples Excessive vibration Unbalanced samples symmetrically The actual speed is different Failure in control board Contact your distributor from the displayed speed Contact your distributor...
Need help?
Do you have a question about the EW-04725-60 and is the answer not in the manual?
Questions and answers