Table of Contents
Advertisement
Advertisement
Table of Contents

Related Manuals for Bayer HealthCare CLINITEK 50


Summary of Contents for Bayer HealthCare CLINITEK 50
- Page 1 USER’S GUIDE...
- Page 2 1996 Bayer Corporation All Rights Reserved Printed in the U.S.A. Unless otherwise noted, all trademarks are the property of Bayer Corporation. Bayer Corporation Elkhart, IN 46515 USA Revised 3/02 99915549...
-
Page 3: Table Of Contents
Contents A Brief Description ....iv Unpacking and Setup ....1 Unpacking . -
Page 4: A Brief Description
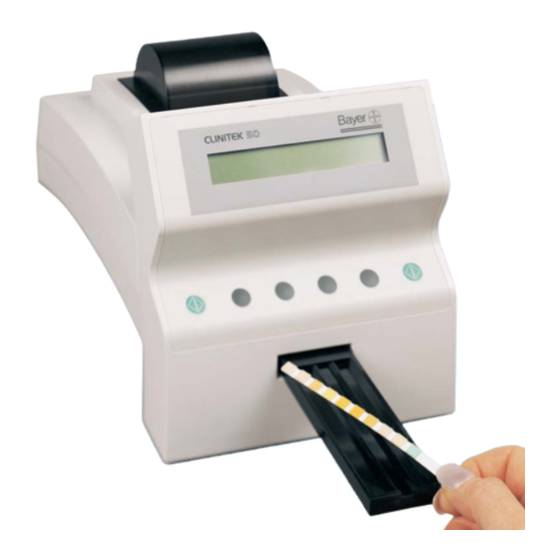
A Brief Description What does this instrument do? the edge of the wet reagent test Your CLINITEK ® 50 Urine strip (if required for the test) and Chemistry Analyzer is a portable place it on the test strip table. The instrument for reading traditional table is then pulled into the instru- Bayer Reagent Strips for Urinalysis... -
Page 5: Unpacking And Setup
Unpacking and Setup Unpacking Carefully remove the Remove each of the contents of the shipping carton. wrappings and check for the Check the carton and instrument following items: for visible signs of damage; if seen, immediately contact the carrier. CLINITEK ®... - Page 6 The best temperature Place the instrument on a for using the instrument is level work surface where the between 22°C and 26°C (72°F temperature and humidity are to 79°F). Do not place the fairly constant. instrument near such things as an outside window, oven, hot plate, or radiator.
- Page 7 Insert the test strip table into the instrument, holding it by the end opposite the white bar and with the flat side facing up. Do not touch the white bar. Push the table in about halfway. If you will be sending results to a computer, you must obtain a special Computer Cable/ Connector Kit (see page 26 to...
-
Page 8: Installing The Battery Pack
Installing the Battery Pack If you will be using the optional battery pack, place six AA-size batteries into the battery compartment. Turn the instrument over and snap the battery pack into the opening. Plug the cord into the power inlet. -
Page 9: Loading The Paper Roll
Loading the Paper Roll Insert the two tabs on the printer cover into the two openings on the instrument. Rest the cover on its back edge. If changing the paper, leave the cover down and pull out the remaining paper. Then raise the cover and remove the empty core to continue. -
Page 10: Powering Up
Feed the paper through the To prevent damage printer cover opening and snap to the printer, do not tear the cover into position. the paper without the cover in place. The cover must be latched in order for the instrument to function. Powering Up Press the power switch on the back of the instrument to... - Page 11 Press the key under the word NORMAL if you want the results to appear in clinical units. Press the key under +/– if you prefer plus and minus signs. The MULTISTIX PRO ® If you want to use the Bayer and CLINITEK Microalbumin Reagent Strip shown on the Strips are not included in this list.
-
Page 12: Final Paper Work
Do not use any The instrument briefly traditional Bayer Reagent displays two screens while it Strip product other than what does an internal check. When is shown on the display. Using the check is complete, the the wrong Reagent Strip will READY screen appears. -
Page 13: Selecting Your Options
Selecting Your Options One copy of each set of Location of Results results will be printed if you do and Number of Copies not change this option. If you want more than one printed copy or if you prefer results to be displayed on the screen, press the key under the word OUTPUT. -
Page 14: Setting The Time
Setting the Time Setting the Date Press the key under the Press the key under the word SET. word SET. Press the key under TIME Press the key under DATE and select the 12 hour (AM/PM) and select a date format: format or the 24 hour (military) Month-Day-Year format. -
Page 15: Reporting The Urine Color
Color will be reported Reporting the Urine automatically when using Bayer Color Reagent Strips that include the Press the key under the leukocyte test pad if this option word SET. is set to YES. If there is no leukocyte pad, lines for manual Press MORE, then press entry of the color and clarity are COLOR. -
Page 16: Clearing The Memory And Marking Positives
You can connect the Clearing the Memory instrument to a computer to and Marking Positives transfer results. Fifty sets of results are stored (for transfer If you want to clear the only) if the memory is not instrument’s memory of all test cleared. -
Page 17: Testing Controls
T esting Controls You should test controls: Positive and negative control solutions should be tested on a at the start of the day; regular basis. This provides a when you open a new bottle check to ensure that the test of test strips;... -
Page 18: Testing Routine Urines
T esting Routine Urines Procedure Before beginning the day’s Testing can be started only testing, check the test strip from the READY FOR TEST table to make sure it is clean. screen. Be sure the Reagent If it looks dirty, remove the Strip name agrees with the table and clean it, as described strip being used, unless using... - Page 19 Blot the strip to remove excess urine by touching the edge to a paper towel. Do not drag the strip across the towel; touch the edge only. Place the Reagent Strip, with the test pads facing up, into the middle trough of the test strip table.
-
Page 20: Summary Of Steps
Summary of Steps: Remove the used Reagent Strip and discard it in the Dip a new Reagent Strip proper container. into the urine sample. Press as the strip is Wipe the test strip table removed from the urine; at the with a damp, lint-free tissue. -
Page 21: When You Are Finished Testing
When You Are Finished Testing Clean the test strip table and You will be prompted to check the white bar at the end clean the table after every 50 of each day or after testing 50 strips. Press CONT to return to strips, whichever is more often. -
Page 22: Cleaning The Instrument
Cleaning the Instrument Daily Cleaning The test strip table must be kept clean if the instrument is to provide accurate test results and operate correctly. Clean the table and check the white bar at the end of every day. Remove the test strip table by pulling it straight out of the instrument. -
Page 23: Disinfecting The Table
Disinfecting the Table Remove, clean, and dry the table. Use of any other solution Several solutions are safe may damage the table. to use on the table when they are used for no longer than 10 minutes once a day. Prepare one of the following solutions: Cidex , Theracide... -
Page 24: Removing Heavy Buildup
Fill a tall, narrow container to a depth of about 4 inches (10 cm) with the solution you have prepared. Place the table into the Be sure the solution solution, making sure the white does not come in contact with bar remains above the liquid level. -
Page 25: General Cleaning
Wet a cotton-tipped stick Do not touch the white with the NaOH. Thoroughly bar with the NaOH! clean the trough and side areas of the table until all urine is removed. Rinse the table thoroughly with water to remove the NaOH. Wipe the surface of the table and the grooves on the under- side of the table with a damp... -
Page 26: Appendix
Appendix Solving Problems If the Display is Blank Your CLINITEK ® 50 Analyzer will If there are no words on the give you trouble-free operation if display after the instrument has you follow the directions for using been turned on, check for each and cleaning the instrument. -
Page 27: Error Messages And Remedies
Possible Cause Error Message and Remedy The batteries do not have enough REPLACE BATTER IES power to test any more strips. Turn the power off and replace the batteries. A test strip is not present, is dry, or STR IP PROBLEM - RETEST is not positioned properly (upside HELP CONT... -
Page 28: 50 Problem Checklist
If you need additional help, our Technical Care Center is here to assist you. Before you call, please fill out this checklist (you may want to make a photocopy of the page first). Then call the nearest Bayer office using the list on the next page. CLINITEK 50 Problem Checklist ®... -
Page 29: Where To Call For Service
Where to Call for Service If you are located in the United If you are located in a country States, contact the Technical other than the United States, Care Center of Bayer Corporation call the Bayer office that is by calling toll free: nearest you: 1-877-229-3711 Canada... -
Page 30: Ordering Accessories
Ordering Accessories Product Description 6511 Battery Pack and Batteries 5773 Thermal Printer Paper (5 rolls) 1364 CHEK-STIX ® Combo Pak Control Strips (1 bottle each — Positive and Negative Control Strips) 1360 CHEK-STIX ® Positive Control Strips for Urinalysis (1 bottle of 25 strips) 6517 Computer Cable/Connector Kit 6521... -
Page 31: Ordering Replacement Parts
Ordering Replacement Parts Part Description 95001874 Test Strip Table — Long (labeled “L”) (for use with Bayer Reagent Strips with five or more tests and with CLINITEK ® Microalbumin Strips) 95001875 Test Strip Table — Short (labeled “S”) (for use with Bayer Reagent Strips with four or fewer tests except for CLINITEK Microalbumin Strips) 50062316 Printer Cover... -
Page 32: Specifications
Weight: Instrument only — 1.25 kg (2.8 lbs.) DC Voltage Instrument with Battery Pack — Power Input 1.42 kg (3.1 lbs.) Computer Interface CLIA Status: The CLINITEK 50 Analyzer is “Waived” per CLIA ’88. -
Page 33: Tables Of Results
Traditional Bayer Reagent Strips Printed/Displayed Results Abbre- Test Units viation Normal System + / – System YELLOW GREEN Color* ORANGE BLUE No Difference BROWN NEGATIVE NEGATIVE Glucose mg/dL > = 1000 TRACE NEGATIVE MODERATE NEGATIVE Bilirubin SMALL LARGE NEGATIVE NEGATIVE Ketone mg/dL TRACE... - Page 34 Traditional Bayer Reagent Strips Printed/Displayed Results Abbre- Test Units viation Normal System + / – System YELLOW GREEN Color* ORANGE BLUE No Difference BROWN NEGATIVE NEGATIVE Glucose mmol/L > = 55 TRACE NEGATIVE MODERATE NEGATIVE Bilirubin SMALL LARGE NEGATIVE NEGATIVE Ketone mmol/L TRACE...
- Page 35 Traditional Bayer Reagent Strips Printed/Displayed Results Abbre- Test Units viation Normal System + / – System YELLOW GREEN Color* ORANGE BLUE No Difference BROWN NEGATIVE NEGATIVE Glucose TRACE NEGATIVE Bilirubin No Difference NEGATIVE NEGATIVE Ketone TRACE < = 1.005 1.020 Specific 1.010 1.025...
- Page 36 MULTISTIX PRO Reagent Strips Printed/Displayed Results Abbre- Test Units viation Normal System + / – System YELLOW GREEN Color* ORANGE BLUE No Difference BROWN NEGATIVE NEGATIVE Glucose mg/dL > = 1000 TRACE NEGATIVE MODERATE NEGATIVE Bilirubin SMALL LARGE NEGATIVE NEGATIVE Ketone mg/dL TRACE...
- Page 37 MULTISTIX PRO Reagent Strips Printed/Displayed Results Abbre- Test Units viation Normal System + / – System YELLOW GREEN Color* ORANGE BLUE No Difference BROWN NEGATIVE NEGATIVE Glucose mmol/L > = 55 TRACE NEGATIVE MODERATE NEGATIVE Bilirubin SMALL LARGE NEGATIVE NEGATIVE Ketone mmol/L TRACE...
- Page 38 MULTISTIX PRO Reagent Strips Printed/Displayed Results Abbre- Test Units viation Normal System + / – System YELLOW GREEN Color* ORANGE BLUE No Difference BROWN NEGATIVE NEGATIVE Glucose TRACE NEGATIVE No Difference Bilirubin NEGATIVE NEGATIVE Ketone TRACE < = 1.005 1.020 Specific 1.010 1.025...
- Page 39 Be kind to the environment. Please recycle the User’s Guides you do not use.
Need help?
Do you have a question about the CLINITEK 50 and is the answer not in the manual?
Questions and answers
Microalbumin 2 doesnt work