Table of Contents
Advertisement
USER MANUAL
2.5kW OIL FILLED RADIATOR
WITH DIGITAL CONTROLS AND WIFI
EDR-TRD1025B
EDR-TRD1025W
Thank you for choosing electriQ
Please read the manual before using this heater
and keep it safe for future reference.
Visit our page www.electriQ.co.uk for our entire product range
THIS PRODUCT IS ONLY SUITABLE FOR WELL INSULATED SPACES OR
OCCASIONAL USE.
Advertisement
Table of Contents

Subscribe to Our Youtube Channel
Related Manuals for ElectrIQ EDR-TRD1025B


Summary of Contents for ElectrIQ EDR-TRD1025B
- Page 1 Thank you for choosing electriQ Please read the manual before using this heater and keep it safe for future reference. Visit our page www.electriQ.co.uk for our entire product range THIS PRODUCT IS ONLY SUITABLE FOR WELL INSULATED SPACES OR OCCASIONAL USE.
-
Page 3: Table Of Contents
CONTENTS SAFETY INSTRUCTIONS PRODUCT OVERVIEW KEY FEATURES PREPARING FOR USE REMOTE CONTROL CONTROL PANEL OPERATING THE HEATER CONNECTING THE APPLIANCE TO WIFI CONTROLLING YOUR APPLIANCE THROUGH THE APP CLEANING, MAINTENANCE AND STORAGE TROUBLESHOOTING TECHNICAL SPECIFICATION SUPPORT PRODUCT FICHE... -
Page 4: Safety Instructions
IMPORTANT SAFETY INSTRUCTIONS • Carefully read the instructions before operating the unit. • Do not use the appliance for anything other than its intended use. It is designed for domestic indoor use only. • Rating: This unit must be only connected to a 220-240 V / 50 Hz earthed outlet. - Page 5 • Regulations concerning the disposal of oil when disposing of the appliance have to be followed • WARNING: Do not use this heater in small rooms when they are occupied by persons not capable of leaving the room on their own, unless constant supervision is provided.
-
Page 6: Product Overview
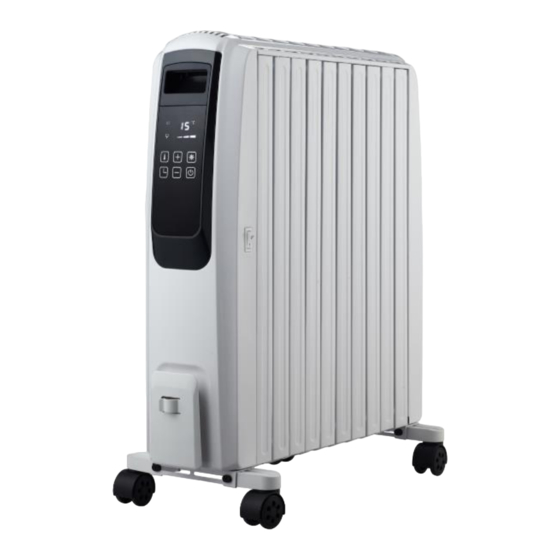
PRODUCT OVERVIEW A. Handle B. Digital display C. Control panel D. ON/OFF Switch E. Cable storage F. Legs G. Handle H. Remote control I. Heater J. Castors KEY FEATURES • 3 Power Settings 1000, 1500 and 2500W. • Wi-Fi connection for easy control. •... -
Page 7: Preparing For Use
PREPARING FOR USE IMPORTANT! Two people are recommended for assembly • On a soft surface, turn the radiator upside down. It is recommended that one person holds the radiator steady during assembly to prevent damage. • Carefully slide out each of the four legs until they are fully extended. -
Page 8: Control Panel
TEMPERATURE CONTROL PANEL INDICATOR When this is shown the appliance is ECO MODE displaying the INDICATOR temperature in in ⁰C. Displays when ECO mode is enabled. TIMER INDICATOR When this is shown, this appliance is POWER INDICATOR displaying the duration Displays when the unit of the timer. -
Page 9: Operating The Heater
OPERATING THE HEATER Before operating the unit, ensure the guidance on preparing the product for use has been followed. BASIC OPERATION 1. Insert the plug into a suitable socket. 2. Locate the ON/OF switch on the side of the unit, and turn on the unit. 3. - Page 10 FURTHER INFORMATION ON SETTING THE DESIRED TEMPERATURE AND ECO MODE Press the thermostat button, and then use the + and – buttons to select the desired room temperature (The available temperature ranges are between 5⁰C and 30⁰C) and the appliance will automatically enter eco mode at the current power level.
-
Page 11: Connecting The Appliance To Wifi
CONNECTING THE APPLIANCE TO WIFI DOWNLOAD THE APP TO YOUR PHONE Download the” TUYA SMART” app, from your chosen app store, using the QR codes below, or by searching for the app in your chosen store. ANDROID MODES AVAILABLE FOR SETUP It is recommended to use Bluetooth connection to connect your unit to Wi- Fi. - Page 12 REGISTER THE APP 1. Press on the register 2. Read the Privacy policy 3. Enter your email address button at the bottom of and press the Agree or phone number and the screen. Button. press continue to register. 4. A verification code will be 5.
- Page 13 SETTING UP YOUR HOME WITHIN THE APP TUYA is designed so it can work with a large number of compatible smart devices within your home. It can also be set up to work with multiple devices within different houses as such during the setup process, the app requires that different areas are created and named to allow easy management of all your devices.
- Page 14 CONNECTING USING THE BLUETOOTH CONNECTION METHOD Before initiating the connection, make sure your mobile phone has Bluetooth enabled and that the unit is plugged in. Also ensure your phone is connected to the WiFi network. (We advise turning mobile data off during setup) Open app and enter the 3.
- Page 15 CONNECTING USING THE QUICK CONNECTION METHOD Before initiating the connection, make sure the WiFi indicator on the appliance is flashing. Also ensure your phone is connected to the WiFi network. (We advise turning mobile data off during setup) 1. Open app and press “+” to Select the type of device 3.
-
Page 16: Controlling Your Appliance Through The App
CONTROLLING YOUR APPLIANCE THROUGH THE APP THE HOME SCREEN Each device has its own entry on the home screen to allow the user to either quickly turn the unit on or off, or to enter the device screen to make other changes. - Page 17 DEVICE SCREEN The device screen is the main control screen for the heater, providing access to the controls to amend the functions and settings. Device Name Edit Name: Use to Back: Returns to the change the name of Home Screen the heater Current Mode: Shows the mode...
- Page 18 SMART SCENES Smart Scenes is a powerful tool providing the option to customize the operation of the air heater based both on conditions within the room and outside influences. This gives the user the option of specifying much more intelligent actions. These are split into two categories Scene and Automation.
- Page 19 AUTOMATION Automation allows an automatic action to be set up for the device. This can be triggered by the Time, and a range of other influences, depending what other TUYA enabled devices you have on the network. 2. Press on the Automation 3.
- Page 20 SETTING THE UNIT TO WORK ON A TIMER The automation feature within TUYA can be used to set up timed operation, this is done through the automation within SMART SCENES. Follow the steps on the previous page, on the “SET A CONDITION” screen, set the condition as schedule, choose the time and days you require the unit to turn on.
-
Page 21: Cleaning, Maintenance And Storage
CLEANING, MAINTENANCE AND STORAGE ATTENTION: Please turn off the appliance and unplug from the mains before cleaning or performing any maintenance. • Clean the heater with a duster or a soft wet cloth. Do not use chemical solvents (such as benzene, alcohol or gasoline) as they may cause irreversible damage. -
Page 22: Technical Specification
Please contact the local council for details of your local household waste recycling centres. DECLARATION OF CONFORMITY Hereby, electriQ declares that this heater follows Directive 2014/53/EU. The full text of the EU declaration of conformity is available at the following internet address: https://www.electriQ.co.uk/content/declaration-of-conformity ENERGY SAVING AND UNIT SAFETY PROTECTION TIPS •... -
Page 23: Product Fiche
Unit J6, Lowfields Business Park, Lowfields Way, Elland, Contact West Yorkshire, HX5 9DA. Details Buy It Direct, The Black Church, St Marys Place, Dublin 7, Ireland...
Need help?
Do you have a question about the EDR-TRD1025B and is the answer not in the manual?
Questions and answers
I have purchased a EDR-TRD1025W recently. It has gone off and will not power on. Fuse and power supply ok.
If the ElectrIQ EDR-TRD1025W will not power on despite the fuse and power supply being okay, ensure that the power dial is not in the off position. Also, if using the timer function, verify that all timer segments are correctly set. If the issue persists, switch the unit off, wait three minutes, and restart it. If the problem remains unresolved, contact the service center.
This answer is automatically generated