Advertisement
Quick Links
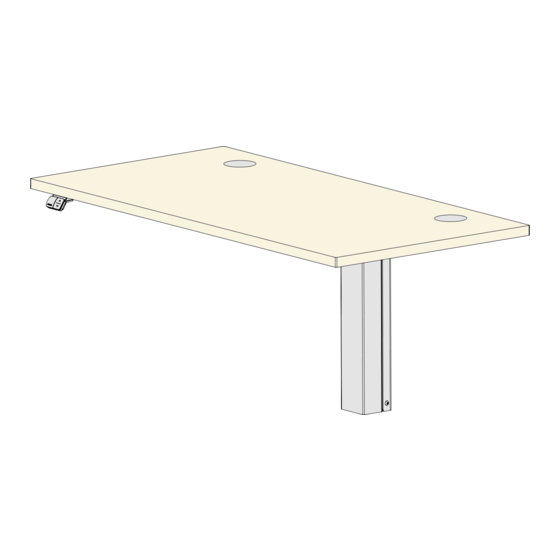
UPLIFT Wall Mounted
Standing Desk
FRM075
OnePod Work Surface
For assembly assistance,
visit upliftdesk.com/contact,
or call 800-349-3839,
or email info@upliftdesk.com
©2022 UPLIFT Desk®. All Rights Reserved
The UPLIFT Wall Mounted Standing Desk is both a standalone desk and a component of the
OnePod Office Phone Booth, referred to in these instructions as the OnePod Work Surface.
two person
assembly
355 lb
Advertisement

Related Manuals for Uplift Desk FRM075


Summary of Contents for Uplift Desk FRM075
- Page 1 For assembly assistance, visit upliftdesk.com/contact, or call 800-349-3839, or email info@upliftdesk.com ©2022 UPLIFT Desk®. All Rights Reserved two person assembly The UPLIFT Wall Mounted Standing Desk is both a standalone desk and a component of the OnePod Office Phone Booth, referred to in these instructions as the OnePod Work Surface.
- Page 2 WARNING: Never use the desk if the power cord or plug is damaged as this can cause a risk of fire and electric shock. Contact UPLIFT Desk for a replacement power cord if it is damaged in any way. WARNING: Risk of serious injury or death.
- Page 3 1/8" Drill Bit 15/64" Drill Bit Socket Wrench 17mm Socket ⅝" Socket (for Wall Mount (for Wall Mount (for Wall Mount (for OnePod installation) installation) installation) installation) © UPLIFT Desk • 800-349-3839 • info@upliftdesk.com • upliftdesk.com...
- Page 4 Component Diagram OnePod Work Surface Wall Mounted Standing Desk Desktop OnePod Work Surface Top Mounting Plate Top Mounting Plate Keypad Keypad Control Box Control Box Wall Mount Bracket Wall Mount Bracket Notes on Wall Construction Wood Stud Installation The lag screws provided are intended to be mounted directly into a wood wall stud. Studs must be a minimum size of 2"...
- Page 5 15/64" drill bit. For other wall or stud types, see "Notes on Wall Construction" on page 5 and follow the directions included with the recommended anchors. © UPLIFT Desk • 800-349-3839 • info@upliftdesk.com • upliftdesk.com...
- Page 6 G. Align the Wall Mount Bracket (P2) with the three holes in the wall ensuring that the three bent tabs on the bracket are facing up as shown. H. For wooden studs, fasten the Wall Mount Bracket to the wall using a 17mm socket wrench, three 10mm x 65mm Lag Screws H2 a (H2a), and three 10mm Plain Washers (H3).
- Page 7 Be careful Washers into the two additional holes drilled in the not to overtighten the screws to avoid stripping. previous step. UPLIFT Desk desktop Customer provided desktop © UPLIFT Desk • 800-349-3839 • info@upliftdesk.com • upliftdesk.com...
- Page 8 Step 5 - Top Mounting Plate Installation for OnePod Work Surface If you are installing a Wall Mounted Desk, skip to Step 6. A. Align the Top Mounting Plate (P3) on the OnePod Work Surface as shown so that the outer two slotted holes in the plate align with the threaded metal inserts near the center of the OnePod Work Surface.
- Page 9 Screwdriver and two #10 x 3/4" Wood Screws (H5). Be careful not to overtighten to avoid stripping. Note: Keypads shown may not be what was ordered. These are shown for reference only. © UPLIFT Desk • 800-349-3839 • info@upliftdesk.com • upliftdesk.com...
- Page 10 Step 9 - Control Box Attachment (for both Wall Mounted Standing Desk and the Control Box OnePod Work Surface) A. Position the Control Box on the Top Mounting Plate (P3) where shown and align the Control Box mounting holes with the two holes in the plate.
- Page 11 If the desk didn't move, try this step again. E. Your desk is now ready for use! F. If you are using an Advanced Keypad, see Advanced Keypad Settings for further information on how to use your Keypad. © UPLIFT Desk • 800-349-3839 • info@upliftdesk.com • upliftdesk.com...
-
Page 12: Keypad Lock
Advanced Keypad Settings These instructions apply to the following keypad types: Advanced Comfort Flush Keypad Advanced Comfort Angled Keypad Set & Use Memorized Heights Save heights on your keypad: 1. Hold the up or down button to move the desk to the desired height. 2. - Page 13 5. Once the desired setting is selected, wait about five seconds for the display to return to "ASr". 6. Hold the down button until the desktop lowers and rises slightly and the display changes back to showing the desk's current height. © UPLIFT Desk • 800-349-3839 • info@upliftdesk.com • upliftdesk.com...
-
Page 14: Troubleshooting
Troubleshooting Resetting the height adjustable desk calibrates and syncs the legs. Avoid the unnecessary delay of waiting for a replacement control box or other parts. Reset your desk if: • Issues with the desk's operation are encountered • The desk has been unplugged or power has been lost Quick Desk Reset Procedure 1. -
Page 15: Starting And Stopping
• If your standing desk feels unstable, please tighten screws used to fasten the desktop to the desk frame. • If any of the screws attaching the desktop to the desk frame are loose, it can cause an imbalance and exacerbate any desktop instability. © UPLIFT Desk • 800-349-3839 • info@upliftdesk.com • upliftdesk.com... - Page 16 Copyright Notice: This guide is a component of this UPLIFT Desk product. This guide is a part of © the scope of delivery, even if the item is resold. This guide is also available on the UPLIFT Desk website: upliftdesk.com. These specifications are subject to United States copyright law.
Need help?
Do you have a question about the FRM075 and is the answer not in the manual?
Questions and answers