
Related Manuals for Uplift Desk FRM059


Summary of Contents for Uplift Desk FRM059
- Page 1 Height Adjustable Bistro Table FRM059 Two person Scan QR code for assembly product webpage For assembly assistance, visit upliftdesk.com/contact, call 800-349-3839, or email support@upliftdesk.com ©2024 UPLIFT Desk®. All Rights Reserved...
- Page 2 Inspect the table regularly and stop using immediately if you notice any damaged or loose parts. Only replace damaged table parts with authorized UPLIFT Desk parts. Under no circumstances does the manufacturer accept warranty or liability claims for damages caused from...
- Page 3 Desk Spacing and Clearance Distances Desk image is for reference only and may not match your desk model. © UPLIFT Desk • 800-349-3839 • info@upliftdesk.com • upliftdesk.com...
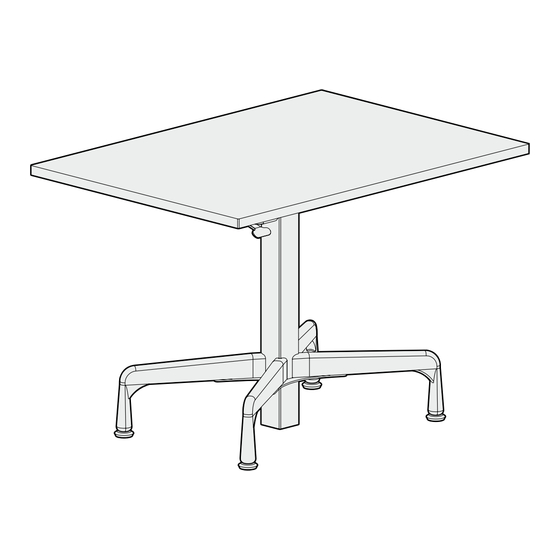
- Page 4 Package Contents Column Leg "A" Leg "B" Top Plate Bottom Plate qty 2 qty 2 qty 2 Hardware Components 4mm Allen Wrench M6 x 14 Screw #10 x 3/4" Wood Screw #10-24 x 3/4" Screw qty 16 qty 8 qty 2 M6 x 10 Machine Screw #10-24 x ¾"...
- Page 5 Parts Diagram Top Plates Column Leg "A" Leg "B" Leg "B" Bottom Plate Leg "A" © UPLIFT Desk • 800-349-3839 • info@upliftdesk.com • upliftdesk.com...
- Page 6 Assembly Instructions WARNING: DO NOT PRESS THE CONTROL PADDLE DURING ASSEMBLY OR INSTALLATION. Doing so may cause injury or damage to equipment and your surroundings by allowing the column to rapidly extend, unrestrained by the weight of the tabletop. For ease and safety, we recommend using two people for assembly.
- Page 7 (front to back measurement) rectangular tabletop, align the two slots in the Top Plate that are furthest from the Column with the threaded metal inserts near the center of the tabletop. © UPLIFT Desk • 800-349-3839 • info@upliftdesk.com • upliftdesk.com...
- Page 8 Round or square tabletops: If you have a round or square tabletop, align the four holes in the Top Plate corners with the four pre-drilled holes near the center of the tabletop. Make sure the column is rotated so that the Control Paddle is able reach the pre-drilled mounting holes near the edge of the tabletop.
- Page 9 If the holes in the end of the Leg do not align with the holes in the Column mounting tab, it is the wrong Leg type for that location. Column mounting tabs © UPLIFT Desk • 800-349-3839 • info@upliftdesk.com • upliftdesk.com...
- Page 10 B. Use the included Allen wrench to insert an M6 x 14 Screw through each of the holes in the Leg and into the Column mounting tab. Do not fully tighten the screws yet. C. Repeat the previous steps to loosely attach the remaining three Legs.
- Page 11 Slightly adjust the Cable Tension Nut until the action is smooth and to your liking. D. Tighten the Cable Locking Nut to lock the Cable Tension Nut in place. Control Paddle Re-tighten Cable Locking Nut © UPLIFT Desk • 800-349-3839 • info@upliftdesk.com • upliftdesk.com...
- Page 12 Study this manual carefully. If this product is sold, please provide this manual to the buyer, installers, or support personnel operating the product. Copyright Notice: This manual is a component of this UPLIFT Desk product. This manual is a ©...
Need help?
Do you have a question about the FRM059 and is the answer not in the manual?
Questions and answers