
Related Manuals for Rockwell Automation Allen-Bradley MicroLogix 1400


Summary of Contents for Rockwell Automation Allen-Bradley MicroLogix 1400
- Page 1 MicroLogix 1400 Programmable Controllers Bulletins 1766 Controllers and 1762 Expansion I/O User Manual Original Instructions...
- Page 2 If this equipment is used in a manner not specified by the manufacturer, the protection provided by the equipment may be impaired. In no event will Rockwell Automation, Inc. be responsible or liable for indirect or consequential damages resulting from the use or application of this equipment.
-
Page 3: Table Of Contents
Panel Mounting ..........31 Rockwell Automation Publication 1766-UM001O-EN-P - September 2021... - Page 4 Ethernet Connections........74 Rockwell Automation Publication 1766-UM001O-EN-P - September 2021...
- Page 5 Set the LCD Password........117 Rockwell Automation Publication 1766-UM001O-EN-P - September 2021...
- Page 6 Transportation ..........150 Rockwell Automation Publication 1766-UM001O-EN-P - September 2021...
- Page 7 Error Codes ..........158 Contact Rockwell Automation for Assistance ..... 159...
- Page 8 Diagnostics for Ethernet Channel (Channel 1) ....266 Diagnostics for Secure Authentication......270 Rockwell Automation Publication 1766-UM001O-EN-P - September 2021...
- Page 9 Configure Using BOOTP........287 Using the Rockwell Automation BOOTP/DHCP Utility ..288 Use a DHCP Server To Configure Your Processor .
- Page 10 Table of Contents Notes: Rockwell Automation Publication 1766-UM001O-EN-P - September 2021...
-
Page 11: Preface
If you do not, obtain the proper training before using this product. Rockwell Automation recognizes that some of the terms that are currently used in our industry and in this publication are not in alignment with the movement toward inclusive language in technology. - Page 12 Distributed Network Protocol (DNP3) Specifications Available from www.dnp.org Information about the Distributed Network Protocol. Provides guidance on how to conduct security assessments, implement Rockwell Automation® System Security Design Guidelines Reference Manual, SECURE-RM001 products in a secure system, harden the control system, manage user access, and dispose of equipment.
-
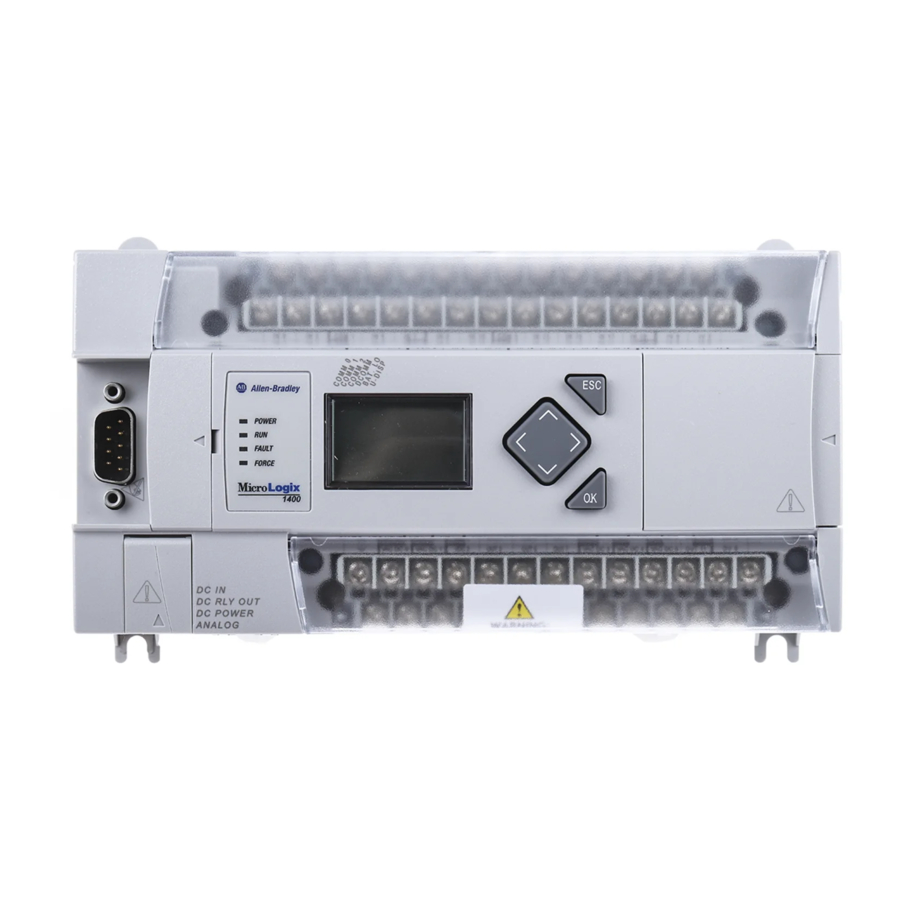
Page 13: Hardware Overview
Comm port 1 – RJ45 connector Battery compartment Comm port 0 – 8-pin mini DIN RS-232C/RS-485 connector 1762 expansion bus connector (1) See MicroLogix 1400 Memory Module Installation Instructions, publication 1766-IN010 for instructions on installing the memory module. Rockwell Automation Publication 1766-UM001O-EN-P - September 2021... -
Page 14: Component Descriptions
The memory module provides additional backup that can be stored separately. The memory module does not increase the available memory of the controller. Figure 1 - 1766-MM1 Memory Module Rockwell Automation Publication 1766-UM001O-EN-P - September 2021... -
Page 15: 1762 Expansion I/O
These cables are required for Class I Div. 2 applications. • 1761-CBL-AM00 Series C or later • 1761-CBL-AP00 Series C or later • 1761-CBL-PM02 Series C or later • 1761-CBL-HM02 Series C or later Rockwell Automation Publication 1766-UM001O-EN-P - September 2021... -
Page 16: Programming
• Fixed defect for CIP Messaging Error when CIP service code is 4Bh or 4Ch. 1766-L32AWA • Fixed defect for the EtherNet/IP List Identity reply. 1766-L32BWA FRN5 May 2007 • Fixed defect for window size error in TCP/IP stack. 1766-L32BBB • Improved system interrupt delay time. Rockwell Automation Publication 1766-UM001O-EN-P - September 2021... -
Page 17: Communication Options
TCP/IP configuration, and diagnostic information, but also includes the data table memory map and data table monitor screen using a standard web browser. Chapter 4 for more information on connecting to the available communication options. Rockwell Automation Publication 1766-UM001O-EN-P - September 2021... - Page 18 Chapter 1 Hardware Overview Notes: Rockwell Automation Publication 1766-UM001O-EN-P - September 2021...
-
Page 19: Install Your Controller
(b) Overvoltage Category II is the load level section of the electrical distribution system. At this level, transient voltages are controlled and do not exceed the impulse voltage capability of the products insulation. Rockwell Automation Publication 1766-UM001O-EN-P - September 2021... -
Page 20: Safety Considerations
Do not replace components, connect equipment, or disconnect equipment unless power has been switched off. The main power disconnect switch should be located where operators and maintenance personnel have quick and easy access to it. In addition to Rockwell Automation Publication 1766-UM001O-EN-P - September 2021... -
Page 21: Safety Circuits
The power rating is expressed in volt-amperes (VA). Power Supply Inrush During power-up, the MicroLogix 1400 power supply allows a brief inrush current to charge internal capacitors. Many power lines and control Rockwell Automation Publication 1766-UM001O-EN-P - September 2021... -
Page 22: Loss Of Power Source
In this case, place blower fans inside the enclosure to assist in air circulation and to reduce hot spots near the controller. Additional cooling provisions might be necessary when high ambient temperatures are encountered. Rockwell Automation Publication 1766-UM001O-EN-P - September 2021... -
Page 23: Master Control Relay
• Install emergency-stop switches and the master control relay in your system. Make certain that relay contacts have a sufficient rating for your application. Emergency-stop switches must be easy to reach. Rockwell Automation Publication 1766-UM001O-EN-P - September 2021... - Page 24 Use IEC 950/EN 60950 (Hi) (Lo) 24V DC I/O Circuits Line Terminals: Connect to terminals of Power Supply (1766-L32AWA, 1766-L32AWAA, 1766-L32BWA, 1766-L32BWAA). Line Terminals: Connect to 24V DC terminals of Power Supply (1766-L32BXB, 1766-L32BXBA) Rockwell Automation Publication 1766-UM001O-EN-P - September 2021...
-
Page 25: Install A Memory Module
Install a Memory Module To install the memory module, do as follows: 1. Remove the memory module port cover. 2. Align the connector on the memory module with the connector pins on the controller. Rockwell Automation Publication 1766-UM001O-EN-P - September 2021... -
Page 26: Use The Battery
1. Insert the replaceable battery wire connector into the controller’s battery connector. 2. Secure the battery connector wires so that it does not block the 1762 expansion bus connector as shown in Figure 5 on page 27 Rockwell Automation Publication 1766-UM001O-EN-P - September 2021... -
Page 27: Controller Mounting Dimensions
Allow 50 mm (2 in.) of space on all sides of the controller system for adequate ventilation. Maintain spacing from enclosure walls, wireways, adjacent equipment, and so on, as shown in Figure 6 on page Rockwell Automation Publication 1766-UM001O-EN-P - September 2021... -
Page 28: Mount The Controller
(b) Over Voltage Category II is the load level section of the electrical distribution system. At this level transient voltages are controlled and do not exceed the impulse voltage capability of the product’s insulation. (c) Pollution Degree 2 and Over Voltage Category II are International Electrotechnical Commission (IEC) designations. Rockwell Automation Publication 1766-UM001O-EN-P - September 2021... -
Page 29: Panel Mounting
Mount to panel using #8 or M4 screws. To install your controller using mounting screws: 1. Remove the mounting template from inside the back cover of MicroLogix 1400 Programmable Controllers Installation Instructions, publication 1766-IN001. Rockwell Automation Publication 1766-UM001O-EN-P - September 2021... -
Page 30: 1762 Expansion I/O Dimensions
The module can be mounted using the following DIN rails: • 35 x 7.5 mm (EN 50 022 – 35 x 7.5), or • 35 x 15 mm (EN 50 022 – 35 x 15). Rockwell Automation Publication 1766-UM001O-EN-P - September 2021... -
Page 31: Panel Mounting
A = 165 mm (6.497 in.) Connect Expansion I/O The expansion I/O module is attached to the controller or another I/O module by means of a flat ribbon cable after mounting, as shown in Figure 9 on page Rockwell Automation Publication 1766-UM001O-EN-P - September 2021... - Page 32 In Class I, Division 2 applications, all modules must be mounted in direct contact with each other as shown on page 23. If DIN rail mounting is used, an end stop must be installed ahead of the controller and after the last 1762 I/O module. Rockwell Automation Publication 1766-UM001O-EN-P - September 2021...
-
Page 33: Wiring Requirements
In addition to labeling, use colored insulation to identify wiring based on signal characteristics. For example, you can use blue for DC wiring and red for AC wiring. Rockwell Automation Publication 1766-UM001O-EN-P - September 2021... -
Page 34: Wire Without Spade Lugs
Because of the potentially high current surges that occur when switching inductive load devices, such as motor starters and solenoids, the use of some type of surge suppression to protect and extend the operating life of the Rockwell Automation Publication 1766-UM001O-EN-P - September 2021... - Page 35 See Recommended Surge Suppressors on page 36 for recommended suppressors. Surge Suppression for Inductive AC Load Devices Output device Output device Output device Surge suppressor Varistor RC network Rockwell Automation Publication 1766-UM001O-EN-P - September 2021...
-
Page 36: Recommended Surge Suppressors
(EMI). Run the ground connection from the ground screw of the controller to the ground bus prior to connecting any devices. Use AWG #14 wire. For AC-powered controllers, this connection must be made for safety purposes. Rockwell Automation Publication 1766-UM001O-EN-P - September 2021... -
Page 37: Wiring Diagrams
This connection must be made for safety purposes on AC-powered controllers. This symbol denotes a functional earth ground terminal which provides a low impedance path between electrical circuits and earth for non-safety purposes, such as noise immunity improvement. Rockwell Automation Publication 1766-UM001O-EN-P - September 2021... -
Page 38: Terminal Block Layouts
IN18 IV1(+) IV3(+) L2/N OUT0 OUT1 OUT2 OUT3 OUT4 OUT7 OUT8 OUT10 OUT5 OUT6 OUT9 OUT11 Group 0 Group 1 Group 2 Group 3 Group 4 Group 5 Group 6 Output Terminal Block Rockwell Automation Publication 1766-UM001O-EN-P - September 2021... - Page 39 WARNING: If you connect or disconnect wiring while the field-side power is on, an electrical arc can occur. This could cause an explosion in hazardous location installations. Be sure that power is removed or the area is nonhazardous before proceeding. Rockwell Automation Publication 1766-UM001O-EN-P - September 2021...
-
Page 40: Sinking And Sourcing Wiring Diagrams
COM 1 COM 2 IN10 IN11 1766-L32AWAA only COM 3 IN12 IN13 IN14 IN15 IN16 IN17 IN18 IN19 IV0(+) IV1(+) IV2(+) IV3(+) “NOT USED” terminals are not intended for use as connection points. Rockwell Automation Publication 1766-UM001O-EN-P - September 2021... - Page 41 +DCb +DCc -DCa -DCb -DCc USED USED IN10 IN11 COM 0 COM 1 COM 2 1766-L32BXBA only +DCd -DCd IN12 IN13 IN14 IN15 IN16 IN17 IN18 IN19 IV0(+) IV1(+) IV2(+) IV3(+) COM 3 Rockwell Automation Publication 1766-UM001O-EN-P - September 2021...
-
Page 42: Controller I/O Wiring
A system may malfunction due to a change in the operating environment after a period of time. We recommend periodically checking system operation, particularly when new machinery or other noise sources are installed near the MicroLogix 1400 system. Rockwell Automation Publication 1766-UM001O-EN-P - September 2021... -
Page 43: Wire Your Analog Channels
The analog common (COM) is connected to earth ground inside the module. These terminals are not electrically isolated from the system. They are connected to chassis ground. • Analog channels are not isolated from each other. Rockwell Automation Publication 1766-UM001O-EN-P - September 2021... -
Page 44: Minimize Electrical Noise On Analog Channels
Use shielded communication cable (Belden #8761). The Belden cable has two signal wires (black and clear), one drain wire, and a foil shield. The drain wire and foil shield must be grounded at one end of the cable. Rockwell Automation Publication 1766-UM001O-EN-P - September 2021... -
Page 45: Expansion I/O Wiring
Figure 23 - 1762-IQ8 Wiring Diagram +DC (sinking) -DC (sourcing) IN 0 IN 1 IN 2 IN 3 24V DC IN 4 IN 5 IN 6 IN 7 Common connected internally -DC (sinking) +DC (sourcing) Rockwell Automation Publication 1766-UM001O-EN-P - September 2021... - Page 46 -DC (sinking) +DC (sourcing) COM 0 +DC (sinking) -DC (sourcing) IN 8 IN 9 IN 10 IN 11 24V DC IN 12 IN 13 IN 14 IN 15 -DC (sinking) +DC (sourcing) COM 1 Rockwell Automation Publication 1766-UM001O-EN-P - September 2021...
- Page 47 Chapter 3 Wire Your Controller Figure 25 - 1762-IQ32T Wiring Diagram Figure 26 - 1762-OA8 Wiring Diagram OUT 0 OUT 1 OUT 2 OUT 3 OUT 4 OUT 5 OUT 6 OUT 7 Rockwell Automation Publication 1766-UM001O-EN-P - September 2021...
- Page 48 OUT 2 OUT 3 OUT 4 OUT 5 OUT 6 OUT 7 OUT 8 24V DC (source) OUT 9 OUT 10 OUT 11 OUT 12 OUT 13 OUT 14 OUT 15 DC COM Rockwell Automation Publication 1766-UM001O-EN-P - September 2021...
- Page 49 Chapter 3 Wire Your Controller Figure 29 - 1762-OB32T Wiring Diagram Figure 30 - 1762-OV32T Wiring Diagram Rockwell Automation Publication 1766-UM001O-EN-P - September 2021...
- Page 50 OUT 0 OUT 1 OUT 2 OUT 3 OUT 4 OUT 5 OUT 6 OUT 7 VAC-VDC OUT 8 OUT 9 OUT 10 OUT 11 OUT 12 OUT 13 OUT 14 OUT 15 Rockwell Automation Publication 1766-UM001O-EN-P - September 2021...
-
Page 51: Analog Wiring
The analog common (COM) is not connected to earth ground inside the module. All terminals are electrically isolated from the system. • Channels are not isolated from each other. • Use Belden 8761, or equivalent, shielded wire. Rockwell Automation Publication 1766-UM001O-EN-P - September 2021... - Page 52 Figure 36 - 1762-IF2OF2 Terminal Block Layout IN 0 (+) IN 0 (-) IN 1 (+) IN 1 (-) V Out 0 I Out 0 V Out 1 I Out 1 Common connected internally. Rockwell Automation Publication 1766-UM001O-EN-P - September 2021...
- Page 53 Instruction Set Reference Manual, publication 1766-RM001. You can access the switches through the ventilation slots on the top of the module. Figure 39 - 1762-IF4 Switch Location Switch location Ch0 Ch1 Ch2 Ch3 Voltage (OFF) Current (ON default) Rockwell Automation Publication 1766-UM001O-EN-P - September 2021...
- Page 54 IN - Transmitter 3-Wire Transmitter Signal Supply Module Power IN + Supply IN - Transmitter 4-Wire Transmitter Module Supply Signal Power IN + Supply IN - All power supplies rated N.E.C. Class 2. Rockwell Automation Publication 1766-UM001O-EN-P - September 2021...
- Page 55 Figure 44 - 1762-OF4 Wiring I out 0 Current load I out 1 I out 2 I out 3 V out 0 Voltage load V out 1 V out 2 V out 3 Rockwell Automation Publication 1766-UM001O-EN-P - September 2021...
- Page 56 Chapter 3 Wire Your Controller Notes: Rockwell Automation Publication 1766-UM001O-EN-P - September 2021...
-
Page 57: Communication Connections
Ethernet I/O master capability through CIP implicit messaging (real-time I/O messaging). For more information on MicroLogix 1400 communications, see MicroLogix 1400 Programmable Controllers Instruction Set Reference Manual, publication 1766-RM001. Rockwell Automation Publication 1766-UM001O-EN-P - September 2021... -
Page 58: Default Communication Configuration
Hold down the OK key more than 5 seconds to toggle the communication mode on the Main Menu screen. Figure 45 - Main Menu Screen The Communication Toggle Functionality only affects the communication configuration of Channel 0. Rockwell Automation Publication 1766-UM001O-EN-P - September 2021... -
Page 59: Change Communication Configuration
The DCOMM status indicator, which is the fourth of the six indicators at the top left of the LED display, displays as an empty rectangle. It means that the communication configuration is set to a user-defined communication mode. Rockwell Automation Publication 1766-UM001O-EN-P - September 2021... -
Page 60: Connect To The Rs-232 Port
It should only be used to power input devices. • For 1766-L32BXB controllers, the VDC NEUT or common terminal of the power supply is also connected to chassis ground internally. Rockwell Automation Publication 1766-UM001O-EN-P - September 2021... -
Page 61: Make A Df1 Point-To-Point Connection
IMPORTANT Do not attempt to use DH-485 protocol through modems under any circumstance. The communication timing using DH-485 protocol is not supported by modem communications. Rockwell Automation Publication 1766-UM001O-EN-P - September 2021... - Page 62 Figure 46 - Typical Straight-through Cable Pinout AIC+ Optical Isolator Modem or 1766-LEC Channel 2 9-Pin 25-Pin 9-Pin Pins 4 and 6 are internally connected for 1766-LEC only Rockwell Automation Publication 1766-UM001O-EN-P - September 2021...
-
Page 63: Connect To A Df1 Half-Duplex Network
• When the Control Line is set to DF1 Half-Duplex Modem, this is the minimum time delay between receiving the last character of a packet and the RTS assertion. DF1 Half-Duplex Master-Slave Network Figure 48 for DF1 Half-Duplex Master-Slave protocol without hardware handshaking. Rockwell Automation Publication 1766-UM001O-EN-P - September 2021... - Page 64 CABLE DC SOURCE CABLE EXTERNAL EXTERNAL EXTERNAL MicroLogix 1000 MicroLogix 1400 MicroLogix 1200 MicroLogix 1500 with 1764-LSP MicroLogix 1500 with SLC 5/03 (slave) (slave) (slave) (slave) or 1764-LRP Processor (slave) 1764-LRP processor (slave) Rockwell Automation Publication 1766-UM001O-EN-P - September 2021...
-
Page 65: Connect To A Rs-485 Network
Table 9 - DH-485 Configuration Parameters Parameter Options Baud Rate 9600, 19.2 Kbps Node Address 1...31 decimal Token Hold Factor 1...4 Software Considerations on page 181 for tips on setting the parameters listed in Table Rockwell Automation Publication 1766-UM001O-EN-P - September 2021... - Page 66 (4) Series A or later cables are required. Typical 3-Node Network (Channel 0 Connection) PanelView 550 PanelView MicroLogix 1400 RJ45 port 1761-CBL-AS09 or 1761-CBL-AS03 1747-CP3 or TERM 1761-CBL-AM00 or SHLD CHS GND 1761-CBL-AC00 1761-CBL-HM02 DC SOURCE CABLE EXTERNAL Rockwell Automation Publication 1766-UM001O-EN-P - September 2021...
-
Page 67: Recommended Tools
Connect the Communication Cable to the DH-485 Connector A daisy-chained network is recommended. Do not make the incorrect connection shown below: Belden #3106A or Belden #3106A or Belden #3106A or #9842 #9842 #9842 Connector Connector Connector Incorrect Rockwell Automation Publication 1766-UM001O-EN-P - September 2021... -
Page 68: Ground And Terminate The Dh-485 Network
Both ends of the network must have Terminals 5 and 6 jumpered together, as shown in Figure 51 on page 69. This connects the termination impedance (of 120 ohm) that is built into each AIC+ or the 1763-NC01 cable as required by the DH-485 specification. Rockwell Automation Publication 1766-UM001O-EN-P - September 2021... -
Page 69: Connect The Aic
Port 1 – DB-9 RS-232, DTE External = external power source connected to item 5) Port 3 – RS-485 Phoenix plug Terminals for external 24V DC power supply and chassis ground Port 2 – mini-DIN 8 RS-232 DTE Rockwell Automation Publication 1766-UM001O-EN-P - September 2021... -
Page 70: Cable Selection Guide
Modem or other communication device Port 1 External (1) External power supply required unless the AIC+ is powered by the device connected to port 2, then the selection switch should be set to cable. Rockwell Automation Publication 1766-UM001O-EN-P - September 2021... -
Page 71: Recommended User-Supplied Components
External power supply and chassis ground Power supply rated for 20.4…28.8V DC NULL modem adapter Standard AT Figure 54 Table 10 on page 72 for port information Straight 9-25 pin RS-232 cable if making own cables Rockwell Automation Publication 1766-UM001O-EN-P - September 2021... -
Page 72: Install And Attach The Aic
Allow enough cable slack to prevent stress on the plug. 3. Provide strain relief for the Belden cable after it is wired to the terminal block. This guards against breakage of the Belden cable wires. Rockwell Automation Publication 1766-UM001O-EN-P - September 2021... -
Page 73: Power The Aic
Make a hard-wired connection from the external supply to the screw terminals on the bottom of the AIC+. ATTENTION: If you use an external power supply, it must be 24V DC (-15%/ +20%). Permanent damage results if mis-wired with the wrong power source. Rockwell Automation Publication 1766-UM001O-EN-P - September 2021... -
Page 74: Connect To Ethernet
1 2 3 4 5 6 7 8 8 7 6 5 4 3 2 1 For information on how to select the proper cable, see Guidance for Selecting Cables for EtherNet/IP Networks, publication ENET-WP007-EN-P. Rockwell Automation Publication 1766-UM001O-EN-P - September 2021... -
Page 75: Lcd And Keypad
The LCD and keypad are shown in Figure Figure 56 - Controller Part Identification Top View Table 12 - LCD and Keypad Feature Description LCD Screen Keypad (ESC, OK, Up, Down, Left, and Right Buttons) Rockwell Automation Publication 1766-UM001O-EN-P - September 2021... -
Page 76: Operating Principles
ASCII data file that contains the bitmap format image to display on the Startup screen and specifying the CBL element of the LCD Function File to the address of this ASCII file. Rockwell Automation Publication 1766-UM001O-EN-P - September 2021... -
Page 77: Main Menu And Default Screen
Main Menu and Default Screen The Main menu consists of five menu items: I/O Status, Monitoring, Mode Switch, User Display, and Advanced Set. Rockwell Automation Publication 1766-UM001O-EN-P - September 2021... - Page 78 Figure 61 - LCD Default Screen – I/O Status Screen Figure 61 is the default screen of the display, allowing you to monitor controller and I/O Status. For more information on the I/O Status screen, I/O Status on page Rockwell Automation Publication 1766-UM001O-EN-P - September 2021...
-
Page 79: Operating Buttons
• Press repeatedly to go to the main menu. • Change menu item. • Change value. • Change position. Select Between Menu Items Cursor up or down Apply or Enter symbol represents the cursor. Rockwell Automation Publication 1766-UM001O-EN-P - September 2021... -
Page 80: Cursor Display
LCD, as in Figure 62 on page 81. The I/O status indicators on this screen are updated every 100 ms to reflect the current I/O status in real time, regardless of controller scan time. Rockwell Automation Publication 1766-UM001O-EN-P - September 2021... -
Page 81: View I/O Status
1. On the Main Menu screen, select I/O Status by using the Up and Down keys on the LCD keypad, as shown. 2. Then, press OK on the LCD keypad. The I/O Status screen displays, as shown. Rockwell Automation Publication 1766-UM001O-EN-P - September 2021... -
Page 82: Monitor User Defined Target Files
HMI, or programming software. It is the user’s responsibility to ensure that data is not inadvertently overwritten. The LCD always starts at bit 0 of a data file. It cannot start at any other address within the file. Rockwell Automation Publication 1766-UM001O-EN-P - September 2021... -
Page 83: Monitor A Bit File
The TUF element of the LCD Function File is set to 3 to specify the bit file B3 as the target bit file to monitor on the LCD, as shown. • The controller mode is set to REMOTE RUN. Rockwell Automation Publication 1766-UM001O-EN-P - September 2021... - Page 84 7. Press OK to apply the changes. Then, the new value OFF (0) is applied. Note that the target bit, “0/0” in this example, flashes. The cursor moves automatically to the target bit position. Rockwell Automation Publication 1766-UM001O-EN-P - September 2021...
-
Page 85: Monitor Integer Files
Monitoring screen of the LCD. To monitor an integer file on the LCD, you have to specify its file number in the Target User Defined File Number (TUF) element of the LCD Function File and Rockwell Automation Publication 1766-UM001O-EN-P - September 2021... - Page 86 For explanations in this section, we assume the following in the application program: • An integer file N7, which is 256 elements long (256 words), is defined with the preset data, as shown. Rockwell Automation Publication 1766-UM001O-EN-P - September 2021...
- Page 87 5. We will change the data value of the N7:0 word to the negative decimal value -1300. First, press OK to move the cursor to the data value position. The last digit of “+00000” flashes, which means the cursor is at the data value position. Rockwell Automation Publication 1766-UM001O-EN-P - September 2021...
- Page 88 You can identify that this change of data value is reflected to your RSLogix 500/RSLogix Micro programming software, as shown. After changing the data value of a target word, press OK to apply the changes or press ESC to discard the changes. Rockwell Automation Publication 1766-UM001O-EN-P - September 2021...
-
Page 89: Monitor Double Integer Files
Valid file type include Bit, Integer, Double integer or Float, as specified in the TUF element. Rockwell Automation Publication 1766-UM001O-EN-P - September 2021... - Page 90 For explanations in this section, we assume the following in the application program: • A bit file L9, which is 256 elements long (256 words), is defined with the preset data, as shown. • LCD Edit Disable is set to unchecked (disable). Rockwell Automation Publication 1766-UM001O-EN-P - September 2021...
- Page 91 5. We will change the data value of the L9:0 word to the negative decimal value -1300. First, press OK to move the cursor to the data value position. Then, the last digit of +0000000000 flashes, which means the cursor is at the data value position. Rockwell Automation Publication 1766-UM001O-EN-P - September 2021...
- Page 92 10. You can identify that this change of data value is reflected to your RSLogix 500/RSLogix Micro programming software. After changing the data value of a target double word, press OK to apply the changes or press ESC to discard the changes. Rockwell Automation Publication 1766-UM001O-EN-P - September 2021...
-
Page 93: Monitor Floating Point Files
89. However, you cannot edit floating point files from the LCD. The Protected! message displays on the LCD for floating point files. MicroLogix 1400 Series A controllers display an Unprotected! message but you cannot edit the corresponding data file. Rockwell Automation Publication 1766-UM001O-EN-P - September 2021... -
Page 94: Monitor System Status Files
REMOTE before you run the control program in the remote test single scan mode with your RSLogix 500 or RSLogix Micro programming software. Rockwell Automation Publication 1766-UM001O-EN-P - September 2021... -
Page 95: Change Mode Switch Position
The following LCD screen appears if successfully done. Note that I/O output status may be changed for some programs. While the controller is powered on, follow these steps to change the position of the Mode Switch. Rockwell Automation Publication 1766-UM001O-EN-P - September 2021... -
Page 96: User-Defined Lcd Screen
LCD keypad, as shown. If the menu items shown in the figure below are not displayed on the Main Menu screen, scroll down the screen by pressing the Down key. Note: The Security menu is available in firmware revision 21.000 or later. Rockwell Automation Publication 1766-UM001O-EN-P - September 2021... -
Page 97: Configure Advanced Settings
Ethernet Network Configuration • use trim pots • view system information • view fault code • save/load Communication EEPROM • change LCD contrast and back light • view/change the Modbus RTU Slave Node address Rockwell Automation Publication 1766-UM001O-EN-P - September 2021... -
Page 98: Change Key In Mode
LCD keypad. If the menu items do not display on the Main Menu screen as shown, scroll down the screen by pressing the Down key. Note: The Security menu is available in firmware revision 21.000 or later. Rockwell Automation Publication 1766-UM001O-EN-P - September 2021... -
Page 99: Communications Toggle Functionality
Ethernet Network View Ethernet Status Configuration The Ethernet configuration screen of the LCD displays the MAC and IP addresses assigned to the controller. Follow these steps to view the Ethernet configuration for your controller. Rockwell Automation Publication 1766-UM001O-EN-P - September 2021... - Page 100 XXXXXXXXXXXX. The IP address is represented as xxx.xxx.xxx.xxx, where each xxx is a decimal number between 0…255. 7. Press ESC to return to the Advanced Set Menu screen, as shown in step Rockwell Automation Publication 1766-UM001O-EN-P - September 2021...
-
Page 101: Configure The Ip Address
4. The password screen displays. Press Up, Down, Left and Right keys to enter the master password up to a maximum of 10 digits. In this example, the current master password is allocated as 1234. Rockwell Automation Publication 1766-UM001O-EN-P - September 2021... - Page 102 7. If the password is correct, the Ethernet network type screen displays as shown. Press Up or Down key to select the appropriate Ethernet mode. 8. If you press OK at the static mode, the IP address flashes. Rockwell Automation Publication 1766-UM001O-EN-P - September 2021...
-
Page 103: Configure The Ethernet Port
1. On the Main Menu screen, select Advanced Set by using the Up and Down keys on the LCD keypad. If the menu items do not display on the Main Menu screen as shown, scroll down the screen by pressing the Down key. Rockwell Automation Publication 1766-UM001O-EN-P - September 2021... - Page 104 After entering the Master password, press the OK key on the LCD keypad. 6. If the Master password is correct, the last configuration displays. In this example, the auto negotiation function is enabled and the 10/100 Mbps link configuration shows. Rockwell Automation Publication 1766-UM001O-EN-P - September 2021...
-
Page 105: Configure Ethernet Protocol Setup
2. Press OK on the LCD keypad. The Advanced Settings Menu screen displays, as shown below. 3. If ENET Cfg is selected, press OK. If not, select ENET Cfg using the Up and Down keys, and then press OK. Rockwell Automation Publication 1766-UM001O-EN-P - September 2021... - Page 106 After entering the Master password, press the OK key on the LCD keypad. 6. The following menu displays. 7. If you want to change the SNMP setting, press Up or Down and press OK to apply the change. Rockwell Automation Publication 1766-UM001O-EN-P - September 2021...
-
Page 107: Trim Pots
Follow these steps to change the data value of a trim pot, either POT0 or POT1. 1. On the Main Menu screen, select TrimPot Set by using the Up and Down keys on the LCD keypad. Rockwell Automation Publication 1766-UM001O-EN-P - September 2021... - Page 108 Trim Pot screen, either the Trim Pot 0 or Trim Pot 1 screen. 6. If you have finished changing the data value of the selected trim pot, POT0 in this example, press ESC to return to the trim pot select screen, as shown in step Rockwell Automation Publication 1766-UM001O-EN-P - September 2021...
-
Page 109: Trim Pot Configuration In Lcd Function File
You can identify the catalog number, operating system firmware revision number, and boot firmware revision number of your controller. 5. Press ESC to return to the Advanced Set Menu screen, as shown in step Rockwell Automation Publication 1766-UM001O-EN-P - September 2021... -
Page 110: View Fault Code
For more information on a specific fault code, see the Online Help of your RSLogix 500/ RSLogix Micro programming software. 5. Press ESC to return to the Advanced Set Menu screen, as shown in step Rockwell Automation Publication 1766-UM001O-EN-P - September 2021... -
Page 111: Save Or Load Communication Eeprom
4. Select Store to MM to save user program and data, and then press OK. 5. If your controller is in a non-executing mode, skip to the next step. Otherwise switch your controller to a non-executing mode. Rockwell Automation Publication 1766-UM001O-EN-P - September 2021... -
Page 112: Load Communication Eeprom
1. Select Load from MM to load user programs and data. 2. If your controller is in a non-executing mode, skip to the next step. Otherwise switch your controller to a non-executing mode. Rockwell Automation Publication 1766-UM001O-EN-P - September 2021... -
Page 113: Lcd Setup
2. Press OK on the LCD keypad. 3. Select LCD Setup, using the Up and Down keys on the LCD keypad. When the LCD Setup menu screen displays, press OK. 4. Select Contrast to adjust the contrast of LCD. Rockwell Automation Publication 1766-UM001O-EN-P - September 2021... -
Page 114: Configure The Back Light
4. Select Back Light to adjust back lighting options for the LCD. 5. The default value for the back light is 30 seconds. You can adjust back light time using the Up and Down keys on the LCD keypad. Rockwell Automation Publication 1766-UM001O-EN-P - September 2021... -
Page 115: Protocol Configuration
2. Then, press OK on the LCD keypad. The Advanced Settings Menu screen displays. 3. Select the Protocol Cfg using the Up and Down arrow keys, and then press OK. 4. Select the Modbus RTU Sl and then press OK. Rockwell Automation Publication 1766-UM001O-EN-P - September 2021... - Page 116 8. If channel 0 is configured with the Modbus RTU Slave driver with node address 100, the following screen will appear as shown. 9. If channel 2 is configured with the Modbus RTU Slave driver with node address 100, the following screen will appear as shown. Rockwell Automation Publication 1766-UM001O-EN-P - September 2021...
-
Page 117: Lcd Password Setup
2. Select Security to set the LCD Password. If LCD Password is not set, Activate PWD menu screen displays. 3. Select Activate PWD menu to set the LCD Password. LCD Password screen displays. Digit at current cursor position blinks always. Rockwell Automation Publication 1766-UM001O-EN-P - September 2021... -
Page 118: Activate The Lcd Password
LCD keypad. If the menu items shown are not displayed on the Main Menu screen, scroll down by pressing the Down key. 2. Select Security. If the LCD Password is set, the LCD Password configuration menu screen displays. Rockwell Automation Publication 1766-UM001O-EN-P - September 2021... -
Page 119: Deactivate The Lcd Password
2. Select Security to deactivate the LCD Password. If an LCD Password is set, the LCD Password configuration menu screen displays. 3. Select Deactivate PWD to deactivate the LCD Password. An authentication screen displays. Rockwell Automation Publication 1766-UM001O-EN-P - September 2021... -
Page 120: Change Lcd Password
4. Press Up or Down to change the digit and press Left or Right to move the cursor position. Enter the old (current) and new LCD Passwords. In this example, the old and new LCD Passwords are 1234 and 5670000009. Rockwell Automation Publication 1766-UM001O-EN-P - September 2021... - Page 121 0000000000. A confirmation screen displays. 6. Press OK to clear the LCD Password. A confirmation screen displays. 7. Press OK on the LCD keypad to change the password. A confirmation screen displays. Rockwell Automation Publication 1766-UM001O-EN-P - September 2021...
- Page 122 Chapter 5 LCD and Keypad Notes: Rockwell Automation Publication 1766-UM001O-EN-P - September 2021...
-
Page 123: Real-Time Clock Operation
The real-time clock does not allow you to load or store invalid date or time data. RTC Battery Operation The real-time clock uses the same replaceable battery that the controller uses. The RTC Function File features a battery low indicator bit (RTC:0/BL), which Rockwell Automation Publication 1766-UM001O-EN-P - September 2021... -
Page 124: Memory Module Operation
DataLog, and Recipe to the controller without the use of a personal computer and programming software. The memory module can store one user program at a time. During program transfers to or from the memory module, the controller’s RUN LED flashes. Rockwell Automation Publication 1766-UM001O-EN-P - September 2021... -
Page 125: Program Compare
To download the program and data from a memory module to the controller’s memory, on the “Comms” menu in your RSLogix 500/RSLogix Micro programming software, point “EEPROM” and then click “Load from EEPROM”. Rockwell Automation Publication 1766-UM001O-EN-P - September 2021... -
Page 126: Program /Data Upload
With MicroLogix 1400, you can also use the LCD and the LCD buttons on the module to transfer applications to or from the controller. For more information on program/data upload, see your RSLogix 500/RSLogix Micro programming software documentation. Rockwell Automation Publication 1766-UM001O-EN-P - September 2021... -
Page 127: Overview Of Online Editing
IMPORTANT It is important to keep in mind that some ladder instructions, when programmed online, cause data table values to change. These instructions are those that require timer, counter, and control addresses to be specified. This is discussed later in the chapter. Rockwell Automation Publication 1766-UM001O-EN-P - September 2021... -
Page 128: Online Editing Terms
Online editing cannot change the size of existing data tables nor can new ones be created. However, some ladder instructions, when programmed cause data table values to change. These instructions are those that require timer, counter, and control addresses to be specified. Rockwell Automation Publication 1766-UM001O-EN-P - September 2021... -
Page 129: Online Edit Error
We recommend that you fully understand the possible results of the edit to the system under control. Failure to properly edit a running program could result in unexpected controller operation. Physical injury or equipment damage may result. Rockwell Automation Publication 1766-UM001O-EN-P - September 2021... -
Page 130: Types Of Online Editing
Edit Functions in Program Online Editing During a program online editing session, the processor is not executing ladder logic. This mode is like the offline editing mode. Note that if a runtime online Rockwell Automation Publication 1766-UM001O-EN-P - September 2021... -
Page 131: Automatic Controller Recovery
MicroLogix 1400 project tree. 2. In the Status data file, set Status Bit S:36/1 to 1. The default for the status bit is 0 (disabled). 3. Download the project to the controller. Rockwell Automation Publication 1766-UM001O-EN-P - September 2021... - Page 132 (a) latest user program means the program that you downloaded or a user program that you successfully edited online, whichever is the latest. (b) latest user data means data that you downloaded as part of a program download or user data that you successfully edited online, whichever is the latest. Rockwell Automation Publication 1766-UM001O-EN-P - September 2021...
- Page 133 2.5 mA max. 0.1 mA max 1.5 mA max. 12 kΩ at 50 Hz Nominal Impedance 2.0 kΩ 5.5 kΩ 10 kΩ at 60 Hz Inrush Current (max.) at 120V AC 30 A Rockwell Automation Publication 1766-UM001O-EN-P - September 2021...
- Page 134 Load current, min 10 mA (1) Scan time dependent Relay Contact Ratings Maximum Volts Amperes Volt-Amperes Amperes Continuous Make Break Make Break 240V AC 7.5 A 0.75 A 2.5 A 1800 VA 180 VA Rockwell Automation Publication 1766-UM001O-EN-P - September 2021...
- Page 135 ATTENTION: Do not exceed the Current per group common specification. Relay Life Chart Switching capacity(A) Figure 63 - MicroLogix 1400 DC Input Power Requirements for 1766-L32BXB/A Unit 1766-L32BXB/A Typical Power Requirements Calculated Expansion I/O Power Load (Watts) Rockwell Automation Publication 1766-UM001O-EN-P - September 2021...
- Page 136 0.100 0.088 0.098 5.0 kHz 0.250 0.229 0.250 0.228 0.248 2.0 kHz 0.500 0.459 0.500 0.455 0.492 1.0 kHz 1.00 0.918 0.995 0.910 0.979 0.5 kHz 2.000 1.836 1.986 1.820 1.954 250 Hz Rockwell Automation Publication 1766-UM001O-EN-P - September 2021...
- Page 137 Analog Input Filter Settings Filter Bandwidth (-3dB Freq Hz) Sampling Frequency 250 Hz 250 Hz 1 kHz 60 Hz 60 Hz 1 kHz 50 Hz 50 Hz 1 kHz 10 Hz 10 Hz 1 kHz Rockwell Automation Publication 1766-UM001O-EN-P - September 2021...
-
Page 138: Expansion I/O Specifications
(3.54 x 3.43 x 1.59 in.) height including mounting tabs is 4.33 in. Temperature, storage -40 °C…85 °C (-40…185 °F) Temperature, operating -20…65 °C (-4…149 °F) Temperature, surrounding air, max. 60 °C (140 °F) Operating humidity 5…95% non-condensing Rockwell Automation Publication 1766-UM001O-EN-P - September 2021... - Page 139 110 mA at 5V DC Bus current draw, max. 50 mA at 5V DC (0.25W) 50 mA at 5V DC (0.25W) 70 mA at 5V DC (0.35W) 0 mA at 24V DC 80 mA at 24V DC Rockwell Automation Publication 1766-UM001O-EN-P - September 2021...
- Page 140 2.0 A at 60 °C (140 °F) 2.0 A at 60 °C (140 °F) common, max. 2.0 A at 30 °C (86 °F) 8.0 A at 30 °C (86 °F) 8.0 A at 30 °C (86 °F) Rockwell Automation Publication 1766-UM001O-EN-P - September 2021...
- Page 141 Verified by one of the following dielectric tests: 1836V AC for 1 s or 2596V DC for 1 s. Output group to output group isolation 265V AC working voltage (basic insulation) 150V AC working voltage (IEC Class 2 reinforced insulation) Rockwell Automation Publication 1766-UM001O-EN-P - September 2021...
- Page 142 (1) Current per relay limited to 6 A at ambient temperatures above 40 °C (104.°F). (2) 24 A in ambient temperatures above 40 °C (104.°F). Limited by ambient temperature and the number of relays controlling loads. See Figure 65 on page 143. Rockwell Automation Publication 1766-UM001O-EN-P - September 2021...
-
Page 143: Analog Modules
±1kV line-earth(CM) on shielded ports IEC 61000-4-6: Conducted RF immunity 10V rms with 1 Hz sine-wave 80% AM from 150 kHz…80 MHz (1) For grounded thermocouples, the 10V level is reduced to 3V. Rockwell Automation Publication 1766-UM001O-EN-P - September 2021... - Page 144 (3) Repeatability is the ability of the module to register the same reading in successive measurements for the same signal. (4) Rated working voltage is the maximum continuous voltage that can be applied at the terminals with respect to earth ground. Rockwell Automation Publication 1766-UM001O-EN-P - September 2021...
- Page 145 ±0.012 °C/°C (0.012 °F/°F) for Ni ±0.043 Ω/°C (0.077 Ω/°F) for 1,000 Ω range ±0.015 °C/°C (0.015 °F/°F) for NiFe ±0.07 Ω/°C (0.130 Ω/°F) for 3,000 Ω range ±0.032 °C/°C (0.032 °F/°F) for Cu Rockwell Automation Publication 1766-UM001O-EN-P - September 2021...
- Page 146 (1) Repeatability is the ability of the input module to register the same reading in successive measurements for the same input signal. (2) Repeatability at any other temperature in the 0...60 °C (32...140 °F) range is the same as long as the temperature is stable. Rockwell Automation Publication 1766-UM001O-EN-P - September 2021...
- Page 147 (2) Only applicable for Series B and Series C I/O modules. Valid Input/Output Data Word Formats/Ranges – 1762-IF2OF2 Normal Operating Range Full Scale Range RAW/Proportional Data Scaled-for-PID 10.5V DC 32760 16380 0…10V DC 0.0V DC Rockwell Automation Publication 1766-UM001O-EN-P - September 2021...
- Page 148 Valid Input/Output Data Word Formats/Ranges – 1762-IF2OF2 (Continued) Normal Operating Range Full Scale Range RAW/Proportional Data Scaled-for-PID 21.0 mA 32760 16380 20.0 mA 31200 15600 4…20 mA 4.0 mA 6240 3120 0.0 mA Rockwell Automation Publication 1766-UM001O-EN-P - September 2021...
-
Page 149: Micrologix 1400 Replacement Kits
1. Insert a battery into the battery pocket with wires facing up. 2. Insert the battery wire connector into the battery connector. 3. Secure the battery connector wires around the 1762 expansion bus connector as shown in Figure 66 on page 150. Rockwell Automation Publication 1766-UM001O-EN-P - September 2021... -
Page 150: Battery Handling
One or Two Batteries Each battery contains 0.23 g of lithium. Therefore, up to two batteries can be shipped together within the United States without restriction. Regulations governing shipment to or within other countries may differ. Rockwell Automation Publication 1766-UM001O-EN-P - September 2021... -
Page 151: Disposal
For a lithium battery product safety data sheet, contact the manufacturer: Sanyo Energy Corporation Tadarand U.S. Battery Division 2001 Sanyo Avenue 2 Seaview Blvd. San Diego, CA 92173 Port Washington, NY 11050 (619) 661-4801 (516) 621-4980 Rockwell Automation Publication 1766-UM001O-EN-P - September 2021... - Page 152 Appendix B Replacement Parts Notes: Rockwell Automation Publication 1766-UM001O-EN-P - September 2021...
-
Page 153: Understand The Controller Status Indicators
Memory module transfer occurring No fault detected FAULT Red flashing Application fault detected Controller hardware faulted No forces installed FORCE Amber Forces installed Amber flashing Forces installed in force files but forcing is disabled. Rockwell Automation Publication 1766-UM001O-EN-P - September 2021... -
Page 154: Status Indicators On The Lcd
(1) When using a MicroLogix 1400 controller, the DCOMM LED applies only to Channel 0. I/O Status Indicators on the LCD Figure 69 - I/O Status Indicators on the LCD I/O LED screen on the LCD Input status indicators (20) Output status indicators (12) Rockwell Automation Publication 1766-UM001O-EN-P - September 2021... -
Page 155: Normal Operation
Model the micro controller. The module provides common questions you might ask to help troubleshoot your system. See the recommended pages within the module for further help. Rockwell Automation Publication 1766-UM001O-EN-P - September 2021... -
Page 156: Analog Expansion I/O Diagnostics And Troubleshooting
Channel over-range or under-range conditions are reported in the module’s input data table. Module hardware errors are reported in the controller’s I/O status file. See MicroLogix 1400 Programmable Controllers Instruction Set Reference Manual, publication 1766-RM001 for more information. Rockwell Automation Publication 1766-UM001O-EN-P - September 2021... -
Page 157: Power-Up Diagnostics
General and specific hardware error codes are specified in the extended error information field. Module-specific error codes are indicated in the extended error field. These error codes correspond to Configuration Errors options that you can change directly. For example, the input range or input filter selection. Rockwell Automation Publication 1766-UM001O-EN-P - September 2021... -
Page 158: Error Codes
0 0000 0000 No error X200 0 0000 0000 General hardware error; no additional information General Common Hardware Error X201 0 0000 0001 Power-up reset state Hardware- X300 1 0000 0000 Reserved Specific Error Rockwell Automation Publication 1766-UM001O-EN-P - September 2021... -
Page 159: Contact Rockwell Automation For Assistance
0 0000 1400 Invalid format select (Channel 3) (1) X represents “Don’t Care”. Contact Rockwell If you need to contact Rockwell Automation or local distributor for assistance, Automation for Assistance it is helpful to obtain the following (prior to calling): •... - Page 160 Appendix C Troubleshoot Your System Notes: Rockwell Automation Publication 1766-UM001O-EN-P - September 2021...
-
Page 161: Prepare For Firmware Update
If a ControlFLASH directory does not exist, one is created in your Program Files directory. Use DMK Extraction Tool for Firmware Update This section applies only to newer OS firmware prepared in DMK format, which requires ControlFLASH version 13.00 or higher. Rockwell Automation Publication 1766-UM001O-EN-P - September 2021... - Page 162 Use ControlFLASH to Upgrade Your Operating System 1. Launch the DMK Extraction Tool application under Programs>Flash Programming Tools. 2. Click Browse and choose the location of DMK file in the system. 3. Click OK. Rockwell Automation Publication 1766-UM001O-EN-P - September 2021...
-
Page 163: Prepare The Controller For Firmware Update
You can check if the SNMP server is enabled by looking at the Channel Configuration page for Channel 1 in RSLogix 500/RSLogix Micro. If the SNMP server is not enabled, you can still enable it in the channel configuration page. Rockwell Automation Publication 1766-UM001O-EN-P - September 2021... -
Page 164: Use Controlflash For Firmware Update
IMPORTANT If you are connecting to the controller through a hub, you can use a standard Ethernet patch cable. If you are connecting to the controller directly from your computer, you must use an Ethernet crossover cable. Rockwell Automation Publication 1766-UM001O-EN-P - September 2021... - Page 165 IMPORTANT Use the IP address that was configured earlier, or use an available IP address that is assigned to by your network administrator. 5. Click Get Info. If the IP address was previously configured and the necessary information about the controller is obtained, go to step Rockwell Automation Publication 1766-UM001O-EN-P - September 2021...
- Page 166 You may need to wait several seconds before you are returned to the AB_SNMP.DLL – Enter IP Address dialog box. Within several seconds, the Device Identification box displays the processor's current revision information. 9. Click OK. Rockwell Automation Publication 1766-UM001O-EN-P - September 2021...
- Page 167 12. Click Yes if the firmware revision matches the controller series. 13. A ControlFLASH warning displays for MicroLogix 1400 Series B controllers only. A ControlFLASH warning displays for MicroLogix 1400 Series C controllers only. Rockwell Automation Publication 1766-UM001O-EN-P - September 2021...
- Page 168 FORCE status indicator stay solid ON. The concurrent ControlFLASH and LCD displays during the Firmware download are shown here. Stage 1 A BOOT screen displays: Stage 2 The BOOT screen displays: Rockwell Automation Publication 1766-UM001O-EN-P - September 2021...
- Page 169 POWER status indicator is steady green, and verify the FAULT status indicator is turned OFF. 17. Click OK. 18. Enter the hardware address if prompted. Otherwise, the AB_SNMP – BOOTP Server Running dialog box may appear. Rockwell Automation Publication 1766-UM001O-EN-P - September 2021...
- Page 170 20. You can continue to upgrade additional controllers by clicking Next, or exit the program by clicking Cancel. If you click cancel, you are prompted to verify that you want to end the update session. Rockwell Automation Publication 1766-UM001O-EN-P - September 2021...
-
Page 171: Controlflash Error Messages
164. If the error occurs again, cycle power and restart the firmware upgrade process. Failed to Receive Initial TFTP Request from Target This error message displays when the initial TFTP request is not received. Rockwell Automation Publication 1766-UM001O-EN-P - September 2021... -
Page 172: Missing Or Corrupt Os State
The POWER status indicator is solid ON and the RUN, FAULT, and FORCE status indicators are blinking simultaneously. The BOOT screen displays: • The POWER and FAULT status indicators are solid ON and the BOOT screen displays: Rockwell Automation Publication 1766-UM001O-EN-P - September 2021... -
Page 173: Recover From Missing Or Corrupt Os State
2. If the IP address was configured during the Preparing for firmware update stage, the same IP configuration is retained in the controller. 3. Start the firmware update as explained in Use ControlFLASH for Firmware Update on page 164. Rockwell Automation Publication 1766-UM001O-EN-P - September 2021... - Page 174 Appendix D Use ControlFLASH to Upgrade Your Operating System Notes: Rockwell Automation Publication 1766-UM001O-EN-P - September 2021...
-
Page 175: Communication Interface
The RS-485 interface supports connection of devices in a multi-drop hard- Interface wired configuration using DH-485, DF1-Half Duplex, Modbus, or DNP3 protocols. Also, the RS-485 interface supports connection in a multi-drop hard- wired configuration using ASCII protocols. Rockwell Automation Publication 1766-UM001O-EN-P - September 2021... -
Page 176: Df1 Full-Duplex Protocol
MSG is sent to the master. The master recognizes that the message is not intended for it, but for another slave, so the master immediately forwards the message to the intended slave. The master does this Rockwell Automation Publication 1766-UM001O-EN-P - September 2021... -
Page 177: Drop Link
60 s. After the timeout, you can re-establish communications with the processor and try the program download again. The only other way to remove program ownership is to cycle power on the processor. Rockwell Automation Publication 1766-UM001O-EN-P - September 2021... -
Page 178: Using Modems With Micrologix Programmable Controllers
Modem protocol. For other protocols, you can only access the DCD signal from your ladder logic. No other modem handshaking lines (such as Data-Set™ Ready and Data Terminal Ready) are supported by MicroLogix 1400 controller. Rockwell Automation Publication 1766-UM001O-EN-P - September 2021... -
Page 179: Communication Protocol
3 channels (2 RS-232 and 1 DH-485) to printers, modems, or the 1746-PM001 DH-485 network for data collection. 1746-RM001 1784-PKTX, 1784-PKTXD PC DH-485 IM PCI Computer us Provides DH-485 using RSLinx. 1784-UM522 Rockwell Automation Publication 1766-UM001O-EN-P - September 2021... -
Page 180: Important Dh-485 Network Planning Considerations
If you must run the cable across power feed lines, run the cable at right angles to the lines. • If you do not run the cable through a contiguous metallic wireway or conduit, keep the communication cable at least 0.15 m (6 in.) from AC Rockwell Automation Publication 1766-UM001O-EN-P - September 2021... - Page 181 The valid range for the MicroLogix controllers is 1...31 (controllers cannot be node 0). The default setting is 1. The node address is stored in the controller Communications Status file (CS0:5/0…CS0:5/7). Rockwell Automation Publication 1766-UM001O-EN-P - September 2021...
- Page 182 You can connect a MicroLogix 1400 controller to your DH-485 network directly without using a RS-232 to RS-485 converter and optical isolator, such as the AIC+, catalog number 1761-NET-AIC, as shown in Figure 72 on page 183, because Channel 0 has isolation and RS-485 built-in. Rockwell Automation Publication 1766-UM001O-EN-P - September 2021...
-
Page 183: Example Dh-485 Connections
However, you may need to use an AIC+ to connect Channel 2 of the MicroLogix 1400 controller to a DH-485 network. For more information on the AIC+, see the Advanced Interface Converter and DeviceNet Interface Installation Instructions, publication 1761-IN002. Rockwell Automation Publication 1766-UM001O-EN-P - September 2021... - Page 184 Typical 3-Node Network PanelView 550 PanelView MicroLogix 1400 RJ45 port 1761-CBL-AS09 or 1761-CBL-AS03 1747-CP3 TERM 1761-CBL-AM00 SHLD CHS GND or 1761-CBL-AC00 or 1761-CBL-HM02 DC SOURCE CABLE EXTERNAL This 3-node network is not expandable. Rockwell Automation Publication 1766-UM001O-EN-P - September 2021...
-
Page 185: Modbus Communication Protocol
IMPORTANT At least 1 of the 3 channels must be active to enable communication with the RSLogix 500 software. You cannot disable the last serial channel if the other 2 channels (Serial, Ethernet) are already configured as disabled. Rockwell Automation Publication 1766-UM001O-EN-P - September 2021... - Page 186 Appendix E Connect to Networks via RS-232/RS-485 Interface Notes: Rockwell Automation Publication 1766-UM001O-EN-P - September 2021...
-
Page 187: Channel Configuration For Dnp3 Slave
IP protocol via Channel 1 Ethernet port. To program the controller, use RSLogix 500/RSLogix Micro software, version 8.10.00 or later for Series A controller and version 8.30.00 or later for Series B and Series C controller, and version 11. Rockwell Automation Publication 1766-UM001O-EN-P - September 2021... -
Page 188: Channel 0 And Channel 2 Link Layer Configuration
• Channel 1 configuration • DNP3 Slave Application Layer configuration. Channel 0 and Channel 2 Link Layer Configuration Link Layer related configuration can be done in the Channel 0 and/or Channel 2 tab. Rockwell Automation Publication 1766-UM001O-EN-P - September 2021... -
Page 189: Channel 1 Link Layer Configuration
To enable DNP3 over IP protocol, check DNP3 over IP Enable in the Channel 1 configuration. Unlike serial port configuration, cycle power to the controller after downloading the Ethernet port configuration to enable the DNP3 over IP feature. Rockwell Automation Publication 1766-UM001O-EN-P - September 2021... -
Page 190: Dnp3 Slave Application Layer Configuration
If you want to communicate with DNP3 protocol using Channel 0 port, set both Channel 0 and DNP3 Slave configurations. If you want to communicate with DNP3 protocol using Channel 2 port, set Channel 2 and DNP3 Slave configurations. Rockwell Automation Publication 1766-UM001O-EN-P - September 2021... -
Page 191: Channel 0 And Channel 2 Link Layer Configuration Parameters
This value is a node address of this DNP3 Slave. The valid range is 0…65519. Default value is 1. Baud The selections can be 38.4 K, 19200, 9600, 4800, 2400, 1200, 600, and 300. Default selection is 19200. Rockwell Automation Publication 1766-UM001O-EN-P - September 2021... - Page 192 This value is used to check validation for Master node address when Enable Master Address Validation is Enabled (Checked). Control For Channel 0, the selections can be No Handshaking, Half Duplex Modem (CTS/RTS handshaking) and No Handshaking (DH-485 Network). Default selection is No Handshaking. Rockwell Automation Publication 1766-UM001O-EN-P - September 2021...
- Page 193 The valid range is 0…255. Default value is 0. Pre-transmit Delay (x1 ms) The controller waits for the specified time before sending the packet. Rockwell Automation Publication 1766-UM001O-EN-P - September 2021...
-
Page 194: Channel 1 (Ethernet) Link Layer Configuration Parameters
Any of the requests are accepted and the responses are transmitted via this connection. The unsolicited responses are transmitted via this connection when this connection is Dual End Point A single TCP server connection available. This connection has higher priority than the Client connection. Rockwell Automation Publication 1766-UM001O-EN-P - September 2021... - Page 195 When this bit is Enabled (Checked), any packets which contain the destination address 65532 (FFFCh) are accepted and processed. Enable Access Control The valid selections are Enabled (Checked) and Disabled (Unchecked). Default value is Disabled (Unchecked). Rockwell Automation Publication 1766-UM001O-EN-P - September 2021...
- Page 196 The valid value is an IP address. Default value is 0.0.0.0. Remote TCP Port Number This value is used to configure Master TCP Port Number for Unsolicited Response. The valid range is 0…65535. Default value is 20000. Rockwell Automation Publication 1766-UM001O-EN-P - September 2021...
- Page 197 DNP3 Ethernet subsystem. The status of DNP3 TCP and UDP subsystem is stores to this data file. The value of this parameter is N file only. Valid range is 0, 7, 9…255. Default value is 0. Diagnostics on page 262. Rockwell Automation Publication 1766-UM001O-EN-P - September 2021...
-
Page 198: Dnp3 Slave Application Layer Configuration Parameters
Class 2 events. When the selection is Enabled (Checked), Unsolicited Response is enabled for Class 2 events. Enable Unsolicited For Class3 Valid selections are Enabled (Checked) and Disabled (Unchecked). Default value is Disabled (Unchecked). Rockwell Automation Publication 1766-UM001O-EN-P - September 2021... - Page 199 NEED_TIME Internal Indication bit (IIN1.4) upon startup. Time Synchronization Interval (x1 mins) This parameter used with Enable Time Synchronization On Start Up Only. Only valid when Enable Time Synchronization On Start Up Only is Disabled (Unchecked). Rockwell Automation Publication 1766-UM001O-EN-P - September 2021...
- Page 200 Events (x1 s) are used together so that if either one of the criteria are met, an Unsolicited Response is transmitted. By default, the Hold time is re-triggered for each new event detected. Rockwell Automation Publication 1766-UM001O-EN-P - September 2021...
- Page 201 Hold Time after Class3 Events (x1 s) before initiating an Unsolicited Response. The valid range is 0…65535. Default value is 5. The value of 0 indicates that responses are not delayed due to this parameter. Rockwell Automation Publication 1766-UM001O-EN-P - September 2021...
- Page 202 This parameter is supported only in MicroLogix 1400 Series B and Series C controllers. The valid selections are Enabled (Checked) and Disabled (Unchecked). Default value is Disabled (Unchecked). When the selection is Disabled (Unchecked), the controller disables DNP3 Secure Authentication subsystem. Rockwell Automation Publication 1766-UM001O-EN-P - September 2021...
- Page 203 5 (0x05) critical optional 6 (0x06) critical optional 7 (0x07) optional 8 (0x08) optional 9 (0x09) optional 10 (0x0A) optional 11 (0x0B) 12 (0x0C) 13 (0x0D) critical optional 14 (0x0E) critical optional Rockwell Automation Publication 1766-UM001O-EN-P - September 2021...
- Page 204 This parameter is supported only in MicroLogix 1400 Series B and Series C controllers. This parameter is used for configuring the reply timeout in 100 ms. The valid range is 0…1200 (120 s). Default value is 20 (2 s). Rockwell Automation Publication 1766-UM001O-EN-P - September 2021...
- Page 205 The value of this parameter is N file only. Valid range is 0, 7, 9…255. Default value is 0. In RSLogix 500/RSLogix Micro software, when this parameter is configured properly, you can see a DNP3 Auth User Info Config File tree in Channel Configuration. Rockwell Automation Publication 1766-UM001O-EN-P - September 2021...
- Page 206 The value of this parameter is N file only. Valid range is 0, 7, 9…255. Default value is 0. For content of the configuration data file, see Table 31 on page 262 in the Diagnostics section. Rockwell Automation Publication 1766-UM001O-EN-P - September 2021...
- Page 207 Double Bit Binary Input Static Object g3v1 Double Bit Binary Input Change Object g4v3 v1, v2 16-bit Counter Static Object g20v6 32-bit Counter Static Object g20v5 Frozen 16-bit Counter Static Object g21v10 v2, v6 Rockwell Automation Publication 1766-UM001O-EN-P - September 2021...
- Page 208 If you have a critical application and do not want to allow any EtherNet/IP Incoming Connections, use the parameter Disable EtherNet/IP Incoming Connections. 1. From the Channel 1 Ethernet Channel Configuration tab, click the check box to disable the EtherNet/IP Incoming Connections. Rockwell Automation Publication 1766-UM001O-EN-P - September 2021...
-
Page 209: Dnp3 Slave Application Layer
This procedure is used for controlling binary output (CROB) or analog output (AOB) objects. FC_OPERATE (FC Byte = 0x04) 04 – Operate FC_SELECT (FC Byte = 0x03) on page 209. Rockwell Automation Publication 1766-UM001O-EN-P - September 2021... - Page 210 This applies only to the MicroLogix 1400 Series B and Series C controller. FC_INITIALIZE_APPL (FC Byte = 0x10) 16 – Initialize Application This function code is used to initialize the user program which was downloaded by RSLogix 500/RSLogix Micro software. Rockwell Automation Publication 1766-UM001O-EN-P - September 2021...
- Page 211 28 – Get File Information This function code is for the master to retrieve information about a file in the controller. This applies only to MicroLogix 1400 Series B and Series C controllers. Rockwell Automation Publication 1766-UM001O-EN-P - September 2021...
- Page 212 FC_AUTHENTICATION_RESPONSE (FC Byte = 0x83) 131 – Authentication Response This function code is used to issue authentication messages to the master. This applies only to MicroLogix 1400 Series B and Series C controllers. Rockwell Automation Publication 1766-UM001O-EN-P - September 2021...
-
Page 213: Internal Indications
273. Data file types used in DNP3 Objects are not the same as that used in the MicroLogix controller, but are similar. Mapping is required between DNP3 data files and controller data files. Rockwell Automation Publication 1766-UM001O-EN-P - September 2021... - Page 214 Short Floating Point Analog Input Object File. • Analog Output Object — 16-bit and 32bit Analog Output Object File, and Short Floating Point Analog Output Object File. For MicroLogix 1400 Series A controllers: Rockwell Automation Publication 1766-UM001O-EN-P - September 2021...
-
Page 215: Dnp3 Data Files
16-bit Analog Output Object File Only N file 7, 9…255 Analog Output Object 40, 41 32-bit Analog Output Object File Only L file 9…255 Short Floating Point Analog Output Object File Only F file 8, 9…255 Rockwell Automation Publication 1766-UM001O-EN-P - September 2021... -
Page 216: Dnp3 Configuration Files
Short Floating Point Analog Output Config File (In Series B and Short Floating Point Analog Output File Only B file 3, 9…255 Series C) Small BCD File Small BCD Class Config File Only B file 3, 9…255 Rockwell Automation Publication 1766-UM001O-EN-P - September 2021... - Page 217 The bit DCE is used to suppress the events by the change of state. Rockwell Automation Publication 1766-UM001O-EN-P - September 2021...
- Page 218 Rockwell Automation Publication 1766-UM001O-EN-P - September 2021...
- Page 219 Small BCD Data from Class 0 poll responses. Other bits are reserved. Related Configuration File Numbers: • Small BCD Config File Number Small BCD Configuration File Data Bit Offset Element 0 Element 1 Element 2 Element 3 Element 4 Rockwell Automation Publication 1766-UM001O-EN-P - September 2021...
-
Page 220: Dnp3 Binary Input Object
As an example, a Binary Input Object File is configured as shown below. This file has 10 elements and 160 Binary Input points. Index 0 of the Binary Input Object is B10:0/0, Index 1 is B10:0/1 and Index 159 is B10:9/15. Rockwell Automation Publication 1766-UM001O-EN-P - September 2021... -
Page 221: Dnp3 Binary Output Object
Binary Output Object File Number in the DNP3 Slave Application Layer Configuration file. When the Binary Output Object File is configured, Index number starts from 0. 1 bit is used for 1 Index. Rockwell Automation Publication 1766-UM001O-EN-P - September 2021... - Page 222 Binary output object. The point index is different than in the Activation or Complementary latch model. The point index varies as shown in Table 27 on page 223. The maximum number of Binary Output index for Complementary two-output model is 2048. Rockwell Automation Publication 1766-UM001O-EN-P - September 2021...
-
Page 223: Dnp3 Double Bit Binary Input Object
– Double-bit Binary Input Event – With absolute time • g4v3 – Double-bit Binary Input Event – With relative time (default) Related Object File Number: • Double Bit Binary Input Object File Number Rockwell Automation Publication 1766-UM001O-EN-P - September 2021... - Page 224 So, in the example below, Class Level of Index 0…7 is 1(B39:0/0 and B39:0/1), Class Level of Index 8…15 is 2(B39:1/0 and B39:1/1), Class Level of Index 16…23 is 3(B39:2/0 and B39:2/1), and Class Level of other Indexes are 0. Rockwell Automation Publication 1766-UM001O-EN-P - September 2021...
-
Page 225: Dnp3 Counter Object
16-bit Counter Object. For example, if 10 elements of a 16-bit Counter Object were configured and 10 elements of a 32-bit Counter Object were configured, the index number is: • 16-bit Counter Object: From 0…9 • 32-bit Counter Object: From 10…19 Rockwell Automation Publication 1766-UM001O-EN-P - September 2021... - Page 226 16-bit Counter Config File, Class Level of Index 0 is 1(B32:0/0 and B32:0/1), Class Level of Index 1 is 2(B32:1/0 and B32:1/1), Class Level of Index 2 is 3(B32:2/ 0 and B32:2/1), and Class Level of other Indexes are 0. Rockwell Automation Publication 1766-UM001O-EN-P - September 2021...
-
Page 227: Dnp3 Frozen Counter Object
32-bit Frozen Counter Config File Number To generate a Frozen Counter Object from the DNP3 Subsystem in the controller, you should configure Counter Object File Number in the DNP3 Slave Application Layer Configuration file. Rockwell Automation Publication 1766-UM001O-EN-P - September 2021... - Page 228 16-bit Frozen Counter Config File, Class Level of Index 0 is 1(B34:0/0 and B34:0/1), Class Level of Index 1 is 2(B34:1/0 and B34:1/1), Class Level of Index 2 is 3(B34:2/0 and B34:2/1), and Class Level of other Indexes are 0. Rockwell Automation Publication 1766-UM001O-EN-P - September 2021...
-
Page 229: Dnp3 Analog Input Object
Short Floating Point Analog Input Object File Number Related Configuration File Number: • 16-bit Analog Input Config File Number • 32-bit Analog Input Config File Number • Short Floating Point Analog Input Config File Number Rockwell Automation Publication 1766-UM001O-EN-P - September 2021... - Page 230 10 elements and F16 has 10 elements accordingly. A total of 30 Analog Input Object indexes are configured. Index 0 of the Analog Input Object is N14:0, Index 10 is L15:0, Index 20 is F16:0 and Index 29 is F16:9. Rockwell Automation Publication 1766-UM001O-EN-P - September 2021...
- Page 231 For Short Floating Point Analog Input Config File, Class Level of Index 20 is 1(B38:0/0 and B38:0/1), Class Level of Index 21 is 2(B38:1/0 and B38:1/1), Class Level of Index 22 is 3(B38:2/0 and B38:2/1), and Class Level of other Indexes are 0. Rockwell Automation Publication 1766-UM001O-EN-P - September 2021...
-
Page 232: Dnp3 Analog Output Object
Point Analog Output Object are configured, the index numbers are: • 16-bit Analog Output Object: From 0…9 • 32-bit Analog Output Object: From 10…19 • Short Floating Point Analog Output Object: From 20…29 Rockwell Automation Publication 1766-UM001O-EN-P - September 2021... -
Page 233: Dnp3 Bcd Object
Small BCD Config File Number To generate a Small BCD Object from the DNP3 Subsystem in the controller, you should configure the Small BCD Object File Number in the DNP3 Slave Application Layer Configuration file. Rockwell Automation Publication 1766-UM001O-EN-P - September 2021... -
Page 234: Dnp3 Data-Set Object
– Data-Set Descriptor – Characteristics • g87v0 – Static Data-Set – Any Variation • g87v1 – Static Data-Set – Present value • g88v0 – Event Data-Set – Any Variation • g88v1 – Event Data-Set – Snapshot Rockwell Automation Publication 1766-UM001O-EN-P - September 2021... - Page 235 Data Set Descriptors file N61 Data Set Descriptors file N62 Data Set Descriptors file N63 Data Set Descriptors file N64 Data Set Descriptors Element Array (N data file) Data Set Descriptors file N68 Rockwell Automation Publication 1766-UM001O-EN-P - September 2021...
- Page 236 X is the element numbers of each Prototype or Descriptor. For DNP3 DS Prototype X, you can configure the controller to construct the Data-Set Prototype objects. For DNP3 DS Descriptor X, you can configure the controller to construct the Data-Set Descriptor objects. Rockwell Automation Publication 1766-UM001O-EN-P - September 2021...
- Page 237 Max Data Length (bytes): 0 for element 1. 0…255 for element 2 or higher. Ancillary Value: Binary Array in hexadecimal for element 1. ASCII strings for element 2 or higher. Maximum 32 bytes. Rockwell Automation Publication 1766-UM001O-EN-P - September 2021...
- Page 238 2/3 in the DNP3 Data-Set Descriptors Object File. When one of the values that are pointing to the Event Occurrence Condition 0/1/2/3 are changed or the criteria are met, the controller generates a Data-Set Event, retrievable using the object g88v1. Rockwell Automation Publication 1766-UM001O-EN-P - September 2021...
- Page 239 The event for other objects consumes a single event buffer. When using Data-Set events, increase the number of events in the DNP3 Slave configuration. Descriptor Element Configuration: Each Descriptors element is configured in this here. Double-click each element to edit it. Rockwell Automation Publication 1766-UM001O-EN-P - September 2021...
- Page 240 FLT = 4 0 or 4 8, 9…255 (F) 0…255 2(S) 0…65 for S 0 for S, N OSTR = 5 0…255 3, 9…255 (B) 0…255 for B, N, 0…15 for B 7, 9…255 (N) Rockwell Automation Publication 1766-UM001O-EN-P - September 2021...
- Page 241 When the Descriptor Code is selected as PTYP, the Point Addressing parameters for the Descriptor element are replaced by 10 Point Addressing parameters. These should be configured in the same order of the DAEL elements in the relevant Prototypes. Rockwell Automation Publication 1766-UM001O-EN-P - September 2021...
-
Page 242: Object Quality Flags
When the controller is in Non-executing mode, the object flag is always all 0. • When the controller is in Executing mode and there is no configuration file, only the Online flag in the object flag is set. Rockwell Automation Publication 1766-UM001O-EN-P - September 2021... - Page 243 ONLINE 1 when the controller is or was in Executing mode and the configuration file does not exist. May be 1 when the controller is in Executing mode and the configuration file exists. Rockwell Automation Publication 1766-UM001O-EN-P - September 2021...
- Page 244 Always 0. Not used. COMM_LOST Always 0. Not used. REMOTE_FORCED Always 0. Not used. LOCAL_FORCED Always 0. Not used. reserved Always 0. Not used. reserved Always 0. Not used. reserved Always 0. Not used. Rockwell Automation Publication 1766-UM001O-EN-P - September 2021...
-
Page 245: Dnp3 Device Attribute Object
Read Only UINT Duration of timing accuracy 0 in seconds Read Only Support for analog output events Read Only UINT Max analog output index 256*3 Read Only UINT Number of analog outputs 0…256*3 Rockwell Automation Publication 1766-UM001O-EN-P - September 2021... - Page 246 This variation returns Ethernet MAC ID. 0000BCxxxxxx. This variation returns This variation returns Subset level and Test Subset level and Test Read Only VSTR DNP subset and conformance procedure version. procedure version. 2:2008. 2:2009. Rockwell Automation Publication 1766-UM001O-EN-P - September 2021...
-
Page 247: Event Reporting
Binary Input Object and a 16-bit Analog Input Object. In the DNP3 Slave configuration, Binary Input Object Data File Number is configured to 10 and its Configuration File Number is Rockwell Automation Publication 1766-UM001O-EN-P - September 2021... - Page 248 16…31, as a Class 2 event and the event for the index 32…47, as a Class 3 event, if there are any changes for the points (B10:0, B10:1 or B10:2). For any other Binary Input points, the events will not be generated. Rockwell Automation Publication 1766-UM001O-EN-P - September 2021...
- Page 249 1 as a Class 2 event, and the event for the index 2 as a Class 3 event, if there are any changes for the points (N14:0, N14:1 or N14:2). For any other 16-bit Analog Input points, the events will not be generated. Rockwell Automation Publication 1766-UM001O-EN-P - September 2021...
-
Page 250: Dnp3 10K Event Logging
When the controller is configured for 10000 events logging, Recipe and/or Data Logging operations are not allowed. If the user program has either of the two configurations (DLG and/or RCP) when 10000 DNP3 event logging is Rockwell Automation Publication 1766-UM001O-EN-P - September 2021... -
Page 251: Control Generating Event
F8:0 16-bit Analog Input Object File Global N11:9 Binary Output Object File Global B12:0 16-bit Analog Input Config File Global B21:9 A16I OLD Global N30:9 A16I DEADB Global N31:9 A16I Temp Global N32:9 Rockwell Automation Publication 1766-UM001O-EN-P - September 2021... -
Page 252: Report Event By Polled Response
For more details, see DNP3 Slave Application Layer Configuration Parameters on page 198. • Master Node 0 • Channel for Unsolicited Response • Enable Unsolicited On Start Up • Enable Unsolicited For Class1 Rockwell Automation Publication 1766-UM001O-EN-P - September 2021... - Page 253 Unsolicited Response. Master Node 0 in Channel 0 Configuration tab indicates that the Unsolicited Response is reported to the Master with the node address 3. Figure 75 - Initiate and Send Unsolicited Response Rockwell Automation Publication 1766-UM001O-EN-P - September 2021...
-
Page 254: Collision Avoidance
RTC Function file every 2 seconds. This resolution is insufficient to log DNP3 events in a DNP3 subsystem. Another timer, incremented by 1 millisecond in the DNP3 Slave subsystem, serves to provide appropriate resolution. Rockwell Automation Publication 1766-UM001O-EN-P - September 2021... -
Page 255: Download A User Program Via Dnp3 Network
File-Control – File identifier: superseded, not supported • g70v2 File-Control – Authentication: supported • g70v3 File-Control – File command: supported • g70v4 File-Control – File command status: supported • g70v5 File-Control – File transport: supported Rockwell Automation Publication 1766-UM001O-EN-P - September 2021... -
Page 256: Default Directories And Files
Typically, RSLogix 500/RSLogix Micro stores the ladder program as RSLogix™ Files (*.RSS). However, to download a ladder program using a File Object via DNP3 network, you must save your ladder program in the RSLogix IMG Files (*.IMG) format. Rockwell Automation Publication 1766-UM001O-EN-P - September 2021... - Page 257 Series C controllers support the opening of *.IMG files. However, some information is not stored into the IMG file, for example, rung comments. Be sure to store your ladder program in the RSLogix Files (*.RSS) format before generating RSLogix IMG Files (*.IMG). Rockwell Automation Publication 1766-UM001O-EN-P - September 2021...
-
Page 258: Rules For File Authentication
Authentication Key must be used for sending the request with the function code OPEN_FILE(25) or DELETE_FILE(27). Rules for Downloading a User Program A DNP3 master should send the function code OPEN_FILE(25), WRITE(2), and CLOSE_FILE(26) for downloading user programs. Rockwell Automation Publication 1766-UM001O-EN-P - September 2021... -
Page 259: Rules For Uploading A User Program
Executing modes include Run, Remote Run, Test Continuous Scan, and Test Single Scan modes. Any others are Non-executing modes. Rules for Uploading a User Program A DNP3 master should send the function code OPEN_FILE(25), READ(1), and CLOSE_FILE(26) for uploading user programs. Rockwell Automation Publication 1766-UM001O-EN-P - September 2021... -
Page 260: Rules For Initializing A User Program
Start and Stop User Programs (Mode Change) via DNP3 Network This section covers how to change the controller mode via DNP3 network. To change the controller mode, use the function codes FC_INITIALIZE_APPL (16), FC_START_APPL (17) and FC_STOP_APPL (18). Rockwell Automation Publication 1766-UM001O-EN-P - September 2021... -
Page 261: Initialize User Program
Application Identifier (g90v1), it changes its mode to Remote Program. If the controller is in a fault mode, it sends the command with the function code FC_INITIALIZE_APPL (16) before sending the command with the function code FC_STOP_APPL (18). Rockwell Automation Publication 1766-UM001O-EN-P - September 2021... -
Page 262: Diagnostics
Data Link Layer Active Node Table CS0:24 CS2:24 Length CS0:25 CS2:25 Format Code CS0:26 CS2:26 Number of Nodes CS0:27 CS2:27 Reserved – Always 0 CS0:28 CS2:28 Reserved – Always 0 CS0:29 CS2:29 Reserved – Always 0 Rockwell Automation Publication 1766-UM001O-EN-P - September 2021... - Page 263 Data element number of last error request CS0:61 CS2:61 Received Confirm Function Code Counter CS0:62 CS2:62 Received Read Function Code Counter CS0:63 CS2:63 Received Write Function Code Counter CS0:64 CS2:64 Received Etc Function Code Counter Rockwell Automation Publication 1766-UM001O-EN-P - September 2021...
- Page 264 4: DISCARD_OUT_OF_ORDER_SEG – The received packet was discarded since the sequence number was out of order. CS0:69 CS2:69 Transport Layer Error Count CS0:70 CS2:70 End Of List Category ID (0) The elements can be seen in the Function Files for each Channel. Rockwell Automation Publication 1766-UM001O-EN-P - September 2021...
- Page 265 MicroLogix 1400 Distributed Network Protocol For the elements of the DNP3 Slave Link Layer diagnostic counter CS0:9…CS0:17 and CS2:9…CS2:17, the counter values are available with the structured display in RSLogix 500/RSLogix Micro as below. Rockwell Automation Publication 1766-UM001O-EN-P - September 2021...
-
Page 266: Diagnostics For Ethernet Channel (Channel 1)
Error Code in sessions* Incoming Message Connections TCP Server – Link Layer Diagnostics for DNP3 TCP Server. Maximum Connections Allowed Counter for Commands Transmitted Reserved Counter for Replies Received Reserved Reserved Reserved Reserved Rockwell Automation Publication 1766-UM001O-EN-P - September 2021... - Page 267 3: OBJ_NOT_SUPPORTED – The received packet has unsupported object(s). Slave. 4: BAD_REQUEST_LENGTH – Reserved 5: CONFIGURATION_ERROR – The error was caused by the invalid configuration during packet generating. For example, invalid Data-Set Configuration. Rockwell Automation Publication 1766-UM001O-EN-P - September 2021...
- Page 268 Socket error during Accept operation. ERR_SOCKET_CONNECT Socket error during Connect operation. ERR_SOCKET_SEND Socket error during Send operation. ERR_SOCKET_RECEIVE Socket error during Receive operation. ERR_SOCKET_UNLISTEN Socket error during Unlisten operation. ERR_SOCKET_UNBIND Socket error during Unbind operation. Rockwell Automation Publication 1766-UM001O-EN-P - September 2021...
- Page 269 RSLogix 500/RSLogix Micro software as shown. If the data file is not configured in the parameter Diagnostic File Number of the Chan. 1 – DNP3 configuration, the Channel 1 – Ext dialog box displays as shown. Rockwell Automation Publication 1766-UM001O-EN-P - September 2021...
-
Page 270: Diagnostics For Secure Authentication
Wait for Reply Event Counter for Rx Critical ASDU Wait for Reply Event Counter for Rx Valid Reply Wait for Reply Event Counter for Rx Invalid Reply Wait for Reply Event Counter for Reply Timeout Rockwell Automation Publication 1766-UM001O-EN-P - September 2021... -
Page 271: Function Codes
Start and Stop User Programs (Mode Change) via DNP3 Network on page 260. Request 19 (0x13) FC_SAVE_CONFIG Deprecated. Request 20 (0x14) FC_ENABLE_UNSOLICITED Controller parses Request 21 (0x15) FC_DISABLE_UNSOLICITED Controller parses Request 22 (0x16) FC_ASSIGN_CLASS Rockwell Automation Publication 1766-UM001O-EN-P - September 2021... - Page 272 Request 22 (0x16) FC_ASSIGN_CLASS Request 23 (0x17) FC_DELAY_MEASURE Controller parses. Used for non-LAN Request 24 (0x18) FC_RECORD_CURRENT_TIME Controller parses.Used for LAN Request 25 (0x19) FC_OPEN_FILE Controller parses Request 26 (0x1A) FC_CLOSE_FILE Controller parses Rockwell Automation Publication 1766-UM001O-EN-P - September 2021...
-
Page 273: Implementation Table
Double-bit Binary Input – Packed 1 (read) 06 (no range, or all) 129 (response) 00, 01 (start-stop) format Double-bit Binary Input – With flags 1 (read) 06 (no range, or all) 129 (response) 00, 01 (start-stop) Rockwell Automation Publication 1766-UM001O-EN-P - September 2021... - Page 274 1 (read) Variation 07, 08 (limited qty) Frozen Counter Event – 32-bit with 06 (no range, or all) 129 (response) 1 (read) 17, 28 (index) flag 07, 08 (limited qty) 130 (unsol. resp) Rockwell Automation Publication 1766-UM001O-EN-P - September 2021...
- Page 275 (qty = 1) Time and Date CTO – Absolute time, 129 (response) 07 (limited qty) unsynchronized 130 (unsol. resp) (qty = 1) 07 (limited qty) Time Delay – Coarse 129 (response) (qty = 1) Rockwell Automation Publication 1766-UM001O-EN-P - September 2021...
- Page 276 Device Attributes – List of attribute 00, 01 (start-stop) 1 (read) 129 (response) 00 (start-stop) variations 06 (no range, or all) 00, 01 (start-stop) Binary Input – Any Variation 1 (read) 06 (no range, or all) Rockwell Automation Publication 1766-UM001O-EN-P - September 2021...
- Page 277 Counter – 32-bit without flag 06 (no range, or all) 9 (freeze clear) 10 (frz. cl. noack) 00, 01 (start-stop) Counter – 16-bit without flag 1 (read) 129 (response) 00, 01 (start-stop) 06 (no range, or all) Rockwell Automation Publication 1766-UM001O-EN-P - September 2021...
- Page 278 07, 08 (limited qty) 130 (unsol. resp) 06 (no range, or all) 129 (response) Analog Input Event – 32-bit with time 1 (read) 17, 28 (index) 07, 08 (limited qty) 130 (unsol. resp) Rockwell Automation Publication 1766-UM001O-EN-P - September 2021...
- Page 279 5B (free format) 129 (response) 5B (free format) File Control – file transport 2 (write file) 5B (free format) 129 (response) 5B (free format) File Control – file transport status 129 (response) 5B (free format) Rockwell Automation Publication 1766-UM001O-EN-P - September 2021...
- Page 280 No Object (function code only) 13 (cold restart) No Object (function code only) 14 (warm restart) No Object (function code only) 23 (delay meas.) No Object (function code only) 24 (record current time) Rockwell Automation Publication 1766-UM001O-EN-P - September 2021...
-
Page 281: Micrologix 1400 Controllers And Ethernet Communication
• thin-wire coaxial cable (10Base-2) See the following page for more information on Ethernet physical media. The MicroLogix 1400 supports Ethernet communication via the Ethernet communication channel 1 shown in the drawing below. Rockwell Automation Publication 1766-UM001O-EN-P - September 2021... -
Page 282: Micrologix 1400 Performance Considerations
802.3 and utilizes 10/100Base-T media. Connections are made directly from the MicroLogix 1400 to an Ethernet hub or switch. The network setup is simple Ethernet Network and cost effective. Typical network topology is pictured in Figure 76 on page 283. Rockwell Automation Publication 1766-UM001O-EN-P - September 2021... -
Page 283: Connecting An Ethernet Switch On The Ethernet Network
The Ethernet cabling with straight-through method is recommended as below. Do not make the incorrect connection. Table 42 - Straight-through cabling Pin Name Cable color Orange/White Orange Green/White No used by 10/100Base-T Blue No used by 10/100Base-T Blue/White Rockwell Automation Publication 1766-UM001O-EN-P - September 2021... - Page 284 However, because the MicroLogix 1400 Ethernet port implements auto-crossover (also called Automatic MDI/MDI-X Configuration), a straight through cable may be used even for direct point-to-point connections between the MicroLogix 1400 and another Ethernet device. Rockwell Automation Publication 1766-UM001O-EN-P - September 2021...
-
Page 285: Ethernet Connections
IP address on the network. If the MicroLogix 1400 determines that there is a conflict (another device on the network with a matching IP address), the following message gets posted on the LCD display. Rockwell Automation Publication 1766-UM001O-EN-P - September 2021... -
Page 286: Configure The Ethernet Channel On The Micrologix 1400
The amount of time (in ms) allowed for a MSG instruction to establish a connection with the destination node. The MSG 15,000 ms read/write Timeout Connection Timeout has 250 ms resolution and a range from 250…65,500. Rockwell Automation Publication 1766-UM001O-EN-P - September 2021... -
Page 287: Configure Using Rslogix 500/Rslogix Micro Programming Software
When BOOTP is enabled, the following events occur at power-up: • The processor broadcasts a BOOTP-request message containing its hardware address over the local network or subnet. • The BOOTP server compares the hardware address with the addresses in its look-up table. Rockwell Automation Publication 1766-UM001O-EN-P - September 2021... -
Page 288: Using The Rockwell Automation Bootp/Dhcp Utility
IP address for each processor or you must use DHCP instead of it. Using the Rockwell Automation BOOTP/DHCP Utility The Rockwell Automation BOOTP/DHCP server utility is a standalone program that incorporates the functionality of standard BOOTP software with a user-friendly graphical interface. It is located in the Utils directory on the RSLogix 500/RSLogix Micro installation CD. - Page 289 4. Enter the IP Address and Description you want to assign to the device, and click OK. Leave Hostname blank. The device is added to the Relation List, displaying the Ethernet Address (MAC) and corresponding IP Address, Subnet Mask, and Gateway (if applicable). Rockwell Automation Publication 1766-UM001O-EN-P - September 2021...
-
Page 290: Use A Dhcp Server To Configure Your Processor
• use your programming software to enter the subnet mask and gateway have a network with subnets address. using BOOTP to configure channel 1 • be sure BOOTP is enabled and have a network with subnets • include the subnet mask(s) and gateway address(es) Rockwell Automation Publication 1766-UM001O-EN-P - September 2021... -
Page 291: Manually Configure Channel 1 For Controllers On Subnets
Ethernet using a standard web browser. For more information on MicroLogix 1400 embedded web server capability, see MicroLogix 1400 Embedded Web Server User Manual, publication 1766- UM002. Rockwell Automation Publication 1766-UM001O-EN-P - September 2021... -
Page 292: Disable The Ethernet Channel
If you attempt to change the status bit S:36/0 from 0 to 1, it reverts to enable (0) after the power cycle. See also Appendix F for information on how to disable the Incoming EtherNet/IP Connections. Rockwell Automation Publication 1766-UM001O-EN-P - September 2021... -
Page 293: System Loading Calculations
Calculated Current Catalog Number Number of Modules at 5V DC (mA) at 24V DC (mA) at 5V DC (mA) at 24V DC (mA) 1762-IA8 1762-IF4 1762-IF2OF2 1762-IQ8 1762-IQ16 1762-IQ32T 1762-IR4 1762-IT4 1762-OA8 1762-OB8 1762-OB16 Rockwell Automation Publication 1766-UM001O-EN-P - September 2021... -
Page 294: System Loading Worksheet
= (3,360 mW) + (1,300 mW) + (4,320 mW) = 8,980 mW 39.845 W = 8.98 W System Loading Worksheet Table Table 50, and Table 51 are provided for system loading validation. See System Loading Example Calculations on page 293. Rockwell Automation Publication 1766-UM001O-EN-P - September 2021... -
Page 295: Current Loading
System Loading: = (________ mA x 24V) + (________ mA x 5V) + (________ mA x 24V) = __________ mW + __________ mW + __________ mW = __________ mW 39.845 W = __________ W Rockwell Automation Publication 1766-UM001O-EN-P - September 2021... -
Page 296: Calculating Heat Dissipation
2.8 W x number of modules 2.8 W x _________ 1762-IQ8OW6 4.4 W x number of modules 4.4 W x _________ Add Sub-Totals to determine Heat Dissipation (1) Only applicable for Series B and Series C I/O modules. Rockwell Automation Publication 1766-UM001O-EN-P - September 2021... -
Page 297: Glossary
Data is transferred from a programming or storage device to another device. DTE (Data Terminal Equipment) Equipment that is attached to a network to send or receive data, or both. embedded I/O Embedded I/O is the controller’s on-board I/O. Rockwell Automation Publication 1766-UM001O-EN-P - September 2021... - Page 298 Bits 0…7 of a word. logic A process of solving complex problems through the repeated use of simple functions that can be either true or false. General term for digital circuits and Rockwell Automation Publication 1766-UM001O-EN-P - September 2021...
- Page 299 RSLogix 500/RSLogix Micro is monitoring the program file in a controller. operating voltage For inputs, the voltage range needed for the input to be in the On state. For outputs, the allowable range of user-supplied voltage. Rockwell Automation Publication 1766-UM001O-EN-P - September 2021...
- Page 300 A term used to describe current flow between an I/O device and controller I/O circuit — typically, a sourcing device or circuit provides a path to the source, high, or positive side of power supply. Rockwell Automation Publication 1766-UM001O-EN-P - September 2021...
- Page 301 The main storage available for programs and data and allocated for working storage. write To copy data to a storage device. For example, the processor WRITEs the information from the output data file to the output modules. Rockwell Automation Publication 1766-UM001O-EN-P - September 2021...
- Page 302 Glossary Notes: Rockwell Automation Publication 1766-UM001O-EN-P - September 2021...
-
Page 303: Index
297 AIC+ 69 DeviceNet network 74 DF1 Full-Duplex protocol 60 DF1 isolated point-to-point connection 61 DH-485 network 65 battery 123 connecting to DF1 Half-Duplex network 63 baud rate 297 Rockwell Automation Publication 1766-UM001O-EN-P - September 2021... - Page 304 I/O mounting 30 DIN rail 297 mounting on DIN rail 30 disable expansion I/O specifications 138 Ethernet channel 292 EtherNet/IP Incoming Connections 208 serial channels 185 disconnecting main power 20 Distributed Network Protocol (DNP3) 185 Rockwell Automation Publication 1766-UM001O-EN-P - September 2021...
- Page 305 26 ControlFLASH software 161 minimizing electrical noise 42 memory module 25 minimizing electrical noise on analog channels your controller 19 instruction 298 mnemonic 299 instruction set 298 Modbus communication protocol 185 Rockwell Automation Publication 1766-UM001O-EN-P - September 2021...
- Page 306 EEPROM 111 power considerations 21 scan time 300 preparing for upgrade 161 serial channels preventing excessive heat 22 disable 185 processor 300 sinking 300 processor file 300 sinking and sourcing wiring diagrams 40 Rockwell Automation Publication 1766-UM001O-EN-P - September 2021...
- Page 307 LCD screen 96 using communications toggle functionality 58 using communications toggle push button 58 using emergency-stop switches 23 using memory modules 123 using real-time clock 123 using the battery 26 using trim pots 107 Rockwell Automation Publication 1766-UM001O-EN-P - September 2021...
- Page 308 Index Notes: Rockwell Automation Publication 1766-UM001O-EN-P - September 2021...
- Page 309 MicroLogix 1400 Programmable Controllers User Manual Rockwell Automation Publication 1766-UM001O-EN-P - September 2021...
- Page 310 Rockwell Automation maintains current product environmental compliance information on its website at rok.auto/pec. Allen-Bradley, ControlFLASH, Data-Set, Data Highway Plus, DH+, DTAM Micro, DTAM Plus, expanding human possibility, FactoryTalk, INTERCHANGE, MicroLogix, PanelView, PLC-5, Rockwell Automation, RSLinx, RSLogix, RSLogix 500, RSLogix Micro, SLC, SLC 5/03, SLC 500, and TechConnect are trademarks of Rockwell Automation, Inc.
Need help?
Do you have a question about the Allen-Bradley MicroLogix 1400 and is the answer not in the manual?
Questions and answers