
Related Manuals for Albrecht CDS SUP-PROSAN


Summary of Contents for Albrecht CDS SUP-PROSAN
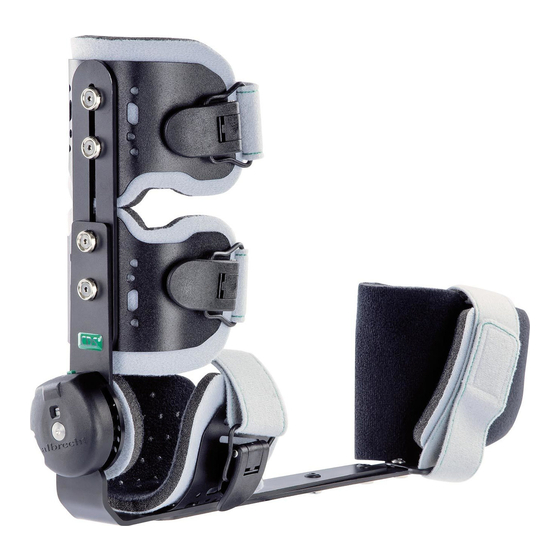
- Page 1 U S E R I N S T R U C T I O N S C D S S U P - P R O S A N ® D Y N A M I C S P R I N G - L O A D E D P R O - / S U P I N AT I O N O R T H O S I S...
-
Page 2: Table Of Contents
SUP-PROSAN ® User Instructions Contents 1. Introduction ....................1.1. Foreword ....................1.2. Customer information ................1.3. Mode of operation ................... 1.4. Application ....................1.5. Scope of delivery ..................1.6. Declaration of conformity ................ 1.7. Features ..................... 1.8. Indications ....................1.9. Contraindications .................. - Page 3 User Instructions 2.2.6. Inserting the stop wedge ............. 2.2.7. Changing the position of the supports ........2.3. Application of the brace by the orthopaedic technician when using as supination orthosis ............... 2.3.1. Deactivate the spring tension ............2.4. Application of the brace by the orthopaedic technician when using as pronation orthosis ..............
- Page 4 SUP-PROSAN ® User Instructions 5. Technical data ..................... 6. Size chart and article numbers ............... 7. Transfer of the brace ................. 8. Disposal ....................... 00800 03032900 – INTERNATIONAL SERVICE-HOTLINE...
-
Page 5: Introduction
Strap padding Set information is not fully understandable, please contact the appropriate specialist retailer or 1.6. Declaration of conformity albrecht GmbH directly, before you use the brace. This particularly applies to the safety The albrecht GmbH company as manufacturer instructions. -
Page 6: Features
SUP-PROSAN ® User Instructions 1.7. Features 1.8. Indications • Therapy in pro-/supination The physician will prescribe the type of treatment to apply based on his or her • Individually adjustable spring tension diagnostic findings. • Spring tension can be switched on and off Generally, the use is indicated in: without tools and without varying the set spring tension... -
Page 7: Contraindications
User Instructions • The product as delivered is not sterile. 1.9. Contraindications • Contact your physician immediately in the • Bony obstruction, osteoporosis event of an allergic reaction. thrombophlebitis • Please note that cushioned sections can heat The brace is intended exclusively for contact up under direct sunlight. -
Page 8: Adjustment By The Orthopaedic Technician
SUP-PROSAN ® User Instructions 2. Adjustment by the orthopaedic technician 2.1. Fitting to the patient • Our CDS braces are constructed to be adjustable. ® • The position of the shell components can be changed and they can be shaped. •... -
Page 9: Setting The Shell Components
User Instructions 2.1.2. Setting the shell components The shell components are movable. Loosen the screws on the shell components with the supplied tool. Move the shell components into the desired position. Tighten the screws again. The shell components can be adjusted to the shape of the extremity. www.albrechtgmbh.com... -
Page 10: Adjusting The Length Of The Brace
SUP-PROSAN ® User Instructions 2.1.3. Adjusting the length of the brace Loosen the clamping screws. Set to the desired length. Tighten the screws again. 00800 03032900 – INTERNATIONAL SERVICE-HOTLINE... -
Page 11: Setting The Limitation
User Instructions 2.2. Setting the limitation 2.2.1. Setting the limitation when using as a supination brace Before setting the limitation, you must deactivate the spring tension. To do this, set the switch to “off”. Bring the brace into pronation. Then turn the stop screw with the supplied tool out of the CDS housing. -
Page 12: Setting The Limitation When Using As A Pronation Brace
SUP-PROSAN ® User Instructions 2.2.2. Setting the limitation when using as a pronation brace Before setting the limitation, you must deactivate the spring tension. To do this, set the switch to “off”. Bring the brace into supination. Then turn the stop screw with the supplied tool out of the CDS housing. -
Page 13: Adjusting The Palm Plate
User Instructions 2.2.3. Adjusting the palm plate Loosen the screw in the forearm rod with the supplied tool. Turn the palm plate into the desired position and ensure that the locking pin of the forearm rod locks into the hole pattern. Then tighten the screws again. -
Page 14: Optional Conversion From Right To Left Or From Left To Right
SUP-PROSAN ® User Instructions 2.2.4. Optional conversion from right to left or from left to right Example of left side. Loosen the screw in the forearm rod with the supplied tool. Rotate the hand piece through 180°. 00800 03032900 – INTERNATIONAL SERVICE-HOTLINE... - Page 15 User Instructions Then tighten the screws again. Change the upper arm shells so that the fasteners are laterally. Example of converted right brace. www.albrechtgmbh.com...
-
Page 16: Adjusting The Finger Plate
SUP-PROSAN ® User Instructions 2.2.5. Adjusting the finger plate Loosen the pad beneath the palm of the hand. Remove the pad. Push the finger plate towards the thumb. While pressing on the finger plate, set the desired position. Ensure that the locking pin locks into the hole pattern. -
Page 17: Inserting The Stop Wedge
User Instructions 2.2.6. Inserting the stop wedge Insert the stop wedge in the desired position and fix it with the supplied screw. The spring tension must be activated before inserting the stop wedge. www.albrechtgmbh.com... -
Page 18: Changing The Position Of The Supports
SUP-PROSAN ® User Instructions 2.2.7. Changing the position of the supports Sup-Prosan is constructed on the basis of a 360° hinge. With the 360° ® hinge, the spring housing and forearm rod can be pivoted against one another. Remove the pad. Remove the two screws. -
Page 19: Application Of The Brace By The Orthopaedic Technician When Using As Supination Orthosis
User Instructions 2.3. Application of the brace by the orthopaedic technician when using as supination orthosis 2.3.1. Deactivate the spring tension Before attaching the brace you must deactivate the spring tension. Turn the green switch to “off”. Bring the brace into pronation. Now open the straps by opening the clips. -
Page 20: Application Of The Brace By The Orthopaedic Technician When Using As Pronation Orthosis
SUP-PROSAN ® User Instructions 2.4. Application of the brace by the orthopaedic technician when using as pronation orthosis 2.4.1. Deactivate the spring tension Before attaching the brace you must deactivate the spring tension. Turn the green switch to “off”. Bring the brace into supination. Now open the straps by opening the clips. -
Page 21: Attaching The Brace To The Elbow
User Instructions 2.4.2. Attaching the brace to the elbow Place the brace on the patient‘s arm from below. Ensure that the pivot of the brace hinge matches the physiological pivot. It is possible for you to adjust the arm rods to the shape of the patient‘s arm by using a bending iron. -
Page 22: Adjust Strap Lengths As Necessary
SUP-PROSAN ® User Instructions 2.4.3. Adjust strap lengths as necessary Adjust the strap to the desired length and shorten it if necessary. First fasten the narrow upper arm strap to secure it. Fasten the forearm strap next to the joint. Fasten the forearm strap further from the joint. -
Page 23: Activate The Spring Tension (Supination Orthosis)
User Instructions 2.4.5. Activate the spring tension (supination orthosis) To activate the spring tension, turn the green switch to “on”. Bring the brace into pronation. The intensity of the spring tension is not altered by activation or deactivation of the spring tension. 2.4.6. -
Page 24: Setting The Spring Tension To The Intensity Needed By The Patient
SUP-PROSAN ® User Instructions 2.4.7. Setting the spring tension to the intensity needed by the patient The spring tension can be adjusted continuously. The spring tension setting is displayed on the CDS housing by a scale from ® 0 to 15. The ranges above 15 and below 0 are marked in red. To prevent damage to the CDS hinge, the red range in the CDS hinge... -
Page 25: Changing The Spring Tension
User Instructions Torque in Nm Drehmoment in Nm bei Beugung 90 ° Settings Einstellungsstufen 2.4.8. Changing the spring tension The spring tension can be adjusted according to the to treatment progress. Insert the tool as far as it will go into the side hole on the hinge. By turning clockwise or towards + the spring tension is increased and it is decreased by turning anticlockwise or towards -. -
Page 26: Handling By The Patient
SUP-PROSAN ® User Instructions 3. Handling by the patient 3.1. Removing the brace (supination) Before removing the brace you must deactivate the spring tension. To do so, turn the green switch to “off”. Bring the brace into pronation. To remove the brace, only open the clips and do not unthread the straps. Take off the brace. -
Page 27: Removing The Brace (Pronation)
User Instructions 3.2. Removing the brace (pronation) Before removing the brace you must deactivate the spring tension. To do so, turn the green switch to “off”. Bring the brace into supination. To remove the brace, only open the clips and do not unthread the straps. Take off the brace. -
Page 28: Putting On The Brace
SUP-PROSAN ® User Instructions 3.3. Putting on the brace Place the brace on your arm from below. 2 - 5 Close the clips in the stated order. To activate the spring tension, turn the green switch to “on”. Bring the brace into pronation respectively supination. 00800 03032900 –... -
Page 29: Cleaning, Maintenance And Disinfection
User Instructions 4. Cleaning, maintenance and disinfection The orthosis is designed to be maintenance-free. To ensure proper operation over the period of treatment the orthosis should be cleaned regularly (at least every 3 months) or as required, according to the following Hand wash at 30°C instructions. - Page 30 SUP-PROSAN ® User Instructions 5. Technical data Name Material Weight 750g Padding material PU foam with PA hook and loop velour Strap material PA strap with PA hook and loop velour Brace material aluminium 6. Size chart and article numbers Circum- Circumfe- Length*...
- Page 31 User Instructions 7. Transfer of the brace The brace is not intended for single use, but rather is intended for multiple use by a single person. We do not recommend transfer to other users. Should this be desired however, please ensure to pass on the care and cleaning instructions and have the brace checked by an authorized specialist dealer for safe and proper operation.
- Page 32 F U R T H E R P A T E N T S P E N D I N G VERSION: EN 09.2022 Medical device Manufacturer albrecht GmbH albrecht GmbH CHIEMSEESTRASSE 81 D-83233 BERNAU AM CHIEMSEE +49 (0)8051 96129-0 +49 (0)8051 96129-30 INFO@ALBRECHTGMBH.COM...
Need help?
Do you have a question about the CDS SUP-PROSAN and is the answer not in the manual?
Questions and answers